


How To Build a Deck Over a Concrete Patio

Updated: Apr. 30, 2024
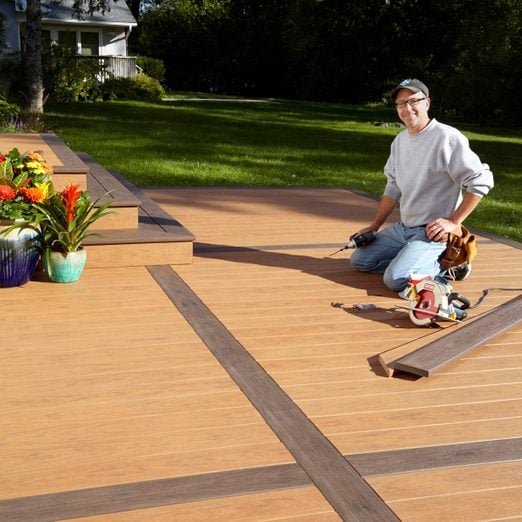
The ultimate solution for a hopeless slab.
Four to five days
Intermediate
$5 to $15 per sq. foot - depending on the materials used
Introduction
Has your concrete patio seen better days? Is it cratered, stained, cracked and sunken? The patio we used for this how-to was in just as rough shape. It was the ultimate bad patio: severely cratered and cracked concrete, some areas raised by frost, others sunken after 50 years of settling. Originally, it was tiled, then the tile was chiseled off, and the pockmarked surface got a coat of paint. Luckily, we've got some great outdoor flooring ideas over concrete, starting with building a deck!
A slab with this much damage can't be fixed. But it can be covered up — and here, I'll show you how. Read on for expert tips on building a deck over concrete from two industry pros, Paul Ricalde from Paul's Toolbox and Sean Collinsgru from Premier Outdoor Living.
What Are Wood Sleepers?
Sleepers are pressure-treated 2x4s used instead of traditional joists when building a deck over concrete. They slightly elevate the deck to allow water to run off the concrete and not get trapped and rot the decking. "[Sleepers] are essential if building over a concrete slab," Collinsgru says.
For this deck build, sleepers are attached directly to the concrete slab, then decking boards are screwed to the sleepers.
Will It Work on Your Patio?
Even if your patio is in terrible shape, you can deck over it. Cracks, craters and seasonal movement along cracks are no problem. "I've built all sorts of decks over concrete that has seen better days," Ricalde says. But beware of these three situations:
- If an area is badly cracked and sinks noticeably year after year, any decking you put over it will also sink and develop a low spot. In most cases, settling concrete stops sinking eventually, so delay this project until it does.
- This project raises the level of your patio by 2-1/2 to 3-1/2 inches, so any door thresholds adjoining the patio must be at least that far above the concrete. If not, this project won't work for you. If you live in a climate where the ground freezes, allow an extra 1/2-inch so that seasonal "frost heave" can raise the slab without damaging the threshold.
- Stairs connected to the patio can complicate this project. To keep step heights equal, you'll have to raise the treads by the same distance you raise the patio (2-1/2-to 3-1/2-inches). On concrete steps, that's a straightforward job: You can treat them just like the patio, screwing sleepers to the treads and risers and decking over them.
Pros and Cons of Building a Deck Over Concrete
Consider these pros and cons carefully to decide if this project is for you.
Pros
Putting a deck over concrete eliminates the cost and labor of removing the concrete. "Disposing of large amounts of concrete can bring on a host of issues, like cost and physical labor," Collinsgru says. "Concrete isn't light!"
With this project, the results look just like a deck, but getting them is much easier and less expensive than building a deck from scratch. In most cases, it's also less expensive than a new patio installed by a contractor. The simpler you can make your deck plan, the faster and cheaper it will be to build.
You could probably replace your patio yourself for less than the cost of this project, but DIY demolition and concrete pours are big, backbreaking jobs.
Cons
"The biggest challenge is the added height," Ricalde says, "especially if the patio comes straight off the house." Clearing thresholds and doorways, and connecting seamlessly to pathways and stairs can be difficult.
Collinsgru points out problems with building on improperly pitched concrete. "If the concrete was not properly pitched, it can cause issues such as water in the basement or pooling," he says. Any existing water problems need to be corrected before building. Caulk the gap between the house and patio and fill any low spots with self-leveling compound.
When to Call a Pro
If you are unsure if your concrete patio is a good candidate for this project, consult with a pro. Also, this is an intermediate-level project, so if you are not comfortable with the skill level required, you may want to hire a pro for this job.
Before You Begin
Safety Precautions
Wear safety glasses, dust mask and hearing protection when drilling concrete and operating saws. Follow all safety guidelines when operating power tools.
Drill bits can get very hot when drilling concrete, so avoid contact with skin until they have cooled.
Tool Specifications
Aside from standard carpentry tools, you'll need a hammer drill for this project. You can get a hammer drill for less than $60 that will do the job. But consider spending $100 or more. "A good hammer drill
Tools Required
- 4 ft. level
- Circular saw
- Drill/driver - cordless
- Dust mask
- Eye protection
- Hammer drill
- Impact driver (optional)
- Leather gloves
- Miter saw
- Pencil
- Saw horses
- Scissors
- Table saw
- Tape measure
Materials Required
- 1/2-in. x 12-in. PVC trim
- 3/16 x 3-1/4-in. concrete screws
- 3/16 x 3-3/4-in. concrete screws
- Deck screws
- Decking
- Flashing tape
- Plastic shims
- Self-leveling compound
- Treated 2x4s
Project step-by-step (12)
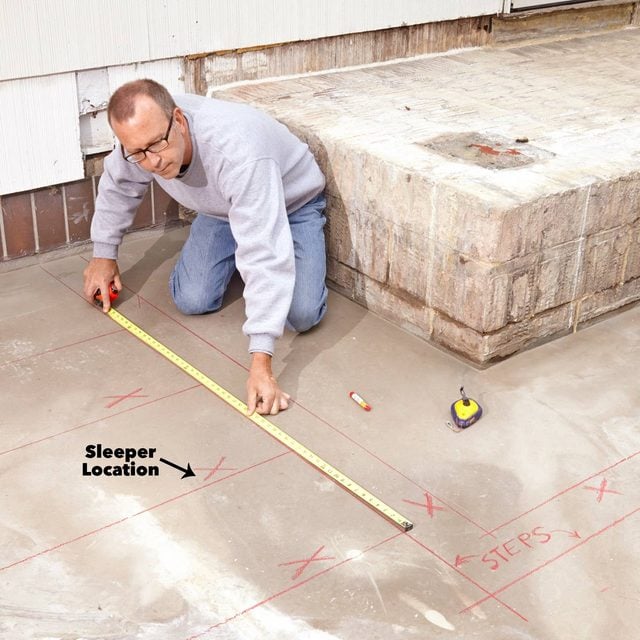
Determine the deck layout
The layout of your deck sleepers will depend on the layout of your decking. If you want a standard decking design — all the deck boards running one direction — all you need are rows of parallel sleepers. If you want a more complicated decking pattern, like the one in this project, you’ll need doubled sleepers to support any boards that run perpendicular to the others. We also installed sleepers to support the steps we later added to the concrete stoop.
For a standard decking design:
- From the top center of the deck, use a pencil and tape measure to mark the layout of the first sleeper on the concrete. Start a 1/2 inch from the house’s foundation or concrete edge.
- Continue measuring and marking from the first sleeper. Use standard joist spacing of 16 inches on center (o.c.) until reaching the end of the patio.
- Repeat this process on the left and right sides of the patio, 1 foot from the patio edge.
- Next, measure and mark 1-1/2 inches to the right of the 16 o.c. marks.
- Use a level or straightedge to draw a line connecting these three new parallel marks.
- Each sleeper edge will be positioned next to these lines.
Cut and install spacers (optional)
You could lay your sleepers directly on the concrete, but we bought a 1/2-in. thick PVC trim board and cut spacer blocks from it. While optional, spacers let you run sleepers parallel to the house, so decking can run perpendicular to the house (if that’s what you prefer). Otherwise, sleepers parallel to the house will block water runoff.
Spacers also allow sleepers to dry, preventing rot. “As long as the sleepers are following the pitch of the slab, you don’t need spacers. But if you want that as extra insurance it doesn’t hurt,” Collinsgru says.
- Measure, mark and rip the PVC board into 3 1/2-in. strips using a table saw or circular saw. This is the width of the sleepers.
- Mark and cut each strip into 2-in. sections with a miter saw. These will be your spacers.
Position the sleepers
The sleepers don’t have to be level; they can follow the slope of your patio. But they do need to form a flat plane. If your patio is in good shape, you’ll get a flat plane automatically. If your patio has ridges and sunken areas, you’ll spend lots of time fussing with shims.
Our project’s biggest time factor was the patio surface’s unevenness. All those ridges and sunken spots meant hours of tedious shimming under the sleepers to form a flat surface for the decking (see Photo 3).
- Lay a straight board across the patio in a few spots.
- Look for the highest hump in the patio and plan to position your first sleeper there.
- If using spacers, space them every 18 inches along the sleeper edge line marked on the patio.
- Lay the sleeper board onto the spacers or directly onto concrete if not using spacers.
- Work outward from the high spot, adding spacers and sleepers.
- Check for flatness along each sleeper and across them using a 4-ft. level.
- Add plastic shims to raise low spots.
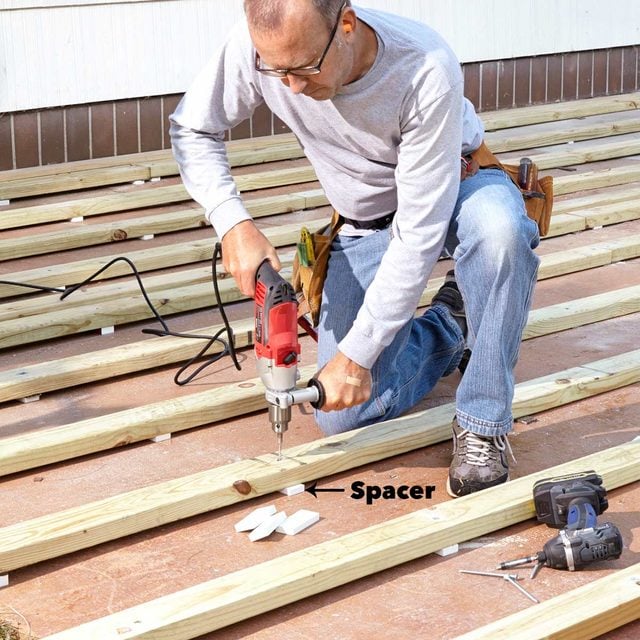
Predrill for concrete screws
All surfaces must be predrilled before securing with concrete screws.
- Position the 3/16-in. masonry drill bit over the center of a sleeper and spacer.
- Drill through sleepers, spacers and into the concrete with a hammer drill.
- Pull the bit completely out of the hole once or twice while drilling each hole to clear the dust. As you drill, dust compresses around the drill bit. That slows you down, strains your drill and overheats the bit.
- Drill the holes 1/4- to 1/2-inch deeper than the screw will reach. Extra-depth provides a space for dust and grit, so screws are easier to drive.
Pro-tip: Have extra drill bits on hand. As a bit wears, it doesn’t just drill more slowly; it also bores a slightly smaller hole and screws become harder to drive. We replaced each bit after about 40 holes.
Screw down sleepers
With holes predrilled, secure sleepers to the concrete.
- Use a drill with a driver bit to drive in concrete screws. Overhang the sleepers along one edge of the patio and trim them to exact length later.
- Screws should penetrate the concrete by at least one inch, so 3-1/4-in. screws are perfect. In low spots, where we had to stack up shims, we switched to 3-3/4-in. screws.
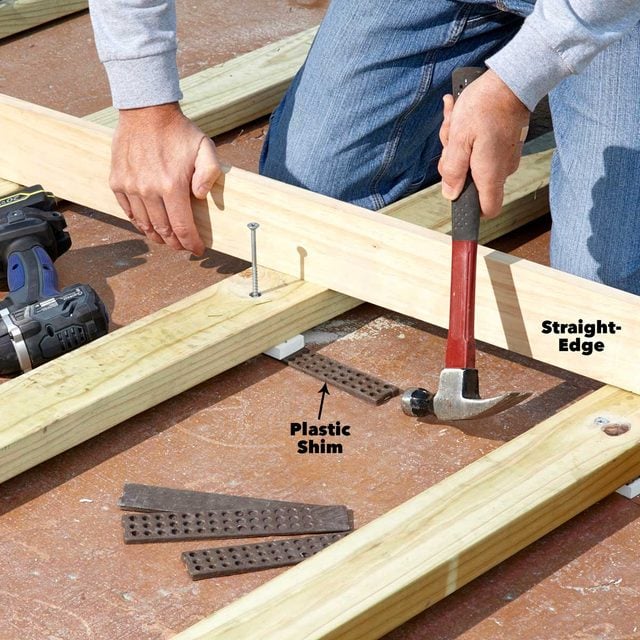
Set sleepers in plane
When all the sleepers are screwed down, take a few minutes to double-check for flatness.
- Set a 4-ft. level on each sleeper, both across it and along it.
- If you find spots that are 1/16-inch or more out-of-plane, back out the screw and add or remove shims.
Install flashing on sleepers
Before decking, we covered the sleepers with flashing tape. Without it, water soaks the tops of the sleepers and the decking prevents the wood from drying.
“Flashing tape is very beneficial,” Collinsgru says. “It’s a cheap insurance to ensure water is not sitting trapped on your sleepers causing rot.”
- Lay flashing tape along the top of a sleeper board.
- Apply firm pressure to adhere the tape to the surface.
- Use scissors or a utility knife to cut it to length.
- Repeat this process across remaining sleepers.
Plan decking layout
To avoid a half board or less at one end of the deck, check the layout first before securing. If necessary, cut end boards on each side of the deck floor for a more uniform look.
If using dried pressure treated wood, space decking boards 1/8-inch apart. If the wood is not dried, butt the boards tightly against each other, as they will shrink when dry. For composite boards, follow the manufacturer’s spacing recommendations.
- Lay deck boards in place across the sleepers.
- Make adjustments or cut end boards as necessary with a circular or miter saw.
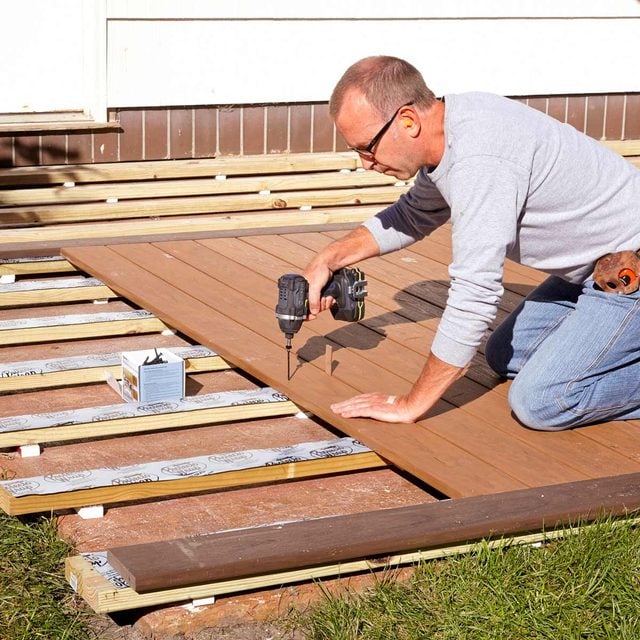
Install decking boards
Installing deck boards over sleepers is just like installing them over standard deck framing. “Make sure you are using fasteners that are not too long,” Collinsgru says. “You don’t want them to hit the concrete.”
- Use deck screws to fasten deck boards to the sleepers with a drill and driver bit.
- Secure each board with two screws at each sleeper. “Always use screws, because nails back up over time,” Ricalde says.
Install a fascia board
To cover the ends of the sleepers, we used a deck “fascia” board made from 1/2-inch-thick PVC. We cut the fascia into strips and screwed them to the sleepers.
- Measure the space between the bottom of the decking and the concrete.
- Transfer this measurement to a 1/2-in. PVC board.
- Rip the board to width using a table saw or circular saw.
- Fasten the fascia board to the sleepers using deck screws.
FAQs
What’s the difference between decking and wood?
Composite decking lasts longer and requires less maintenance than wood decking.
Should I use composite decking over my concrete patio?
If your budget can cover the added cost of composite decking, it can be an excellent choice over wood. “Composite boards are nice to use, but they’re expensive,” Ricalde says.
About the Experts
- Paul Ricalde has over thirty years of experience in the construction industry. He also provides in-depth home improvement videos on his YouTube channel, Paul’s Toolbox with over 360,000 subscribers.
- Sean Collinsgru is the owner of Premier Outdoor Living, an outdoor living space design-build firm in Southern New Jersey. Mr. Collinsgru is a Deckorators Certified Pro-elite, and specializes in unique decks, patios and landscaping.
Originally Published: August 27, 2019