Your home's big power draws can't be plugged into a standard outlet. This project shows you how to safely wire a 240-volt outlet for appliances.
A few hours
Intermediate
$200
Introduction
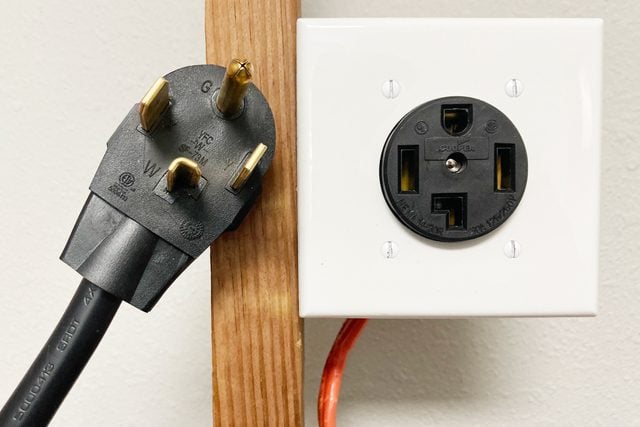
Electric air conditioners, clothes dryers and ranges can't use the 120-volt, 15-amp or 20-amp circuits that power our lights, computers and microwaves. They need 240-volt or 120/240-volt circuits with current-carrying capacities of 30, 40 or even 50 amps.
A 240-volt circuit has two hot wires and an equipment ground, which is a safe path for unintentional current to dissipate. A 120/240-volt circuit has two hots, a ground and a neutral wire, which allows the appliance to use both voltages. Sensitive electronics, like touchpads and timers, run on 120 volts, heating elements and condensers on 240 volts.
Here I'll show you how to wire a 120/240V, 30-amp dryer outlet that accepts a four-prong grounded plug. The National Electric Code (NEC) requires this configuration for new construction. If your home was built before 1996, you may have a three-prong dryer plug and a circuit without an equipment ground. That's perfectly OK, but here, I'll show you how to safely update the wiring.
Before starting the project, pull a new circuit to the dryer location. You need two hots, one neutral and an equipment ground. For a dryer protected by a 30-amp circuit breaker, that means a 10-3 non-metallic sheathed cable, with ground.
Call a licensed electrician to hook up your circuit breaker if you don't have experience with wiring projects. If you're confident in your skills, connect the power yourself. Always be safe when working with electricity. Use a multimeter or non-contact voltage tester before connecting or disconnecting any electrical wires, and call an electrician if you need help.
Tools Required
- Jab saw
- Level
- Lineman's pliers
- Painters tape (optional)
- Pencil
- Screwdrivers (standard and Phillips)
- Stud finder (optional)
- Tape measure
- Utility knife
- Wire strippers
Materials Required
- 10-3 non-metallic sheathed cable
- 2-gang PVC "old work" electrical box
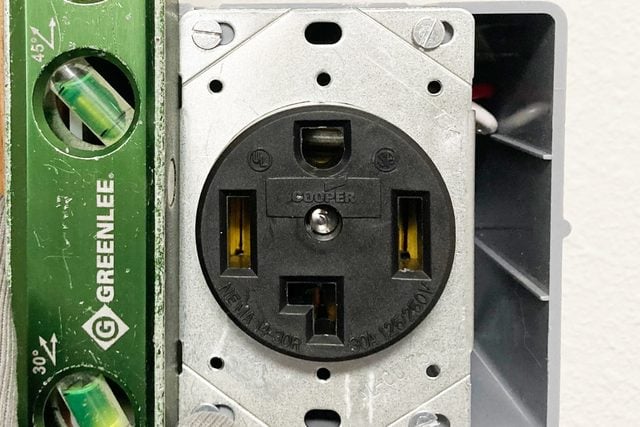
- 30 amp dryer receptacle
- Cover plate
Project step-by-step (9)
Step 1
Lay Out the Outlet Box
- Use a stud finder to find and avoid studs in your walls.
- Alternatively, start at a corner or door jamb and measure 16 inches over.
- If you don’t find a stud at 16 inches, try 24 inches.
- Hold the electrical box level on the wall at the height you’d like your dryer outlet, avoiding the stud by two inches.
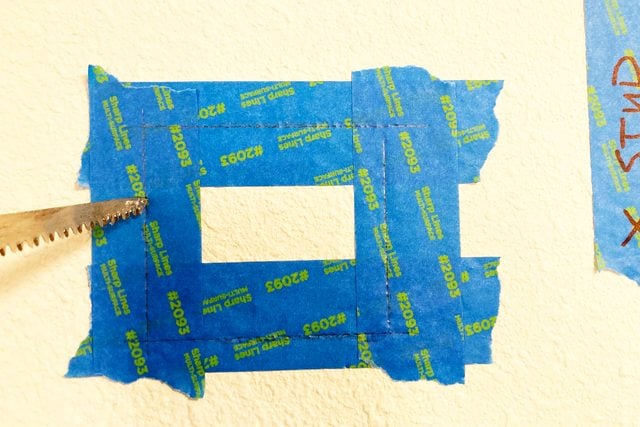
- Put painters tape on wall before outlining, in case you make a mistake or want to move locations.
- Trace the outline of the front of the box onto the wall/painters tape with a pencil.
- Hold a level on the box as you trace so your finished outlet won’t be crooked.
- If you can’t get your pencil around the whole outline, make several marks around the perimeter and connect the lines with a level.

Step 2
Cut in the Outlet Box
- Cut out the drywall using a jab saw, staying just inside the pencil line.
- You can always make the hole bigger, but you can’t make it smaller.
- Start with a horizontal cut in case you run into an obstruction, like a vertical stud or pipe.
- Move the box left or right to avoid, and retrace your box.
- Test the box to see if it will fit, then shave away extra drywall with the jab saw.
Step 3
Pull Wire Through Outlet Box
- Punch through one of the cable openings in the box with a screwdriver.
- Widen the hinged cable opening enough to push the cable through.
- Reach into wall and retrieve the cable you’ve fished through the walls.
- Push cable into box and extend about eight inches into the box.
- Leave enough length in the wall to freely move the box around.
- Don’t attach the box to the wall yet.
- It’s easier to manipulate the wires and receptacle with the box off the wall.
Step 4
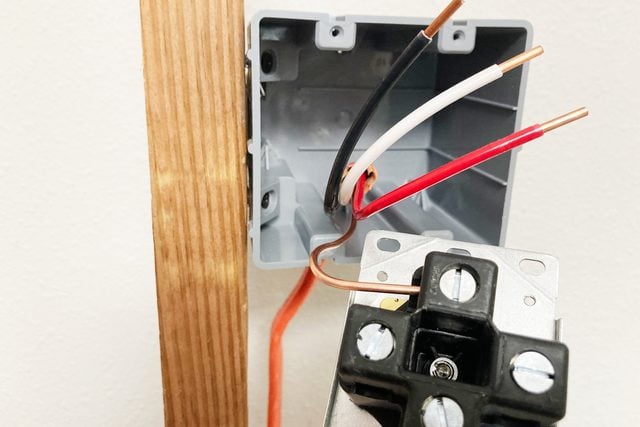
Prep the Cable
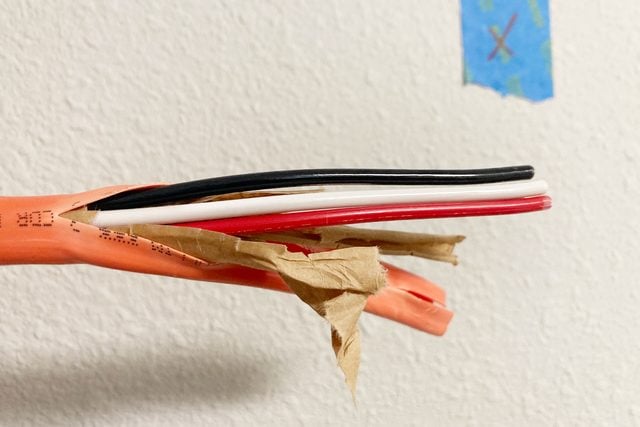
- Cut a slit lengthwise at the end of the cable, through the outer orange covering.
- Peel back the orange covering to expose the interior white, black, red and bare wires.
- Cut off the sheath and any paper coverings with lineman’s pliers.
- If you see any nicked wires, cut off that portion and pull more cable into the box if needed.
- Trim the ends of the wires, leaving you six inches of space to work with in the box.
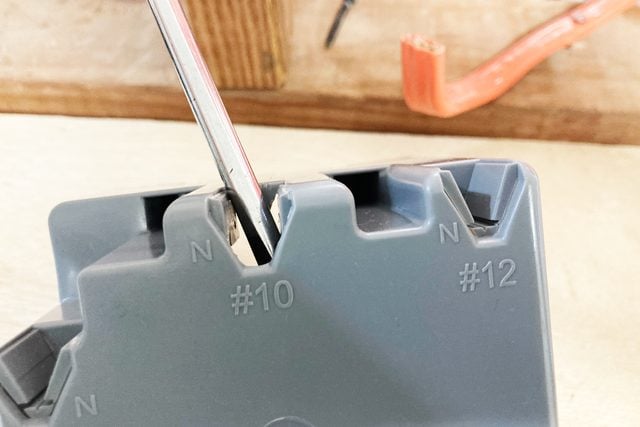
- Grab wire strippers and strip about 1/2-in. of insulation from the ends of the white, black and red wires.
- The receptacle also has a gauge on the back showing how much to strip off.
Step 5
Attach the Ground Wire
- Insert the ground wire into slot labeled “ground” on the back of the receptacle.
- Tighten the screw with a screwdriver.
- Tug on the ground wire to ensure it’s secure in the receptacle.
Step 6
Attach Neutral and Hot Wires
- Insert the white wire into the port labeled “white” or “neutral” and tighten the screw.
- Insert the black wire into the “X” or “Y” port and tighten.
- It’s common to use “X” for the black wire, but either one is fine.
- Insert the red wire into the empty “X” or “Y” port and tighten.
- Pull on each connection to ensure they’re secure.

Step 7
Install Receptacle Into Box
- Determine the best orientation — ground prong up or down — for your receptacle.
- Dryer plugs are large and the cord end can easily run into cabinets or shelves.
- Make sure you will have room to insert the plug once the outlet is installed.
- Push the receptacle into the box and attach with the screws that came with the receptacle.
- #10 solid copper wire is really stiff.
- Bend the wires as necessary to fit into box, making sure the terminations remain snug.
- Leave the screws slightly loose. We will level the receptacle after installing the box in the wall.

Step 8
Insert Box In Drywall and Level
- Push the box and receptacle into the hole in the drywall.
- The box has flanges that hold the box against the outside of the wall, and wings that grip the inside of the wall.
- Holding the box level, tighten the wings with a Phillips screwdriver until tight.
- Level the receptacle and tighten the screws holding the receptacle in the box.
Step 9
Install Faceplate
- Attach the faceplate using the screws that came with it.
- Level the faceplate before tightening screws.
- Turn all screw head slots to face the same direction for a professional look.