


Garage Makeover: How to Create the Garage of Your Dreams

Updated: Jan. 30, 2024
Get the garage of your dreams one step at a time. This makeover includes high-capacity cabinets, a new garage door, a floor coating and a built-in entertainment center.

Introduction
If your garage looks like a junk shop, this storage project can solve the problem. With this simple system, you can build full walls of storage that are easily accessible behind the attractive sliding doors. We’ll show you how to build the exact version shown in this project.Tools Required
- Brad nailer (optional)
- Circular saw
- Drill
- Level
- Miter saw (optional)
- Standard carpentry tools
- Straightedge
- Table Saw (optional)
Materials Required
- 1-1/4-in. brad nails
- 1x2 x 12' trim board (1)
- 1x2 x 6' trim boards (2)
- 1x2 x 8' trim boards (4)
- 1x3 x 12' trim board (1)
- 1x3 x 6' trim board (3)
- 1x4 x 12' trim board (1)
- 2-in. brad nails
- 2-in. trim-head screws
- 2200 36" 2-door hardware sets (Johnson Hardware No. 2200722H) (2)
- 2x4 x 12' treated lumber (2)
- 2x4 x 8' treated lumber (1)
- 3" wood screws (1 lb.)
- 3/4" x 3/4" x 6' trim boards (3)
- 32" x 80" hollow-core doors (4)
- 4' x 8' x 3/4" plywood (3)
- Composite or treated shims (2 pkgs.)
- Trim nails (1 lb.)
- Wood glue
Garage Upgrades
We ordered hollow-core birch veneer doors for our cabinets, but you can use any 1-3/8-in.-thick doors. For a more traditional look, inexpensive six-panel composite doors would work well. To complement the birch doors, we found 3/4-in. maple plywood at a local home center to use for the cabinet construction. The four-door cabinet entertainment center cost us about $600, or about $60 per linear foot. But you could reduce the cost by choosing less expensive doors and paint-grade plywood.
With help from a friend or two, you should be able to finish constructing one six-door section of cabinets in a weekend, not including the painting and varnishing. The most time-consuming and difficult part of the project is cutting the plywood parts. For this, a good quality table saw is helpful. But if you don’t have access to a table saw, you can use a straightedge guide and a circular saw to make accurate cuts. In addition to a table or circular saw, you’ll need a drill, a level and standard carpentry tools like a tape measure and square. We used a miter saw to cut the trim and brad nailer to attach it, but these aren’t required.
Undecided on garage floor paint? Click the link to learn what you need to know about the options available.
You can also make a plywood storage rack and customize the size based on your own needs to store away in this awesome garage space saver.
Getting started
Every garage is a little different. Before you order materials, take a close look at your garage walls to find the ideal location for your storage cabinet and to identify possible obstructions like pipes, outlets, windows or doors. Use a level to see if the floor is sloping, and note any protruding brick or concrete at the bottom of the wall. We had to modify our plan to avoid an outlet, and we shimmed the base to compensate for the sloping floor.
If you’ve found a suitable location to build the six-door version shown here, you can use the Materials List in Project PDF’s below to order materials and the Cutting List (also in Project PDF’s below) for reference to cut the parts. To customize the cabinets for your garage, see the tip below.
Customize the Plan for Your Garage:
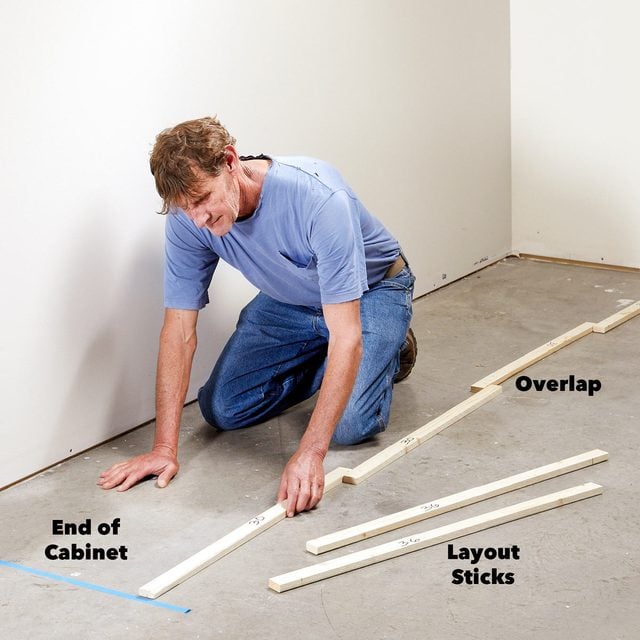
Your cabinet can be any length you want. Using scrap lumber, cut layout sticks to represent the common door widths (24, 30, 32 and 36 in.). Mark the desired end of your cabinet with tape and layout different combinations of sticks. The sticks should overlap by about 1-1/2 in., but you can adjust the overlap to get the exact cabinet length you want. Mark the overlap locations on the floor to later position the partition panels (F).
To customize the depth of your cabinet, start with the desired shelf depth. Add 4-5/8 in. to get the depth of the end, top and floor panels (C, D, E).
Project step-by-step (12)
Level the base
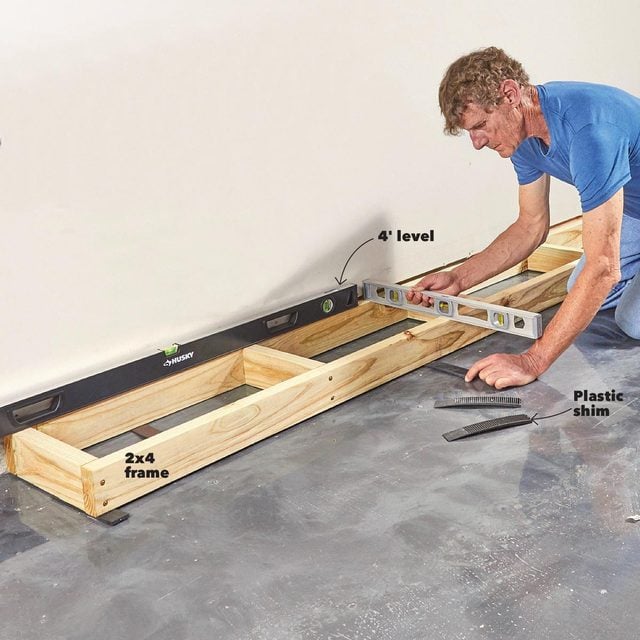
As with many other construction projects, a level foundation is the key to success. In our case, this is the 2×4 frame. Build the ladder-type frame and set it in place against the wall. Then use a level and shims to level the 2×4 frame from end to end and front to back. Screw the frame to the wall. We used masonry screws to attach the frame to the concrete curb. Here are a few tips for cleaning the garage.
Cut the parts and attach to the floor
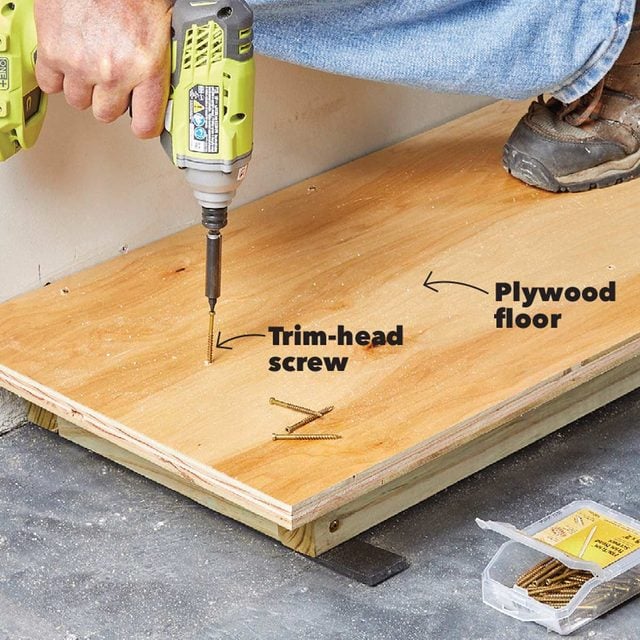
Rip the plywood for the bottom, top, ends and partitions with a table saw or circular saw. For the best results, fit your saw with a blade that’s labeled for crosscutting plywood. Cut the parts to length. We used a crosscutting guide for quick, accurate crosscuts. You won’t regret taking time to build one. For instructions, check out our awesome crosscutting guide. To save finishing time, we applied satin polyurethane to all of the plywood before cutting the parts. Label the parts with masking tape to simplify assembly.
With the parts cut, building the box goes quickly. Start by attaching the floor. Screw the plywood floor to the 2×4 frame. Trim-head screws hold well and are less conspicuous. (Suggest getting 1 lb. of trim-head screws for this project.)
Mark for the ledger
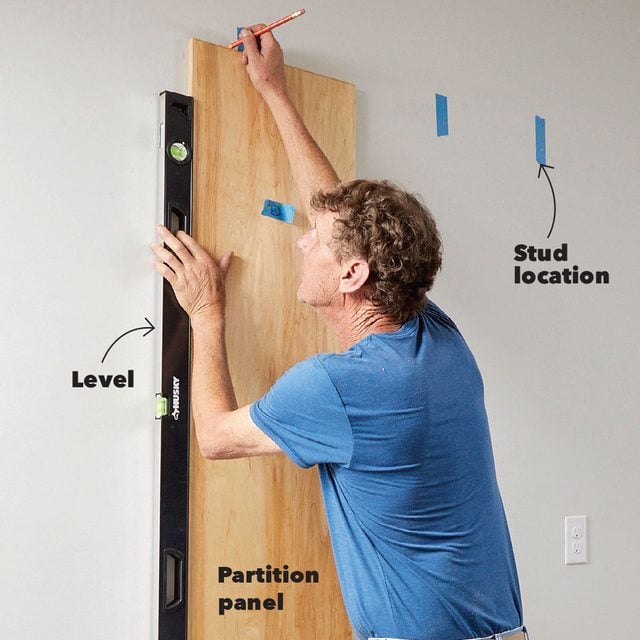
Next, locate the studs with a stud finder and mark them with masking tape. Then use one of the interior partitions and a level to mark the location of the top ledger board Align the edge of a partition panel with the end of the bottom plywood. Plumb it with a level and mark along the edge and along the top with a pencil.
Attach the ledgers for the top and shelf
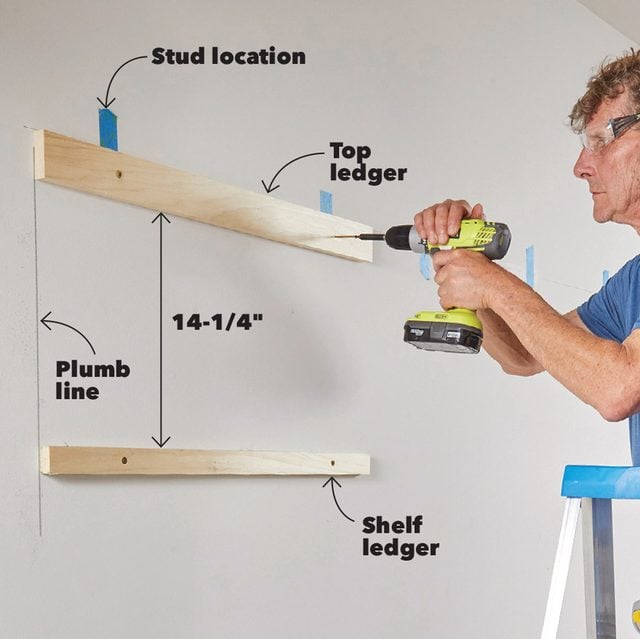
To attach the ledger boards for the top and the shelf, align the end of the ledger with the plumb line and the top with the level line. Drive 2-in. screws through the ledger into the studs. Position the shelf ledger 14-1/4 in. below the top ledger.
Install the end panel

With the ledger boards in place, it’s easy to attach the end panel. The 3/4-in. cleat attached to the bottom of the end panel helps position the panel accurately. Position the end panel by snugging the end cleat against the bottom of the floor plywood. The top of the end panel should be exactly 3/4 in. above the ledger. Then drive screws through the end panel into the ledgers to hold it in place.
Add the partitions
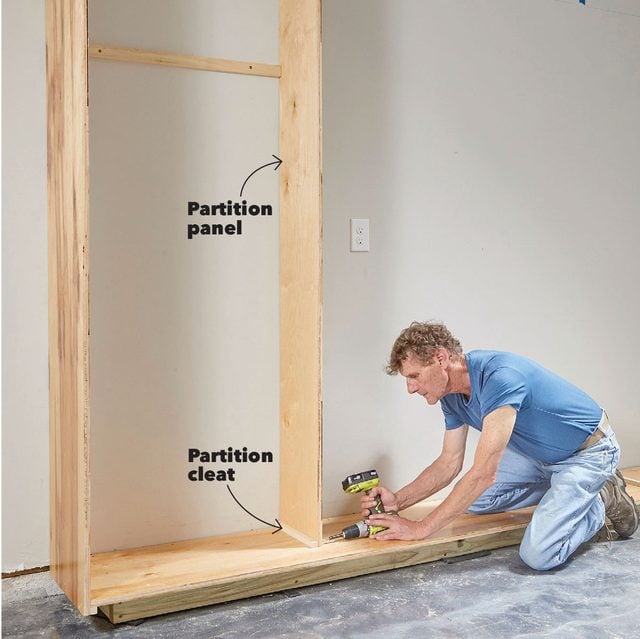
After attaching the end panel, repeat this process for each of the partitions. Screw a 3/4-in. cleat to the floor plywood. Press the partition panel against the cleat and ledgers and attach it with screws. Add the ledger and cleat for the second partition and attach it with screws.
Install the top
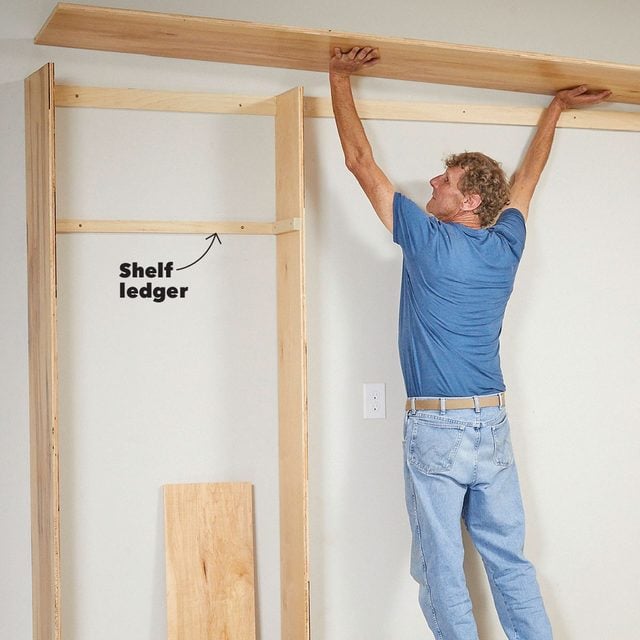
Finally, nail or screw the opposite end panel to the wall and install the final two ledgers. Complete the cabinet box by adding the top. Drive screws through the plywood top into the ledger and partitions.
We purchased two wall cabinets that were 30 in. x 30 in. x 12 in. deep to fit between the center partitions. If you decide to do the same, mount the cabinets and add 3/4-in. spacers to the tops to support the countertop that fits over the cabinets. This allows you to add a 1-1/2-in.-wide piece of trim to the front of the counter.
Nail on the trim
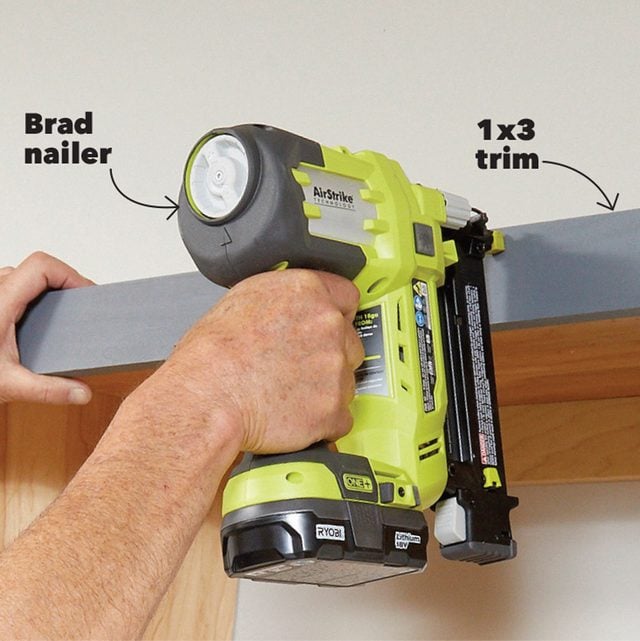
Using Figure A as a guide, cut the wood trim pieces to fit and use wood glue and finish nails or brads to attach the trim. Painting or finishing the trim before you install it will save you time. Later, you’ll only need to fill the nail holes and touch up the paint or finish.
Mount the track
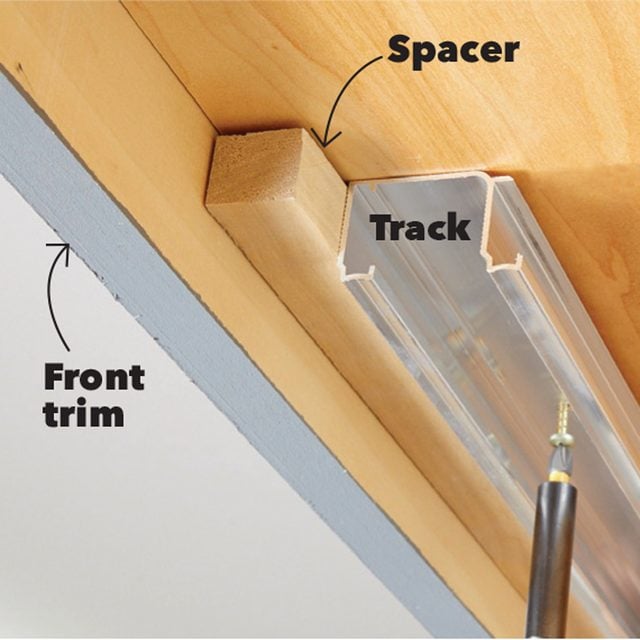
We used two 6-ft. door tracks and cut them with a hacksaw to meet in the middle of the cabinet. For best results, butt the uncut ends together when you install the tracks, being careful to keep them accurately aligned. Use a 7/8-in.-wide spacer to position the tracks before attaching them with 3/4-in. screws.
Hang the doors
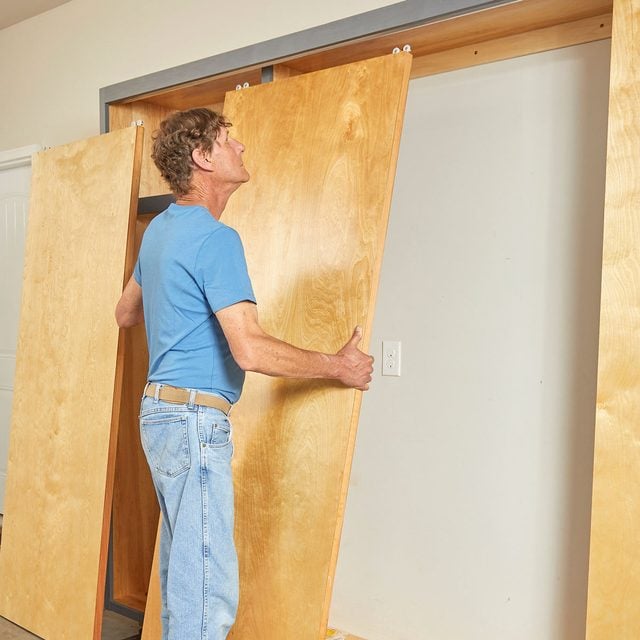
Mark the less attractive side of each door with masking tape and mount the hangers to this side. Mount hangers 1 in. from the edge of the door. You’ll notice that the hangers have different offsets. Doors with the wide offset hangers hang on the back of the track. The ones with the narrow offsets go on the front. After mounting the hangers, hang the doors to test how they fit. If the doors don’t meet properly or appear crooked, loosen the two adjusting screws on the back of one hanger and move that door until it’s aligned with the other. Then retighten the screws. When you’re happy with the fit of the doors, mount the door guides to hold the bottom of the doors in alignment.
With the doors mounted, you’re ready to add a storage system to the cabinet interiors. We mounted Rubbermaid FastTrack rails and slat wall panels to the walls in some of the bays. If you want more shelving, add cleats to the sides and back to support additional plywood shelves, or mount shelf standards to the walls and use shelf brackets to support the shelves. The result will be an attractive storage space in your garage neatly concealed by the convenient bypass doors. Don’t forget to check out these cheap garage workshop upgrade ideas.
Project PDF’s:
New Garage Door
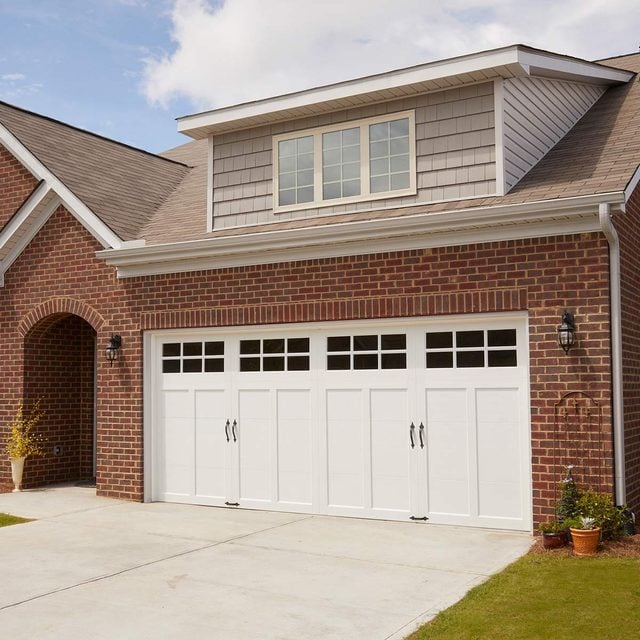
A new garage door dramatically boosts the curb appeal of your home, but the benefits don’t stop there. This Clopay door features top-of-the-line polyurethane insulation for maximum insulation value and sound deadening. That, combined with the quiet nylon rollers, gets you one step closer to converting your garage to the perfect man-cave hangout. The door we chose cost about $3,000 including professional installation and removal and disposal of the old door. Follow along as our expert shows how to safely install a new garage—door and how to remove the old one.
A Built-In Entertainment Center
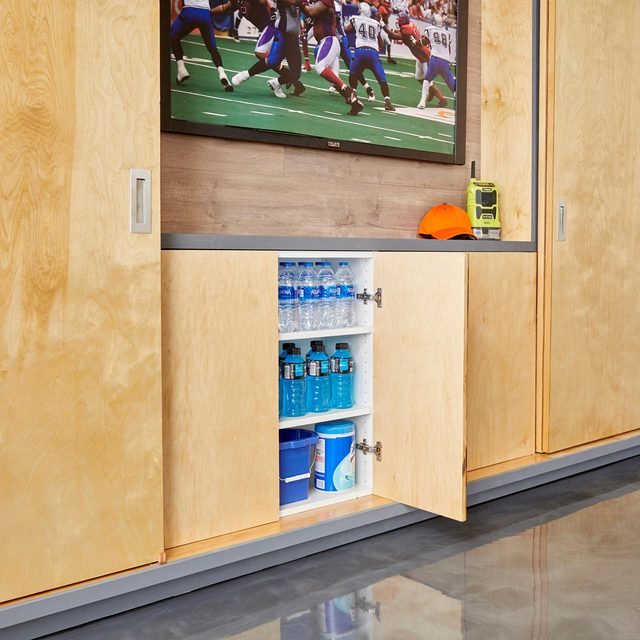
If your garage serves as a gathering spot, consider including a bar and TV as we did. To do it, you just add inexpensive stock cabinets, put a bar inside one of the cabinet openings (see Figure A in Project PDF’s above), then hang a TV above. Our stock cabinets cost about $300 for the pair. If you spend a lot of time in your garage, then here are a few tips to convert your garage into a living space.
Next: Checkout what not to do during garage remodeling.