


How to Make Structural Repairs by Sistering Floor Joists
Updated: Jun. 03, 2024
Repair sagging or broken floor joists by “sistering” on a new joist

A full day
Intermediate
$101–250
Introduction
This article provides step-by-step instructions and pictures on how to make structural repairs by sistering floor joists alongside weak joists. If you have sagging, cracked or twisted joists, which can happen in older houses, this project will provide the extra support the floor needs.Tools Required
- Caulk gun
- Circular saw
- corded drill and bits
- Hammer
- Hearing protection
- Safety glasses
- Tape measure
Materials Required
- 16d nails
- Construction adhesive
- Hydraulic jack
- Joists
Project step-by-step (3)
Sistering floor joists
Spread adhesive on the joist
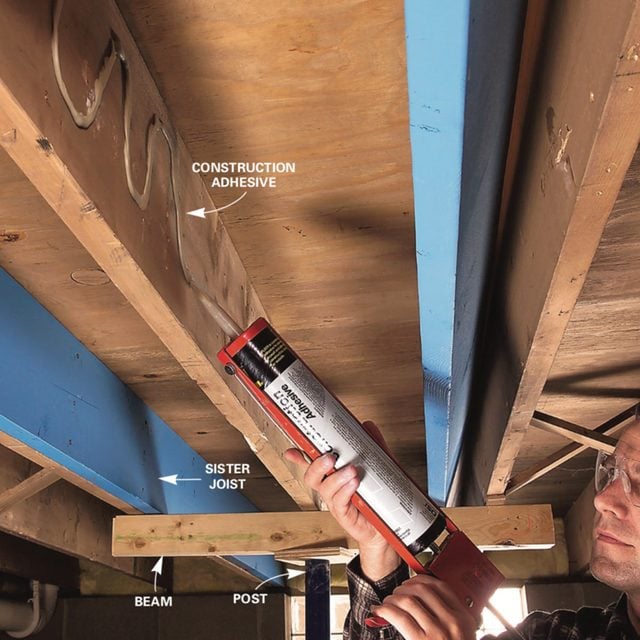
Apply ample construction adhesive to the existing joist
Nail the new joist in place
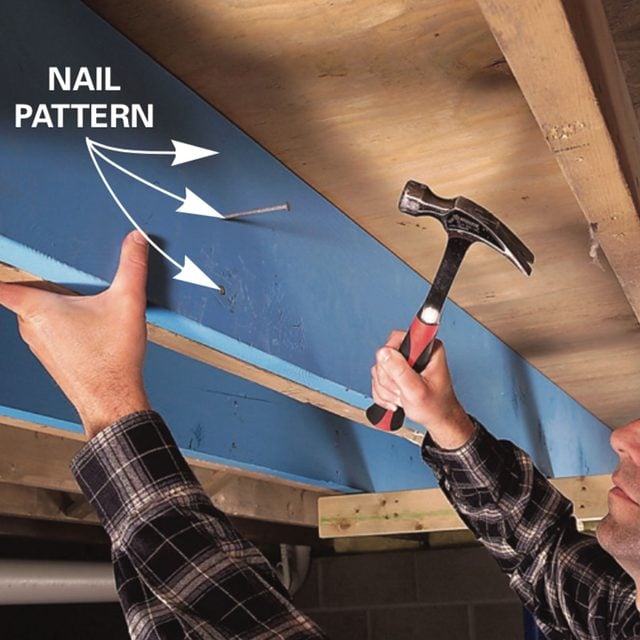
Fasten the sister joist to the existing joist with three nails every 16 in.
Call in a structural engineer

If you’re concerned about the structural integrity of sagging, cracked or twisted joists in your house, first call in a structural engineer to inspect the floor and recommend strengthening measures that’ll take out the sags and bring the framing up to code (search online or for “Engineers, Structural” in the yellow pages). The inspection ($300 to $500) will tell if you have structural problems, such as undersized joists, that will require professional repairs. However, you can usually remedy sagging problems yourself by “sistering” new joists alongside the existing ones (this also works for stiffening bouncy floors).
First remove electrical cables, pipes and other obstructions. If this is difficult (it often is!), consult your local building inspector about notching the new joists. Notches will compromise the strength of the new joists, but some notches are acceptable, depending on their location.
Then set new joists (same height as existing ones) alongside the old. Tack a beam under the sagging joists. Nailing two 2x4s together will work to span about three joists, unless the sag is under a weight-bearing wall. Set a hydraulic jack and post under the beam, and jack up the joists about 1/8 in. a day until they’re level. Jacking them up too fast may cause cracks in the walls and floors overhead.
If a crack or sag is isolated to one area, the sister joist should extend at least 3 ft. on both sides of the problem area. But it’s usually best to run the sister joist over the entire span. When the sagging joists are level, apply a generous bead of construction adhesive to the existing joist. Then attach the sister joist using three 16d common nails driven every 16 in. Driving 16d common nails in old, hard wood is difficult. Predrill and drive 3/8-in. x 3-in. lag screws if you’re having trouble nailing.