If you're looking for a beginner wood carving project, a duck is a great place to start. Follow these steps to learn how to carve a wooden duck.
Multiple Days
Beginner
Varies
Introduction
For years, a carved wooden duck sat on the upstairs bookshelf of my childhood home. As a little boy, I'd often admire it while playing. It was life-sized, beautifully hand-painted and stunningly realistic. Its glass eyes seemed to stare at me as I walked past. The duck, and the equally impressive wooden loon next to it, were fixtures of my early years.
It wasn't until I was nine or 10, with a budding interest in woodcarving, that I grew tall enough to reach the waterfowl and examine them more closely. The smooth wooden perfection of their bodies, heads and beaks fascinated me. Then I turned the duck over to examine the underside. Inscribed on the flat, unpainted bottom were the letters "S.M." — my father's initials. Only then did I realize they were my father's handiwork.
I later learned he carved them years earlier while in college, during the early days of his relationship with my mother. Mom had taken part, too, adding the stunning paint jobs.
I was amazed. I'd already been carving for a few years at that stage, but had no idea such beauty and detail could be pulled from a block of wood. It wasn't long before I attempted to carve a bird of my own. It wasn't nearly as nice as these, but I was hooked.
My skills improved in the years that followed, and now I'd like to pass them on to you. Here I'll teach you how to carve a simple wooden duck, from start to finish.
The best part? You don't need expensive tools. After the initial planing and band saw cutout work, you'll carve this duck with a simple utility knife.Let's get started.
Watch Easy Woodcarving Project: How To Carve a Wooden Duck
Tools Required
- 2 quick-grip clamps
- 4 wooden hand screw clamps (or other strong
- Band saw with 1/4-inch-wide blade
- Drill and drill bit index
- Large utility knife with extending segmented blades
- Miter saw or hand saw
- Pack of extra blades for utility knife
- Paint brush set (optional)
- Paper duck template
- Pencil
- Safety glasses and hearing protection
- Scissors
- smooth face)
- Tape measure
- Thickness planer or hand plane (if your pieces of wood don't already have at least one flat
- wide-jawed woodworking clamps)
- X-Acto knife with spare blades
Materials Required
- Acrylic paints or wood finish
- Double-sided tape
- Glass taxidermy duck eyes
- Rubber cement glue
- Three or four approx. 1- to 2-inch-thick slabs of knot-free basswood pine or poplar (At least 6- nches longer and 2 inches wider than you want your duck to be.)
- Transparent tape (If duck template won't fit on a single sheet of paper.)
- Transparent urethane
- Two 1/4-inch-diameter dowels about 2 inches long 120-grit sandpaper (optional)
- Waterproof wood glue
Project step-by-step (12)
Step 1
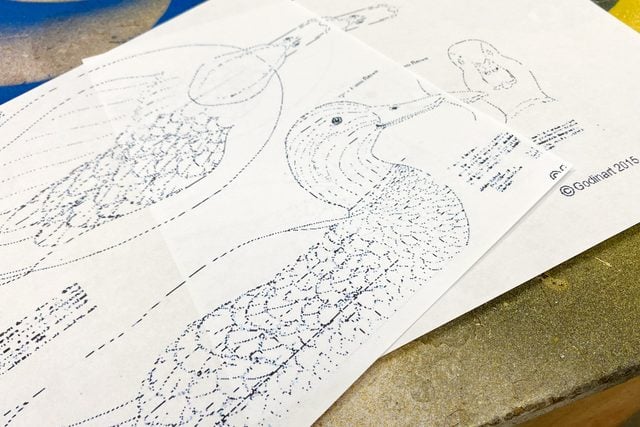
Find (or draw) a duck carving template
- Search Google for “duck carving template.” Lots of images will come up.
- Choose one you like with a crisp side and top view of the duck’s body and head shapes; the two will be carved separately. A front view is also helpful if it has one.
- You could draw your own template as well, but use professional ones online as a guide for how yours should look.
Step 2
Size and print your template
- Save the template image, decide what size duck you’d like to carve, and then size and print the template accordingly. Depending on species, a life-sized duck in swimming position will be around 20 inches long. I recommend going smaller for your first duck to reduce the amount of carving. I sized my template to barely fit on a standard 8-1/2- x 11-inch sheet of paper, so my duck will be around 11 inches long.
- If your template won’t fit on a single sheet, print it out on multiple sheets and tape them together.
Step 3
Cut head and body blocks
- Avoid using a single block of wood for your duck. I recommend 1- to 2-in.-thick pieces laminated together. Solid blocks are susceptible to splitting as they dry. Laminated blocks aren’t.
- Cut your slabs of wood into rectangular pieces an inch or two longer and wider than your duck’s body, as shown on the template.
- Cut enough slabs to create a stack slightly taller than the duck’s body.
- Repeat the cutting/stacking procedure for the head, creating smaller rectangles of wood based on the head size in your template.
- If necessary, use a thickness planer or hand plane to flatten and smooth the faces of your pieces of wood. You’ll need flat, smooth surfaces for the next step.
Step 4
Assemble head and body blocks
- Apply wood glue generously to the mating surfaces forming your duck’s body. Be sure the glue extends to the edges of all pieces of wood, as well as into the middle.
- Stack the pieces one at a time, making sure the edges and corners line up closely.
- Clamp the full stack firmly together with hand screw-style clamps. A little glue should squeeze out all sides of every joint. If it doesn’t, you need more glue. Add the glue right away; it sets quickly.
- Repeat the gluing procedure for the smaller head blocks, if needed. With a smaller duck, this might not be necessary. A single piece of wood might be thick enough for the head.
- Wait a full day for the glue to dry. Then remove the clamps.

Step 5
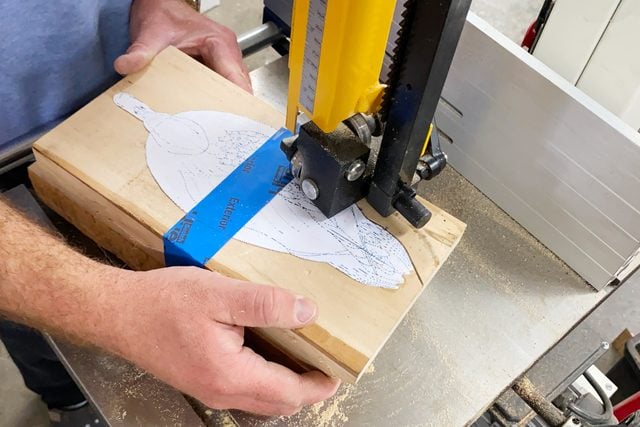
Cut out and apply paper templates
- With a sharp pair of scissors, carefully cut out the components of your paper template, showing the side and top views of the duck’s head and body. Be sure to follow the outside of the lines precisely as you cut. Leave the lines visible.
- Attach the paper cutouts to the side and top of your blocks of wood with rubber cement. Carefully line up the side and top templates with each other on the blocks of wood, ensuring they’re in the same plane.
- Give the rubber cement 10 minutes or so to dry.
Step 6
Cut out the side view shape of the body
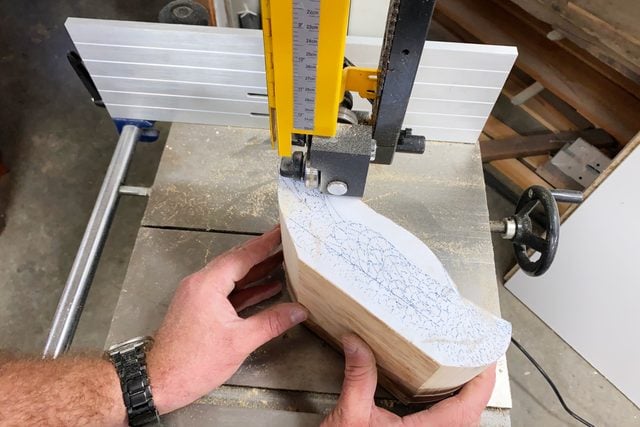
- Put on safety glasses and hearing protection.
- Take a band saw with a narrow blade (no more than 1/4-in.) and carefully cut out the rough shape of your duck, using the glued-on template as your guide. Begin with the side view profile.
- Cut close to the paper, but never into the template.
- Cut off the head of the template, placing it to one side. You’ll need it later.
Step 7
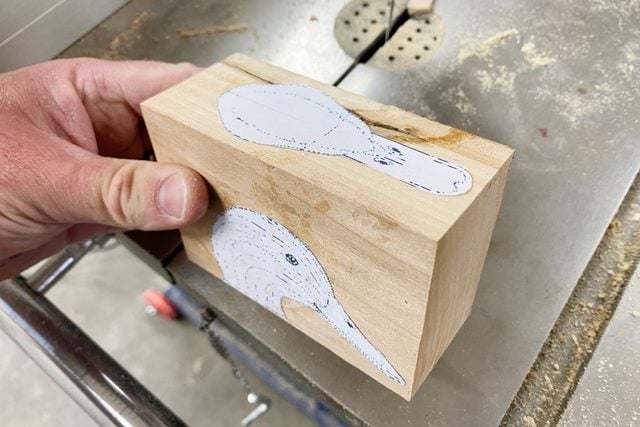
Cut out the top view shape of the body
- Cutting out the side view profile will also cut off your top view template. Use double sided-tape or masking tape to temporarily reattach it exactly where it was on the block.
- With the band saw, cut out the top view profile by following the template on the off cut you just reattached.
- Remove the off cut once the top view cut is complete. You should now have a wood block roughly the shape of a duck’s body.
Step 8
Cut out the head
- Repeat the template gluing procedure and band saw cuts for the head, starting with the side view. Be extra careful, because the head block is small and your fingers will be close to the saw blade.
- Use the double-sided tape to reattach the top-view head template, then cut it out. You should have a small block of wood roughly resembling a duck’s head.
Step 9
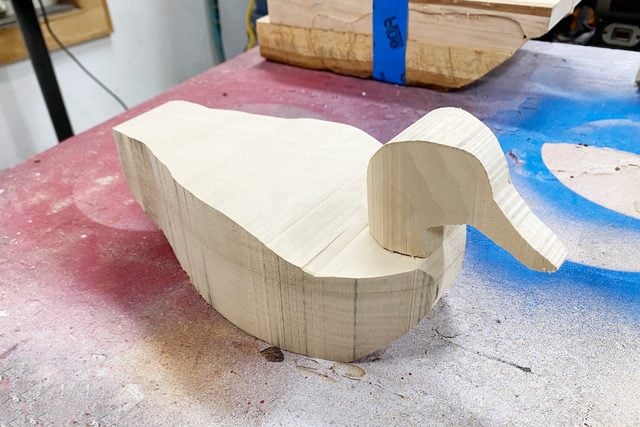
Join the head to the body
- Place the duck body upright on your workbench, then measure and mark a spot as close to the center of the neck area as possible.
- Measure and mark a corresponding spot on the underside of the head.
- Make sure the two spots line up, otherwise the head won’t be mounted in the right position relative to the body.
- Drill two 1/4-in.-dia. holes in the spots you marked. Each hole should be about 1-1/4-in. deep.
- Half-fill each hole with wood glue, then tap a 2-in.-long piece of 1/4-in.-dia. maple dowel into the hole in the duck’s body. Be sure to leave about one inch of dowel sticking out.
- Dribble a little wood glue into the hole in the bottom of the duck’s head, then spread some more on the flat bottom surface of the head around the hole. Get full coverage.
- Quickly flip it over and lower the head onto the body, making sure the dowel goes into the hole. Be quick to avoid glue leaking from the head hole.
- Use a quick-grip clamp to apply moderate pressure to the head and body, drawing them firmly together.
- Allow the joint to dry overnight.
Step 10
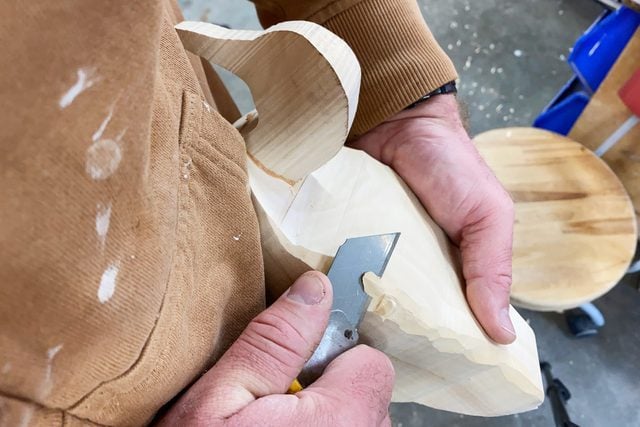
Do the rough carving
- Extend the blade of your utility knife so about 1-1/2- to 2-in. of cutting edge is visible.
- Begin to carve the duck. Start by whittling down the angled corners of the block, slowly rounding them by removing shavings of wood.
- Keep a picture in your mind of how you want your finished duck to look, and whittle accordingly. At first, don’t worry about neatness; there will be lots of wood to remove. As your duck begins to emerge, take more care with your whittling strokes.
- Continue carving until your duck looks about 80 percent done.
- Snap off segments of utility knife blade and extend fresh ones every 30 minutes or so, or whenever you notice it’s not carving as smoothly as before.
- Leave a small section of the bottom uncarved so it will sit flat on a shelf or table.
Step 11
Do the fine carving
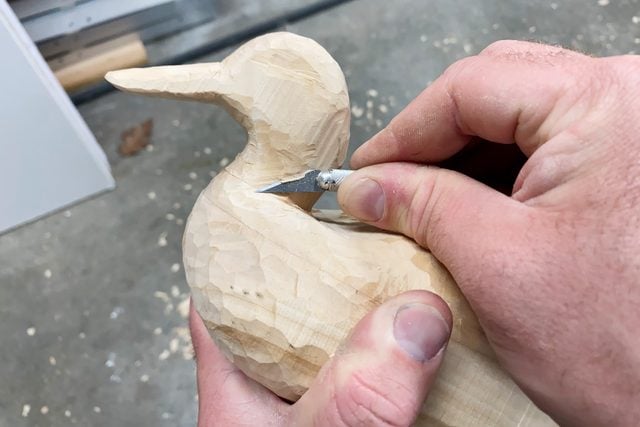
- Retract your utility knife blade so only about an inch of cutting edge is showing.
- Place your thumb on the back of the knife to help guide the blade as you make shorter shallower, more precise carving strokes.
- Take your time and don’t angle the blade too steeply against the wood. Small, thin shavings are the goal at this stage.
- Use your small-bladed X-Acto knife for tighter, more delicate areas, like the beak, neck, head and tail. Look at photos of real ducks for inspiration.
- Continue this gentle, precise wood carving until you’re pleased with the shape of your duck.
Step 12
Add finishing details
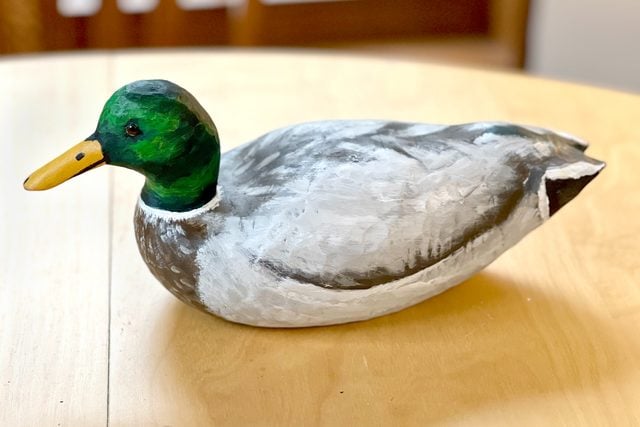
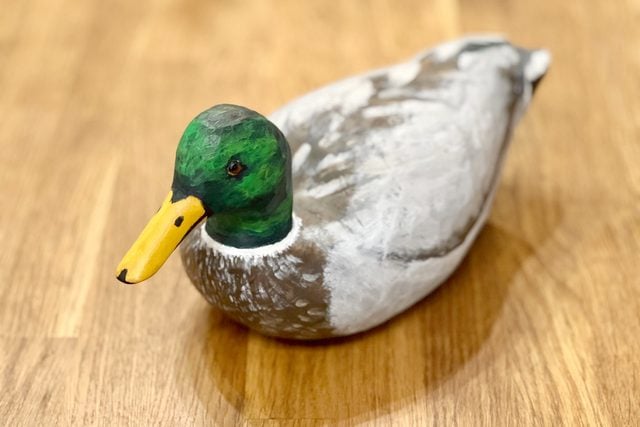
- If you prefer, smooth your duck with sandpaper. Personally, I skip sanding and leave most carving marks visible, except the areas that really should be smooth. The beak and the base of the neck are hard to carve smoothly with a knife alone.
- If you plan to model your work after a particular species (mine is a mallard), look up the eye color of the species you’re carving, then buy that color of eyes. For size, multiply the length of your duck in centimeters by 0.015, then multiply the resulting number by 10. This will give you the eye size for your duck in millimeters, which is how taxidermy bird eyes are sold. Don’t buy the eyes ahead of time; they may not be the right size for your finished duck.
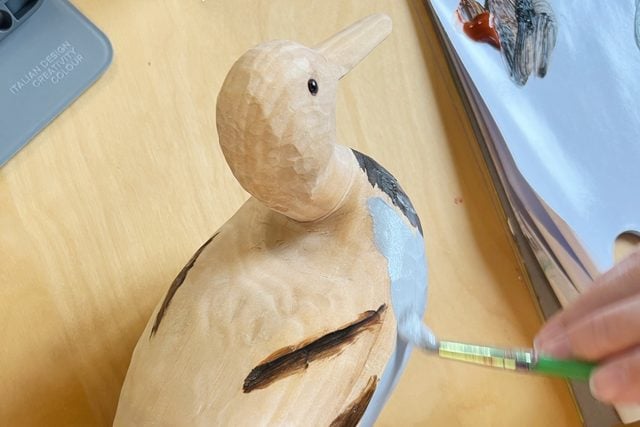
- Drill two small, shallow holes on the sides of the head for the glass eyes. Be sure the holes are symmetrical; your duck will look odd if they’re even slightly mismatched.
- Pro tip: Make two small, light pencil marks on either side of the head where you think the eyes should go, then check the duck’s face head-on. Any mismatch will be obvious, making it easy to adjust and optimize your marks before drilling. After marking and drilling, glue the eyes in place.
- Apply two coats of clear polyurethane for protection. Allow it to dry.
- Add acrylic paint detailing if you’d like.