


How to Build a DIY Workbench with Storage

Updated: Aug. 25, 2023
With plywood, MDF and these simple plans, you can build an inexpensive yet sturdy workbench that's perfect for your basement or garage workshop.
A full day
Beginner
about $100
Introduction
Build yourself more workspace and extra storage with these DIY project plans.Tools Required
- 1-1/4” wood screws
- 2” wood screws
- Table saw or Circular saw
- Wood glue
Materials Required
- 1 – ¾” x 4’ x 8’ MDF
- 1 – ¾” x 4’ x 8’ plywood
No matter what you do in your workshop, you’ll need a solid workbench more than anything. This one is similar to one I designed a couple of years ago, but it incorporates shelves instead of drawers.
To build this simple workbench, all you need is a sheet of plywood and a sheet of medium density fiberboard (MDF). The top, work surface and shelf platforms are all MDF, with the rest plywood. I upgraded the workbench by adding a tool tray on the back, but that’s optional.
Cutting List
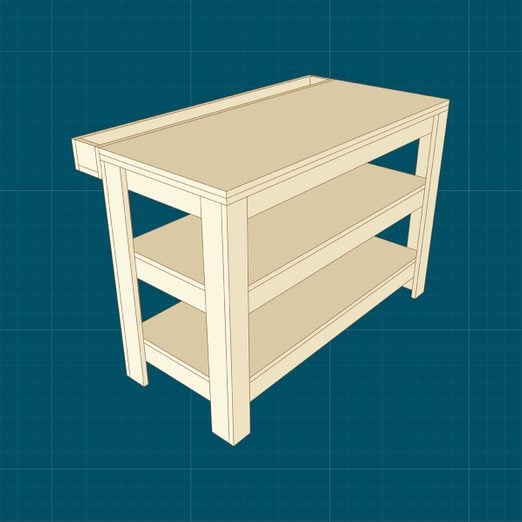
Overall dimensions: 33-1/2-in. H by 48-in. W by 20-3/4-in. D.
| KEY | QTY. | DIMENSIONS | PART |
| A | 8 | 3/4″ x 3″ x 32″ | Leg |
| B | 6 | 3/4″ x 3″ x 46-1/2″ | Frame front & back |
| C | 12 | 3/4″ x 3″ x 17-3/4″ | Frame stretchers |
| D | 2 | 3/4″ x 19-1/4″ x 46-1/2″ | Shelf |
| E | 2 | 3/4″ x 20-3/4″ x 48″ | Top |
| F | 2 | 3/4″ x 4″ x 48″ | Tray front & back |
| G | 1 | 3/4″ x 4″ x 48″ | Tray bottom |
| H | 2 | 3/4″ x 4″ x 4″ | Tray ends |
Note: Tool tray adds 5-1/2-in. to the overall depth.
Project step-by-step (8)
Build the Legs
Cut the parts for the legs (A), then assemble each leg with glue and two-inch wood screws.

Build the Shelf Frames
Cut all the frame fronts (B), backs (B) and stretchers (C). Clamp the frames together without glue. Pre-drill clearance holes in parts B and pilot holes in parts C. Assemble the frames with glue and two-inch wood screws.

Attach the Bottom Frame
Fasten the bottom frame to the legs with glue and 1-1/4-inch wood screws. Set the bottom of the frame four inches from the bottom of the legs.

Add the Platform
Cut the two shelf platforms. Apply wood glue to the top edges of the bottom frame, then set the bottom platform in place. Secure the platform with two-inch wood screws.

Add the Remaining Frames
Repeat the above procedure with the middle frame and platform and the top frame. Set the height of the middle frame and platform to whatever suits you.

Add the Top
Cut the pieces for the top assembly. Spread glue on the top frame, then fasten the sub-top to the frame with wood screws. Next, attach the work surface using 1-1/4-inch wood screws from the top or from underneath. Don’t glue the work surface in place. It’ll be easy to replace when it wears out.

Build the Tool Tray
Assemble the tool tray as shown with glue and wood screws. Set the ends inside the front, back and bottom.

Attach the Tool Tray
Fasten the tool tray flush with the work surface using wood screws. Do not glue the tray in place.

Originally Published: March 14, 2023