


How to Add a Covered Entryway to Your Home

Updated: Oct. 31, 2023
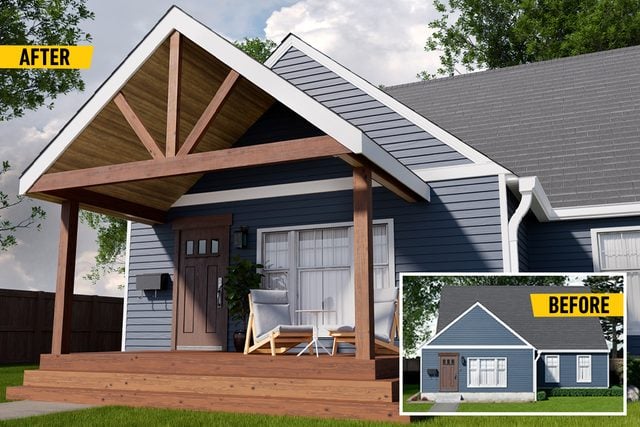
Take your home's basic facade to the next level. Add a roof over the entryway.
Multiple Days
Advanced
Introduction
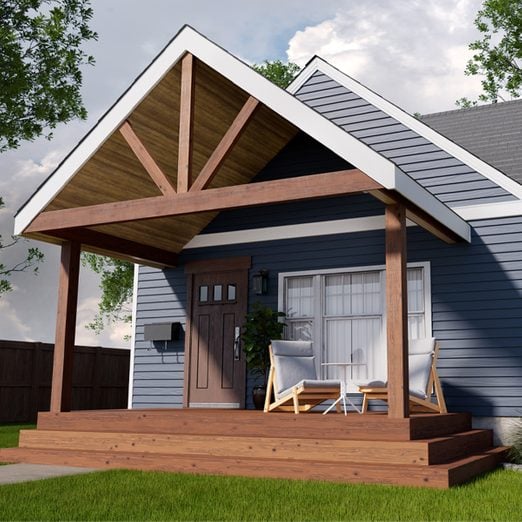
A covered front entryway is the perfect, practical way to add curb appeal and function to your home. Here's how to build one.Build Some Cover
Many houses in my neighborhood feature a plain entryway stoop with two or three steps. Kinda bland — and impractical. I’ll drive by and see homeowners carrying bags of groceries getting soaked in the rain as they struggle to open the front door. A covered home entryway would keep these folks dry and add a shady place to sit on summer afternoons.
When designed and built right, this covered, comfy entry will lift a home’s curb appeal through the roof!
Note: Before you begin, check with local building officials for frost-footing depth, necessary permits and the sizing of beams, footings, posts and rafters.
Project step-by-step (21)
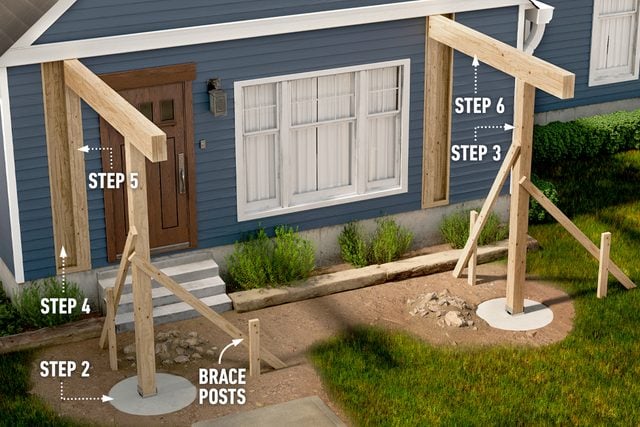
Phase 1: The Foundation
Begin construction by installing the support system for the roof. This includes footings, posts and beams to carry the entire structure.
Pour Footings
Determine the depth and width of the entryway roof and mark the corners. We designed this one to be 16 ft. wide and 10 ft. deep. The front is cantilevered past the posts by two feet, so the footings are placed eight feet away and parallel with the front of the house. The region where you live will determine the depth and diameter of these footings.
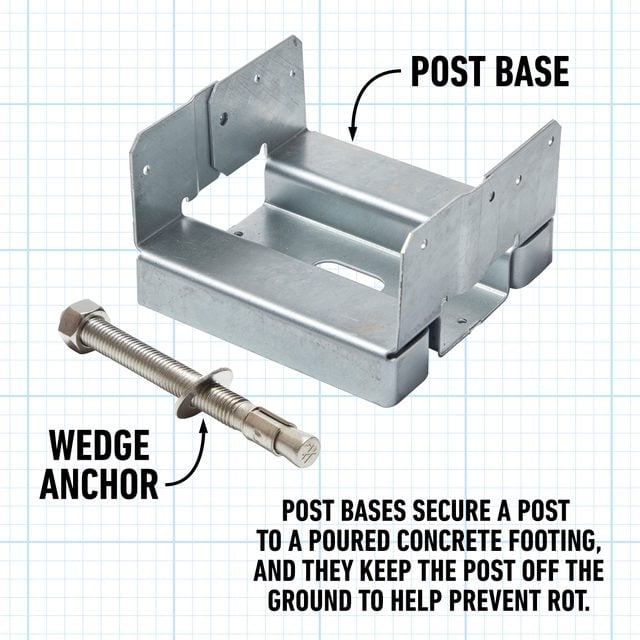
Raise and Brace Posts
Once the concrete footings have cured, fasten 6×6 post bases with correctly sized wedge anchors. The diameter of the anchor is determined by the manufacturer of the post base, and the length determined by local building code.
Then position the posts in the bases and brace them in opposite directions with 2x4s. Drive stakes into the ground and adjust the posts so they’re plumb, then fasten the braces to the stakes.
Cut Away the Siding
On each side, place another post inside the exterior wall. You can do this from inside or outside the house. There’s an advantage to doing it from inside: You can easily and inexpensively patch drywall. From the outside, it’s more difficult to patch siding, but it’s easier to position each post and beam.
In either case, when you cut into the wall cavity, find the stud bay and cut down the middle of the studs. This will leave you with enough space on the stud to fasten the sheathing or drywall patch. If you can remove the siding instead of cutting through it, you won’t have to worry about patching it or buying replacement siding.
Add Beam Support
Each beam support consists of 2-by lumber to match the framing of the existing wall (2×4 or 2×6). Each beam support will also be the same number of plies as the beam you’re installing. This design called for three-ply beams, so we needed three-ply supports.
To determine the length of the supports, subtract the height of a beam from the height of the studs in the wall. Align each support inside the wall so that the line between the post and the support is perpendicular to the house.
Place the Beam
Install each beam in one of two ways: Either build it on a pair of sawhorses and lift it into place, or build it in place on the posts. Glue and nail the plies of each beam together, making sure the tops and bottoms are flush, then use post-beam connectors to secure it to the posts. Before installing rafters, add a fascia board to the outside of each beam.
Phase 2: Roof Structure
For the second phase of the project, build the roof support structure, including the rafter ledger against the house, the gable rafters and the ridge beam. Match the pitch of the existing roofline — the cuts in the rafters are specific to that pitch.
Add the Cross Beam
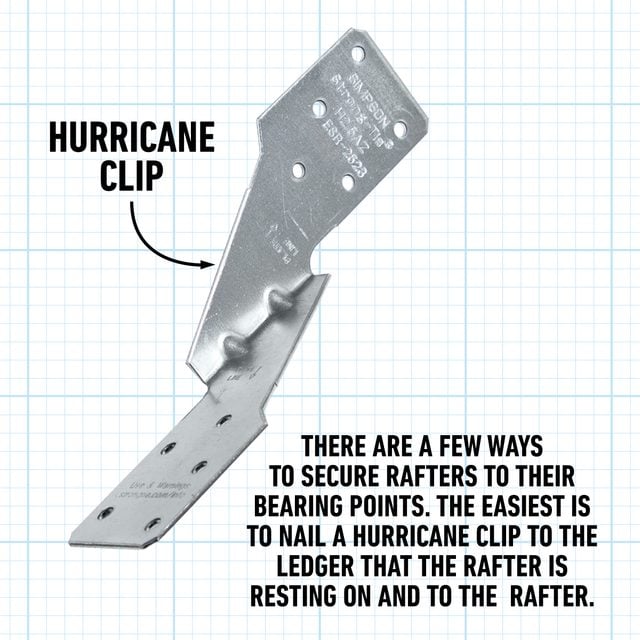
Install a concealed hanger flush with the end of each beam. Different hangers are available for specific beam sizes, depending on your design needs. Build and set the beam in the hanger and fasten it with hanger nails.

Fasten the Ledger
Make the connection to the house by cutting away the siding and using structural screws to attach ledger rafters to the studs inside the wall. Start by cutting the seat cut and heel cut toward the eaves and the plumb cuts on both ends, then tack both sides of the ledger rafters in place right over the siding.
Use the boards as a guide to cut away the siding on top; this will result in a cut 1-1/2-in. above the ledger boards. The extra space will be enough to build up the sheathing and add flashing. Trace the bottom of the ledger, then remove it from the wall. Cut away the siding and fasten the ledgers with structural screws on top of roofing felt or house wrap.

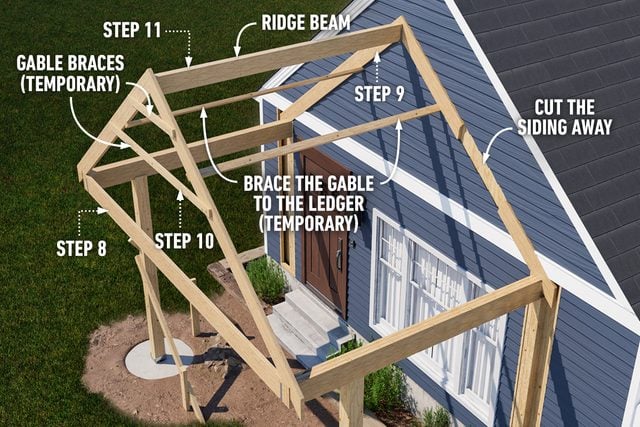
Tip Up the Gable
The gable rafters are cut to the same shape and dimensions as the ledger rafters. Fasten the peaks together with a few screws and brace them in two places with 2x4s to install them.
Have another pair of 2×4 braces cut to the same length as the gable depth ready to brace the gable to the house. Then tip the gable up and attach it to the front of the beams and to the braces. Check the gable for plumb; adjust if necessary.
Drop in the Ridge Beam
Build the ridge beam, then add a hanger to the peak of the ledger rafters and gable rafters. Drop the beam into place and nail it through the hangers using the nails called for by the hanger manufacturer.
Phase 3: Add the Rafters
To finish the roof structure, make rafters by cutting two standard 2×6 or 2×8 boards. You could purchase prebuilt trusses for your project, but making your own is less expensive and you won’t have to wait for a months-long manufacturing process.

Cut and Install the Rafters
To mark the bird’s-mouths and the plumb cuts at the peak and eave consistently, use one of the cut rafters as a template. Note that the bird’s-mouth cannot be cut more than one-fourth the width of the rafter. When the rafters are cut, space them 16 inches on-center from the house at the peak and at the eave, then fasten them into place.
Add Rafter Supports
To support the fronts of the ridge beam and rafters, add vertical support from the cross beam to the ridge beam and gable rafters. To support the gable rafters, add a double layer of 2x6s in the center, cutting them to fit. They will help hold up the front of the structure and are decorative as well.
Phase 4: Sheathing and shingles
Install the roof sheathing to complete the structure of the entryway. Then protect it from the weather with water-resistant layers that shed water off the roof.
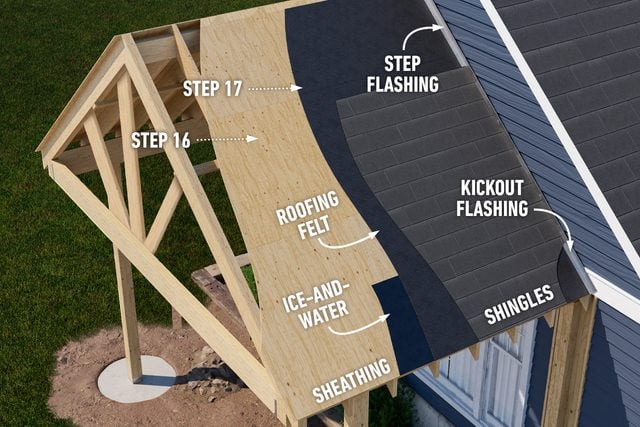
Stagger the Sheathing
Lay the plywood or oriented strand board (OSB) on the rafters starting at the bottom, arranging the sheets so any seams meet with factory edges in the center of a rafter. Lay the first sheet in each course past the gable; you’ll trim this later and then cut the next sheet to fit.
Fasten the sheathing with ring shank framing nails and make sure the seams are staggered on different rafters. Continue attaching the sheathing through the top course, which will be cut to width.
Water-Resistant Barrier
The water-resistant barrier starts with an ice-and-water shield — a self-adhered membrane applied along the eaves. Then comes a layer of roofing felt starting at the eaves and overlapping all the way to the peak. Next are the flashing and shingles.
Start with kickout flashing at the eave, then add a few layers of step flashing, followed by the starter course of shingles. Overlap the shingles, alternating between shingles and step flashing where the roof meets the house. Make sure the shingle and flashing layers shed rainwater to the next layer on its way off the roof. Cover the peak with ridge cap shingles.
Finishing Touches
Polish the look of the porch with trim and tongue-and-groove boards to hide the construction lumber.
Wrap the Posts and Beams
To complete the look, trim the beams and posts. Choose cedar or sealed wood for rot resistance, or go with maintenance-free composite material.
To cover the beams, cut boards to fit their width and fasten the boards to the bottoms, then cover the sides the same way. For each post, cut two boards to fit the width and then two more to cover the rest.
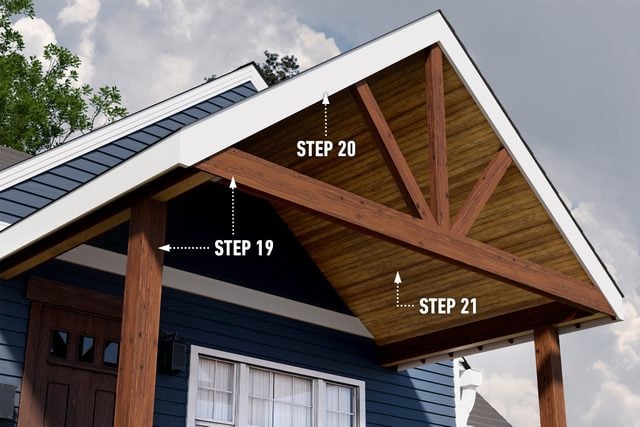
Add Fascia Board
Hide the rafter tails with fascia board that’s one inch wider than their height. Cover the gable rafters on the front the same way you wrapped the beams. The miter at the peak matches the plumb in the rafters; fit the miter together and tack up the boards temporarily to mark where to cut the ends. Cut the ends and install the rest of the fascia.
Tongue-and-Groove Ceiling Boards
The final step is to install the tongue-and-groove ceiling boards. Tuck the first course into the beams on each side and work your way to the ridge. You can bring both sides into the peak, but it’s easier to fasten a flat board to the ridge and cut the final pieces of the sides to fit.
Originally Published: June 17, 2022