


A quick, inexpensive way to transform a room—and a beautiful cover-up for damaged ceilings
Multiple Days
Intermediate
$101–250
Introduction
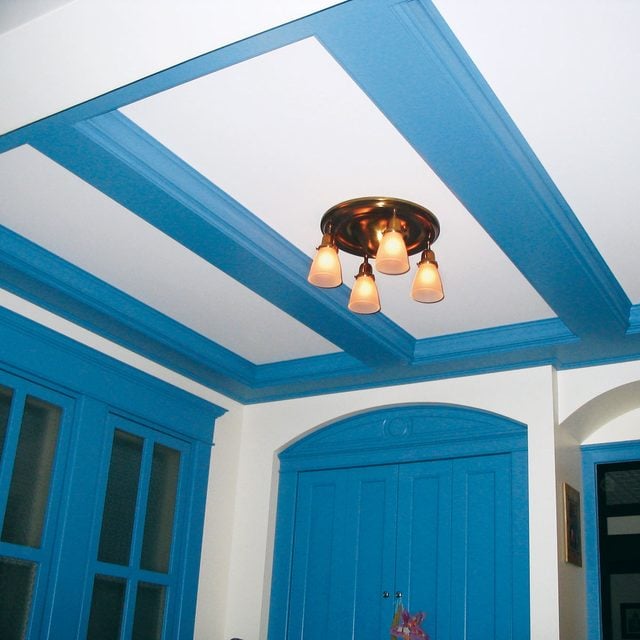
Create an attractive beam and panel ceiling with just 2x4s and fiberboard. It's inexpensive, easy to assemble and looks like a classic beamed ceiling when painted.Tools Required
- 4-in-1 screwdriver
- Chalk line
- Chamfer router bit
- Circular saw
- Countersink drill bit
- Drill bit set
- Drill/driver - cordless
- Dust mask
- Finish nail gun
- Framing square
- Hammer
- Hearing protection
- Miter saw
- Paint roller
- Roller tray
- Router
- Safety glasses
- Sanding block
- Stud finder
- Tape measure
Materials Required
- 1/2-in. MDF
- 2x4s
- 3/4-in. MDF
- Paint
- Primer
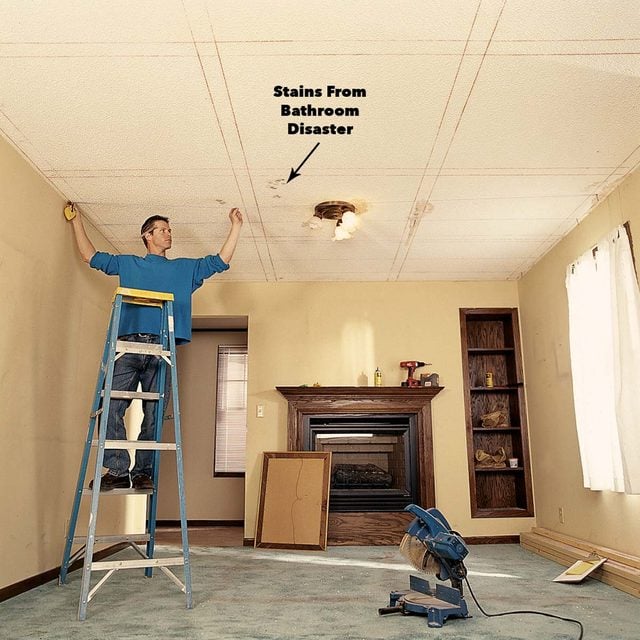
Paneling a ceiling is a great way to add character to a plain room. And if the existing ceiling is cracked or water-stained and in need of a makeover, all the better. Covering it with panels and beams is more elegant and less expensive than hiring a pro to restore a damaged ceiling to its original condition.
A paneled ceiling like this normally calls for expensive tools and lots of carpentry skill, but we designed this project to be DIY-friendly. It’s made easy by a homemade circular saw ripping jig, the installation of a simple 2×4 framework and miter-free joinery (Figure A). The visible finished material over the framework is MDF. It’s inexpensive, readily available at home centers, and smooth and easy to work with. However, cutting, sanding and routing MDF is extremely dusty, so do all your power tool work outside or at least in the garage with the overhead door open, and be sure to wear a dust mask.
While the ease of construction is a big plus, the real beauty of this project is its low cost. The materials for this 12 x 12-ft. ceiling cost less than $350, including the paint.
Project step-by-step (18)
Step 1
Three Shortcuts Make This Project DIY-Friendly
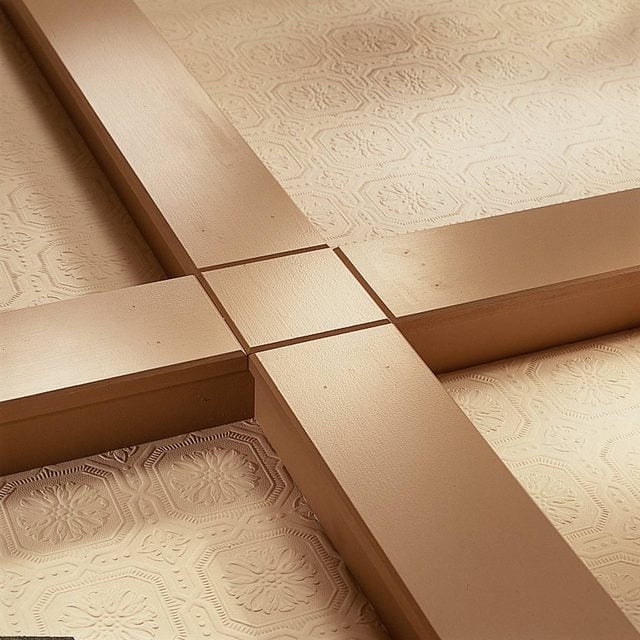
1. Miter-free joints: There is no such thing as a miter on this project. Every end joint is a straightforward square cut. Just get the length right, cut at 90 degrees on your miter saw, and all the joints will look like a million bucks.
2. Chamfered edges: Small 45-degree chamfers routed on the edges of all the exposed trim hide all but the worst imperfections.
3. Overhangs: The vertical side trim overhangs the ceiling panels to hide any sloppy cuts. And the caps overhang the side trim, so small gaps there will be hidden as well.
Step 2
Choose the Design for Your Room (Figure A)

Our system is ideal for dressing up any ceiling whether it’s damaged or perfect, textured or flat, drywall or plaster. If your ceiling is flat and in good shape, you can omit the MDF panels and simply paint the ceiling and apply the grid work and trim right over the existing material. But keep in mind that you’ll have to make the side trim strips 1/2 inch wider to account for the missing panel thicknesses.
In a nutshell, the MDF trim fastens to a 2×4 grid that’s screwed to the ceiling. The nine-panel pattern works for rooms up to 13 ft. wide and 33 ft. long. The use of materials is efficient and the shape of the panel will automatically be proportional to the shape of the room. A square room will have square panels; a rectangular room will have rectangular panels. Plus: Check out 14 more ways to cover a hideous ceiling.
Step 3
Design Options
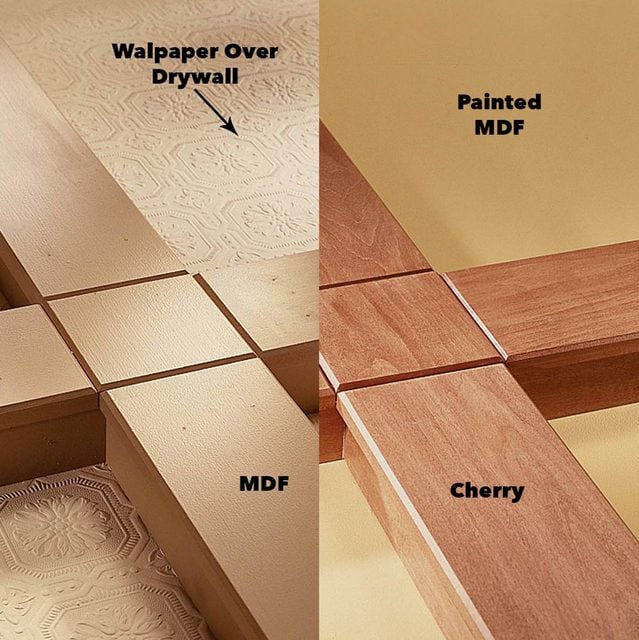
If you love the natural look, you can panel your ceiling with any type of wood and still use the techniques we show. Use painted MDF for the panels and solid natural wood for the beams, or go all out and use matching veneered plywood for the panels. To save money when you use this technique, rip plywood for the side trim pieces. That’ll look fine since the plywood edges will be hidden. You can also use any type of wallpaper or covering on the panels, or on the existing ceiling drywall if it’s in good shape.
Step 4
Mark the Grid on the Ceiling
The first step in laying out the grid work is to chalk lines around the perimeter of the room 4-1/2 inches away from the walls. That will allow the full 5-1/2-inch cap to fit against the wall and match the rest of the finished trim. Then measure the length and width of the space inside. It’s up to you how many panels to use and how big to make them. Most average-size rooms work well with nine panels. In other words, divide both room dimensions by three. You’ll only be able to have perfect square panels if the room is square. Otherwise, you’ll have rectangles, which is fine—they’ll look great as long as they’re a consistent size. And you can always make the panels exactly the same size. Make them as large or as small as you wish, as long as they’re under 4 ft. wide and 8 ft. long, as much as the sheets will allow.
Once you figure out the panel sizes, snap the grid layout on the ceiling with chalk lines. To avoid some confusing math (accounting for the width of the 2×4 grid), just snap center lines to lay out the grid and then snap lines 1-3/4 inch on both sides to mark the outsides of the 2x4s. It’s a good idea to snap lines with a different color chalk, marking all the ceiling joists at this point so you’ll know where to put the fasteners for the grid and ceiling panels.
Step 5
Install 2x4s
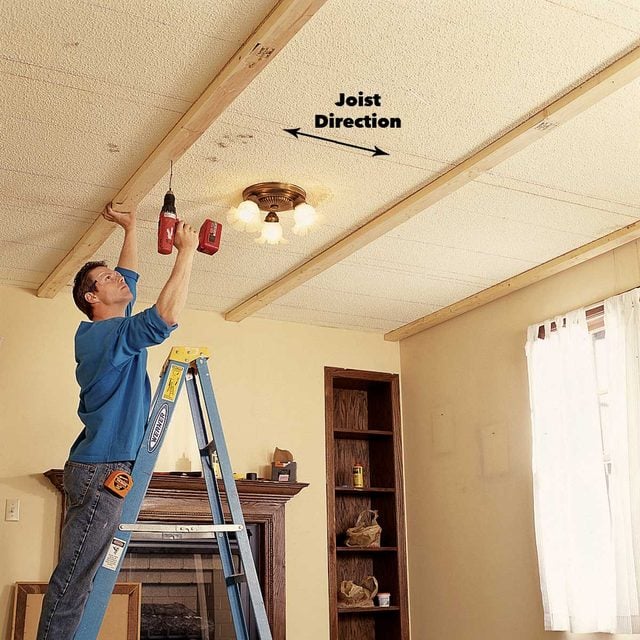
Screw 2x4s to the ceiling perpendicular to the joist direction with a couple of 3-inch screws into each joist.
Step 6
Add Crossing 2x4s

Screw the overlapping 2x4s to the first ones at each intersection. Fill the spaces between the lower 2x4s to complete the grid work. Space screws every 16 inches.
Step 7
Cut and Install the Panels
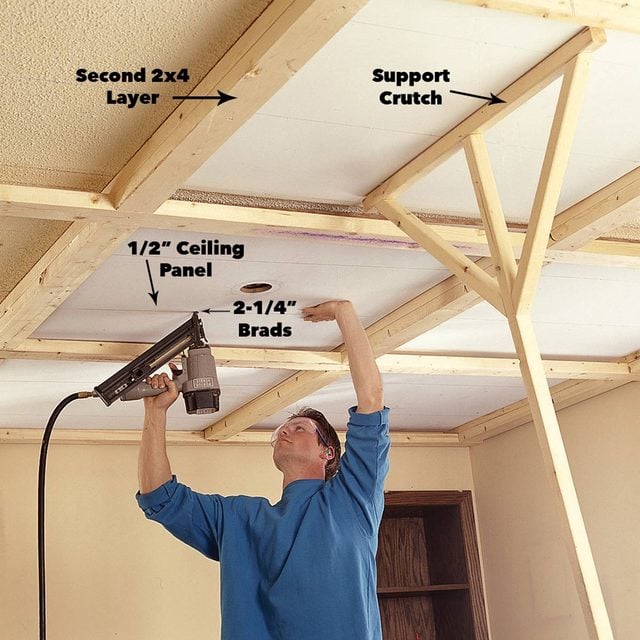
Cut the panels 1/2 inch shorter than the grid openings to make them easy to slip into place. Cut them to width first and set aside the 8-ft.-long waste pieces to use for trim caps and hubs. Then cut them to length. You can just snap chalk lines and cut the panels “freehand” since the side trim pieces will hide imperfections. Then roll on a stain-blocking primer (KILZ and BIN are two brands) with a 3/8-inch-nap roller sleeve. If you’re working alone, make yourself a support crutch to hold the panels tight against the ceiling while you nail them into each floor joist with 2-1/2-inch nails spaced every 8 inches.
Fill the nail holes with wood filler. Sand down any excess filler and surface imperfections and spot-prime those areas. Then roll on two coats of latex paint.
Step 8
Top Cap and Hub Jig (Figure B)
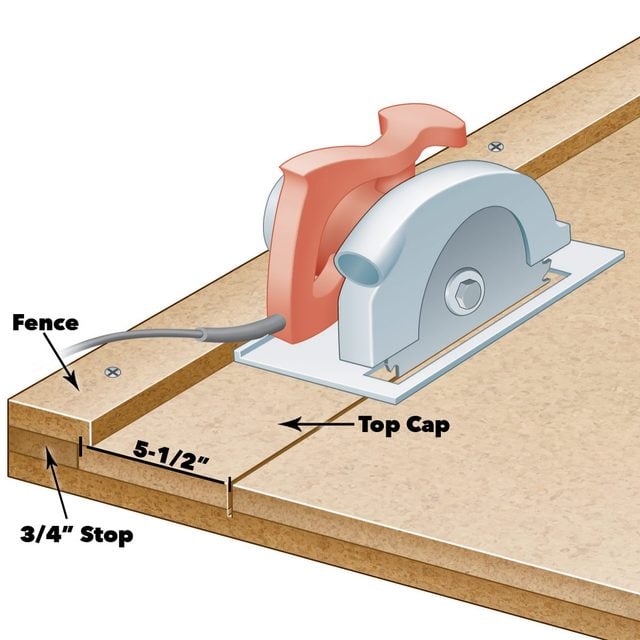
MDF panels are heavy—90 lbs. for a 3/4-inch sheet! So even if you have a table saw, you’re better off cutting side trim and caps with a ripping jig and a circular saw. Here’s how to make a jig that will accurately cut the trim pieces you need for the ceiling:
- Rip an 8-ft.-long, 3-inch-wide “fence” for a top cap ripping jig (Figure B).
- Screw each stop to the jig base with countersunk 1-1/4-inch screws spaced every 12 inches, and then screw the fence to each stop wherever it needs to be to match the width you’re ripping. The key to both jig setups is the distance from the left side of your circular saw’s base to the edge of the saw blade (Figure B). That distance will determine fence placement.
Step 9
Side Trim Jig (Figure C)
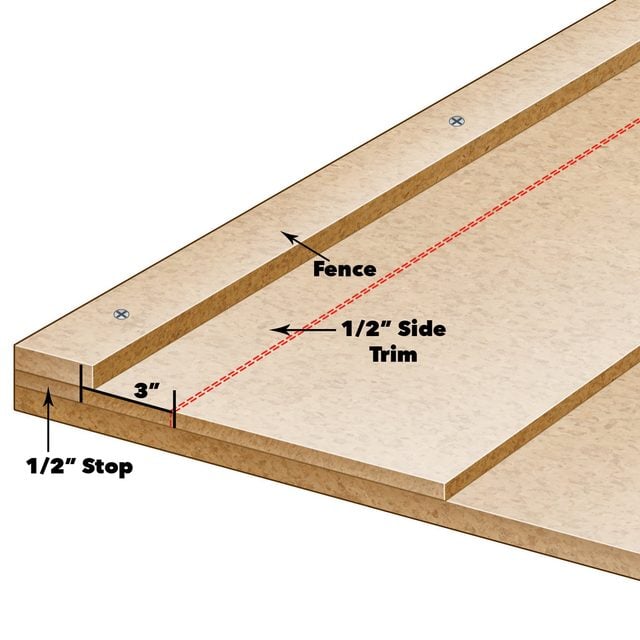
Assemble the jig from MDF or plywood. To make this side trim jig:
- Rip one 2-1/2-inch-wide “stop” out of 1/2-inch material for ripping the trim strips for the side trim (Figure C) and a 3/4-inch-thick stop for ripping the caps and hubs. Rip the stop and fence from the edges of new sheets, and always face the factory edges toward the saw for straight, true guide surfaces.
Step 10
Use a Jig to Cut the Side Trim and Cap Trim
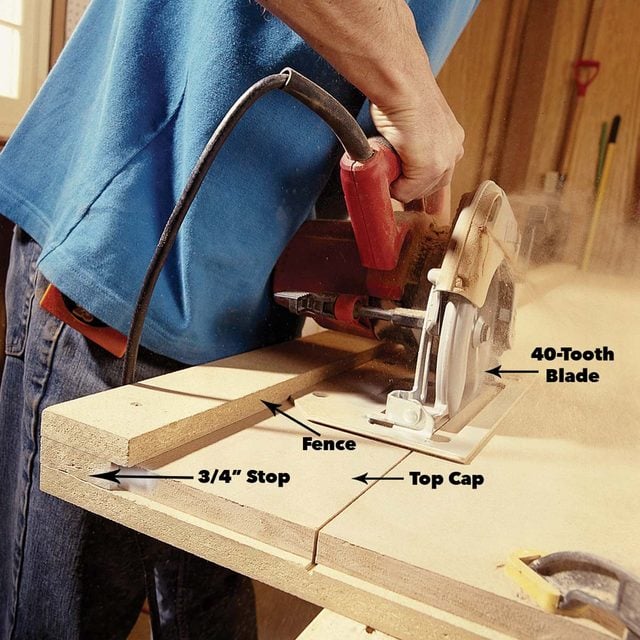
Rip the top cap trim using a ripping jig. The simple three-part jig gives you straight cuts and perfect widths.
You’ll have to set up the ripping jig twice with two different fence locations and the stop that matches the thickness of the material you’re cutting (1/2-inch-thick side trim or 3/4-inch-thick caps and hubs). The base of the jig is the same for both jig setups—a 1/2-inch or 3/4-inch sheet of any flat sheet good. Or use one of the MDF sheets and make panels with it later.
Hubs are cut from the 5-1/2-inch cap strips, so while you still have the jig set up, make sure you rip enough stock for those, too.
Step 11
Install the Side Trim
Prime the side trim pieces then nail the pieces to the framing. Paint and mask the panels with painter’s tape first to avoid fuss when you paint the trim.
Step 12
Rout the Hub Edges
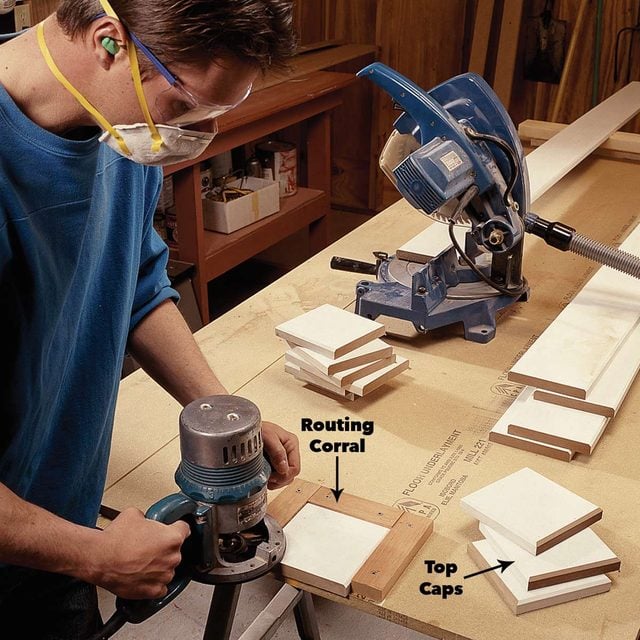
Figure out roughly how long the caps will be and cut and rout the hubs from the extra material. Cut the hubs to length, then rout the edges using a “corral” tacked to your workbench to safely hold the small pieces in place. Sand off any saw blade marks on the edges of the cap stock and rout those edges.
Step 13
Install the Hubs
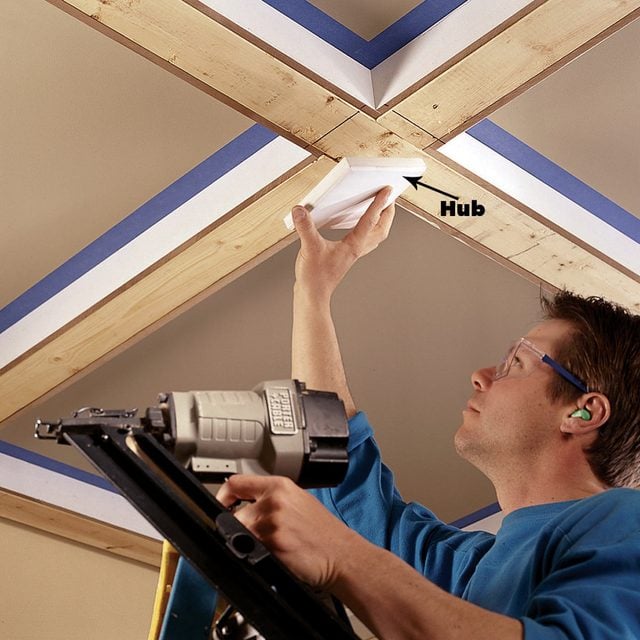
Center and nail the hubs at each intersection. Don’t forget to prime the freshly routed edges.
Step 14
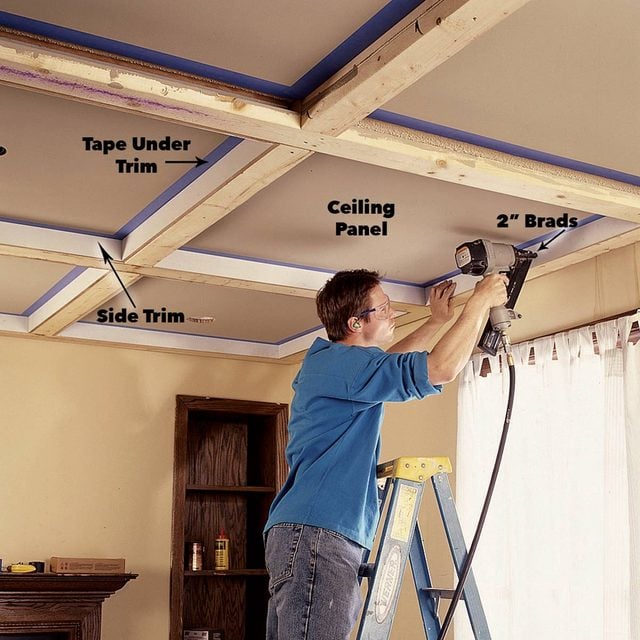
Rout and Install the Caps
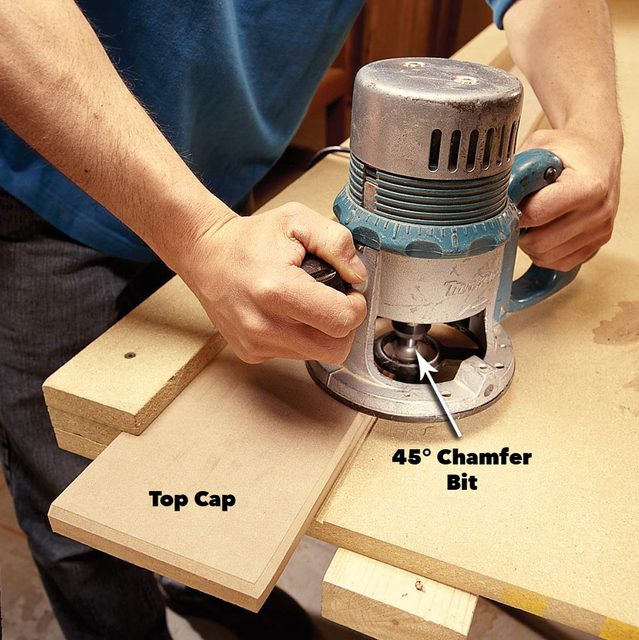
Use the top cap ripping jig to hold the caps in place while you rout the edges. Cut them to length and nail them to the grid with 2-inch brads.
Step 15
Finish the Beams

Patch the nail holes, lightly sand, spot-prime and then paint the grid-work trim.
Step 16
Pull the Tape

After you paint the trim, slice through the tape at the inside corners and peel it away.
Step 17
Improve Your Lighting

Since you’re covering the drywall with panels, this is a great time to add or move ceiling light fixtures. If you have a floor above, just cut channels in the drywall and drill holes through the middle of joists, or staple the cables on the sides of joists to get the cables to the new electrical boxes or recessed light canisters. If you have an attic above, you’ll have to crawl up there to run the cables. Just remember that when you mount the new boxes, they should be flush with the finished MDF surface. You’ll need to add 1/2-inch-deep plaster rings to existing boxes before you install the finished ceiling.
Step 18
DIY Success Story
When Brian Dohrwardt added a small second-floor bathroom, he ran into a big problem. The undersized floor joists didn’t allow a path for the drain lines (drilling 4-inch holes through 7-inch joists is a recipe for floor collapse!). His only option was a bad one: He had to run the pipes under the floor joists and along the ceiling of the dining room below. But those ugly, exposed pipes inspired a beautiful solution. Brian built false, hollow beams to enclose the pipes. The resulting coffered ceiling is the best feature of his home, Brian tells us.
Check out these 100 Incredible Projects By DIYers Like You.