


We'll tell you how to build a beautiful, durable patio from stone and brick.
Multiple Days
Intermediate
$501-1000
Introduction
Add a welcoming feature to your backyard with this attractive, long-lasting brick and stone patio. Our design easily adapts to fit your yard. Choose from a wide variety of stone types and brick styles. The result will be permanent and maintenance-free.Tools Required
- 4 ft. level
- Brick hammer
- Chalk line
- Garden hose
- Garden rake
- Gloves
- Hammer
- Hearing protection
- Line level
- Mason's string line
- Masonry saw (diamond blade)
- Push broom
- Safety glasses
- Shovel
- Sod cutter
- Tamper (plate compactor)
- Tape measure
- Trowel
- Wheelbarrow
Materials Required
- 3/4-in. x 10-ft. black iron pipes (3)
- Brick pavers
- Gravel
- Landscape fabric
- packable Sand
- Stone
- Wooden stakes
How to Build a Brick Patio Overview
Building a brick and stone patio like ours doesn’t take special skills. The casual, free-form design allows you to relax and be creative rather than worrying about precise cutting and fitting.
It’s a big project, but we’ll tell you how to build a patio. In a nutshell:
- Plan the size.
- Dig a hole about 10 in. deep, and pack a 6-in. layer of gravel to form a flat base that slopes slightly for drainage.
- Set the patio stones and brick in a layer of sand and tamp them down so the surface is even.
- Fill the cracks with sand, tamp again, then landscape around the new patio and you’re done.
The time this project will take you:
This DIY brick patio project isn’t technically difficult, but be prepared to devote a big chunk of time and energy to it. You’ll haul tons of dirt, gravel, stone and brick before you’re done. With a small crew of strong and ambitious helpers, you could finish this project in two or three weekends, but working alone at a leisurely pace, you’ll spend the better part of a summer.
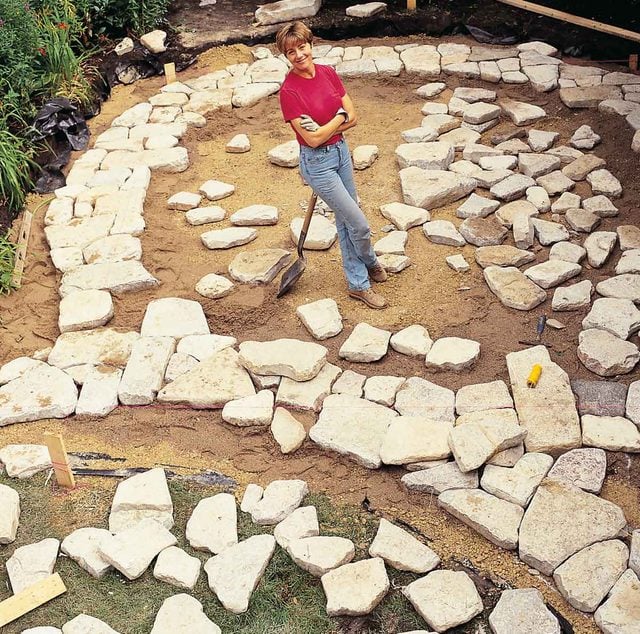
The stones we used:
We assembled our patio from used street pavers that we bought from a brickyard. Individually, the bricks look a little crude, covered with tar and well worn, but the overall effect is perfect. Then we chose tumbled Wisconsin limestone for the border. The tumbling rounds the edges and gives the stone a worn look that complements the rustic appearance of the used pavers.
You may not find the exact materials we used locally; check the stone dealers in your area to see what’s available as you determine how to build a patio to your liking.
Varying costs depending on chosen materials:
This patio costs about as much as a premium-quality wood deck. The cost of patio stones varies widely, though. Get patio paver ideas before you start. Depending on your location, you might spend a lot more or a lot less as you figure out how to build a patio to your style. Our patio cost just over $500.
Project step-by-step (23)
Step 1
The Character of the Stone Makes This Patio!
Stone Options:
Stone varies greatly in color and texture. Visit a number of stone suppliers to see what’s available in your area and to check prices. We chose 3- or 4-in. thick stone intended for building walls, but any relatively flat stone that’s 2 to 4 in. thick will work. Because stone is sold by the ton (we used 5- 1/2 tons), a thinner stone like flagstone would have been more economical, but it wasn’t available in the tumbled finish we wanted. If you use thinner stone, don’t tamp it with the compactor. It will crack. The stone dealer will tell you approximately how many square feet a ton of each type of stone covers. Order at least 15 percent extra to allow more selection when you’re looking for just the right shape.
Clay Pavers:
Concrete pavers are the most economical choice for paving patios. They are available in many sizes and colors. Traditional clay pavers have truer brick color and cost a bit more. Concrete pavers are available at home centers and landscape retailers, but you’ll probably have to find a brickyard to buy clay pavers. You’ll need about 4-1/2 bricks for every square foot, assuming an average sized 4 x 8-in. brick. It’s difficult to figure the exact amount of brick needed for an irregularly shaped patio like this, so order about 15 percent extra.
Step 2
Site Planning
Plan a strategy for getting the materials to and from your patio location. Sand and gravel will arrive in dump trucks that are too heavy be driven on your driveway or in your yard without damaging them. You’ll probably have to use wheelbarrows. If it’s a long haul, ask your supplier for a smaller truck or skid loader that can get closer. A cozy spot is the main requirement for a patio like this. But you’ll also want to consider the following:
- Shade. You’ll want it. If you don’t have it, include shade plants or structures in your plan.
- Drainage. Avoid low spots. Pick a spot that’s well drained.
- Slope. A little slope, less than about 1/4 in. per foot, is OK. More than that and you’ll have to build retaining walls or regrade the surrounding soil.
- Digging complications. Don’t build directly under trees. It could damage the tree, and besides, digging out roots is no fun.
- Contact local utility companies before you dig and have them locate buried lines.
Step 3
Order the Base Materials and Stone
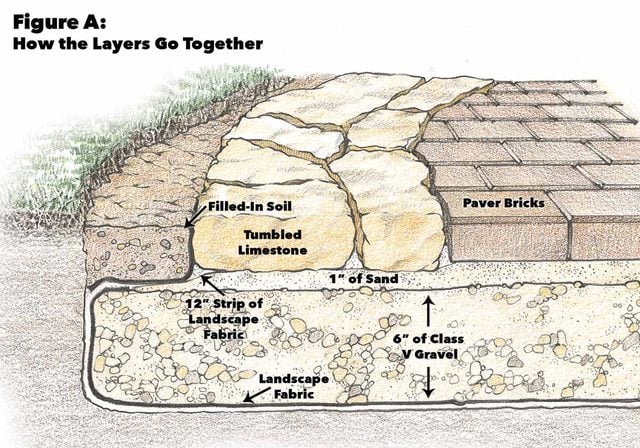
It’s what’s underneath that counts. Stone and brick are what you see, but the landscape fabric, gravel and sand are what hold them together and make your patio last.
Landscape fabric stabilizes the soil underneath the gravel base by keeping them apart while allowing water to drain through. We used 12-1/2 ft. wide, heavy, woven stabilization fabric purchased from our stone supplier. If this isn’t available, use the widest landscape fabric you can find.
Class V (“five”) limestone forms the foundation of our patio, but there may be different materials available in your region. Any granular fill will work as long as the size of the granules ranges from 3/4 in. down to a powder and they’re angular, not smooth and round. These qualities allow the fill to be tightly packed for a firm base that allows water to drain through. A mixture of recycled concrete and asphalt is widely available and is a good substitute for Class V.
Depending on your soil, you’ll need a 4- to 10-in. thick layer of gravel. Sandy soils require less gravel than soils with organic matter or clay. Gravel is sold by the ton or cubic yard. One cubic yard (27 cu. ft.) covers about 50 sq. ft. at a 6-in. depth by the time it’s compacted and weighs 1-1/2 tons. We used 12 tons of gravel.
Coarse washed sand is spread over the gravel in a 1-in. layer to form a setting bed for the stone and brick, and later to fill the cracks between the bricks and stone. We used 5 tons of sand.
Step 4
How the Layers Go Together
When you’ve found a suitable spot, make a rough sketch showing trees, shrubs and gardens, then take measurements. Transfer these measurements to graph paper, letting each square equal 1 ft. Lay tracing paper over your plan and sketch in the stone border and bricks. Experiment with different designs, and when you come up with a plan you like, use it to calculate the quantities of materials and help you place the patio stones. Remember that this is a casual, free-form patio. Have fun and let the plan evolve as you work.
Note: You can download Figure A and enlarge it from the additional information below.
Step 5
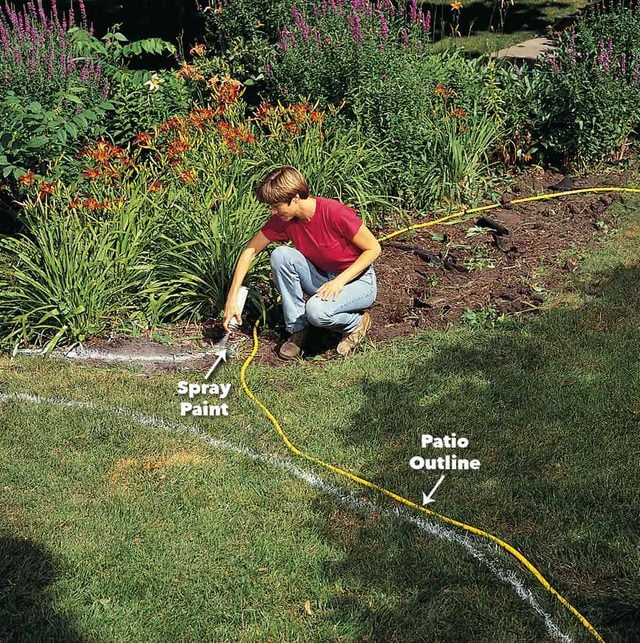
Mark the Patio Outline
Outline the patio with a garden hose. Then mark 6 in. beyond the perimeter with spray marking paint. Also, align adjoining paths.
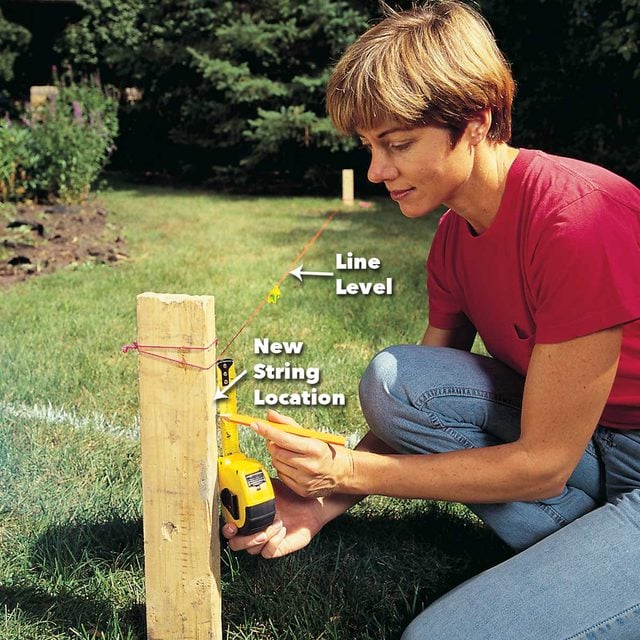
Step 6
Establish a Slight Slope
Set up a string line across the center of the patio in the direction you want the water to drain. Tie the stringline to stakes driven at each end of the patio so it stretches in the best drainage direction. Use a line level to adjust the string until it’s level. Then lower one end of the string 1 in. for every 10 ft. of length to establish a sloped reference line. You’ll use this string to gauge the depth of the hole as you dig, and to set the slope of the compacted base.
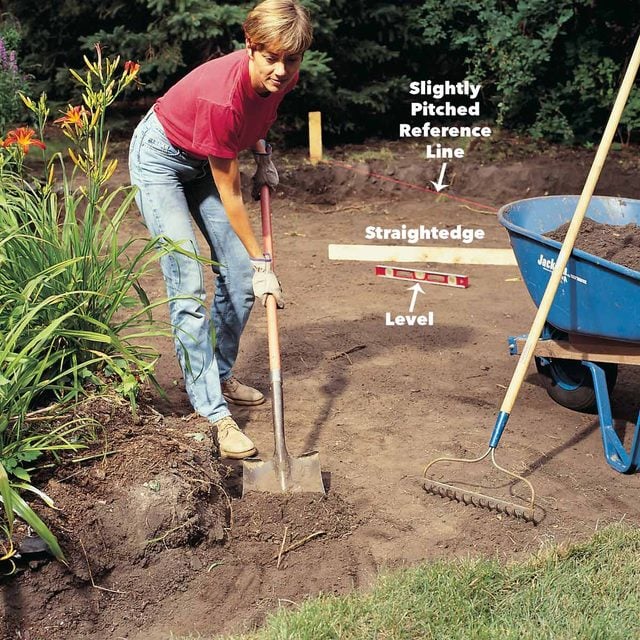
Step 7
Excavate the Patio
Pick up your shovel and get ready to move 16 tons of dirt. To keep the patio flush with the yard, you’ll have to dig out about 10 in. of dirt, and then find a place to put the excess. That’s a lot of dirt. Consider building a raised planter bed or grassy mound in your yard.
If that’s not possible, you may want to jump-start the project by hiring an excavator with a skid loader and dump truck to dig the hole and haul away the dirt. As a last resort, rent a large trash bin, at least 10 cu. yds., and move the dirt into it with a wheelbarrow. Let the company know you’ll be filling it with dirt, though, because it’ll likely limit how much you can put in.
Dig out the patio area to a depth of about 10 in. below the finished patio level. Measure from the string to gauge the depth. Hold a level on an 8-ft. straightedge to check areas on both sides of the string. Take a well-deserved break when you’re done digging.
Step 8
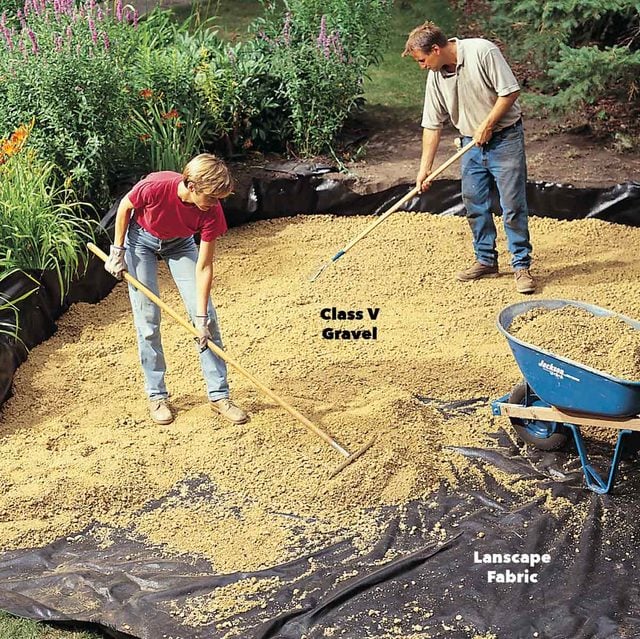
Spread Landscape Fabric and Gravel
Double-check your calculations for gravel and sand and arrange for deliveries. Then call the rental store and reserve a gas-powered plate compactor or “tamper”. This is a heavy beast; you’ll need a trailer or pickup truck and a couple of strong bodies to move it around.
After compacting the soil with the tamper and before you start filling the hole, roll out the landscape fabric, allowing it to extend at least 6 in. beyond the patio all around. Use spikes to temporarily hold it in place. Then we spread a 2-in. layer of gravel over the top.
Note: If your soil is soft or soggy, you might have to add more gravel fill to create a stable base. Ask your building inspector or a soil engineer to recommend the right base for you.
Step 9
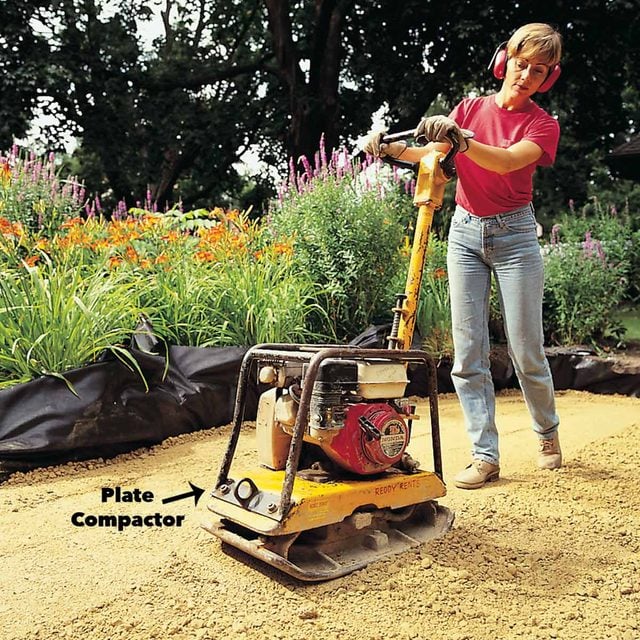
Compact the Gravel
To establish a strong, flat base for the patio, follow our two-step procedure:
- First spread and tamp down two layers of gravel, each about 2 to 3 in. thick.
- Then establish a perfectly flat surface with a final 1 to 1-1/2 in. layer (as shown in step 11) and tamp this down.
Wet the gravel and compact it with the plate compactor. Make two passes around the perimeter. Then compact the center, first working one direction, then a second pass at a right angle to this. Finally, make two diagonal passes.
Step 10
Set Straight Iron Leveling Pipes
Set a 3/4-in. iron pipe on a 1-1/2 in. thick mound of gravel placed directly under the string. With a tape measure, align its height with the string. Then with a level, align two other pipes parallel to the first, about 8 ft. to each side.
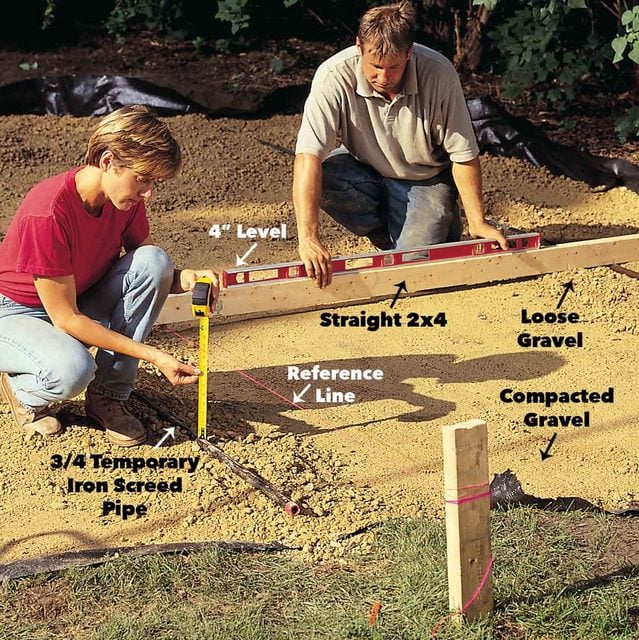
Step 11
Level the Gravel
To level the gravel, spread a third and final layer of gravel, 1-1/2 in. thick, between the pipes. Pull a straight 10-ft. 2×4 across the top of the pipes to level it. Pull out the pipes and fill the trenches with gravel, using a trowel to level it with the surrounding gravel. Compact this layer like the previous one.
When you’re done, you’ll have a solid, flat base that slopes slightly for drainage and is ready for the sand bed, stones and bricks.
Step 12
Set the Border Stone
The next step in the project is to lay the stone border. Measure the thickness of a few stones to get an average and compare this with the thickness of the bricks you’re using. Then adjust the depth of the sand bed to compensate for the difference in thickness. Your goal is to get the stones and brick even on the top.
Establish the patio height with strings stretched across the edges of the patio. Set the strings parallel to the gravel base and at a height equal to the thickness of a brick (not a stone) plus a 1-in. sand bed plus an extra inch for clearance.
Spread a layer of sand. Set a perimeter stone onto the sand bed and wiggle it down into the sand until it’s sitting 1 in. below the string. Add sand to raise the height of the stone if necessary.
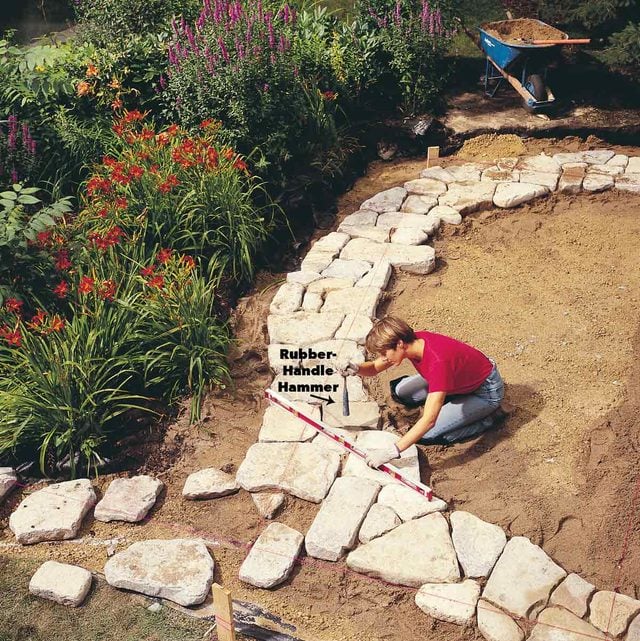
Setting the stones is like assembling a complicated jigsaw puzzle. It’ll take time and patience, but the reward is great. Spread out the stones so you can pick the best shape. Stagger the joints as you fit the stones. If possible, limit gaps to about 1 in.

Step 13
Level the Stones
Level the stones that aren’t directly under the string with a 4-ft. level held at a right angle to the original center string line. Tamp high stones down with a rubber-coated hammer handle.
Step 14
Lay the Bed of Sand
With the border stones in place, it’s time to lay the bricks. The simple running bond pattern we’ve chosen looks good with the stone border and is easy to lay.
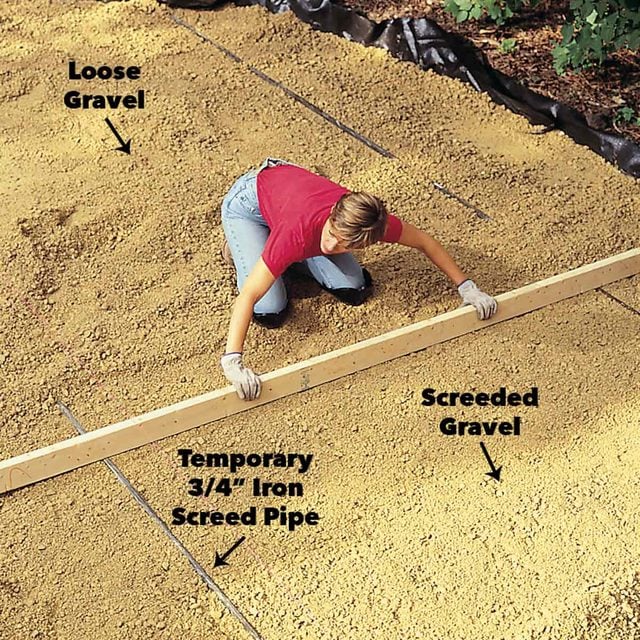
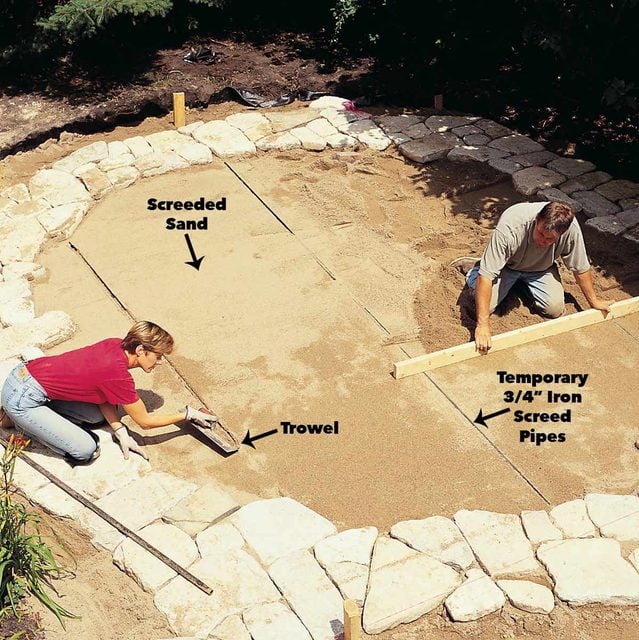
To ensure that the sand is level, set 3/4-in. iron pipes in long mounds of sand using the same procedure shown in step 10. Set the top of the pipes high enough so that when the bricks are set on the sand bed, they’ll protrude above the stones about 3/8 in. Dump the sand between the pipes and drag a straight 2×4 across the pipes to level it (also called screeding).
Remove the pipes and fill the trenches. Use a trowel to level the sand in the nooks and crannies around the perimeter. When you run the compactor over the bricks to seat them in a later step, they’ll settle down flush with the stone.
Step 15
Snap a Base Line and 2 Perpendicular Lines
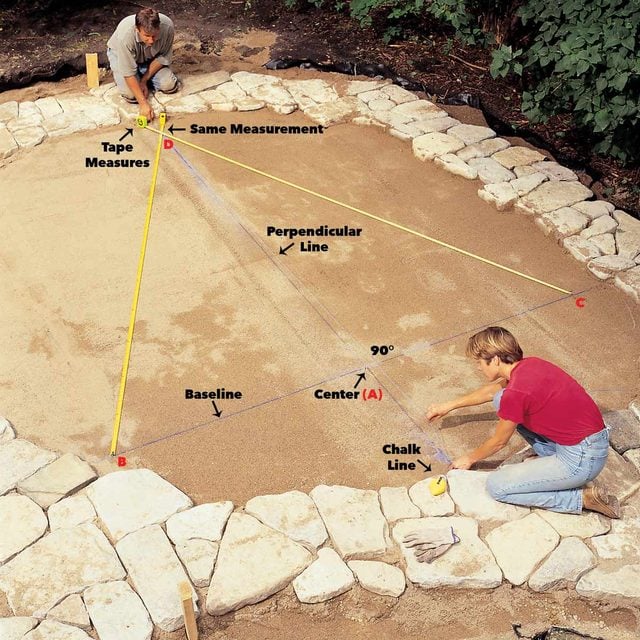
Snapping chalk lines directly in the sand is the best way to keep your bricks running straight. For the running bond pattern, you’ll only need a baseline and two lines perpendicular to the baseline, offset by half the width of a brick. Mark the rough center (A) and snap a line at right angles using this method:
- Measure out an equal distance from the center and make two more marks (B and C).
- Cross two tapes at the same measurement (length BD = CD).
- Snap a chalk line from point “D” through point “A.”
- Then snap a second line half the width of a brick from the first line.
Step 16
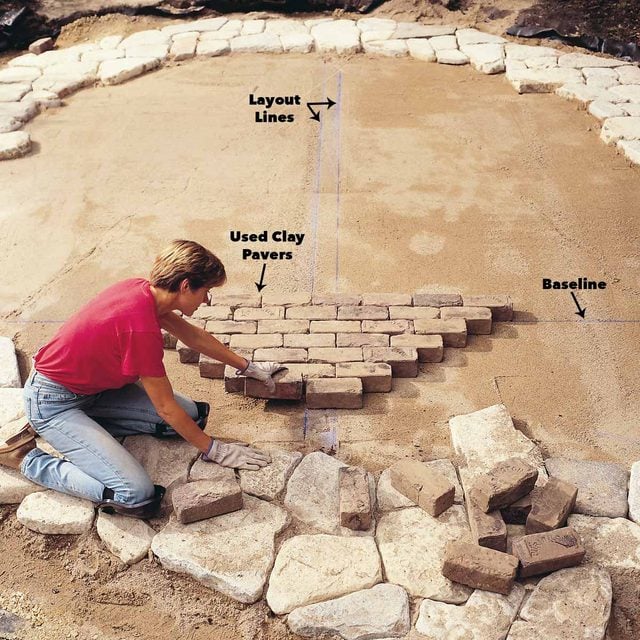
Lay Bricks Along Layout Lines
Lay a row of bricks along the baseline, aligning the end of the first brick with the perpendicular layout line. Butt them tightly together. Lay another row, aligning the end of the first brick with the second line. Continue laying bricks until one section is complete. Then work out from this section to complete the patio.
Step 17
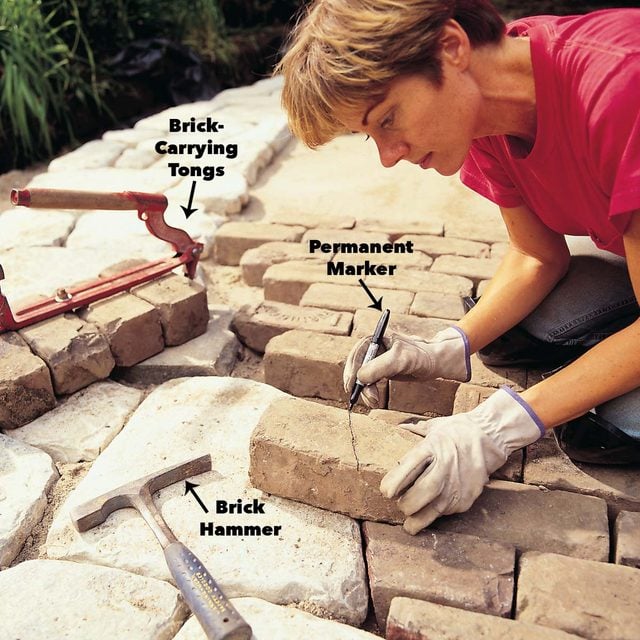
Mark Cutting Line
Mark bricks for cutting. Hold the brick in position and eyeball down to the stone below to sketch the line with a permanent marker.
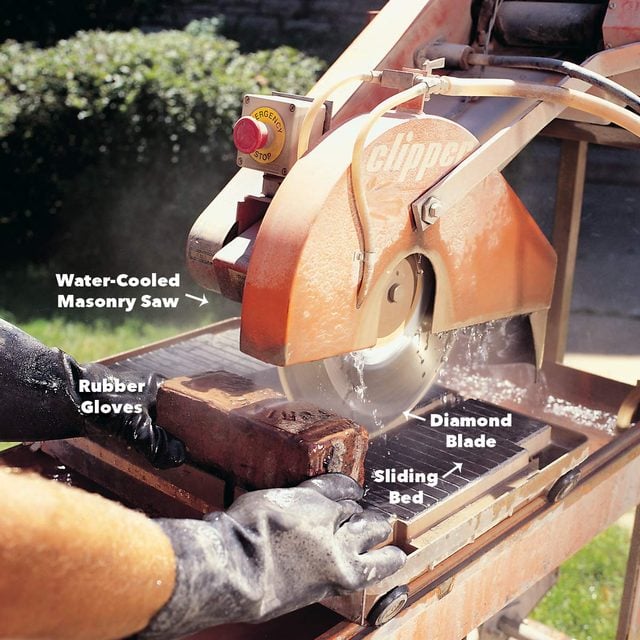
Step 18
Cut with Masonry Saw
We experimented with a few different cutting methods and settled on the gas-powered masonry saw as the best option for our pavers. The diamond blade on this saw is not nearly as dangerous as a woodcutting blade, but even so, follow these safety precautions:
- Wear rubber gloves, safety glasses and hearing protection.
- If the rental store doesn’t have a gas-powered saw, use an electric tile-cutting saw instead. It’ll cut a little bit slower.
With your rented masonry saw use a wet-cutting diamond blade to cut the border bricks. Saw along the line with a water-cooled masonry saw. Set the brick on the sliding bed and slowly push it forward while you guide the blade along the line. The edge bricks don’t have to fit perfectly. You can plant ground cover in the large gaps to give your DIY patio a more natural look.
Step 19
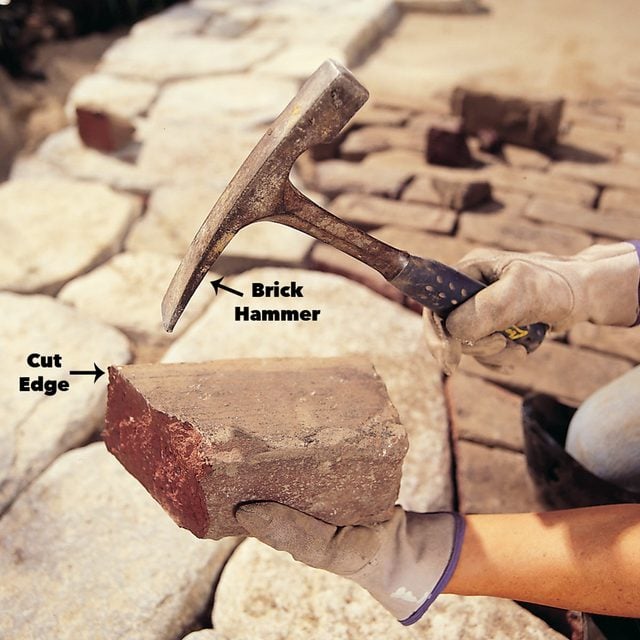
Chip the Brick Edges
Chip the cut edge of the brick with a brick hammer so it blends with the rough edges of the used brick.
Step 20
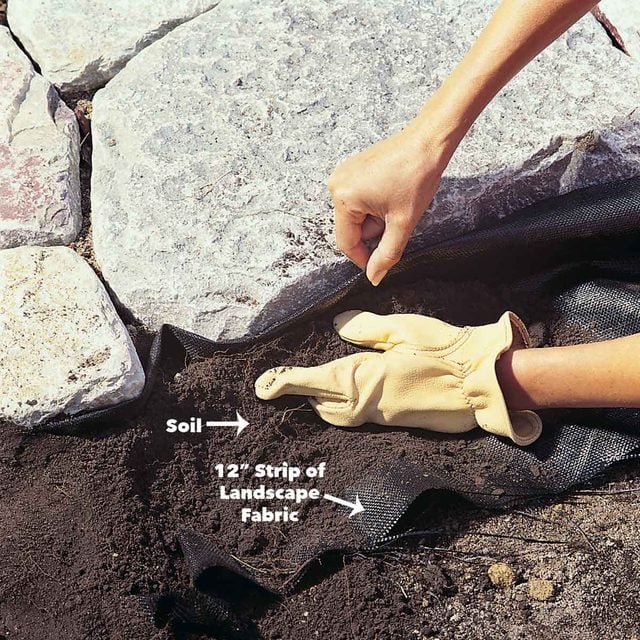
Pack Stone Edges
Before you spread sand to lock the stones and bricks into place, pack dirt around the perimeter. Cut 12-in. strips of landscape fabric and fold them up against the stones around the outside perimeter. Pack soil firmly against the stones and fabric.
Step 21
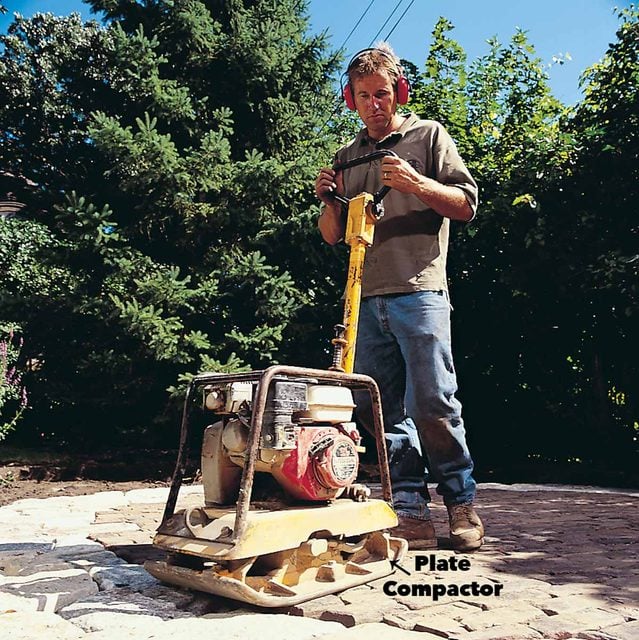
Tamp the Patio
When you’re done setting bricks, run the compactor over them to settle them in and create a level surface and to embed them in the sand. Work in a circular pattern from the outside to the center. Keep the compactor moving to avoid breaking bricks or creating a low spot. If your stone is thick like ours, tamp it along with the bricks. Don’t tamp thinner stone (2 in. thick or less); it may break.
Step 22
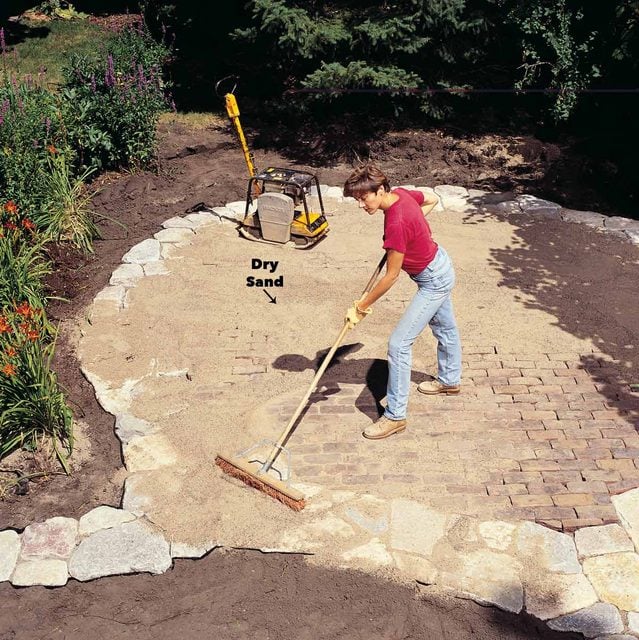
Sweep Sand Into the Joints
Spread dry sand over the stones and bricks and work it down into the cracks with a broom. Tamp with the plate compactor. Keep spreading sand and tamping until the joints are full.
Note: If your sand is damp, spread it out to dry before sweeping it into the cracks. If you run short, buy 50-lb. bags of mason’s sand at a home center or lumberyard.
Step 23
Finish with Landscaping
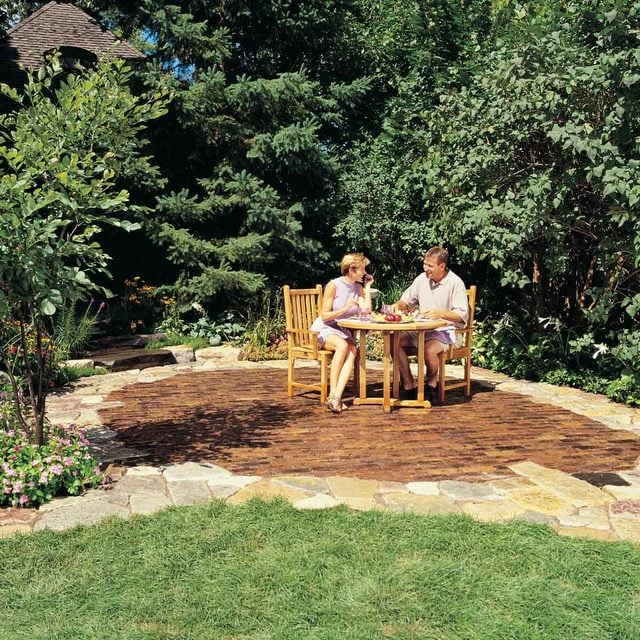
Finish up by landscaping around the DIY patio. We added a stone path and a few steps at the upper end of the patio and planted a perennial bed alongside. Our landscape consultant recommended planting a small ornamental tree at the front of the DIY patio to create an inviting entrance. A table and a few chairs gave us the only excuse we needed to sit back and enjoy a well-deserved break.
Additional Information: