
Don't go crazy with extensive remodeling projects, try out these quick home upgrades that make big improvements.
19 Quick Home Upgrades That Deliver Big Result
1
/
19
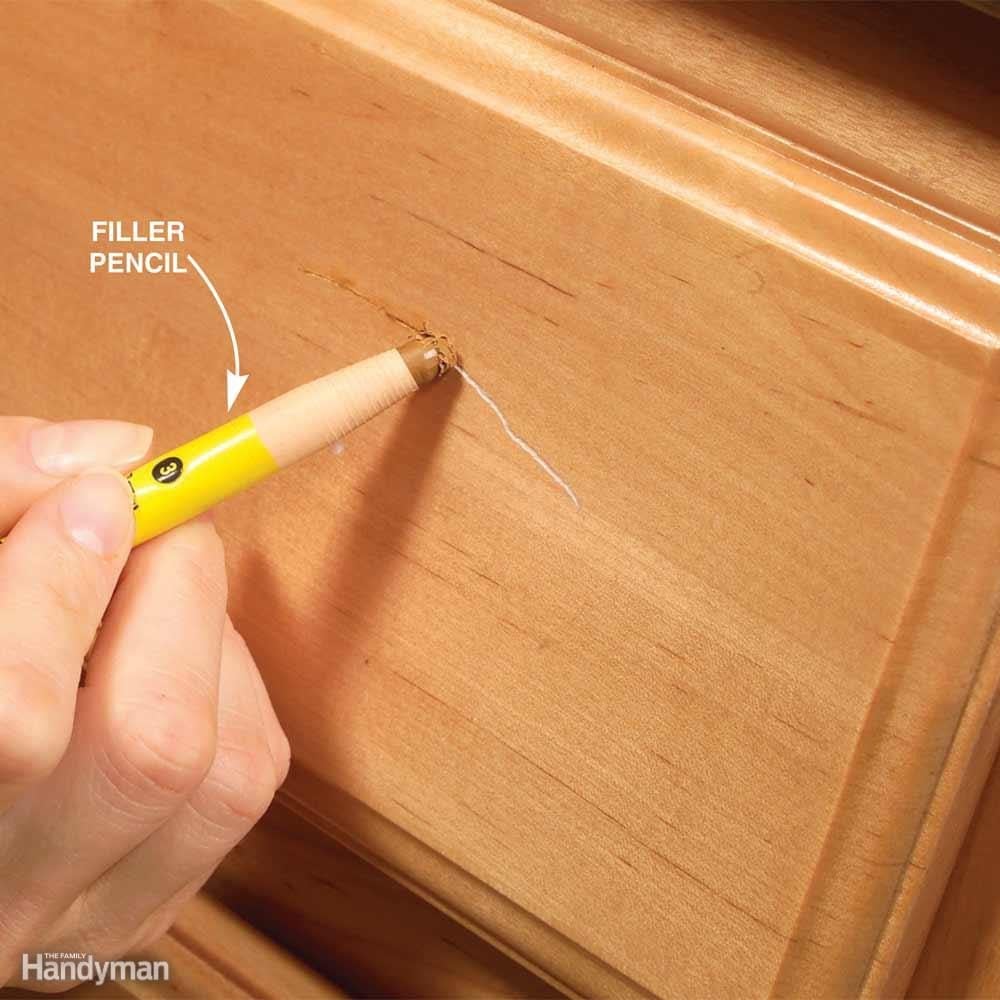
Touch up Nicks and Scratches
If you have shallow scratches or nicks, hide them with a stain-filled touch-up marker. Dab on the stain and wipe off the excess with a rag. But beware: Scratches can absorb lots of stain and turn darker than the surrounding finish. So start with a marker that's lighter than your cabinet finish and then switch to a darker shade if needed. For deeper scratches, use a filler pencil, which fills and colors the scratch. If the cabinet finish is dingy overall and has lots of scratches, consider a wipe-on product like Old English Scratch Coat. These products can darken the finish slightly, so you have to apply them to all your cabinets. Bigger than a scratch? Use polyester filler.
2
/
19
Restore Free Flow to a Faucet
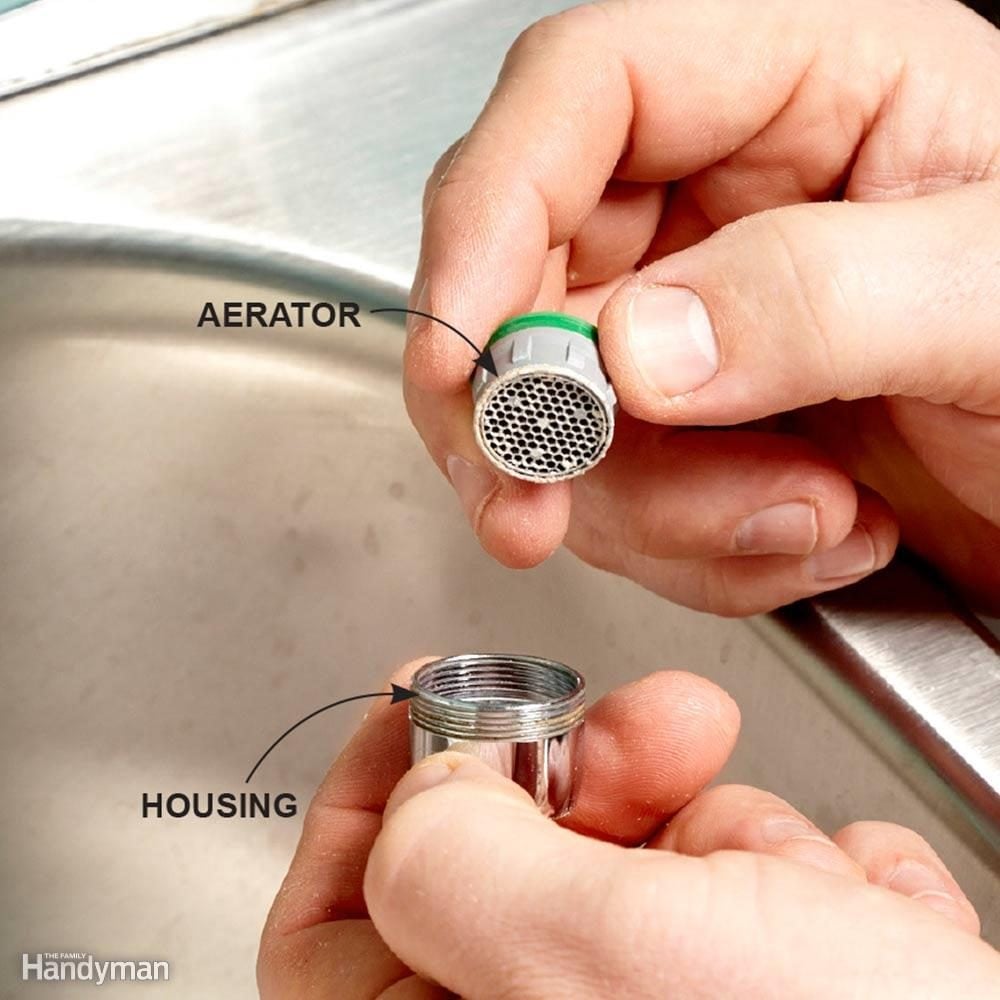
When a kitchen or bathroom faucet loses pressure or starts spraying to the side, it's usually due to a dirty aerator screen. Luckily, cleaning a screen is an easy job. Start this fix by closing the drain plug (so you don't drop parts down the drain). Then remove the aerator using a rag or masking tape so you don't mar the finish with your pliers.
To remove the sand and other deposits, soak the aerator in vinegar, then scrub it with a toothbrush. This usually solves the problem. If you have to disassemble the aerator to clean it, lay out the parts in the order you removed them so you can reassemble them correctly. Still having issues? Do a showerhead deep clean.
3
/
19
Painting Kitchen Cabinets
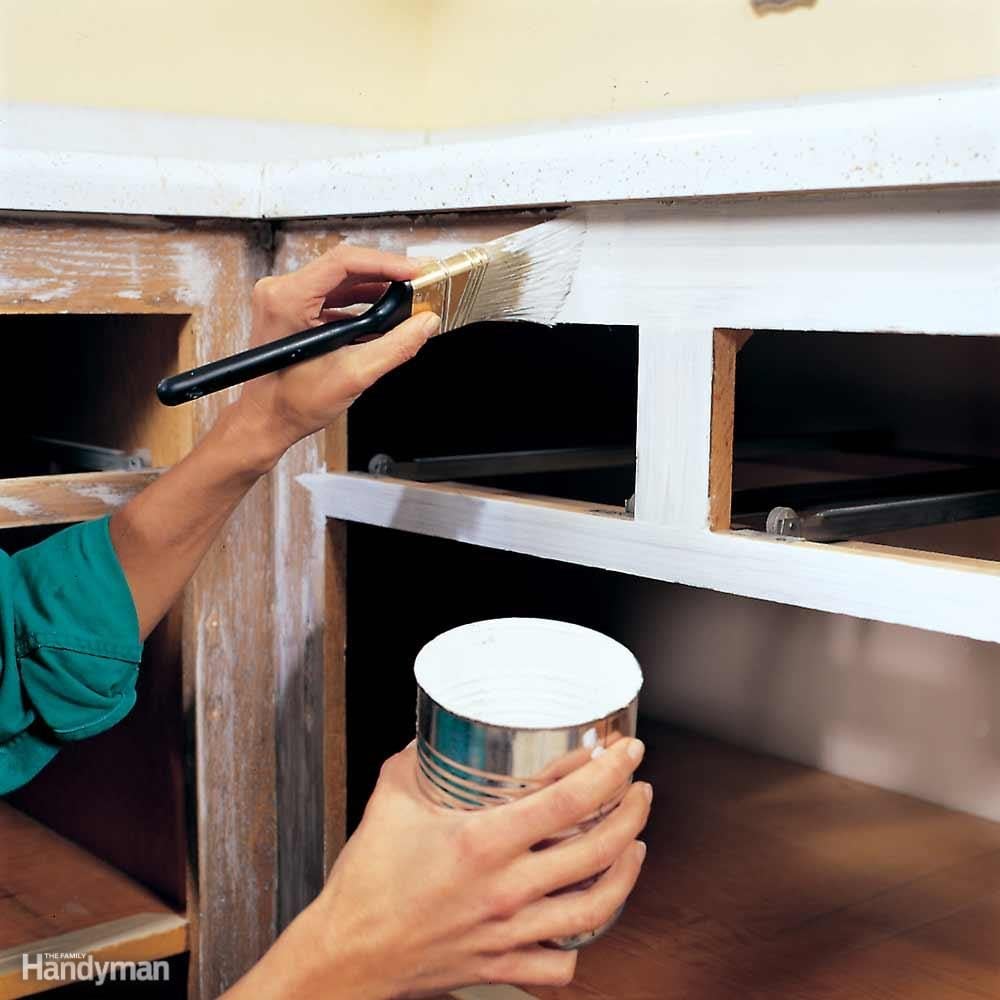
Give new life to your old wood kitchen cabinets with a fresh coat of paint. But what is the best type of paint to use?
For the best adhesion and a harder, more durable finish, an oil-based (alkyd) paint is tough to beat for kitchen cabinets. But you must be willing to put up with the strong odor and solvent cleanup, along with a longer drying and curing time than you'd get if you used an ordinary water-based paint. Plus, the color may yellow over time.
The best solution to avoid the hassle of oil-based paint is a new-technology waterborne acrylic enamel paint (such as Satin Impervo by Benjamin Moore) that delivers the good flow, leveling and hardening characteristics of an oil-based paint without the odor and long drying time. These new paints dry fast and clean up with soap and water. The main challenge is a smooth finish, but pros say that if the waterborne acrylic enamel is applied heavily enough and worked in small sections, it will flatten out nicely. Avoid a dry brush and going over sections already starting to dry.
Don't forget other keys to success when painting cabinets—surface preparation (degreasing, cleaning and sanding), priming (use a top-quality primer), brushing (use the best-quality brush for the type of paint) and drying (follow label directions). Want to add more storage space? Build under-cabinet drawers.
4
/
19
Appliance Touch-up Paint
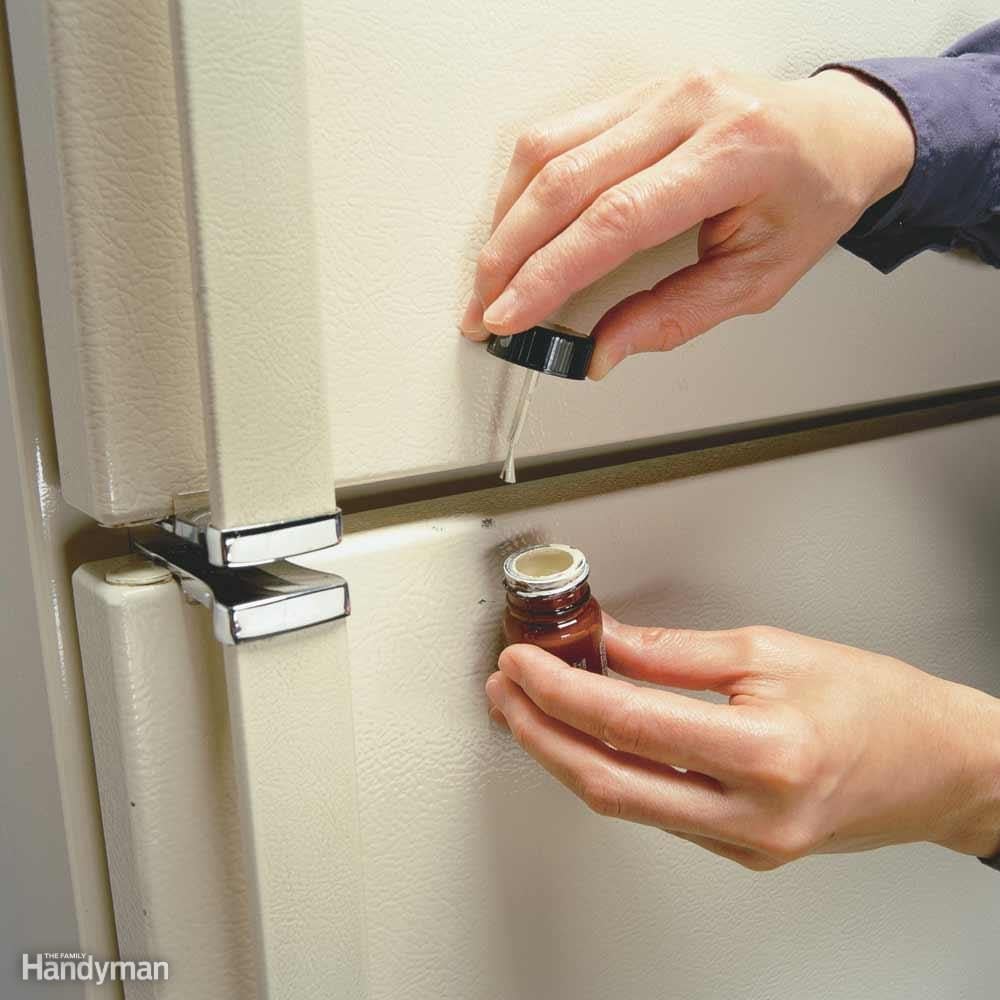
A single scratch or chip can make a beautiful new appliance look like something you found out in the alley. Fortunately, you can make those eyesores, even up to 1/4-in. diameter, almost completely vanish with color-matched epoxy touch-up paint. The trick? Fill the chip with multiple thin coats instead of trying to cover it all at once. Use the porcelain-type version for stovetops and sinks. You can also paint the plastic handles on your appliances to make them look brand new.
5
/
19
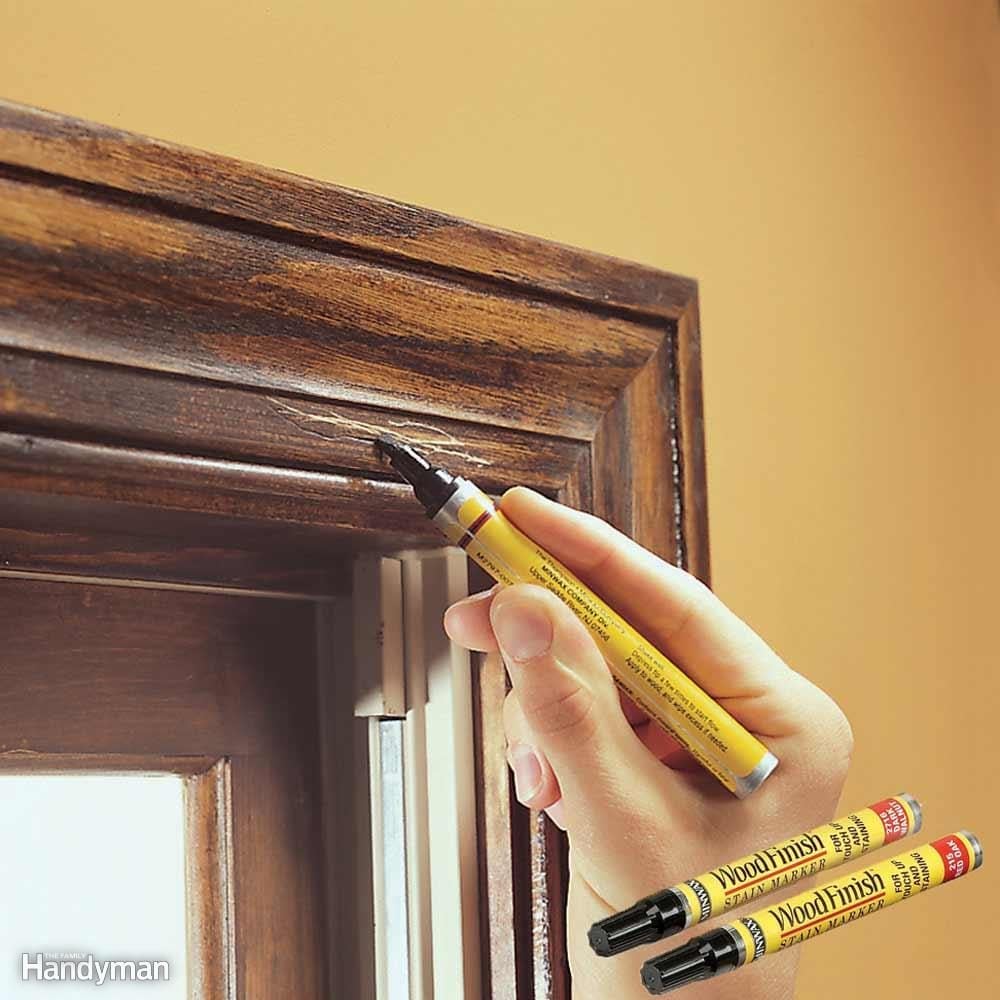
Stain Markers
Natural or stained woodwork is beautiful, but scratches can really stand out—especially with darker stains. You can make these scratches disappear by touching them up with a stain marker. It's simple to use, and much cheaper than buying whole cans of stain. Start with a lighter color, and if the scratch still shows, go over it with a darker shade. Unless the varnish is in bad shape and needs to be recoated, that's usually all you have to do to make older woodwork look almost new again. If you need to replace whole pieces, learn how to finish and match the stain.
6
/
19

Under-Cabinet Cleanup
When the floor of your sink cabinet needs a spruce-up, lay down squares of self-adhesive vinyl tile. They're about a buck a square at home centers and provide an easy-to-wipe-clean surface.
7
/
19
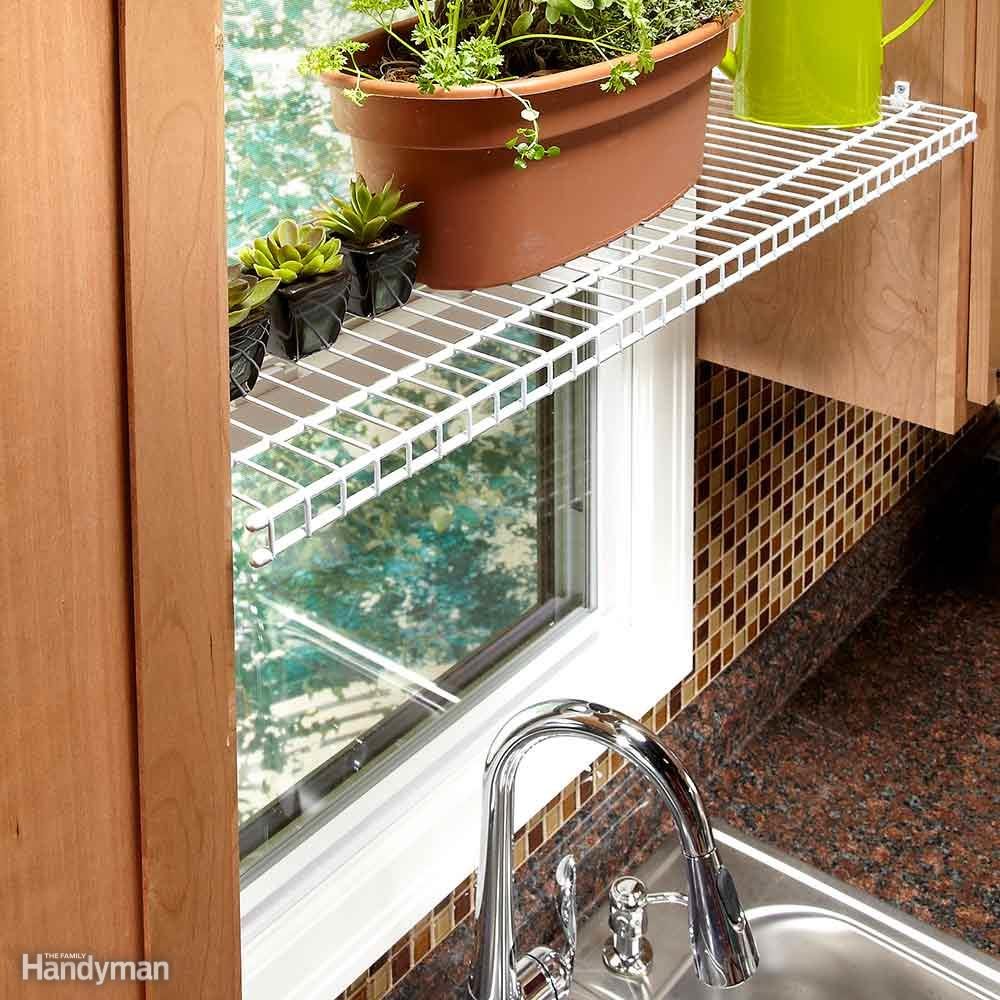
Kitchen Window Plant Perch
Do you like having fresh herbs at your fingertips? Keeping them on your counter takes up valuable space and doesn't expose them to enough light. Try this easy storage idea: Install a wire shelf between the upper cabinets flanking your kitchen window. You can set your plants where they'll get plenty of light without blocking the view. This also makes watering easy and keeps them readily available for snipping. Make sure to install the shelf high enough so you don't bump into it when you're working at the sink. Get more quick and clever kitchen storage ideas.
8
/
19

Above-the-Door Shelves
The space above a doorway is an overlooked storage bonanza! It's the perfect spot for a cookbook cubby in the kitchen or a towel shelf in the bathroom. Consider adding a shelf or cubby over the doorways in your home office, laundry room and bedrooms too. Here's how to build one yourself.
9
/
19
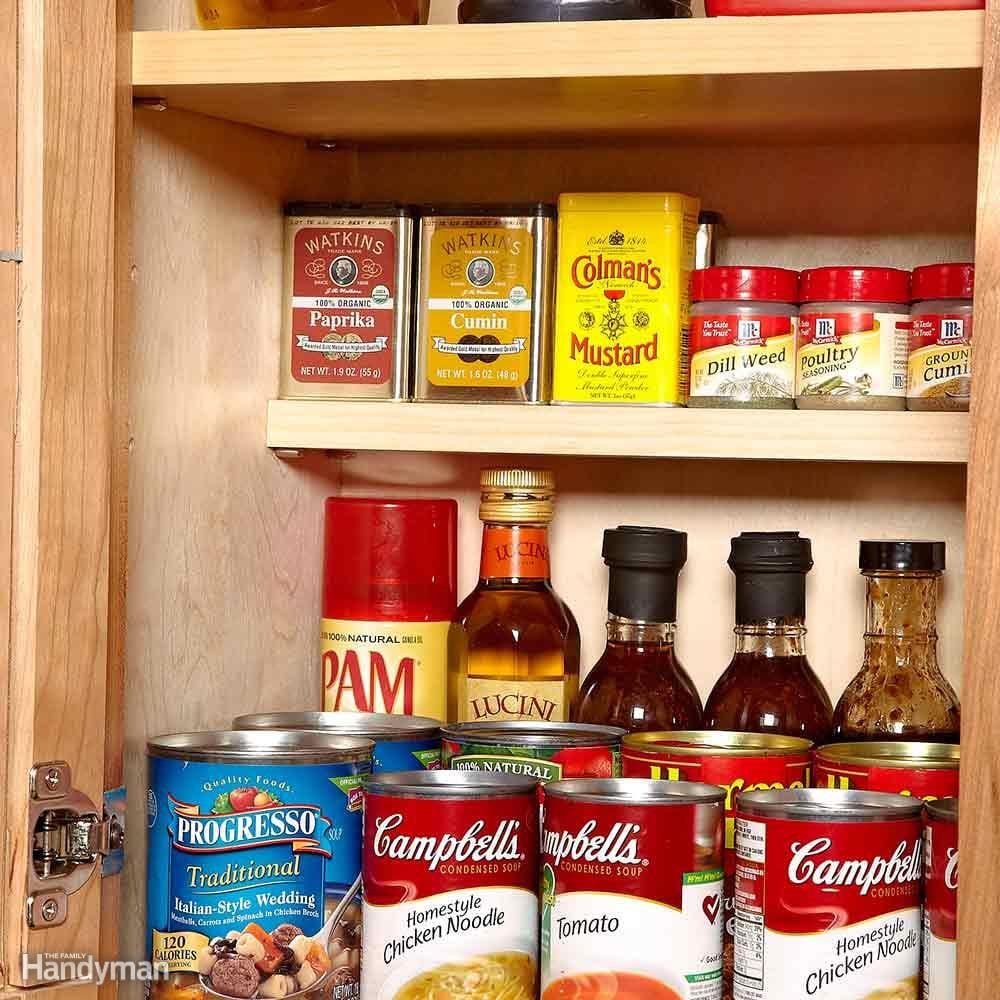
Add a Spice Shelf
Spices are a pain to store. They get easily lost in your cabinets, so you end up buying duplicates when you can't find what you need. Here's a simple solution. Pick up a bag of adjustable shelf supports and a 1x4 board at a home center. Just measure the height of your tallest spices, measure down from your shelf, drill holes and mount your spice shelf on shelf supports. You'll put an end to buying three tins of poultry seasoning and more bay leaves than you'll use in a lifetime. Here's another idea for storing spices.
10
/
19
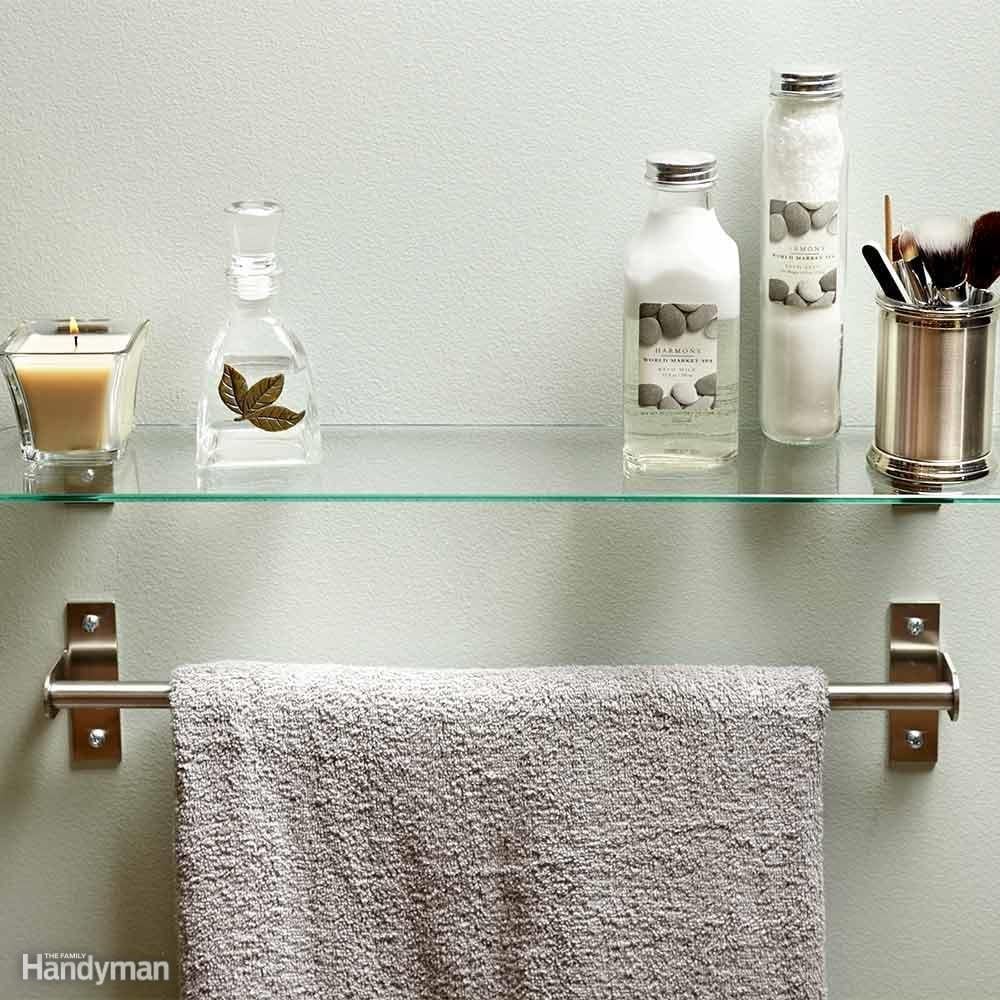
Hang a Shelf Over Your Towel Bar
For some reason, once the towel bar goes up, we don't consider the wall usable for anything else. Why not hang a shelf for toiletries and decorative items? Just make sure to mount the shelf high enough so it allows easy access to your towels. Get more simple bathroom storage ideas.
11
/
19
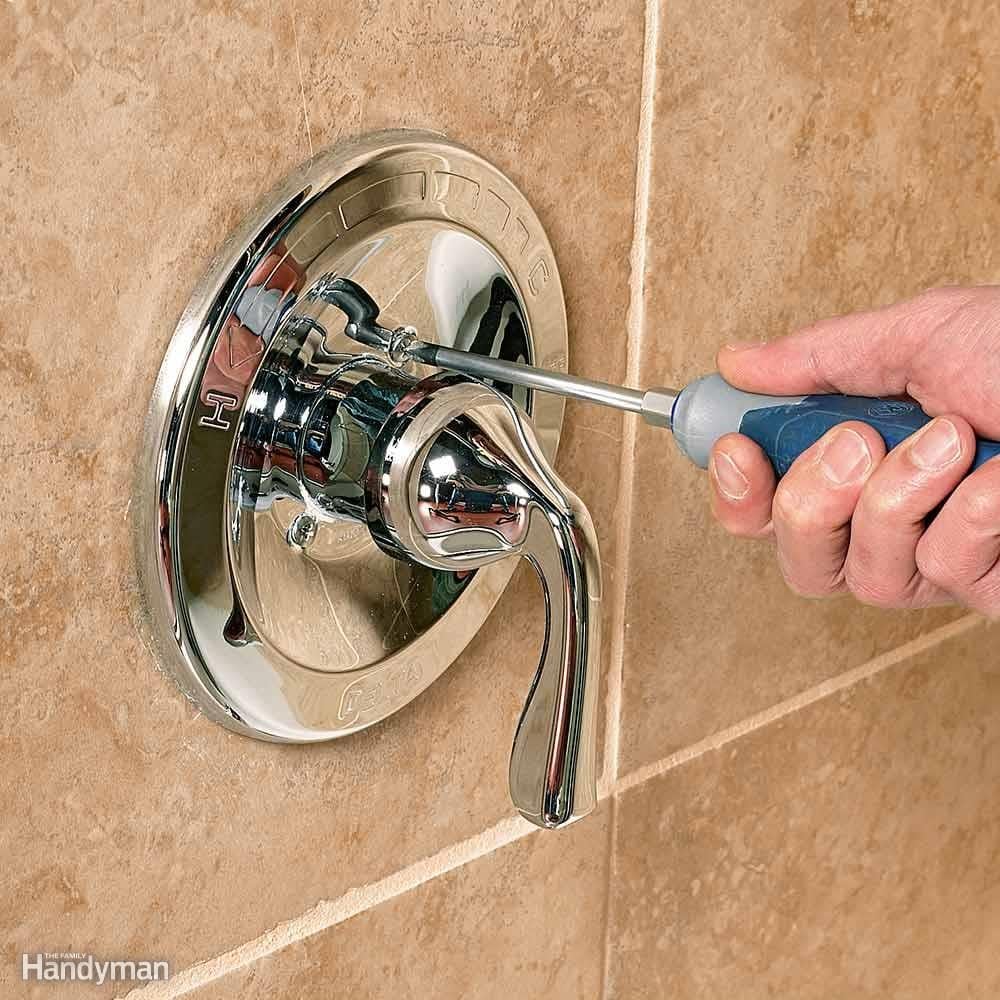
Install a New Tub and Shower Trim Kit
Give your shower an instant face-lift by swapping out your existing showerhead, handle and tub spout for new ones. To make this a painless switch, buy a trim kit that uses the existing trim valve—you won't have to touch anything inside the wall. Before you buy, check the manufacturer's Web site for specs, styles and finishes. Also check your tub spout to see if it slips on or is threaded so you can buy the right replacement. You can buy complete trim kits or buy each component separately at home centers, plumbing suppliers and online retailers.
12
/
19
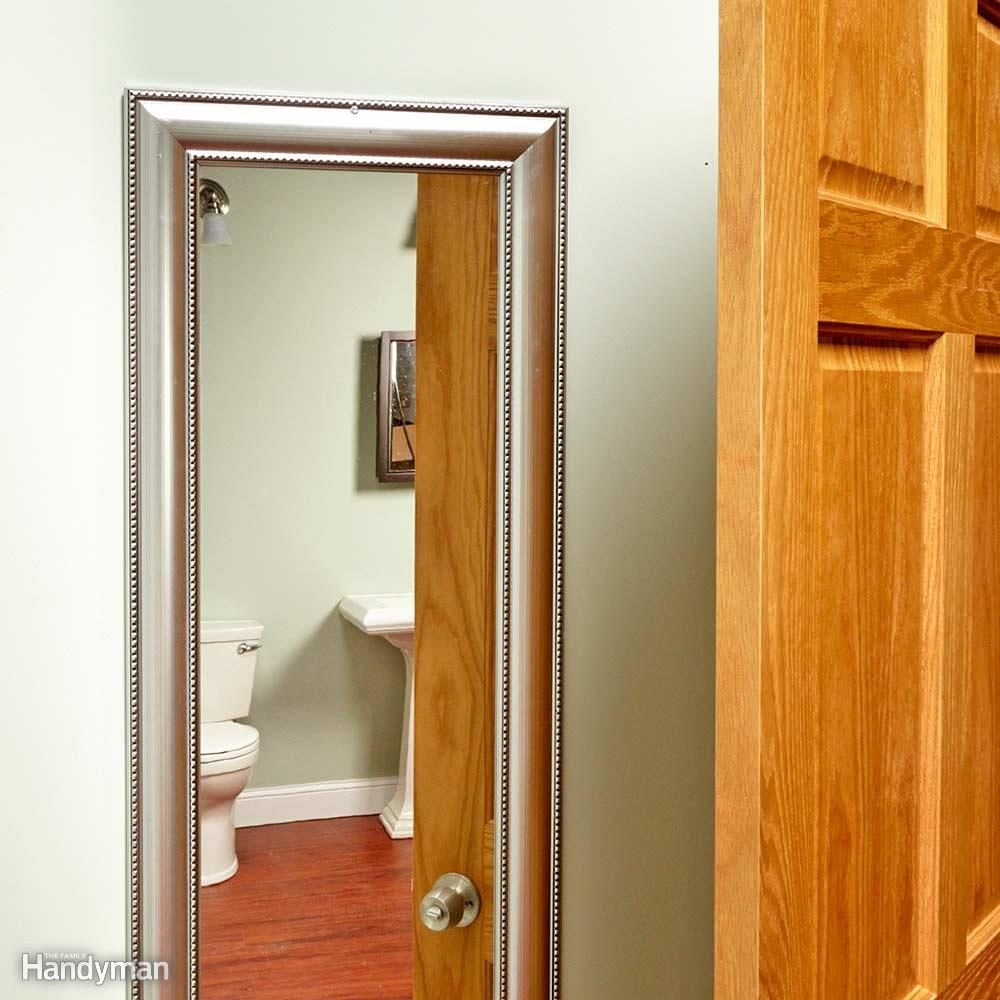
Hang a Mirror Behind the Door
The wall behind the bathroom door goes unused because the door will hit anything that protrudes. Hang a mirror there. You'll still be able to use the back of the door to hang robes and towels. The mirror will instantly make the bathroom feel larger. And it's nice to be able to check whether your shirt is tucked in before you head out into the world. Full-length mirrors cost as little as $30 at home centers.
13
/
19
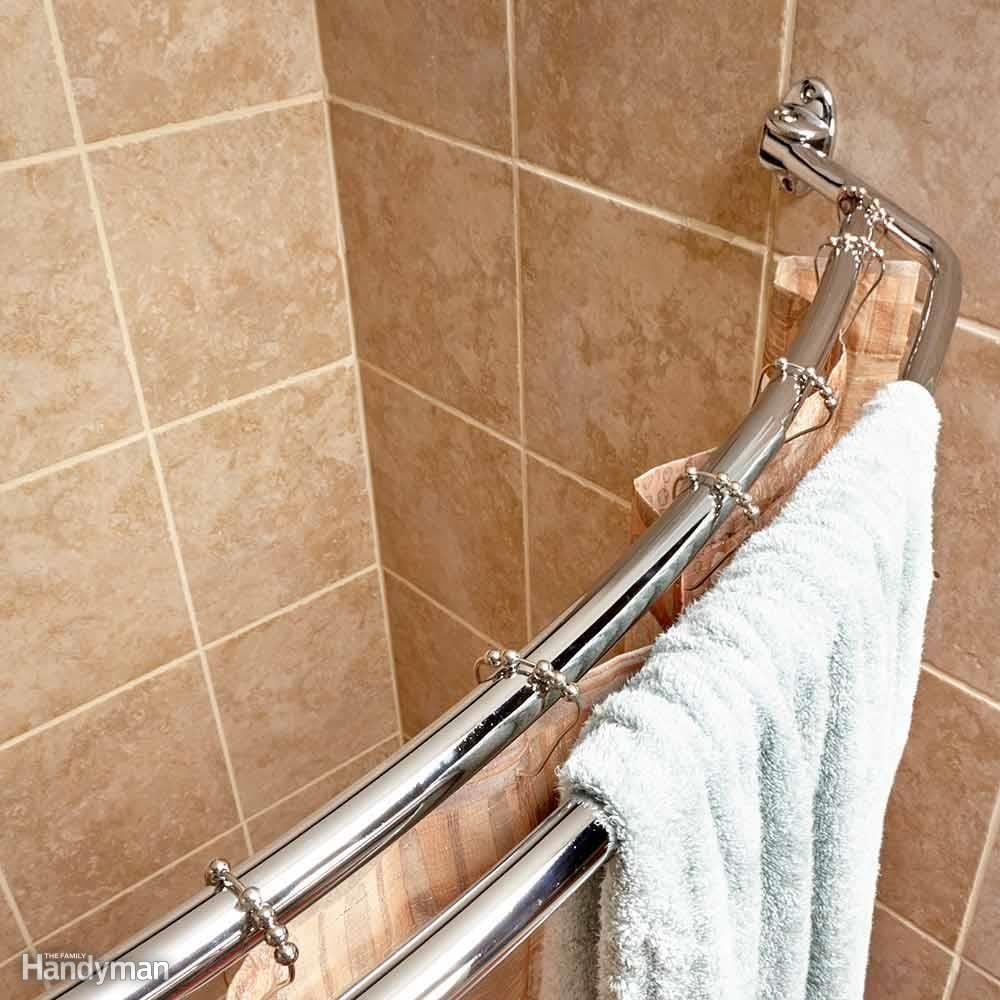
Install a Curved Shower Curtain Rod
This is a two-fer. A curved shower curtain rod is an affordable luxury that makes you feel a lot less claustrophobic taking a shower. Having just that extra few inches of space means you don't constantly brush against the shower curtain every time you raise your arm. And a double curved shower curtain is just plain clever. You can hang towels on the outer rod, which buys you drying space and puts your towel right where you need it. Or you can hang your liner and your curtain on separate rods. You may need an extra-long liner since the curve pulls the hem of the shower liner higher in the tub. You can find a variety of double rods, both curved and straight, in different finishes at online retailers, bath shops and department stores. This is just one of many easy ways to makeover your bathroom.
14
/
19

Wallpaper One Wall
If you haven’t visited a wall-covering retailer lately, you’re missing a treat. With the revived popularity of wallpaper, stores are offering an expanded range of choices. The prices of some of these may knock your socks off too.
But take heart. You don’t have to cover every wall to make a dramatic change. Papering only a single wall will do, and that’ll make some of those fine, expensive papers or fabrics affordable. It’ll also lessen the time, effort and mess of papering an entire room. This is an especially good solution for a room with plain walls, slim baseboards and window trim, and no built-ins. You create instant character. Here are 15 stunning accent wall ideas you can do.
15
/
19

Rollouts
Rollouts are one of the easiest and most satisfying upgrades you can make to your kitchen. They bring everything that’s tucked out of sight in the back of cabinets right to your fingertips—you actually gain usable storage space.
If you don’t want to make the rollouts yourself, you can shop for moderately priced yet sturdy rollouts online or at Lowe’s and Home Depot. You simply mount them to the existing shelves in your cabinets with four screws.
The biggest mistake is ordering the wrong size. When you measure the opening in the front of the cabinet, be sure to account for the door, hinges and other obstructions.
Cost: $40 to $80 per rollout.
Time: 15 minutes per rollout.
16
/
19

Trim and Paint
By adding two simple lines of trim—a chair rail and a crown molding—you create the perfect framework for any handsome two-color wall combination. This is one of the secrets of fast, easy redecorating.
To have the biggest color impact, paint your trim. This also simplifies installation. You don’t have to cut perfect joints, because a little filler and paint will leave them looking sharp and crisp. You can also use less expensive materials.
The trim combination we show looks best in rooms with at least 4-1/2-in.-tall baseboards. If your baseboard is narrower, consider replacing it or choosing a different wall decorating technique.
17
/
19

Backyard Oasis
Two elements make for a great backyard retreat—shade from the sun and protection from irritating insects. The good news: You can now choose from a wide range of screened canopies (also called gazebos) that handle both sun and insects. They’re easy to put up and maintain, you can plant them in almost any flat spot, and they’re reasonably priced, typically $200 to $500, depending on the size. Typical sizes range from 10 x 10-ft. to 12 x 12 ft. You can create a comfortable sitting area in just a few hours. Look for screened canopies at home centers and outdoor furniture dealers. Check out these 30 outstanding one-day backyard projects that can add a special look outside.
18
/
19

Closet Organizer
You don’t have to spend a fortune to have a neat closet. Wire shelving systems are inexpensive, practical and easy to install. They increase your storage space and simplify cleaning too. Almost everything hangs on the walls, keeping the floor clear for easy vacuuming. And the wire shelving won’t collect dust like solid shelving does. It can cost you as little as $100 to put one in. Be sure to check out these 12 awesome closet storage hacks to make sure you maximize your closet space.
19
/
19

Create a Laundry Center
Equip your laundry room with a spacious folding table, more storage space, better lighting and a durable floor in one weekend. You can get more details on how to organize a laundry room here.