


Save $100s and update your outdoor spaces instantly with these easy and inexpensive one-day backyard projects!
30 Outstanding One-Day Backyard Projects
1
/
28
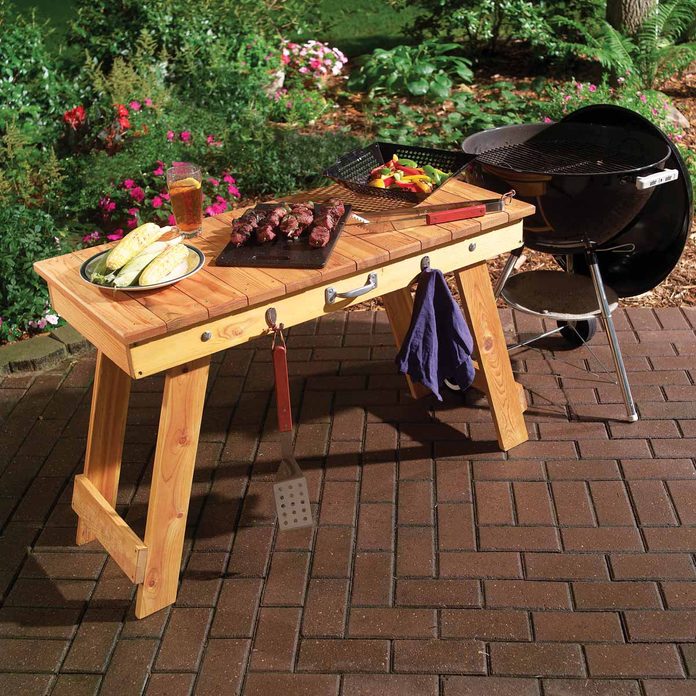
Fold-Up Grill Table
After building this collapsible cedar table, your family will wonder how they ever grilled without it. The legs nest under the top for quick storage or carrying to all kinds of other jobs, indoors or out. Learn how to build this handy companion for your barbecue that collapses for easy storage.
Plus, if you’re looking to become a DIYer or if you’ve been a DIYer for years we’ve got an assortment of incredible DIY projects you can try. Check out these 50 incredible DIY home projects.
2
/
28
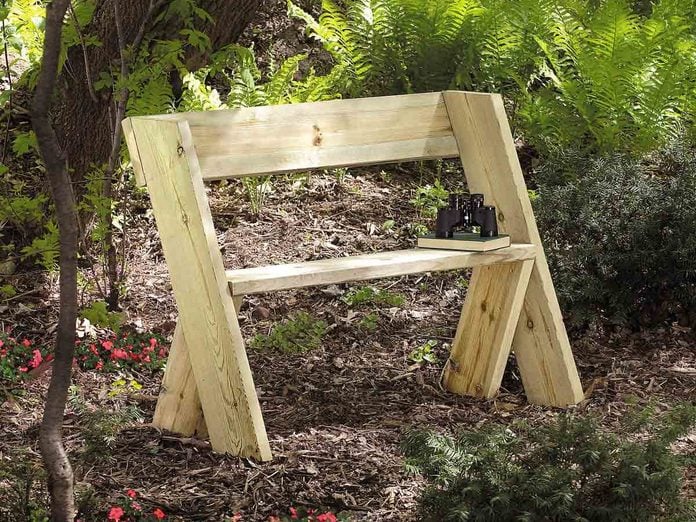
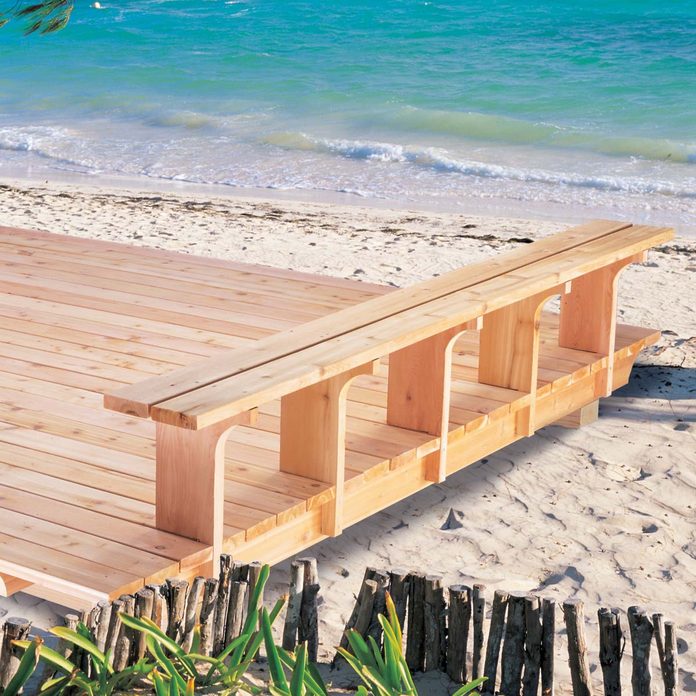
Simplest Bench in the World
Need outdoor seating in a hurry? This simple bench, based on author and ecologist Aldo Leopold’s classic design, and can be constructed in a couple of hours. All it takes is two boards and 18 screws. Best of all, this outdoor project is amazingly comfortable, and perfect for birdwatching—even for two people. Learn how to build this solid, durable, inexpensive bench in a couple of hours here.
3
/
28
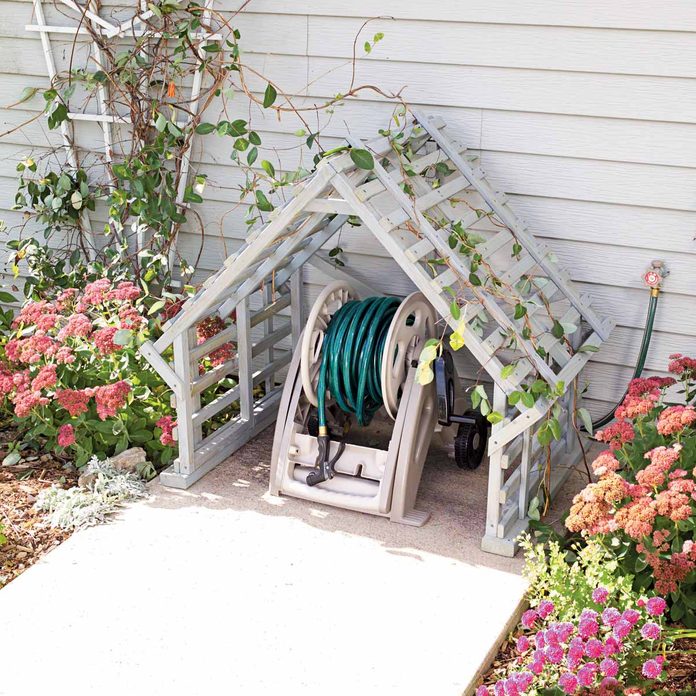
Hose Reel Hideaway
This latticework structure was designed as a hideout for clunky plastic hose reels—but it can turn into a fun shady hideout for kids and pets as well. In a few years, the lattice will be covered with a dense mound of vines, and you’ll be the only person who knows there’s a hose hiding underneath. Learn how to build this home for your watering equipment here.
4
/
28

Storage Bench
This outdoor storage bench is a place to tuck a bag of charcoal, stick a pair of work shoes, hide an extension cord or watering can and hey, you can even sit and take a breather on it, too. Even if you’ve never taken on a woodworking project, you can build this bench. You can never have enough storage space, especially on a deck or patio, so learn how to build this outdoor project storage bench.
5
/
28
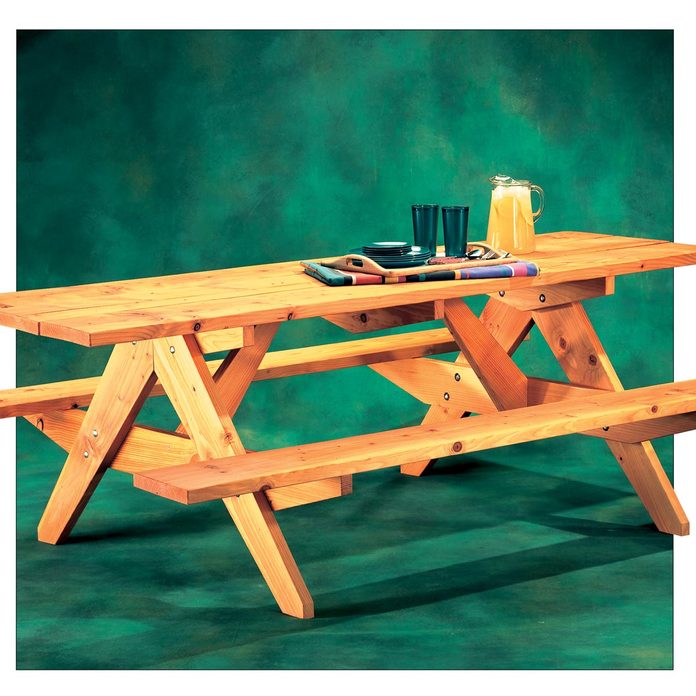
A-Frame Picnic Table
Here’s a great-looking, sturdy picnic table that’s strong enough to support eight or more bulky NFL linemen, even after a pregame feast. This A-frame picnic table is easy to build and inexpensive because it’s made from construction-grade Douglas fir lumber. And this isn’t a project that’ll take weeks to build. You can buy the lumber, build the table, and apply the finish all in one day.
6
/
28
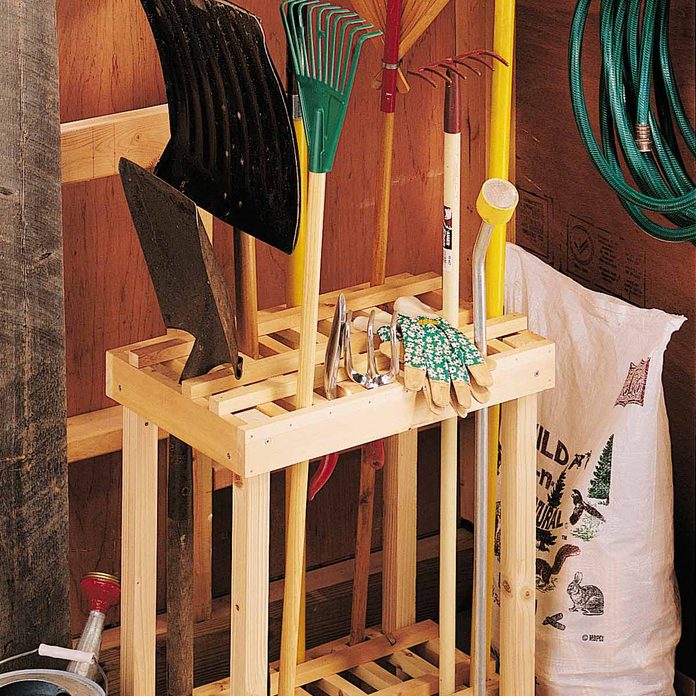
Space-Saving Tool Holder
If you are constantly contending with backyard-tool clutter, this handy holder is just the ticket. It’s a great way to organize your rakes, shovels and other long-handled tools. Organize your gardening tools in an afternoon!
7
/
28

3-Hour Cedar Bench
The beauty of this cedar bench isn’t just that it’s easy to assemble and inexpensive—it’s that it’s so doggone comfortable. You can comfortably sit on your custom-fit bench for hours, even without cushions. We’ll show you how to build the bench and how to adjust it for maximum comfort.
8
/
28
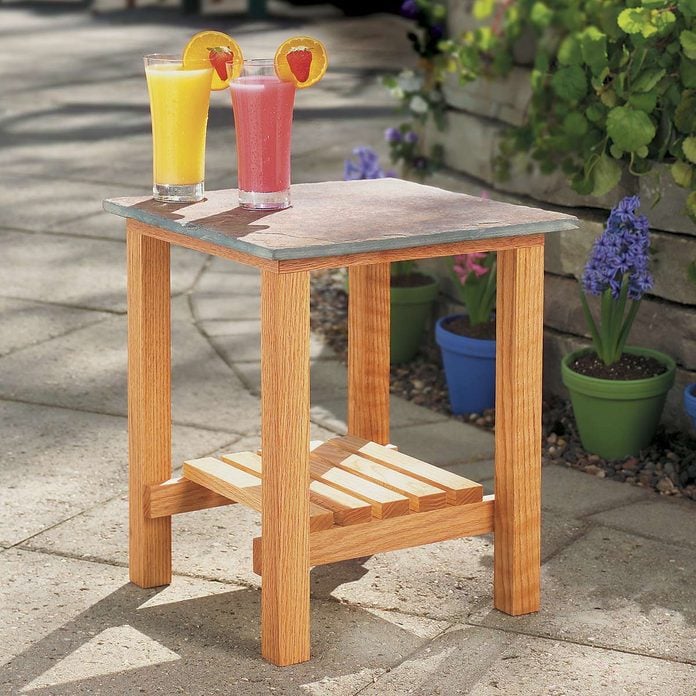
Stone-Top Patio Table
Tile makes an instant tabletop that’s easy, inexpensive and durable. This project is simple enough for a beginner to build and is inexpensive. Tile stores carry a wide selection of beautiful stone tile. And that’s the inspiration for this table. We chose a slate tile, but you’ll also find granite, limestone and marble tiles. You could also use manufactured tile, though the edges may not match the face of the tile.
9
/
28
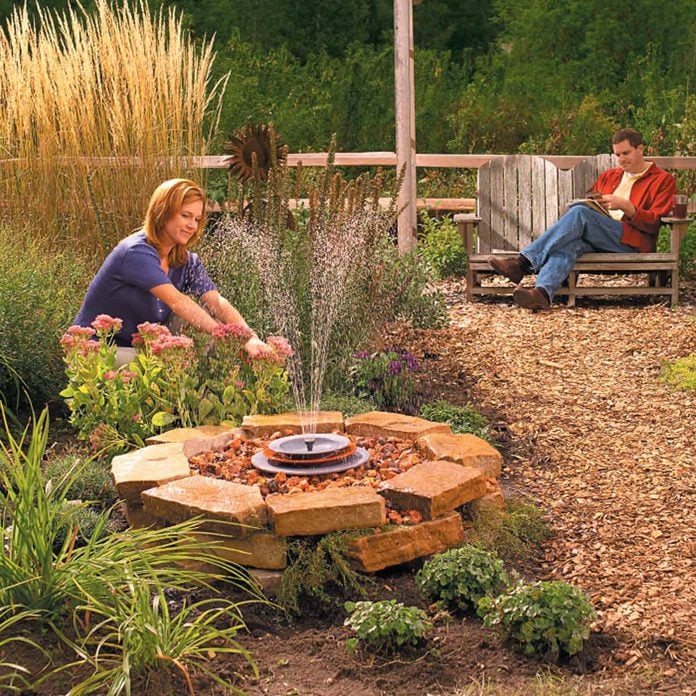
Build this Soothing Fountain in an Afternoon
This soothing fountain is a “disappearing fountain” so there’s no exposed standing water. This means there’s less maintenance since there’s less chance debris and critters will wind up in the water. Yet it provides the soothing sight and sound of running water people love. Another bonus—since birds love moving water, there’s a chance you’ll attract some of these outdoor friends. This quaint fountain is proof that good things come in small packages. You can build it in an afternoon.
10
/
28
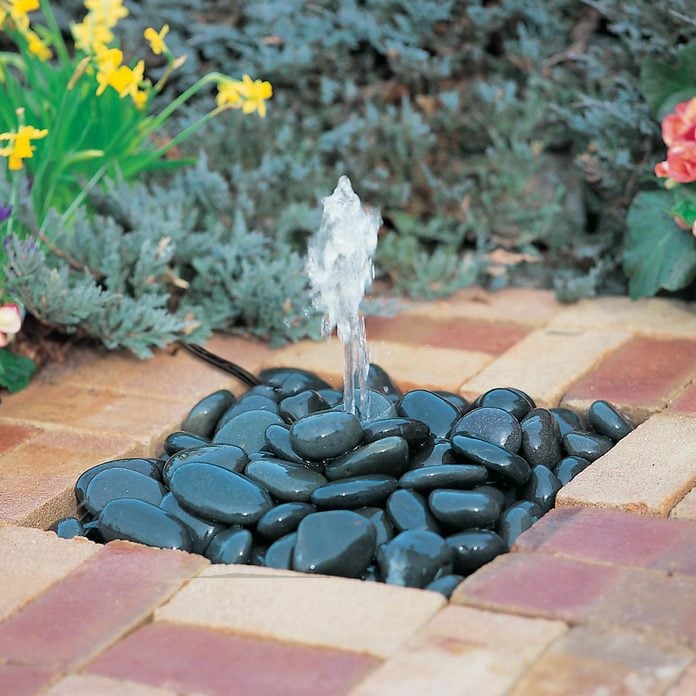
Build a Spring in Your Backyard
If you’ve ever been to Yellowstone, you probably remember the magic of the natural springs. Water bubbles out of the ground from seemingly nowhere. We can’t promise you the grandeur of our national parks, but in less than half a day you can build a small spring that will spark a similar sense of wonder.
11
/
28
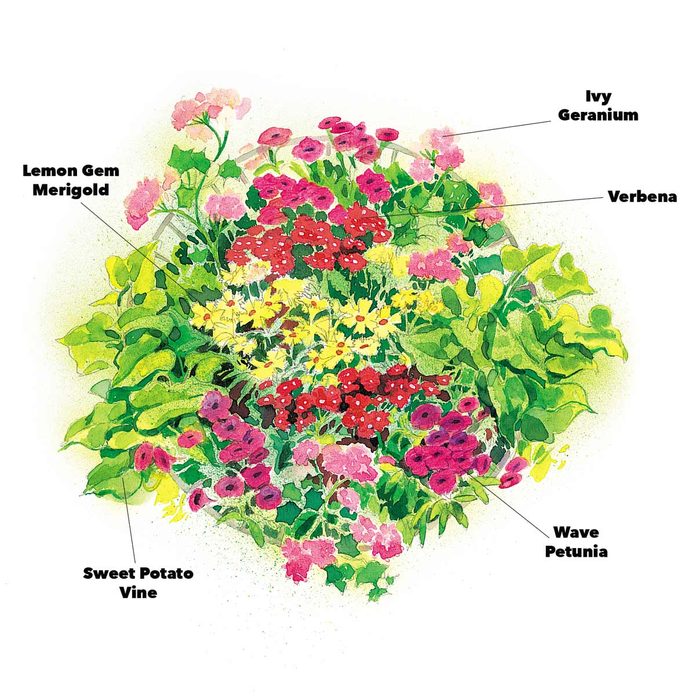
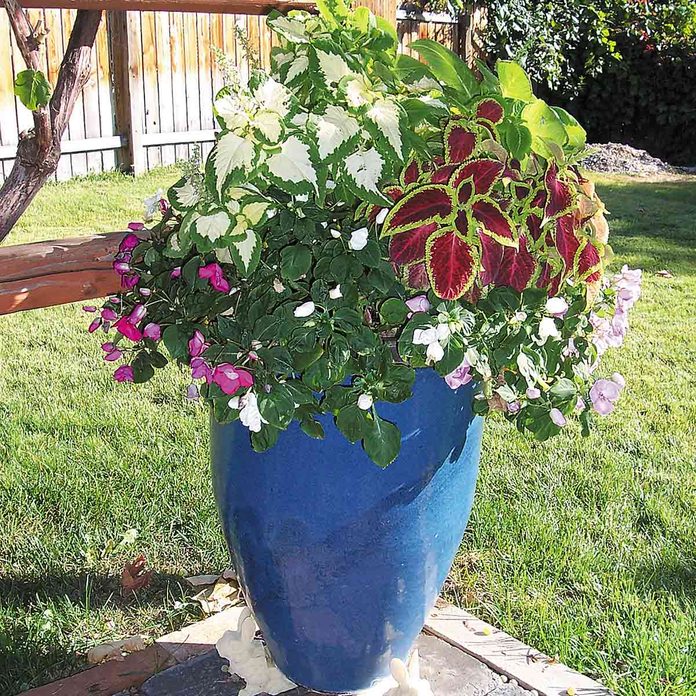
Recipes for Perfect Flower Containers
Make planting easy. Plant large flower containers at their growing location to eliminate excess lifting. A picnic table, bench or other elevated surface make container planting easier on your back. Plus, learn what flowers go well together for perfect and healthy flower containers.
12
/
28
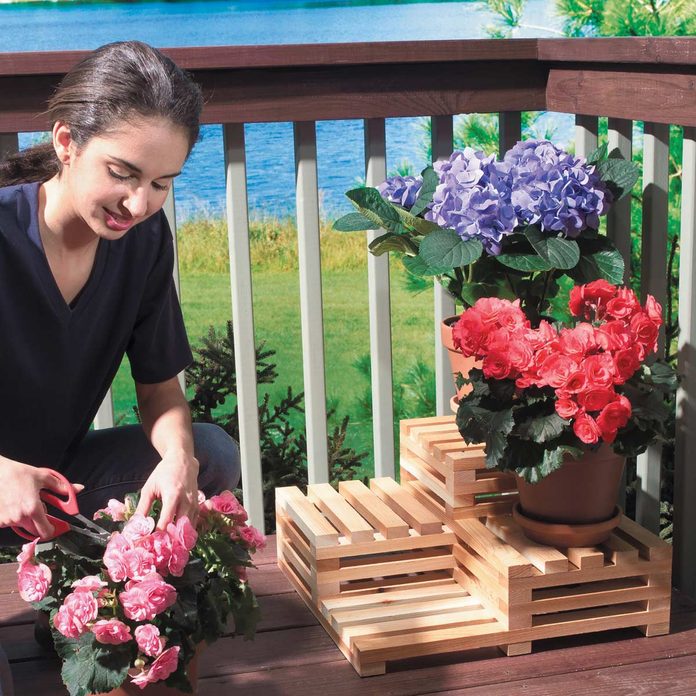
Stair-Step Plant Display
If you’re as hungry for spring as we are, maybe this simple plant stand will help. You build it from boards that are cut into just two lengths, stacked into squares and nailed together. You’ll only need seven 8-ft. long 1x2s, exterior wood glue and a few dozen galvanized 4d finish nails. We used cedar for its looks and its longevity outside, but any wood will do. Build this handsome, durable plant stand in one morning.
13
/
28
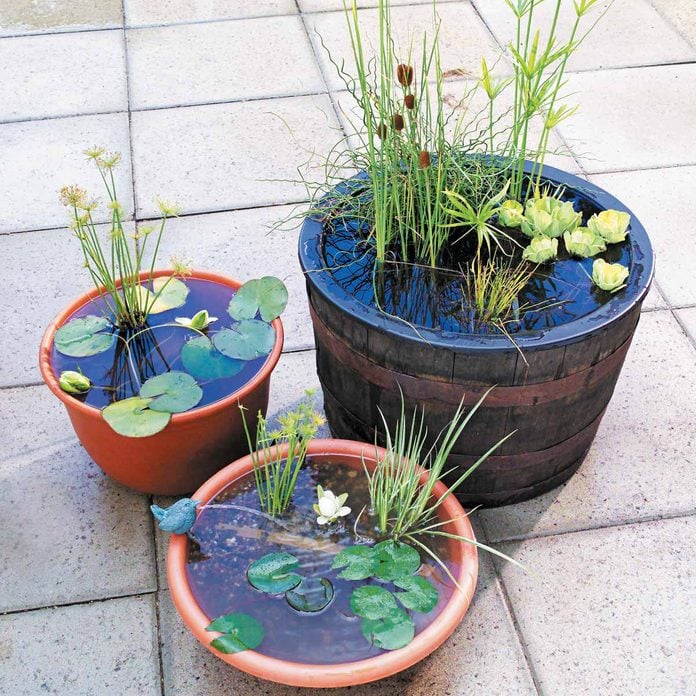
Pint-Sized Water Gardens
These pint-sized water gardens are extremely low maintenance. Top them off with water before you go on vacation, and they’re still beautiful when you come home. Container water gardens are inexpensive and easy to build, too.
14
/
28
Sturdy Deck Planter
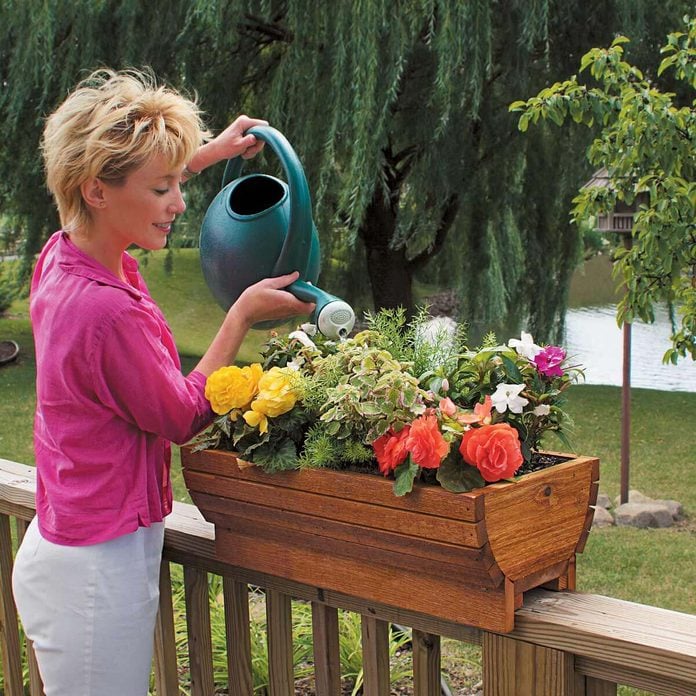
This sturdy deck planter has a clever design so it can rest securely on a 2×4 or 2×6 deck railing or sit on a patio, porch or deck floor without tipping. Plus, it can be made just about any length you want. If that’s not enough to get you building, it’s easy to make, even for first-time woodworkers. Learn how to build this outdoor project here.
15
/
28
Flower Recipes for Mini Gardens
These quick-to-plant beauties will bright up your yard. So learn what flowers grow well together in both sun and shade and in window boxes and pots!
16
/
28
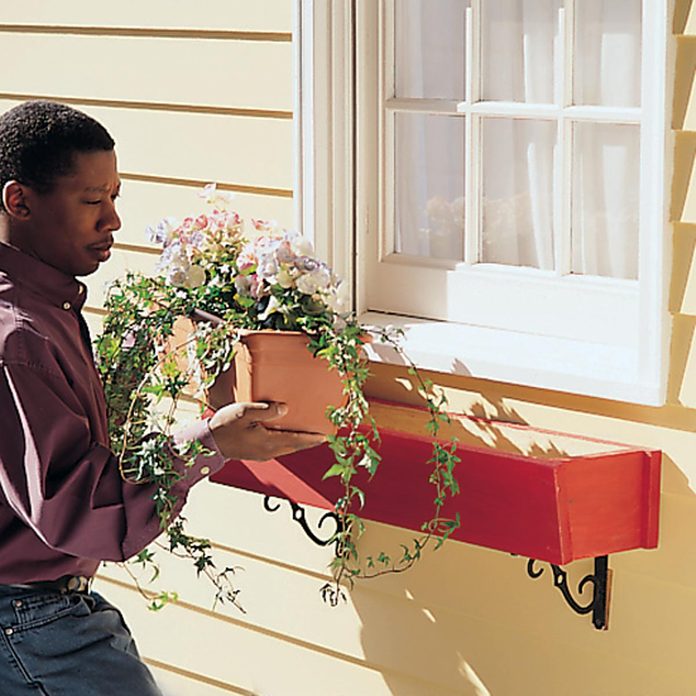
Rot-Proof Window Box
Window boxes will bring a splash of color to the front of your home. Plant perky pansies or cascading flowers such as petunias. You can even use the boxes to grow herbs. Learn how to make this window box here.
17
/
28
Path in a Wheelbarrow
This garden path is as easy to build as it is to look at and walk on. A bundle or two of cedar shakes, a roll of landscape fabric, a few bags of mulch and a couple of hours are all it takes to build it. No heavy lifting, no fancy tools and really, really cheap!
18
/
28
Simple Deck with Bench
Since this deck is at ground level and is freestanding, you don’t have to fuss with challenging railings or footings. All you need are basic carpentry tools and a relatively flat area in your yard or garden. The foundation is nothing more than 4×6 treated timbers buried in the soil, with decorative treated joists and construction-grade cedar decking and a bench. We can’t promise you a beachfront view but we know you’ll enjoy relaxing on this simple deck wherever you choose to build it.
19
/
28
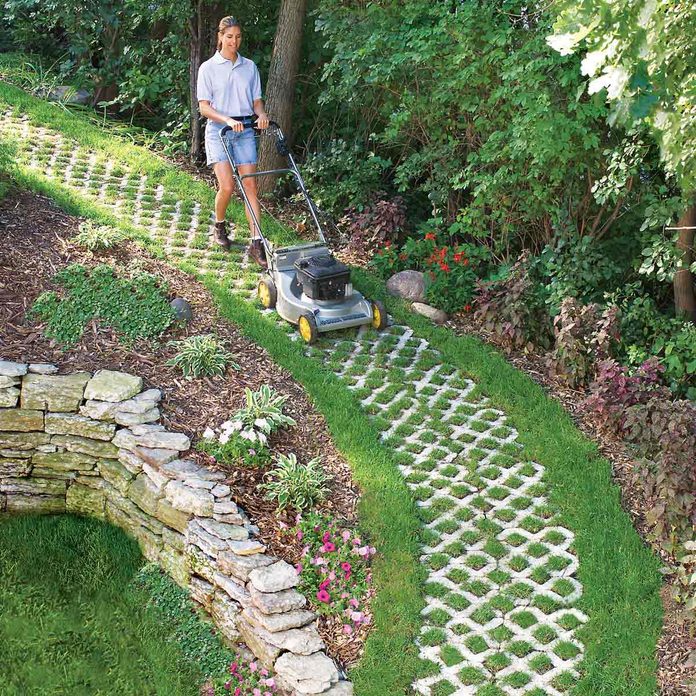
A Paver Path That Grows
Weave this Trustone paver path just about anywhere in your yard. There’s no thick base to install or difficult cutting and fitting; you just lay the stone over a simple dirt bed and lay sod squares. This easy-to-build paver path will last a lifetime and looks great too!
20
/
28
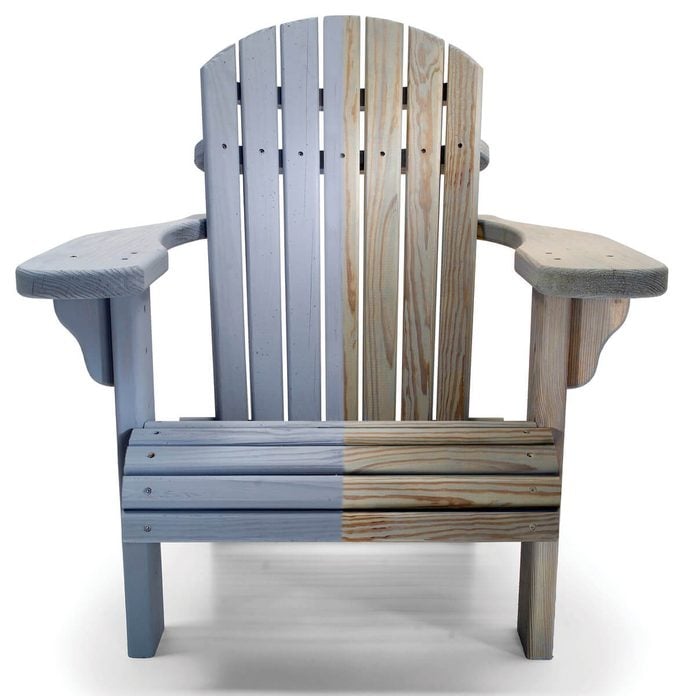
Add Color to Treated Wood
If you want to apply a colored finish to new furniture, choose one that you can renew fairly easily, because no finish is likely to last more than three to five years. We recommend either a semi-transparent or a solid exterior stain. The solids will protect the wood longer than the semi-transparent stains.
21
/
28

Back-Stoop Boot Scraper
In most parts of the country, spring is a time of fresh lovely blossoms—and deep gooey mud. Store-bought doormats look nice, but it can be hard to find one that can actually clean out deep, zigzag boot treads.
22
/
28
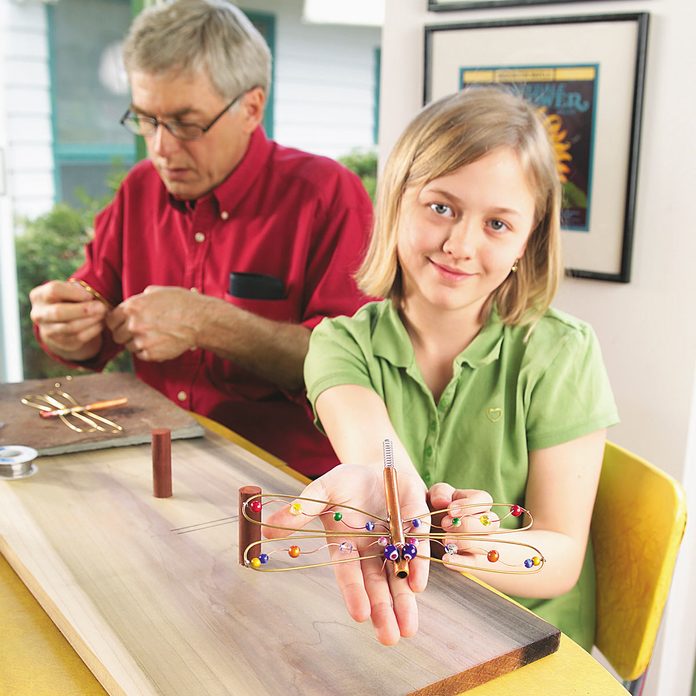
Dazzle Them With Dragonflies
This project, which captures the delicacy and color of dragonflies in a simple garden ornament, is a real attention-grabber. Let your imagination take off… copper wire and beads give this fun project wings. Children may enjoy making these fun dragonflies or bugs, so it’s a great DIY project to do on a rainy day.
23
/
28
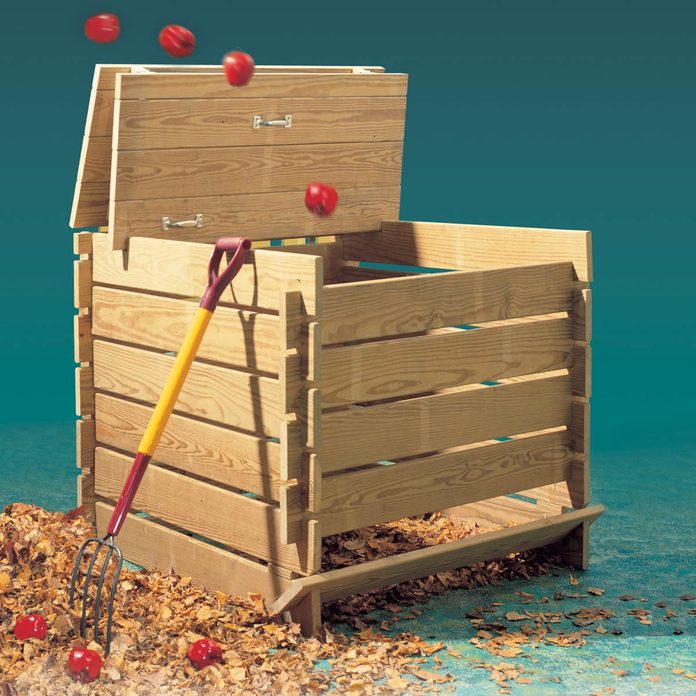
Build a Compost Bin
Why not turn your yard waste into yard gold by building this compost bin? You can build it now, then start your compost pile this fall with leaves, end-of-the-season garden plants and some grass clippings. (Leave most of the clippings on the lawn to return nitrogen to the grass as they decompose.) This “log cabin” bin will keep your compost pile from becoming an eyesore.
24
/
28
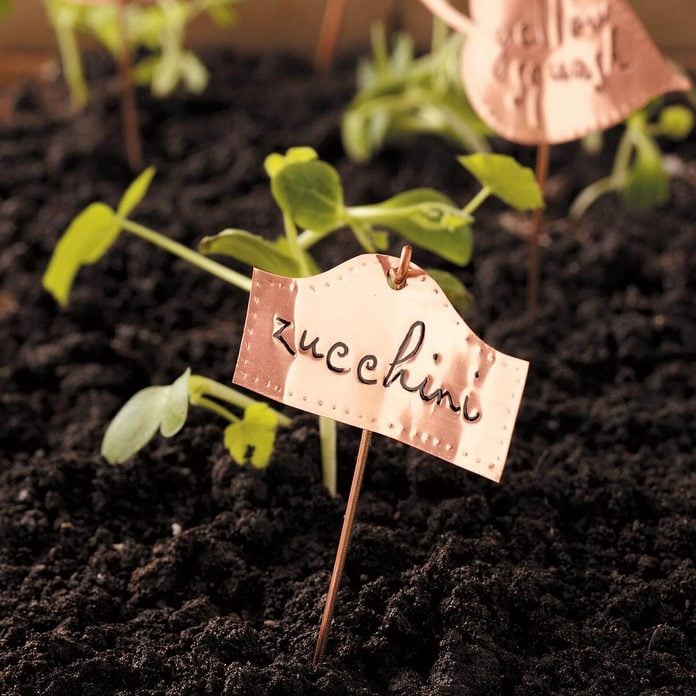
Classic Copper Plant Markers
Finding plant markers that can withstand sun, wind and rain is a challenge. And you want them to be attractive, easy to make and reusable year after year. These cheap, durable plant markers are the perfect solution. Don’t limit yourself to the shapes shown here. Be creative! See how to make classic plant markers.
And if warmer weather still hasn’t arrived, check out these 10 indoor plants that grow well in winter.
25
/
28
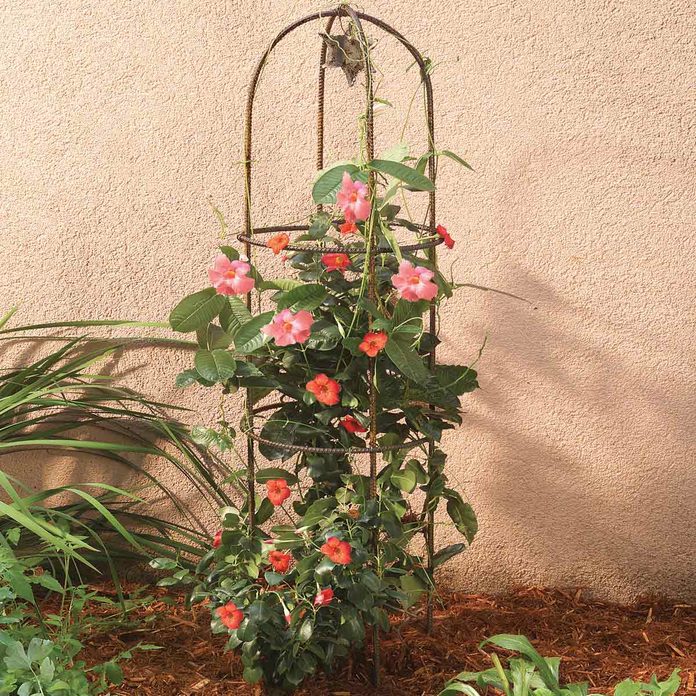
Rustic Rebar Plant Cage
Covered with vines, this rustic metal plant cage makes an attractive addition to your flower garden. In the vegetable patch, it’s a great support for peppers or tomatoes. It’s built from inexpensive concrete reinforcing steel (rebar) connected by twisted wire. Learn how to make this rustic rebar plant cage!
26
/
28
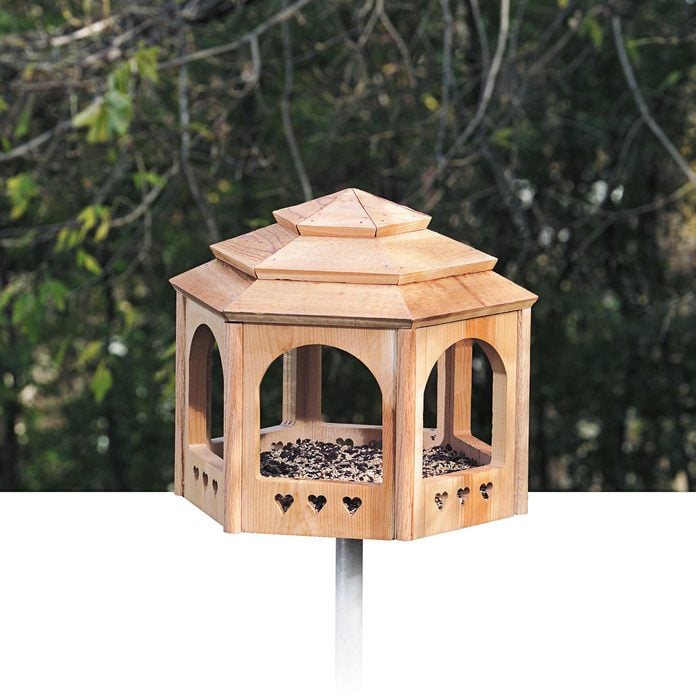
A Gazebo for the Birds
This fly-through gazebo-style bird feeder has a simple yet attractive “hatbox” design. The materials for the gazebo for the birds are all available at local home centers. It only takes part of an afternoon to build, without any fancy tools. If you want, you can build several assembly-line style
27
/
28
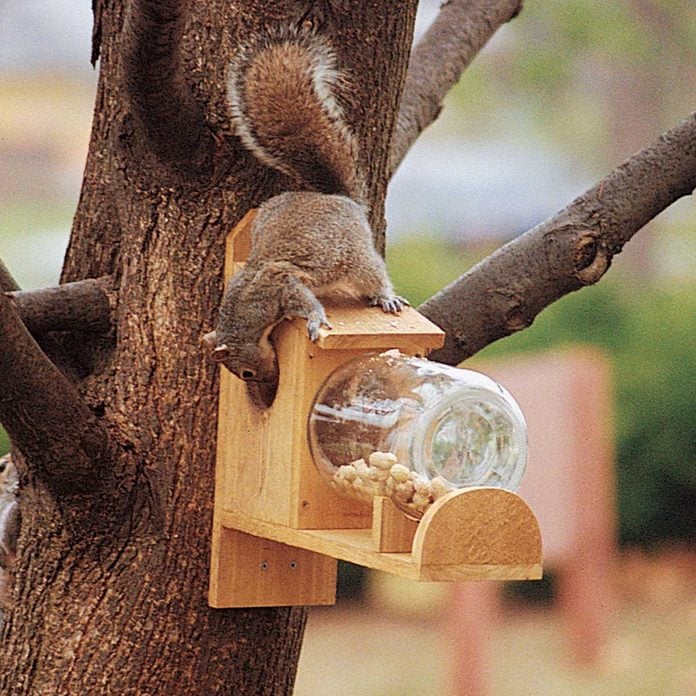
Entertaining Squirrel Feeder
This feeder provides an unusually clear view of the squirrels that frequent it, because the bold critters actually climb inside the feed jar to eat! This entertaining squirrel feeder requires only a minimum of materials. All that’s needed is a 6-ft. fence board, a handful of screws and a 1-gallon glass jar. If you don’t have the glass jar, or don’t want to eat a year’s supply of pickles to build this feeder, ask local restaurants, schools or other establishments that buy food in bulk if they have a jar to spare.
28
/
28
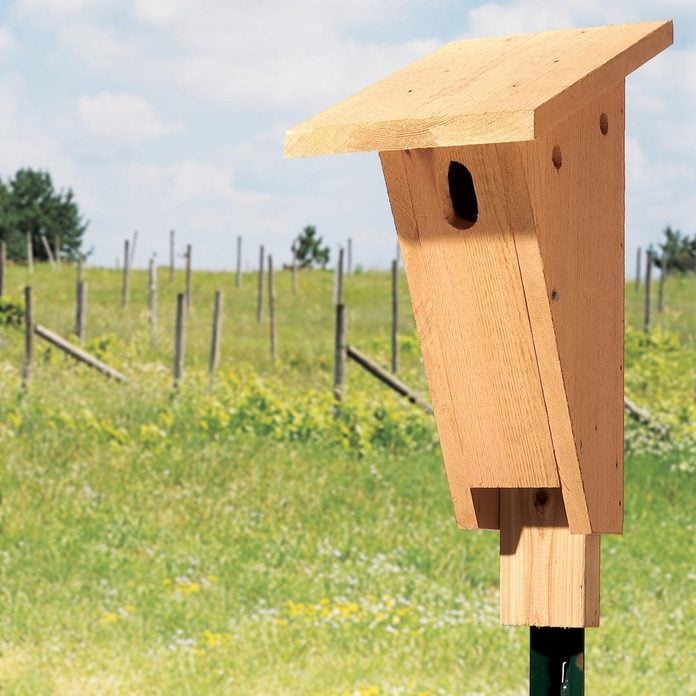
Build a Bluebird House
Bluebird populations declined during the first half of the last century as habitat loss and the introduction of “pest” bird species claimed many of the bluebird’s natural nesting sites. Now, however, bluebirds are making a dramatic comeback, thanks to thousands of dedicated folks who have put up bluebird nesting boxes. Here’s how to build one for your yard.
Do you have the DIY bug but only a Saturday morning free to get projects done? Here are 101 amazing Saturday morning home improvement projects that you can do in just a few hours or less!