


Work smarter, not harder - spend more time enjoying your garden this year!
22 Genius Gardening Hacks You’ll Be Glad You Know

Updated Sep. 04, 2024

We could all use more time, especially on the weekends when the garden is calling! The right tool or information can make your garden tasks much easier.
There’s a lot of unverified gardening information — and misinformation — out there, so it’s always good to check qualifications. Start with sources such as experienced nursery professionals, certified professional horticulturists, master gardeners, accredited landscape designers, arborists, county agricultural extension offices, and websites with .org and .edu extensions. If it’s an individual’s website, look in the “About” section of the website for information like educational background and professional affiliations.
Today we’ve saved you even more time searching before we save you time in the garden. Check out these expert tips to free up more time to see friends or just put your feet up in the garden with a glass of lemonade.
1
/
22
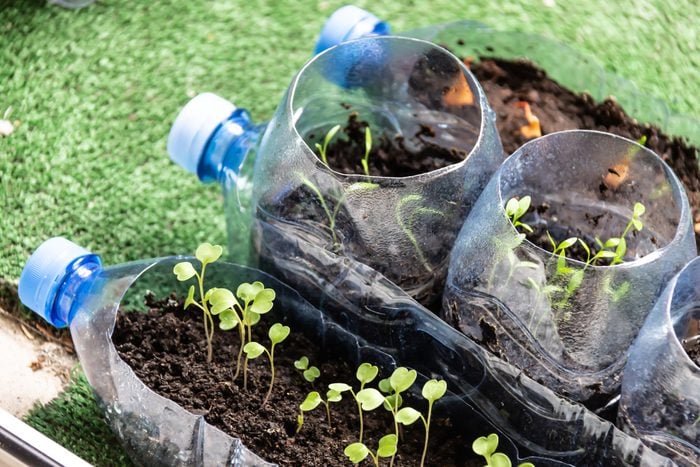
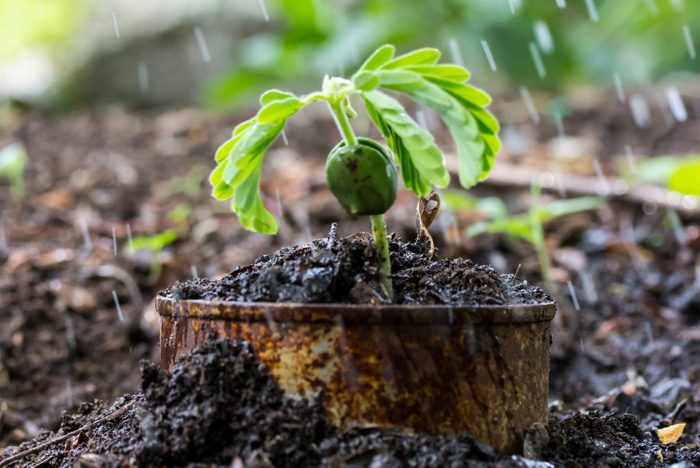
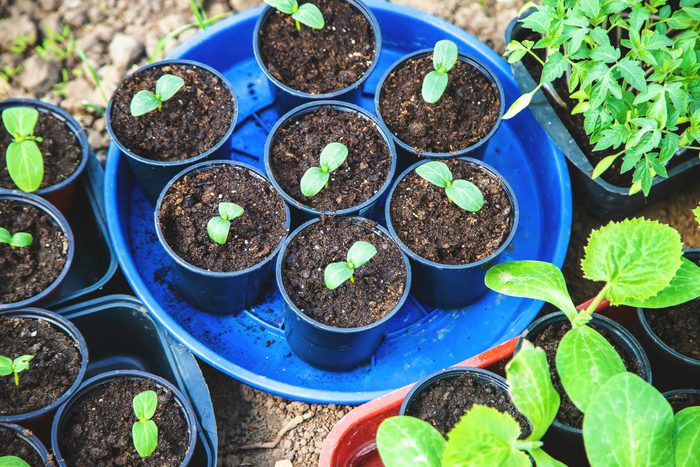
Save space by winter sowing your seeds outdoors
Imagine starting seeds without all the lights, counter space, and time needed to grow them indoors — not to mention repotting and transitioning them gradually outdoors. My husband was tired of having our kitchen bathed in purple light with every free surface covered in plant flats of seedlings, so I was thrilled to learn of Winter Sowing. It’s a technique devised by Trudi Davidoff, a home seed starter challenged for space inside. Bonus: being outside makes the seedlings tougher and stronger.
The USDA defines it as “A propagation method used throughout the winter where temperate or non-tropical climate seeds are sown into protective vented containers and placed outdoors to foster a naturally timed, high percentage germination of climate tolerant seedlings.”
How it works:
This method is best with seeds that like cold temperatures to germinate, such as cold-hardy annuals like calendula, and perennials that need a chilling period or “cold stratification,” like native milkweeds (Asclepias species). I grew sweet peas, calendula, and native baby blue-eyes (Nemophila menziesii) this way in 2023. Pro-tip: even though it originated for cold-tolerant seeds, you can also use it later for warm-temperature lovers (seeds that usually say “plant after last frost” on the packet), like zinnias and tomatoes.
In warmer weather, the containers need a little more supervision so they don’t dry out, but you can sow them about a month early with this protection and get sturdy seedlings.
- After Dec. 21, choose clear plastic containers with at least 3″ depth. Milk jugs cut in half and produce clamshells are popular, but you can also put plant pots inside a clear plastic storage bin with a lid drilled with ventilation holes.
- Drill many holes on all sides for drainage and rain access — you can also use a heated screwdriver or awl to make holes. A plastic drill bit can make it less likely to break brittle containers.
- Fill the container with a minimum of 3″ potting mix (not seed-starting mix), allowing the seeds to grow 3″ before hitting the top of the container.
- Sow seeds according to planting directions on the packet. You can plant many seeds together using this method because you’ll transplant early.
- Place one label inside with the seed name, and tape another to the outside, using a waterproof marker.
- For milk jugs, leave the cap off to let rain in.
- Check periodically for water as needed if rain is sparse and make sure the soil is draining well.
- The seeds will sprout when the outdoor temperatures are right for them.
- When plants reach 2″ tall, transplant them into garden beds or pots.
Why we like this:
It’s simple, low-cost and an efficient reuse of plastics. If you have chosen cold-tolerant seeds, they can even withstand snow. Check out Davidoff’s Winter Sowers Facebook group for detailed information.
2
/
22
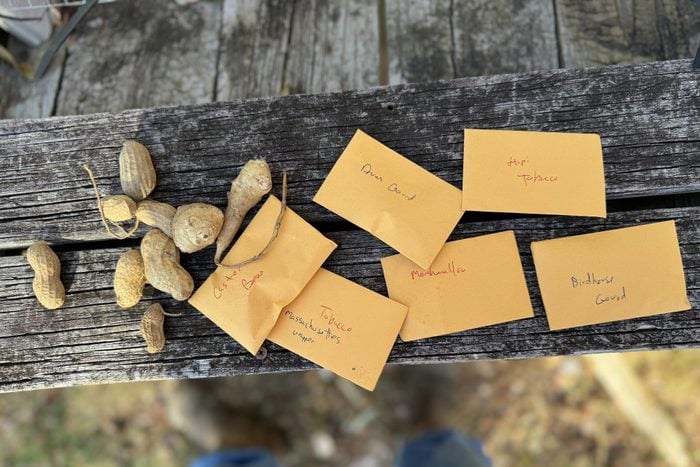
Spend Less on Seeds by Seed Saving
Saving seeds puts money back in your pocket. Most seed packets average from $2-$5, and if the seed is open-pollinated, you can use its seeds to make ten, 20, or 100 more plants, depending on the variety.
How it works:
Choose open-pollinate or heirloom seeds for the best results. Saved seed from hybrids or varieties designated “F1″ on the seed packet or catalog description will not produce the same plant reliably the next year. Let some flowers dry and form seedpods on the plant — don’t cut them all for bouquets. If you are growing a multicolored seed mix but you fall in love with the purple ones, just save those. If you want to be sure bees don’t cross-pollinate a favorite and make a new plant, you can cover a few flower heads with a paper bag and a twist tie.
Wait until the seed pods or seed heads feel dry and papery. If you’re not sure what to look for, research what your plant’s seed pods look like online. Don’t wait too long, or birds may snack on your seed before you get a chance to harvest them.
Bring them inside, shake them off, and separate them from petals and sepals. I like to use 2″ x 3” manila envelopes to hold seeds. Label the name, color if applicable, and the year you harvested them. Seeds can remain viable for several years under cool and dry conditions, but it’s helpful to know how old they are.
Why we like this:
Saving seeds preserves genetic diversity, and gives you more plants to grow or give away.
3
/
22
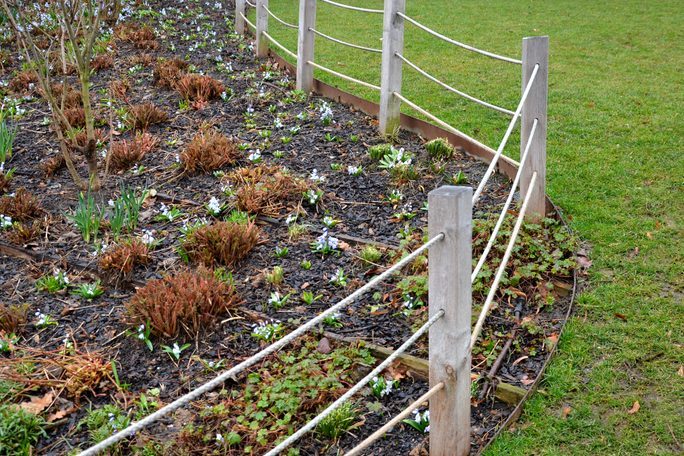
Design Garden Beds With Rope
Inspired to dig new garden beds, but want to ensure they look professional? You probably have the tools you need in your garage.
How it works:
A rope or garden hose can help mark your prospective garden beds before you start digging. Play with the curves until you like the proportions. If you need to mark the shape, you can sprinkle sand or flour along the edge as a temporary marker.
If you have space, generous beds look more appealing — usually, people make their beds too skinny. If a fence backs them up, extend at least one section of the beds out as far as the height of the fence if you can. It will look more balanced. Pro tip: check the view from above if you can from a deck or a second-story window.
Remember the designers’ rules — my instructors always said, “Don’t make fussy curves that look like an ’80s perm — keep it simple with a few gradual curves.” Also, avoid making a drastic bend without a visual reason, like a tree or a bench that calls for the path to curve.
Want a circle or a semi-circle? Tie a rope to a stake at the circle’s center to proscribe your edge.
Why we like this:
It’s hard see the wider perspective of the bed shape from ground level — this method gives an instant visual that’s easy to adjust.
4
/
22
Use Stockings to Tie Up Garden Vines
Many vines need guidance to grow onto your arbor, stakes, or pergola, but how can you tie them up safely? If you use something inflexible, it can cut into the plant as it grows.
Instead of using zip-ties, made of single-use plastic that can constrict growth and be hard to remove, or twine, which quickly disintegrates, Jentz often uses pieces of flexible pantyhose to tie up her clematis or scarlet runner beans.
How it works:
To follow Jentz’s method, cut up the pantyhose legs into tubes of the length you need and tie up the vines wherever they need it. Pantyhose might be fragile for thorny roses or raspberries, but they work well for thinner annual vines and clematis.
Why we like this:
The stretchy fabric is easy on plants and easy to remove and reuse the next season.
5
/
22
Protect Seedlings From Cutworms
It’s devastating to see tender new seedlings mowed down in the night by marauding cutworms, but there is a simple solution.
How it works:
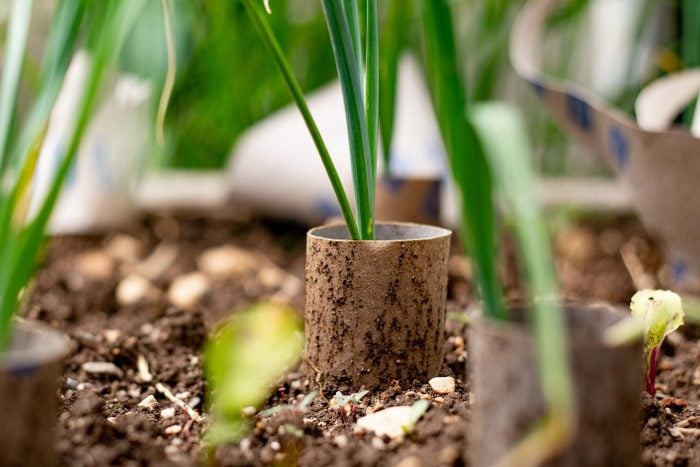
Jentz recommends cutting out the tops and bottoms of shallow cans, like tuna fish or cat food cans so they are open at both ends. Place the can over the seedling, pressing partly into the soil. You’re done! Cutworms living in the surface of the soil don’t like to climb. Toilet paper tubes can also work as a protective collar.
Why we like this:
Once seedlings are taller, they are less vulnerable to cutworm chomping. This protects them and their crucial main stem at a critical period in development.
6
/
22
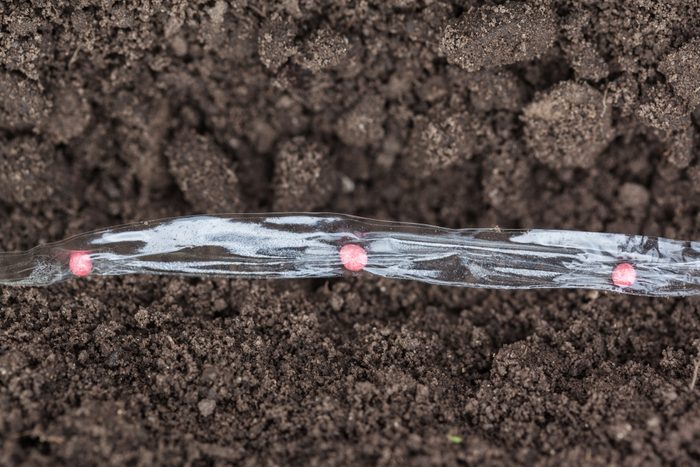
Handle Tiny Seeds Like a Pro
Some seeds, like carrot or breadseed poppy seeds, are minuscule, making it a challenge to pick them up and place them where you want them. It’s all too easy to take half your seed packet in one pinch, and tricky to release them one at a time. It’s especially difficult for younger children and older adults. Some seed companies sell premade plantable paper strips for crops like carrots. Here are two clever tips to address this issue using common household items.
How it works:
When Jentz is teaching kindergartners to plant seeds, she uses this genius method: pick up two or three seeds yourself and place them on a sticky note. The adhesive holds those poppy seeds until the you can grab them.
Another tip to get the seeds onto the sticky note is to use a small water dish and a toothpick. Wet the toothpick; the water will help it pick up and hold a few seeds.
Why we like this:
Sticky notes are easily portable and can be piled together and brought to the garden before planting.
7
/
22
Keep Seedlings Warm With Stones
If you’ve planted flowers or vegetable seedlings that need extra warmth, never fear. Water or stone can warm up the air around those plants.
How it works:
There are two ways to do this — which can also be combined. You may have seen “Wall of Waters” for sale, which protects tomato seedlings while adding a few extra degrees of heat. To make your own, fill milk jugs or plastic water bottles with water and surround your plant. The water retains the heat from the day’s sunshine all night. The second is to surround your plants with bricks or large stones, which will absorb and reflect ambient heat onto them.
Why we like this:
I’ve used these methods in Seattle to gain any kind of edge over our slow or blink-you-missed springs when planting tomatoes and other crops that prefer soil temperatures over 50 degrees.
8
/
22
Protect Seedlings from Snacking Birds with Strawberry Baskets
Birds often find your seeds and seedlings before they get a chance to grow. Hang onto the mesh-basket-style berry baskets from the market for planting time.
How it works:
Jentz likes to place strawberry baskets upside-down over young seedlings or freshly sown seed beds to protect young shoots from hungry birds.
Why we like this:
The interlocking grid is the perfect size to hamper little beaks from getting to your seeds and seedlings.
9
/
22
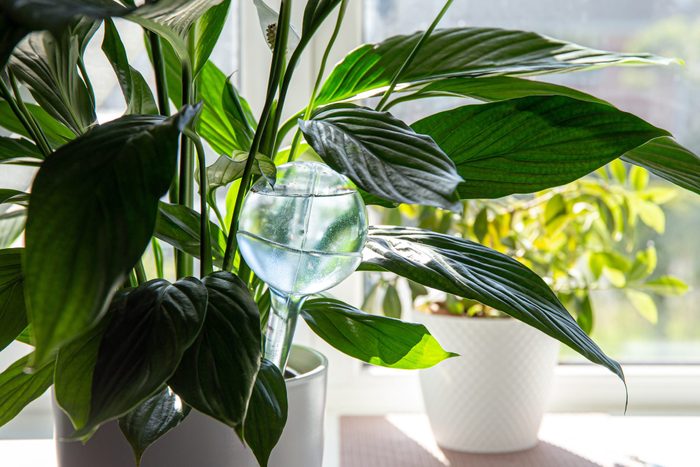
Precision-Water Your Houseplants With a Funnel
Watering houseplants is messy. Even though my watering cans have tiny spouts if the water hits a leaf, it ricochets everywhere. One day, a product came across my feed — a plastic leaf-shaped watering device that funnels the water to your plant’s roots. They came in a set of 12, one to sit in each planter. But I thought, funnel? I have one of those!
How it works:
Bring a funnel with you to water your houseplants, hover over an open area of soil and pour away. No fuss, no muss. Move to the next plant. I have a set of four in my cupboard, and they all work well. I still carry a towel with me, however, because orchids have crazy aerial roots.
Why we like this:
Instead of adding multiple plastic gizmos to your plant display, you can just bring one funnel with you and return when done watering.
10
/
22
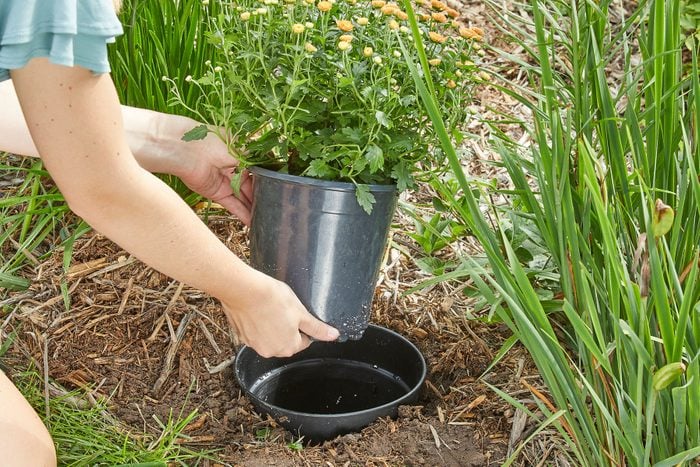
Move Seasonal Annuals Easily With Pots
Unless you live in California or Florida, annuals are used for long-blooming but temporary color. Consider this smart time-saver if you only plan to have a plant in a particular spot for a month or two. Plant them in another pot for easy removal with less upheaval than planting in open soil. It works well for plants that you plan to bring inside over the winter, such as geraniums (Pelargonium) or houseplants taking their summer vacation outside. It’s also helpful when you want seasonal color with tender plants where frosts are brief and infrequent, such as Asparagus ferns in the South, or winter cyclamen in the Northwest. If the thermometer dips below the mid-30s, just pop that cyclamen inside overnight.
How it works:
Bury a pot and leave it open. If you want to bring your plant back inside, use a size matching the existing pot and just nest that inside the bottom one. Remove and bring indoors before the first frost.
If you instead plan to dispose of it at the end of the season, use a larger pot than the annual pot. Fill with native soil or organic potting mix and plant your plant. When it’s finished blooming, or frost threatens, simply remove it to the compost pile. You can backfill the larger pot with soil and mulch or stones to mark the area for next year.
Why we like this:
This method involves less digging which disturbs the soil ecosystem, and allows you to make quick changes when you want some rich color.
11
/
22

Grow a Mini-Salad Bar Greenhouse
In addition to winter sowing, plastic clamshell packaging can be used indoors to grow a salad bar full of microgreens in a small space. They pack a ton of nutrition in their stems — even more than their fully grown counterparts — and can be harvested in about two weeks. They are tasty additions to smoothies, stir-fries, sandwiches and salads!
How it works:
Save a large plastic clamshell with at least two inches of depth and a top at least three inches tall. Fill with seed starting mix to two inches or a well-draining potting mix. Add drainage holes at the bottom if needed with a heated screwdriver.
Choose your greens — almost any edible leaf can be grown as a microgreen, from beets and broccoli to lettuce and cucumbers, and sow thickly — your goal is to fill the planter. They will grow straighter with a grow light, but you can still grow in a window with full sun exposure. Keep evenly watered, and harvest with herb scissors when they are about two inches high.
Why we like this:
Growing microgreens offers a way to have fresh, nutritious greens at hand any time of year in a small space, without transplanting. Have fun experimenting with all the flavors available!
12
/
22
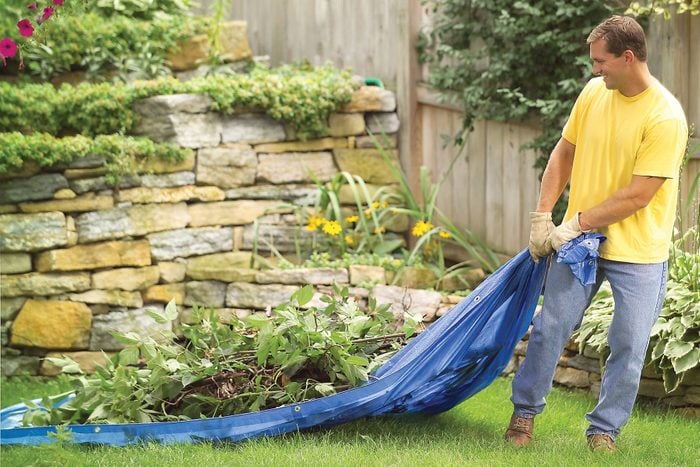
Corral, haul, and Protect Garden Projects With a Tarp
Other than doing the digging or hauling, there are very few garden tasks tarps can’t help with.
How it works:
Tarps act as a working surface to keep my patio clean while potting up or transplanting plants so clean-up is a breeze. WIth their help, I drag shrub and tree trimmings to the compost pile. When I beg arborists to leave their wood chips on my driveway instead of sending them to the dump, a tarp covers the pile from spring rains.
Why we like this:
I love a multipurpose tool that can be brushed off and folded away in the winter.
13
/
22
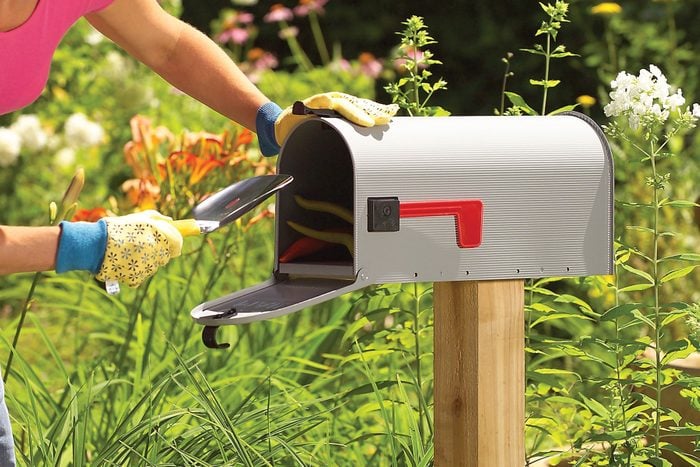
Keep Tools Clean and Dry With a Mailbox
Mailboxes are designed to be weather and critter-proof. Your tools, not so much. Combine the two, and you don’t have to bring tools back and forth from the house, and they stay safe and dry over the winter.
How it works:
Mount a mailbox in a handy spot, or do as Jentz does in her community garden plot: leave the metal mailbox portion on the ground holding your tools, like a safe.
Why we like this:
Tools will rust much slower while protected and stay organized in one spot.
14
/
22
Keep Track of Tools With Paint
If you’ve gardened for any amount of time, you’ve probably lost half as many tools as you’ve bought. They get buried while planting, moved, forgotten, or mistakenly appropriated by others when working in a group.
How it works:
Pick your favorite neon color, ideally, a screaming pink, lime, or yellow that stands out from foliage and soil. Paint the handles of your tools your new trademark color so you’ll see them sticking out from the compost pile — or your friend’s jacket.
Why we like this:
Tools keep your garden going, and you don’t want to stop working to go buy a new one.
15
/
22
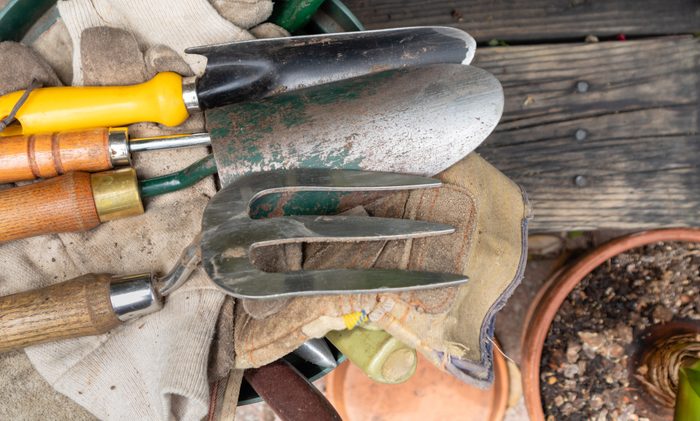
Multitask With a Hori-Hori
This is my top garden tool of all time. It was designed by Japanese bonsai hunters to be able to dig, divide, and cut specimens in the wild. With this one tool in your pocket, you’ve got a trowel, knife and weeder in one.
How it works:
A Hori-hori looks like a knife, but they are not so sharp they will prick you or make a hole in your pocket. The best ones are wooden with well-forged iron blades and sometimes come with a belt holster. One surface is curved inward, which can act like a scoop or trowel. One side is serrated, for cutting or dividing roots, and the point is narrow enough to get in between some paving cracks to get at the dandelion or crabgrass.
Why we like this:
Needing fewer tools keeps me ready for anything in the garden.
16
/
22
Name Your Plants with Elegant, Waterproof Plant Markers
I struggled to find a plant tag solution for some time. The nursery plant tags are visually loud and shatter into pieces over time, but making my own wasn’t ideal either. I tried “permanent” Sharpie markers and pencils, but neither outlasted the rain. I also wasn’t crazy about the look of the white plastic tags. There are also copper tags that you “engrave” with a stylus, but they are more expensive and hard to read. Then I discovered chalk paint pens.
How it works:
I’m using black plant tags in a 2.36 x 3.96 inch rectangle shape with a matte “chalkboard” surface, and writing on them with waterproof white paint markers. The paint marker is erased easily with rubbing alcohol or hand sanitizer if you need to change the name of a plant.
If you prefer white tags, China marker pencils (what artists used to call “grease pencils”) last pretty indefinitely in the rain.
Why we like this:
The black tags fade into the background more than the white tags, which I prefer, yet the white lettering is quite visible. It gives a kind of apothecary aesthetic.
17
/
22
Streamline Garden Tasks with a Tub Trug
Like the tarp and the Hori-Hori, the trug is something I’ll never be without in the garden. Jentz and I both use them all the time.
How it works:
You can find lovely wooden trugs for harvesting flowers and produce. These are not those. These are plastic, waterproof tubs that are garden workhorses. They hold or haul plants, soil or garden amendments and water. Deep ones can hydrate overly dry potted plants with a full-pot soak. They can hold your plant purchases after shopping at the nursery, or while waiting to be transplanted. They can corral weeds and trimmings on the way to the yard waste or compost heap.
My favorites are flexible enough to squish the handles together, making them easy to put under your arm or hold like a shopping bag. When one handle finally broke after several years of use, I poked drainage holes in the bottom and planted it.
You can find ones made for the garden; Jentz swears by the Torkis laundry tub from IKEA.
Why we like this:
They’re useful, tough, and cute in bright colors. You could use one as a beverage cooler at a garden party in a pinch!
18
/
22
Sow Your Seeds Straight With Toilet Paper Tubes
You made a nice row for your seeds, but did they make it in there? Maybe, maybe not. To be sure your seeds reach their destination, try this.
How it works:
Take a paper towel holder, toilet paper tube, or hollow piece of PVC pipe to steer your seeds in the right direction. Set them over your pre-dug row, aim, and shoot the seeds through the cylinder, moving down the row.
Why we like this:
Seeds float, roll, and fly. This way you’ve targeted the row so they have the best chance of success — and you’re less likely to weed them out by mistake if they grow in the wrong spot.
19
/
22
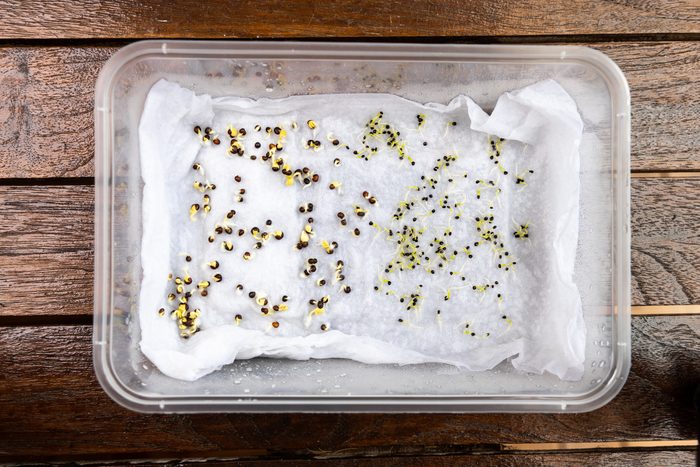
Test Your Old Seeds
Seeds can last for many years if stored in cool and dry conditions, but over time they lose viability. When you’re ready to plant, test their strength with this kitchen counter mini-greenhouse. Your kids may have done this as an experiment with fast-sprouting bean seeds in elementary school — it’s a fun way to watch them grow.
How it works:
Moisten a paper towel. Take a sample or all of the seeds and place them on the paper towel. Put the paper towel inside a plastic baggie or a plastic storage container. The warmth and humidity will encourage them to break dormancy and sprout. Check for sprouting every few days. Following directions for that seed, plant the ones that sprout and compost the ones that do not. Don’t wait too long after sprouting to plant them or they may become tangled in each other and the paper towel, making it harder to separate them.
Why we like this:
Instead of spending time, space, and soil growing non-viable seeds, with this test you know which seeds can be planted.
20
/
22
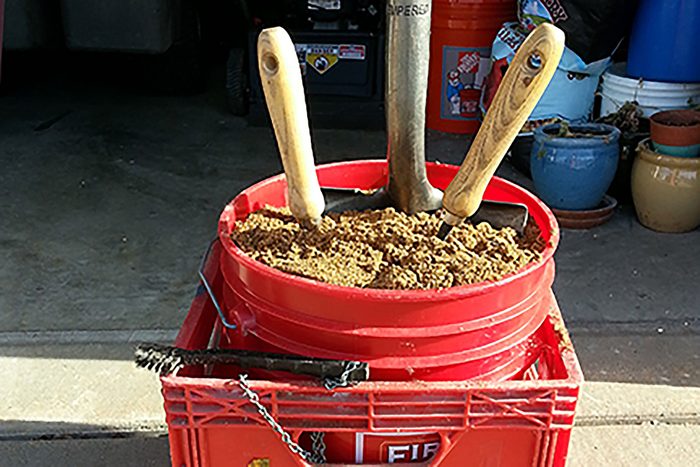
Clean Your Tools With This Hands-Off Technique
Rust has claimed many a cherished garden tool, but it doesn’t have to. Tools last much longer when cleaned and dried after use. Here is a way to keep your tools sparkling while storing them — and it couldn’t be easier.
How it works:
Fill a five-gallon bucket with clean sand and a splash of oil and stir with a trowel to mix (linseed is often recommended). Jentz has even used the remainder from her car oil change. However, you don’t want to attract animals by using canola or other typical cooking oils.
To clean your tools of dirt and debris, simply plunge in a few times and wipe with a rag, or you can store them this way if you like! Cover the bucket to prevent accidental spills.
Why we like this:
If you make this a routine at the end of your garden sessions, your tools will last so much longer!
21
/
22
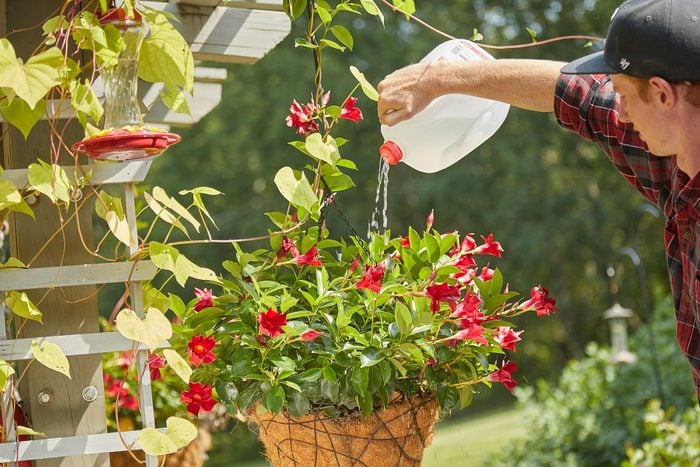
Convert Milk Jugs into Extra Watering Cans
Yet another use for the handy, reusable milk jug! Sometimes you don’t want to pull the hose out, or there are places you’ve planted beyond the reach of the hose, but the plants need water now. For moments like this, I keep several milk jugs at the ready for my driveway containers and parking strip plants which our hose barely touches when fully extended.
How it works:
As mentioned above, milk jugs full of water also warm the air and soil slightly. If you’ve done this for some seedlings you have some at the ready. You may want to drill holes in the caps to create a gentle rain-like pour for smaller plants.
Why we like this:
If watering is easy, I’m more likely to do it, even when in a rush. This way, it’s easier to take care of thirsty plants, no excuses.
22
/
22
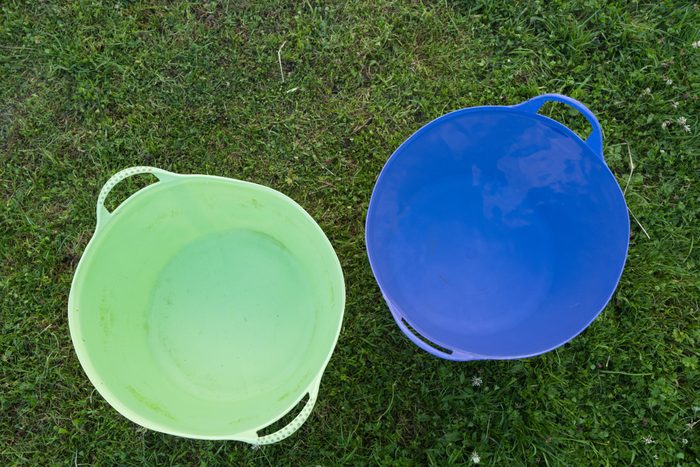
Water Plants While on Vacation with a Kiddie Pool
If you’re going away for two weeks and you don’t have an irrigation system, you probably need a helpful friend to water your potted outdoor plants. However, if you are going for five to ten days, this method is here for you.
How it works:
Jentz puts a kiddie pool to work in these instances, and you can, too. Simply fill it with the water hose and move your plant pots into the kiddie pool for an extended soak. The water will gradually wick up to the plants’ roots through the drainage holes in the bottom of their pots. How long the water lasts depends on the sun, heat, wind, and the thirstiness of the plants. If you put the pool in the shade, it will last longer.
Note that this even, regular watering method wouldn’t be recommended for desert plants like succulents and agaves, which prefer to go dry between waterings. For those, I’d keep them in their original location and water them if needed before leaving.
Why we like this:
You don’t want to spend your vacation tracking the weather report back home fretting about your dahlias.
About the Experts
Kathy Jentz, author of The Urban Garden and Groundcover Revolution, is editor and publisher of Washington Gardener magazine and the Green Media columnist for the Mid-Atlantic Grower newspaper. She is also the host of the podcast, GardenDC, which received a GardenComm 2023 Laurel Media Awards Gold Award.
Erica Browne Grivas is a lifelong journalist and gardener based in Seattle, Washington, whose writing appears in Horticulture, Midwest Living [can change to the American Gardener if you prefer], and the Seattle Times, as well as green industry publications. She has studied landscape design at The New York Botanical Garden and worked for nine years at nurseries in New York City and Seattle, Washington.
Sources
- U.S. Department of Agriculture: National Agricultural Library
- Virginia Cooperative Extension: Piedmont Master Gardeners
Originally Published: November 14, 2019