
Here are 28 clever solutions from our readers and the DIY experts at The Family Handyman.
28 Odd But Useful Tips All DIYers Need to Know
1
/
28
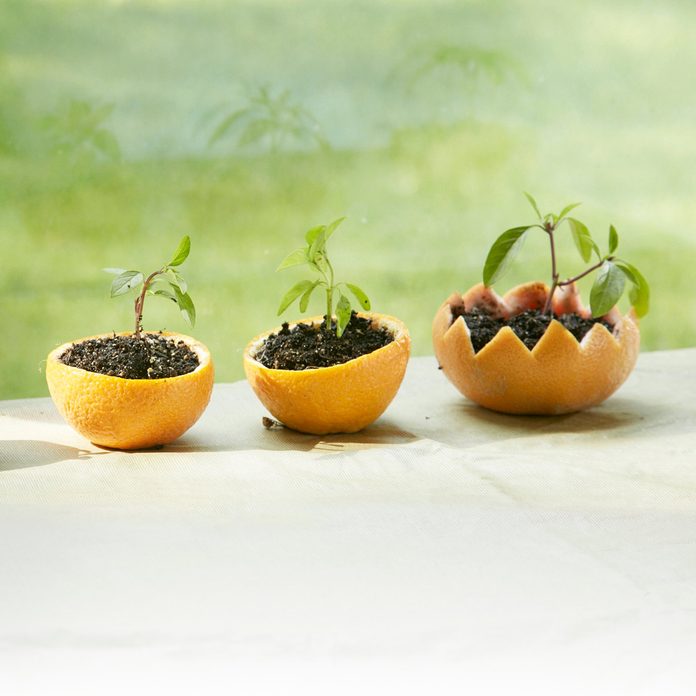
Citrus Rind Seed Starters
Grapefruit, orange and other citrus rinds are just the right size for starting new seedlings. Make a hole in the bottom of each one for drainage and add some damp seed-starting mix and seeds.
Then, when it’s time to move them outside, plant the whole works in the ground—peels and all. The citrus rinds make the soil more acidic, however, so only do this with acid-loving plants like radishes, peppers and the like. — JUDY WILDER
2
/
28
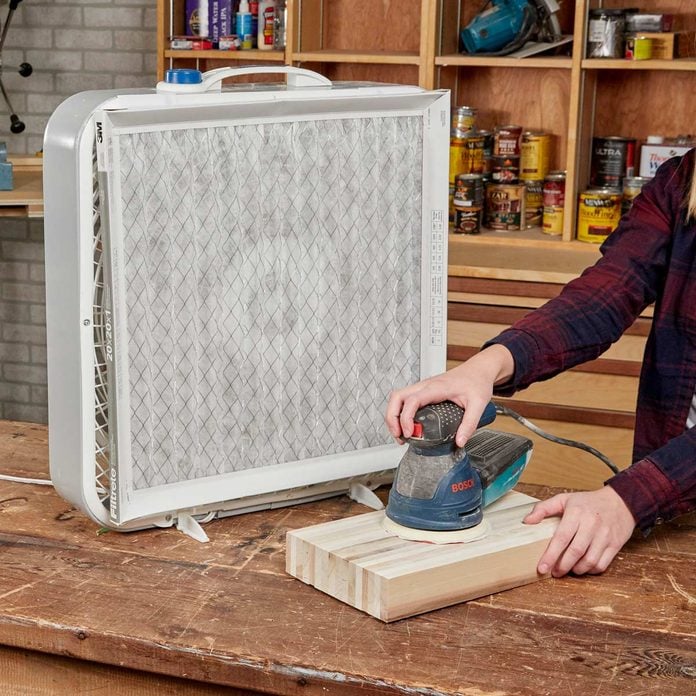
Saw Dust Filter Fan
My workshop doesn’t have air conditioning, and it gets pretty hot while I’m working. I used to blow a fan directly at myself, but it sucked in dust from around the shop and blew it at me. I had a few extra furnace filters lying around, so I tried attaching one to the back of the fan using hook-and-loop fasteners.
This made a huge difference! Don’t use a super-high-performance filter, as it could cause the fan to have to work too hard to pull air through, resulting in an overheated motor. — Larry Brannock
These 34 incredible tips will help you complete your woodworking projects faster and better than ever before!
3
/
28
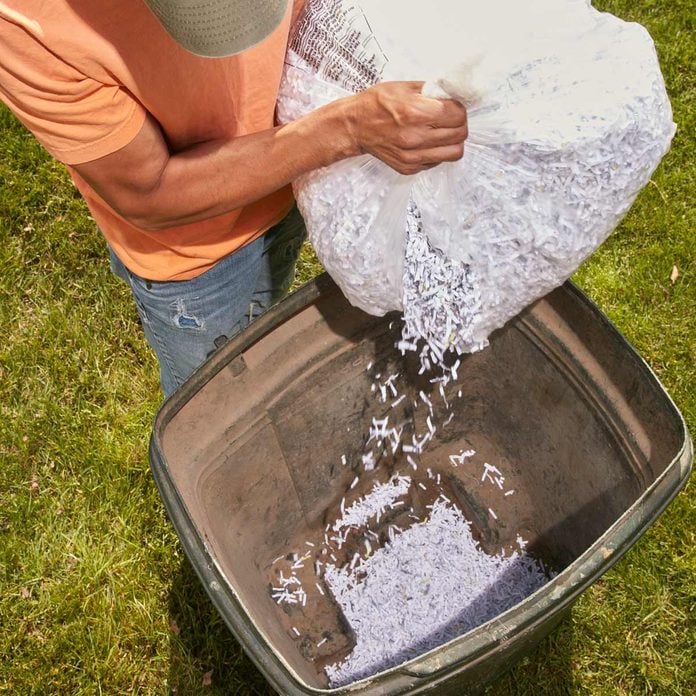
No More Smelly Lawn Clippings
After mowing, dump all of your lawn clippings into a “green refuse” bin. But after a day or so, the grass clippings turn into a slimy, smelly mess.
To combat the stench, raid your electric paper shredder and through a few handfuls of shredded paper into the bottom of the barrel. The paper helps absorb the moisture and reduce the smell. — Emil Machrone
4
/
28

Clean Your Coffee Mugs Once and for All
Got stubborn coffee stains on a pot, thermos or mug? Denture cleaner is the best solution we’ve ever found for these tough stains.
How to remove coffee stains from a mug or thermos:
- Dissolve one denture cleaning tablet per two cups of hot water.
- Pour it in the stained vessel and let it sit for several hours.
- Then use a scrub brush to clean off the stains and all the loosened bits.
- Pour the solution out and rinse thoroughly.
Check out these clever kitchen hacks you’ve never thought of before.
5
/
28
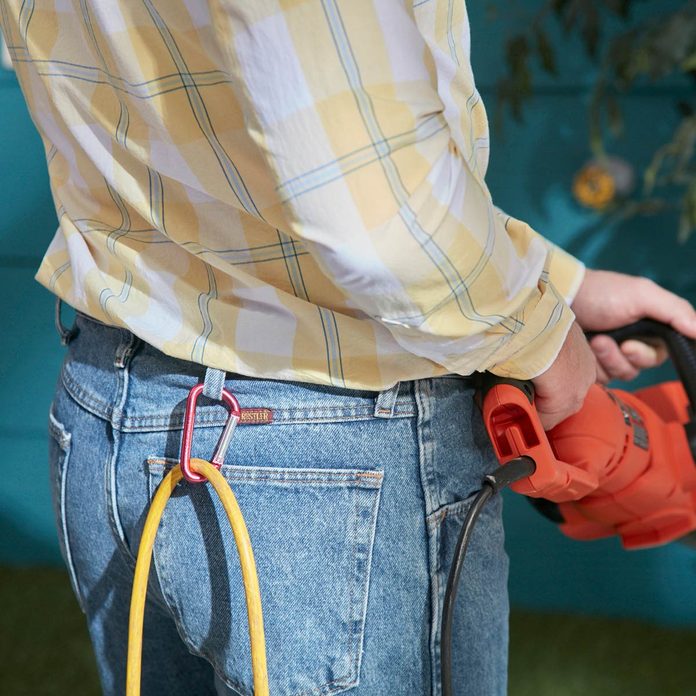
Extension Cord Tamer
I was always struggling to keep the extension cord away from the blade of my electric hedge trimmer. So I attached a carabiner clip to a belt loop on the back of my pants and threaded the cord through it, which keeps the cord behind me and out of harm’s way. — Graham Daly
6
/
28
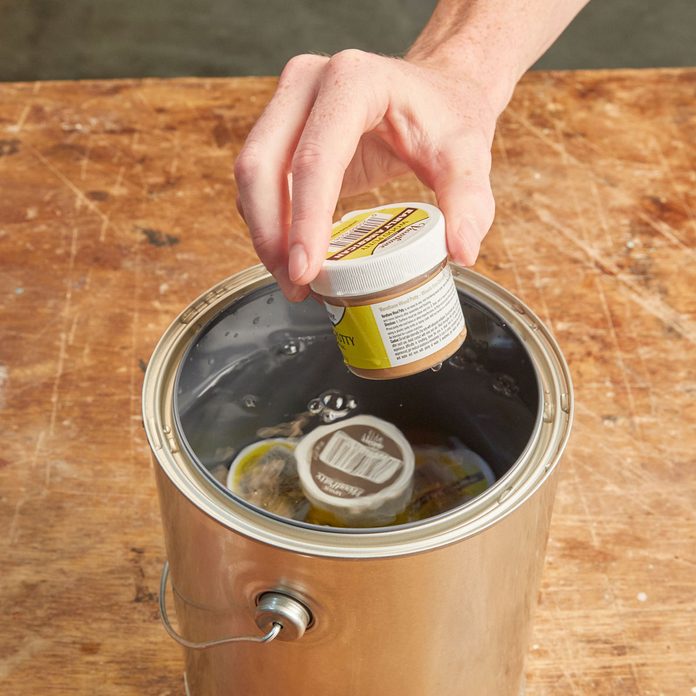
Simple Storage Solution for Longer-Lasting Wood Putty
Wood putty is often a one-time use product for me. Before I even think about using it a second time, it’s dried out.
The trick I found was to fill an empty paint can with water and store all my putty jars submerged so no air can get in. Now I can finally say that I have seen the bottom of a putty container. – Kim Boley
7
/
28
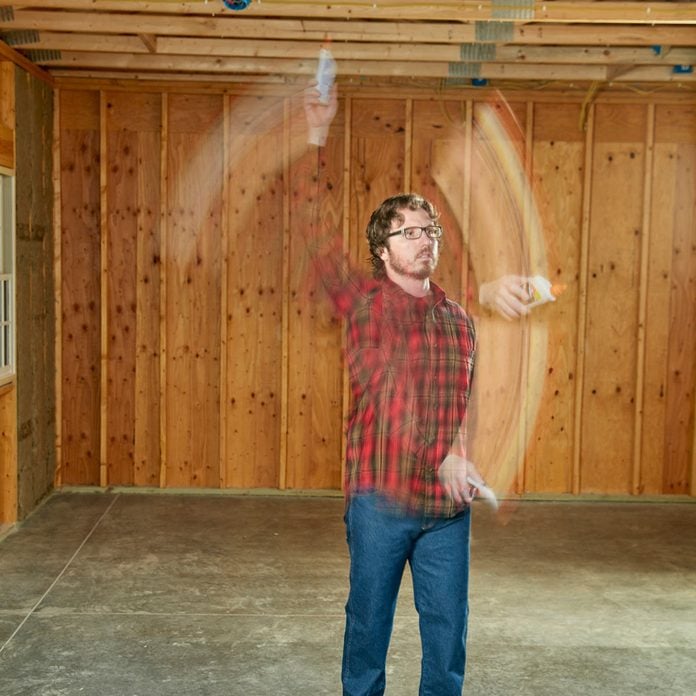
Take Your Glue for a Spin
If you don’t like waiting for wood glue to come out after you squeeze the bottle, put the cap on and swing it around a couple of times. Centrifugal force will concentrate the glue at the top of bottle, making it come out of the nozzle faster. — Alan Peroutky
8
/
28
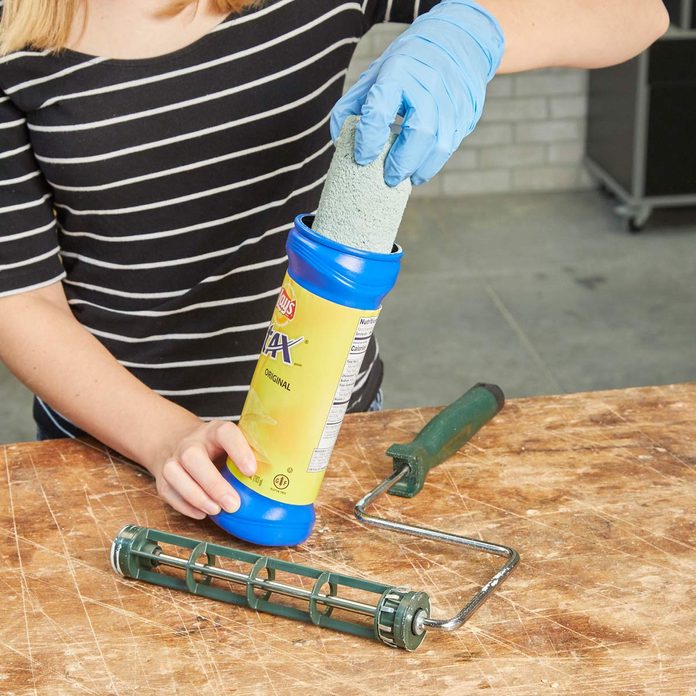
Paint Chips
Washing a roller cover between coats of paint is a waste of time and paint. So one of my painting necessities is a can of chips; preferably the plastic cans. Before I start painting, I eat the chips and then clean out the can.
I don’t want any unintended texture on my walls! Between coats, I slip the wet roller cover in the empty chip can and pop on the lid to keep it from drying out. — Thomas Nolan.
With a little creativity, many common household items can be transformed into something else that’s entirely different and amazing.
9
/
28
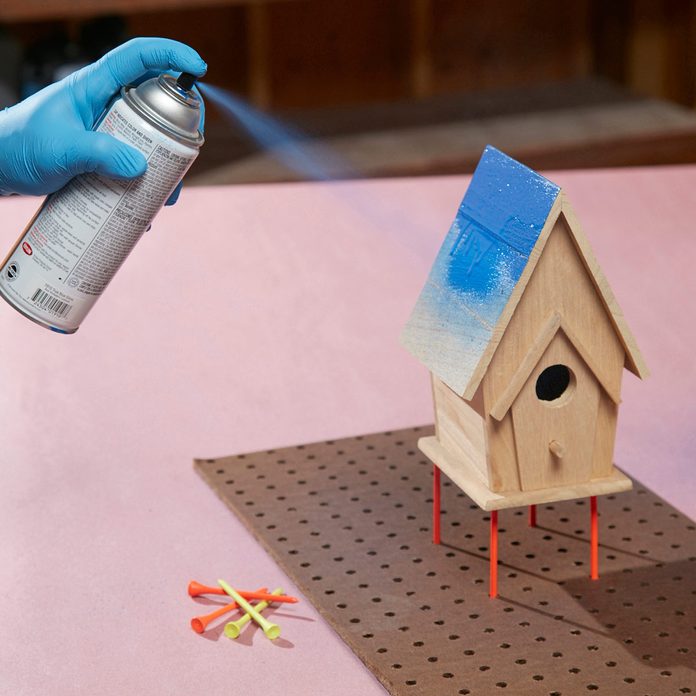
Golf Tee Paint Helpers
When you’re painting or varnishing small projects, it’s best to elevate them for good coverage and to keep your project from sticking to the worktable.
Use an old piece of pegboard and some golf tees. The pegboard keeps the tees in place, and then you can arrange them as necessary for different size projects. — Terry Meincke
10
/
28
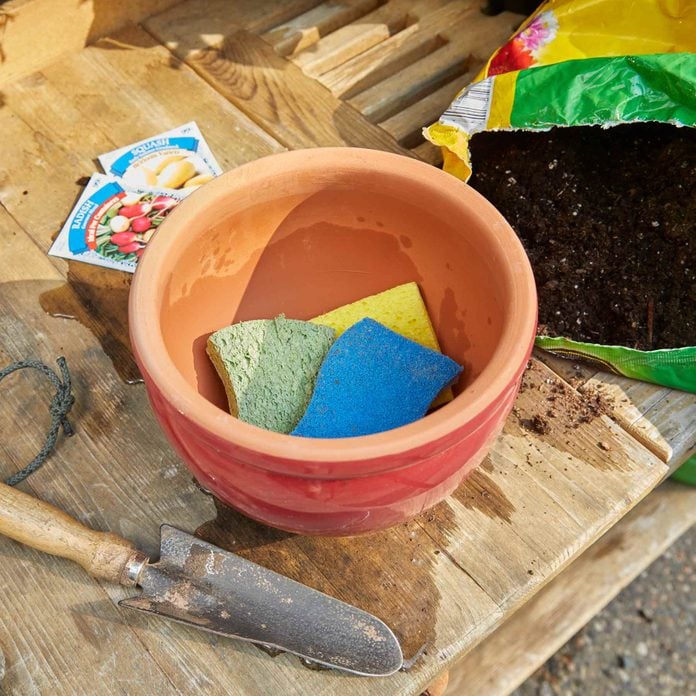
Healthy Plant Hydration
Water settling at the bottom of pots can lead to root rot. To combat this problem, cut up old sponges and put them in the bottom of the pot. The sponges retain moisture and create necessary air space. They also help prevent water from flushing out the bottom. The sponge acts as a water reserve and keeps soil moist longer.
Love to garden but short on time? Here are some tips that will help you plant, water and weed more efficiently so you have more time to stop and smell your roses.
11
/
28
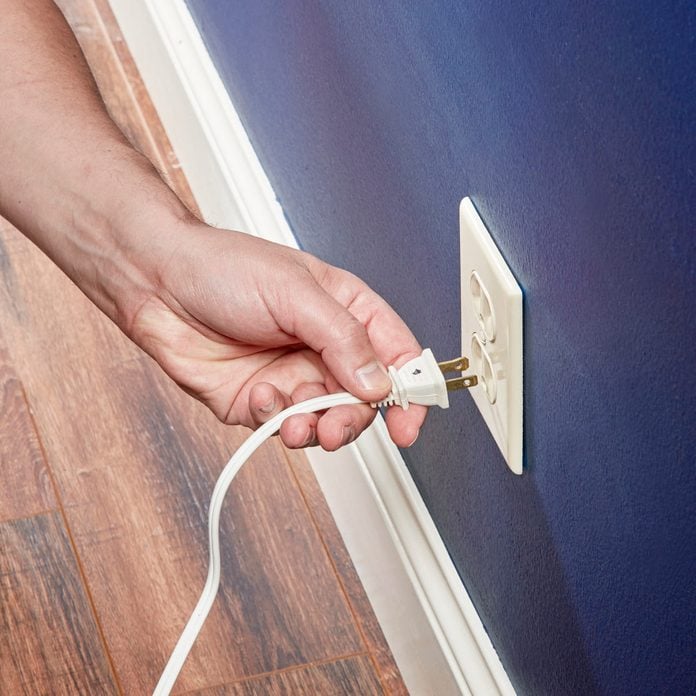
Right Side Up
A polarized plug has a larger prong on the neutral leg, so it has to be put into an outlet a certain way. As I get older, I find it harder to see whether I’m holding a polarized plug right side up when I’m pushing it in. And it’s especially hard to see what I’m doing when there’s furniture in the way.
That’s why I make a dot on the tops of all my plugs. I use a black marker for light-colored plugs and white correction fluid for dark- colored ones. — Norman Schock
12
/
28
Use What You’ve Got
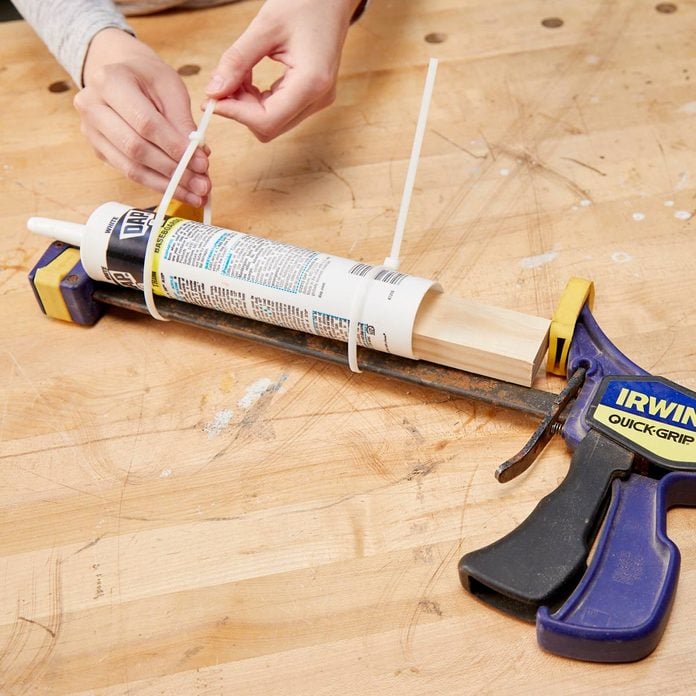
Over the years, I have accumulated quite the collection of caulk guns because I’m always forgetting to bring one along to the job site. This time, I improvised a caulk gun instead of buying yet another one.
I zip-tied the tube of caulk to the bar of a trigger-style clamp and stuck a wood scrap in the tube’s end to act as a plunger, dispensing caulk as I squeezed the clamp’s trigger. — Frank McDonough
Check out our expert caulking tips to get perfect results every time!
13
/
28

Mud Ladle
No sooner did I finish digging footing holes for a new shed then it rained, filling all the holes with water. It looked like mud soup! I had to get rid of it quickly in order to pour concrete, so I fashioned a “mud ladle” out of a section of round duct work, a piece of 3/4-in. plywood and a solid wood handle.
Thanks to my invention, I was able to scoop out all the water in just a few minutes. — Dave Choudek
14
/
28
Use a Ceramic Mug as a Sharpening Stone
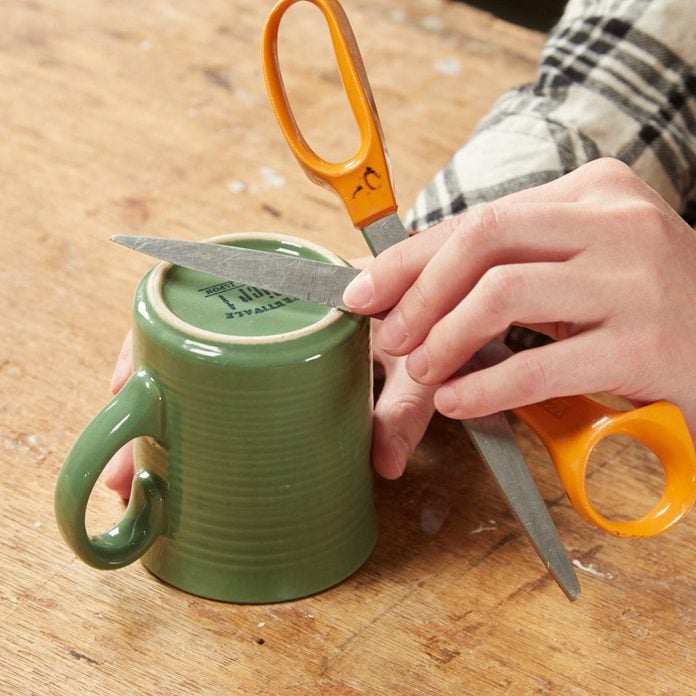
The bottom of most ceramic coffee mugs have a flat, unglazed ring that is the perfect surface for giving that dull knife or blade a quick sharpening. And if you find yourself in need of sharpening a utility knife, pocket blade or scissors and don’t have access to a sharpening stone, you can simply flip over a ceramic coffee mug and use the outer edge of the bottom, the non-glazed part, as an emergency sharpening stone.
Just run the blade across the bottom of the mug at a 45-degree angle, working from the one end of the blade to the tip. Next, slide the blade downward in one direction, keeping your fingers out of the way as you work.
This isn’t a perfect solution for continually sharpening your blades, but if you need to quickly sharpen and clean up the edge of a blade this method will do in a pinch. We do recommend eventually investing in a blade sharpening kit.
Now go check out how to sharpen your gardening tools.
15
/
28
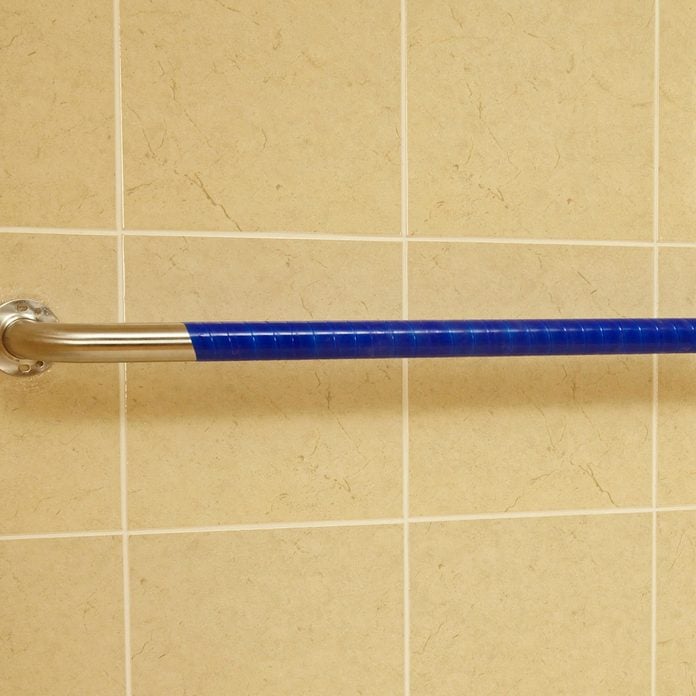
No-Slip Grab Bar
Sometimes the grab bars in my shower can get a little slippery. My quick fix was to wrap them with Stretch & Seal silicone tape. It grips well and stays where you put it.
Just be sure to stretch it as you wrap it so it sticks to itself. I’ve also used it to get a better grip on lots of other handles. — Bruce Knott
16
/
28
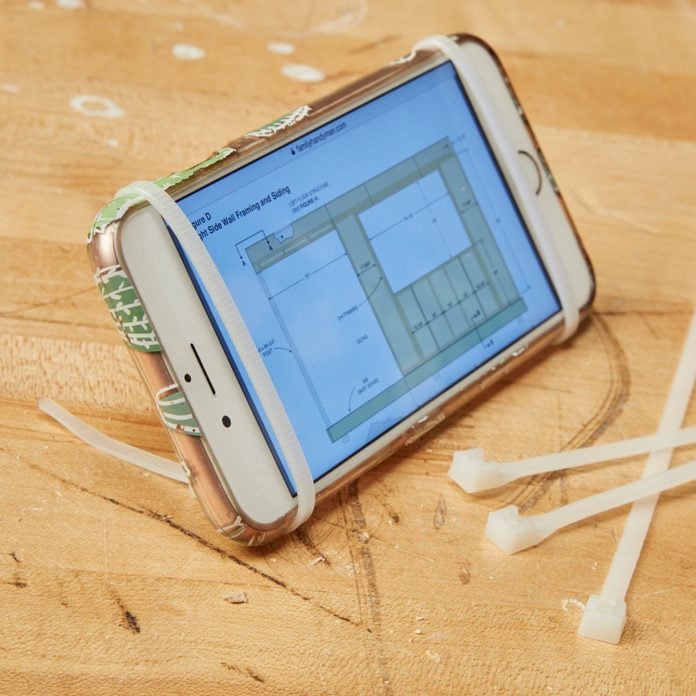
Zip-Tie Phone Stand
When referencing projects plans or a photo for inspiration while working on a DIY project, most of us use our phones to display images or instructional videos. Our phones don’t prop themselves up, making it difficult to see at the images while working.
You can make a smartphone stand out of just about anything these days, but it doesn’t get much simpler than looping zip ties around your phone (one on each side).
All you have to do is tighten the zip ties until they are snug to the phone with the zip-tie heads facing down and near the edge of your phone. Now you can watch video instructions or look at project drawings without having to hold it in your hands the whole time.
Plus, the next time you are charging your phone in the car you better think twice! Learn why you should stop charging your smartphone in your car.
17
/
28
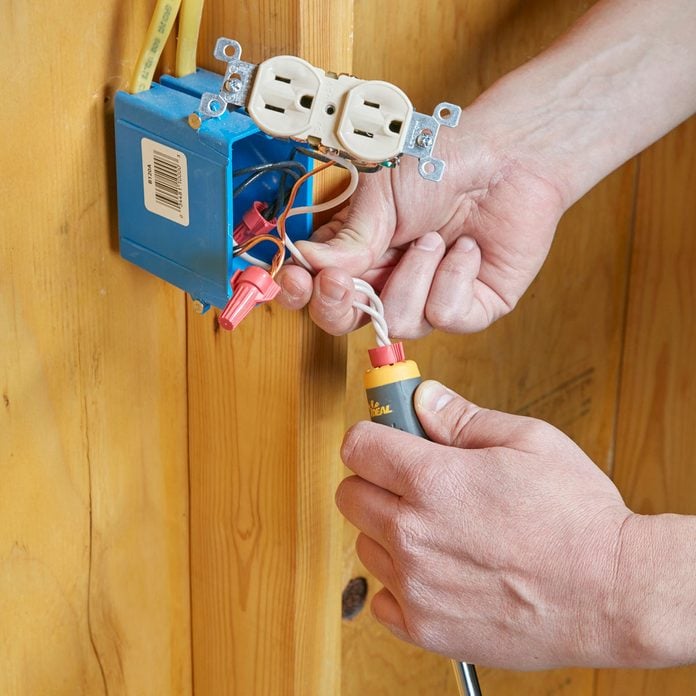
Easier Twisting for Wire Connectors
When you have multiple or heavy-gauge wires to join, twisting on wire connectors by hand can be a real bear, even when they have wings on them. Several manufacturers have tools that make the job easier.
You just insert the wire connector into the star-shaped recess as shown; the recess and the tool’s large rubber grip make twisting wires much easier.
18
/
28

Lubricate Your Glue Caps and Lids
Caps on certain adhesives/glues, like rubber cement and super glue, have a habit of getting stuck or glued on no matter how hard you try and keep them clean. This can be prevented by simply smearing a little coating of petroleum jelly onto the threads of the tube or lid.
You just need a small dab of the petroleum jelly to prevent even more of a mess. Be sure to smear a little bit on before putting the cap back on the glue and it should prevent the cap from cementing on over time. So the next time you go to use your super glue, you’ll be able to open it with ease and get right to work!
You can also get the same effect by spraying a little squirt of WD-40 inside the cap. Check out these 20 brilliant ways to use WD-40.
19
/
28
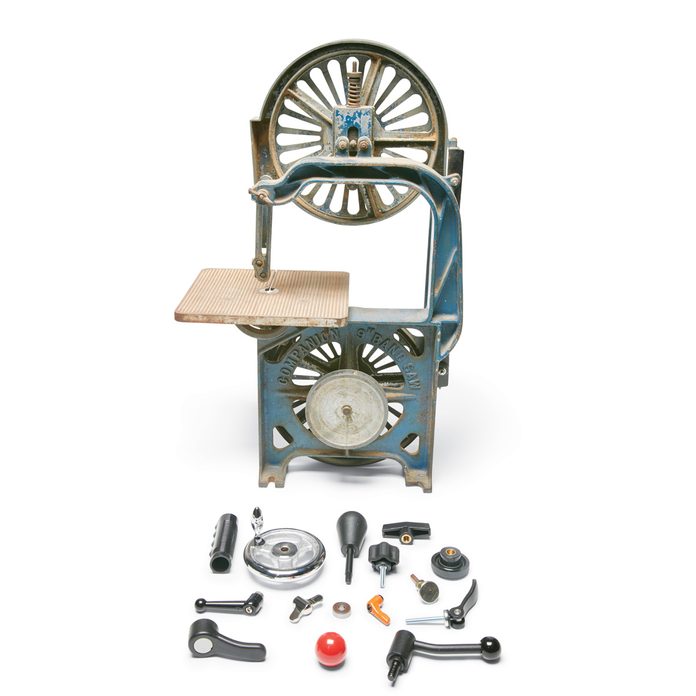
New Parts For Old Tools
I’ve bought a lot of old, used power tools, woodworking machines and outdoor power equipment on craigslist.org. And more often than not, they’re missing parts or parts are broken. I can’t always get replacement parts from the manufacturers because they’re out of stock or discontinued. That’s when I turn to a handful of different websites for hard- to-find parts.
My favorite site for power tool parts is Ereplacementparts.com. It stocks parts for just about every major power tool manufacturer and ships them quickly. Toolpartsdirect.com, mikestools.com and partstree.com are also good sites.
If I still can’t find what I need, I turn to industrial machine component suppliers like essentracomponents.com (formerly Reid Supply). But you can’t just indicate what machine you have and order a replacement part.
It takes some digging around on the website to track down a part that’ll work for you. Essentra has good photos and detailed drawings with exact measurements for everything it sells.
Check out Essentra the next time you need an unusual part like a clamping handle, handwheel, knob or bearing. — Jason White
20
/
28
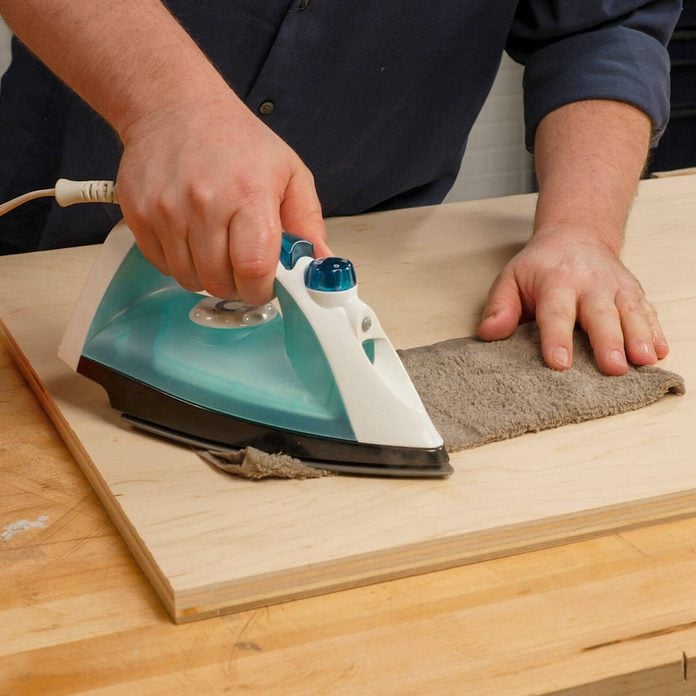
How to Get Dents Out of Wood
Dents in wood surfaces can be annoying. But fret not, they can be fixed!
- Simply soak a washcloth in water and ring it out a bit so it’s not sopping wet.
- Put the damp washcloth on the affected area. The water will wick through the wood, and that’s fine.
- Now, with your iron on its highest setting, place it on the damp washcloth over the affected area, and make small movements back and forth and in circles.
- Press down firmly and continue until your washcloth is dry. It won’t take long to evaporate.
At this point, the wood fibers are absorbing the water and should expand back to where they were originally. Continue this process and repeat by adding more water until the dents rise up to be flush with the rest of the material. Here are more instant fixes for nagging problems around the house.
21
/
28
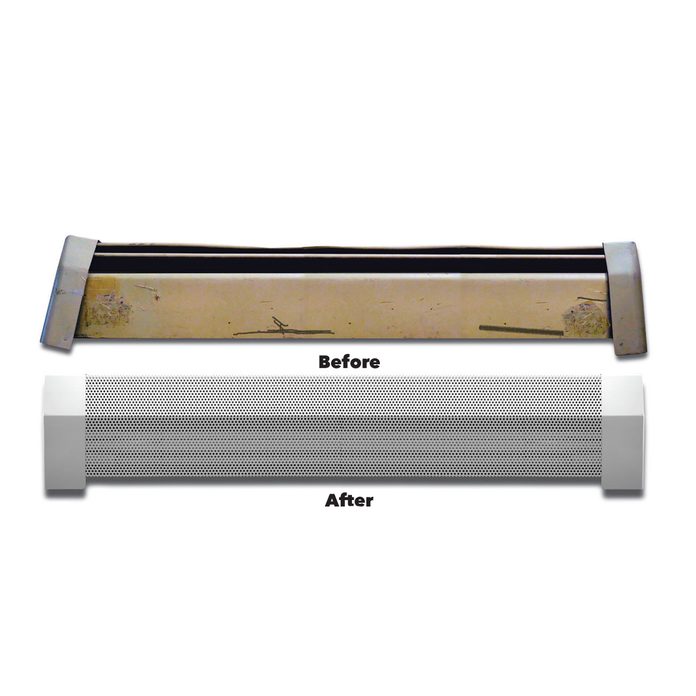
Replace Baseboard Heater Covers
Got old, rusty “hydronic” (hot water heat) baseboards? You could replace them in their entirety, but that’s expensive and time-consuming. You could also sand and paint them, but that’s a lot of work.
The easiest option is to replace just the front covers and end caps with aftermarket ones made of plastic or metal, which are available at home centers and online.
Supplyhouse.com sells several styles of replacement covers, called “baseboarders,” for about $16 to $27 per foot. End caps cost about $16 to $28 apiece. Plus, the company’s website has easy-to-follow installation videos.
22
/
28
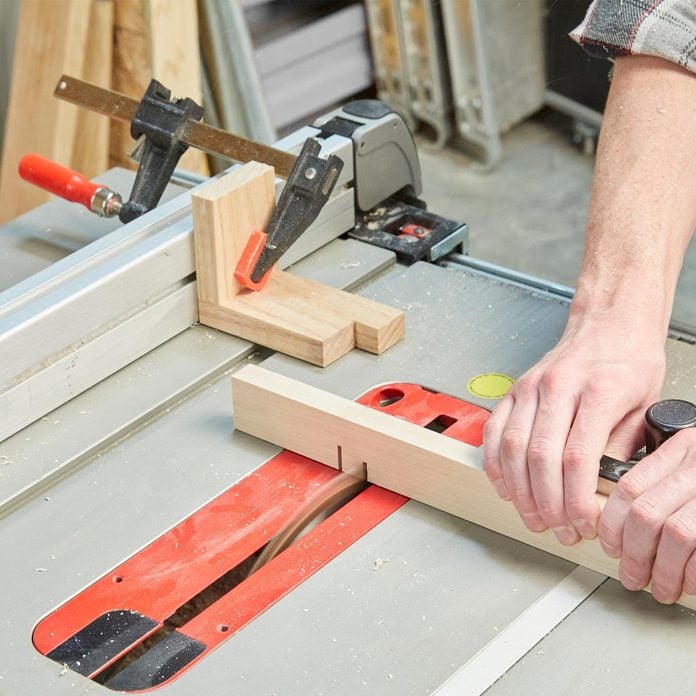
The Perfect Notch Jig
Here’s a cool trick for cutting a bunch of identical notches without a dado stack. Carefully cut an accurate notch from the end of a board, exactly the same dimension as your desired notch.
Attach a clamp board to the other end of the notched board and clamp the assembly to your saw’s fence. Mark the notch location on your workpiece and set the fence. The jig’s end registers the first cut.
Slip the workpiece into the notch for the second cut, and then make multiple passes to clear the remaining waste. – Craig Harper.
23
/
28
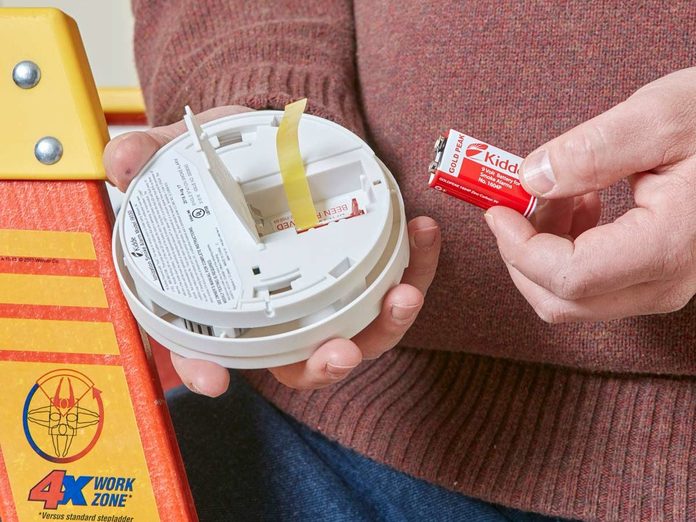
Chirping Smoke Detectors
Ever been driven crazy in the middle of the night by a chirping smoke detector? One of your detectors has a dying battery, but determining which detector is chirping is surprisingly tough.
Instead of trying to figure out which smoke detector has the dying battery, just replace the batteries in all the smoke detectors at the same time to eliminate the guesswork.
Also, be sure to replace any smoke detectors that are older than ten years because they’re no longer reliable. If there’s no manufacture date on any of your smoke detectors, just replace them to be safe.
Some newer ones have 10-year batteries in them that you never have to replace; you just replace the smoke detector.
24
/
28
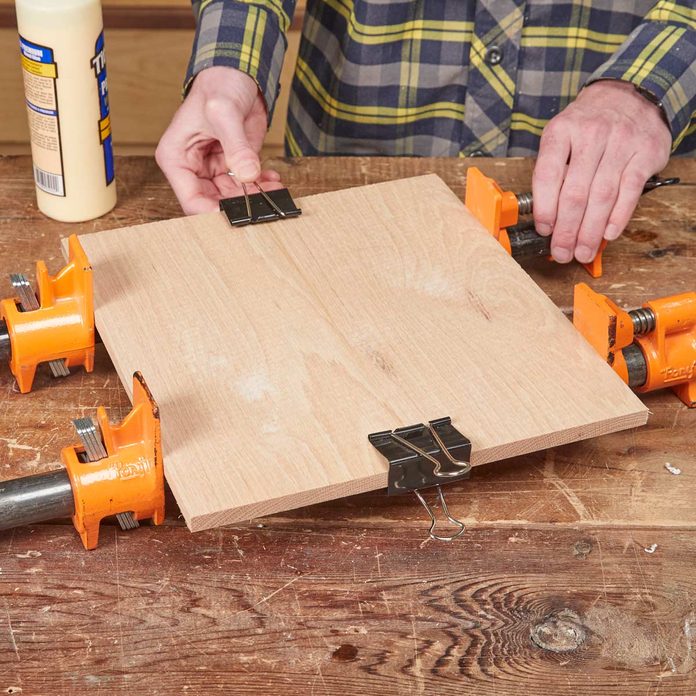
Binder Clips Make Perfect Mini Clamps for Glue-Ups
Glue-ups can be really frustrating if your boards start to wander out of alignment while you apply clamping pressure. If you don’t have any spring clamps to keep the boards aligned, large binder clips will suffice. I keep some near my workbench all the time for just this purpose. – Bill Segura.
25
/
28
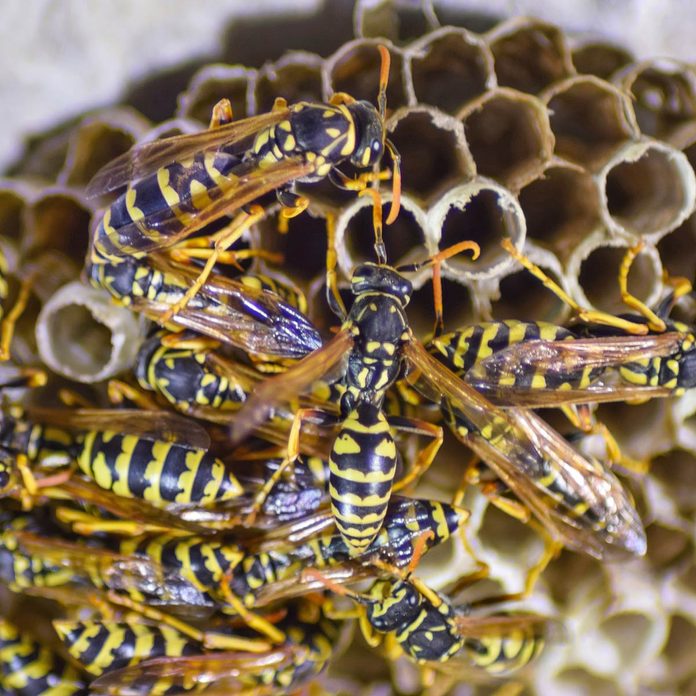
Got Wasps?
If you have a nest of yellow jackets or paper wasps near your house and they’re not bothering you, just leave them alone and let them eat the caterpillars and spiders in your yard.
These types of wasps die off after a couple of hard frosts, anyway. According to the “bee lab” at the University of Minnesota—beelab.umn.edu—only the new queens survive winter.
They hibernate underground and establish new nests in the spring and don’t reuse the old nest, whether it’s underground or inside an exterior wall of a house. If you’re really worried about getting stung, and the nest is visible, you can kill the entire nest with an aerosol spray products.
You just spray the product directly into the nest at sunset or sunrise (follow the directions on the can). Just make sure you’re standing far away from the nest while you’re spraying in case all the wasps decide to fly out and try to sting you.
26
/
28
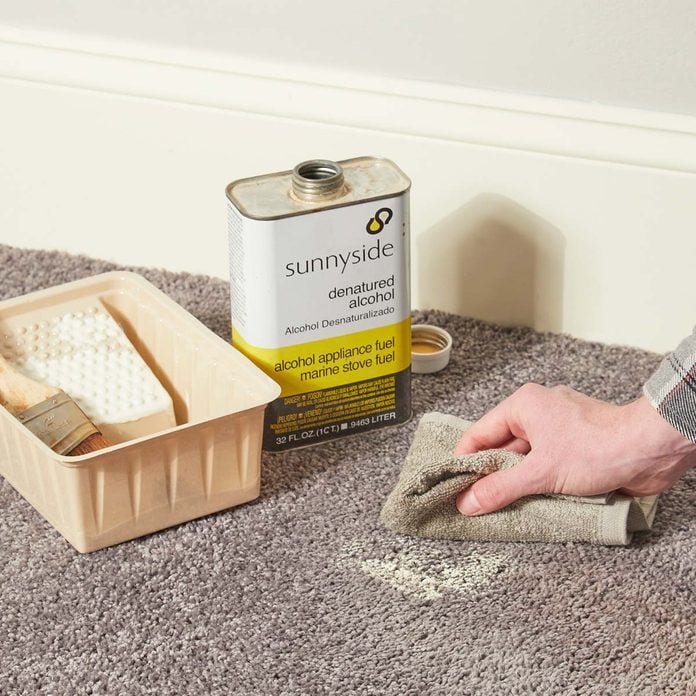
Spilled paint on your carpet? Don’t panic, do this:
I used to think dropping a loaded paintbrush on the carpet meant replacing the carpet, until a former foreman told me this little tip. Pour some denatured alcohol onto a rag and scrub away the paint.
Use a rag that is as close in color to the carpet, as the alcohol can transfer some of the rag’s color to the carpet. – Tom Gerdowsky
Need some denatured alcohol? Buy it from Amazon.
27
/
28
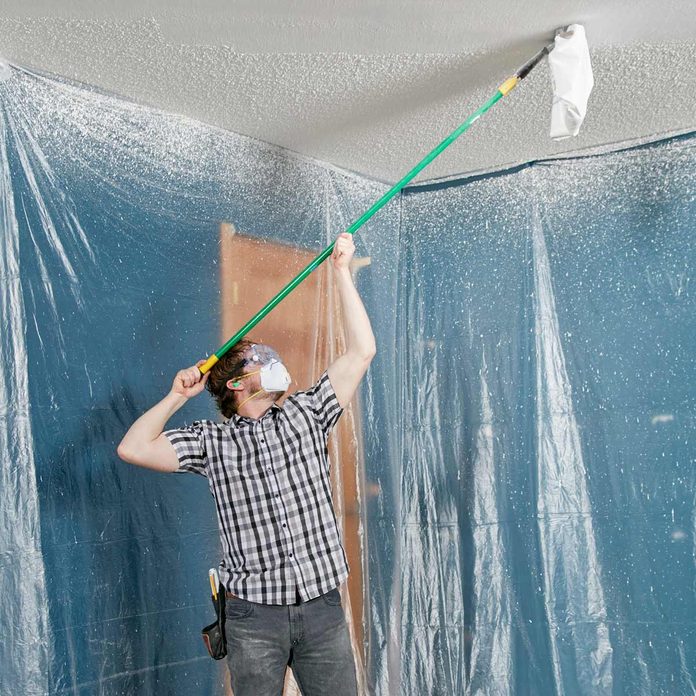
Another Way to Remove Popcorn Texture
We ran a story a few months ago on how to remove popcorn texture from ceilings. One of our readers, John McKinney, wrote to us with a tip of his own.
“I use a Homax Popcorn Ceiling Scraper,” says John. “It’s a rectangular scraper that you screw onto a painting pole or broom handle. The rectangular part accepts a plastic grocery bag that catches most of the texture as you scrape it off. You can dump the bag when it gets too heavy or put on a new bag.”
The Homax popcorn scraper is available at home centers and online for about $20.
28
/
28
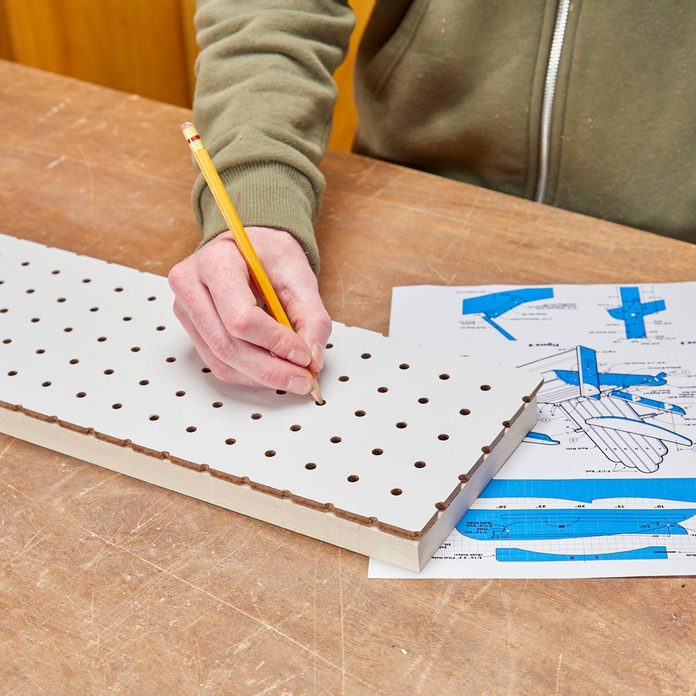
Use Pegboard to Enlarge Project Plans
Scale plans are often drawn on a grid so you can readily enlarge the original drawing. But enlarging means redrawing the grid to a larger scale—a tedious and time-consuming job.
I’ve found a quick way to recreate 1 in. grid with 1/8 in. thick pegboard. Just place the pegboard on your workpiece and center a dot in each hole with a pencil. — Dean St. Clair