


Get an impressive shower upgrade without breaking the bank or turning your basement into a jobsite.
Multiple Days
Intermediate
More than $1000
Introduction
Bathrooms are often high on the renovation wish list. But if you’re like me, the thought of demolishing your bathroom and putting it out of commission keeps you from taking the plunge. To avoid that, I dreamed up ways to get big upgrades in less time and with less mess!
Why a Drop Ceiling?
Drop ceilings are common in kitchens and basements, where they hide ductwork, plumbing or beams. Building one above the bathtub might seem a little crazy, but it’s a perfect way to add luxury features without tearing apart your bathroom. I built this ceiling from PVC sheet material, which is waterproof, paintable and easy to work without special tools.


Tools Required
- Angle grinder
- Basic carpentry tools
- basic electrical tools
- Circular saw
- Drill
- Jigsaw
- Plumbing tools
- Tile Drilling Bits
Materials Required
- 1/2" PEX pipe
- 1/2" x 4' x 8' PVC sheets
- 14/2 NM cable
- 2 x 4 x 8'
- 2 x 6 x 8'
- Cortex screws
- Drop ear elbow
- Low-voltage cable
Project step-by-step (15)
Step 1
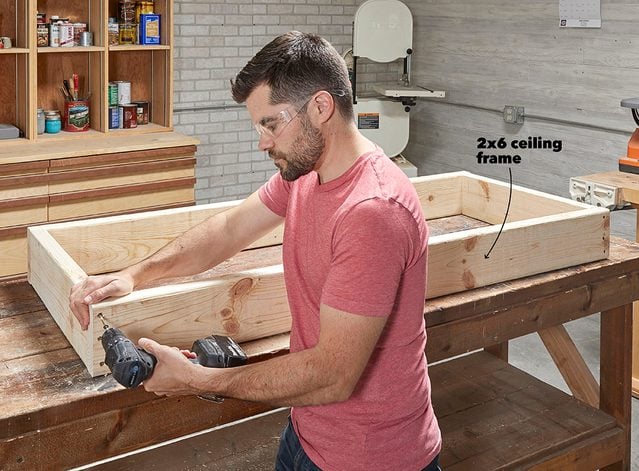
Build a Box
- Build the ceiling frame by screwing 2x6s together.
- Pro Tip: To determine the length of this simple box, measure between the two walls and subtract 1/4-in.
Step 2
Add Supports for the Fan and Shower Head
- Set the bath fan and shower head in the ceiling frame. I placed the center of the showerhead 20 inches from one side (one-third of the total length) and then centered the fan between the opposite side and the showerhead.
- Screw the 2x4s and 2x6s into place from the outside of the frame.

Step 3
Cover the Box with PVC
- Cut a sheet of 1/2-in. PVC to fit the top and sides of the frame.
- Fasten this PVC skin to the frame with composite screws, then plug the holes to hide the screw heads.
- Carefully position the PVC before driving screws.
- Note: Removing a composite screw leaves a hole that you can’t screw back into.

Step 4
Cut a Hole in the Top
- Using a jigsaw, cut out a 6-in.-diameter hole in line with the fan’s exhaust port to run flexible duct through.

Step 5
Install Plumbing Elbow
- Install a drop ear elbow centered in the frame 20 inches from the side.
- Note: This fitting holds the rainfall showerhead in place. PEX pipe will be attached to it later to supply the water.

Step 6
Install Lights
- Screw a strip of PVC along the side of the ceiling frame toward the top. Stick on the damp-rated LED strip so it faces down.
- Drill a 1/4-in. hole above the strip and feed the low-voltage cable inside the ceiling frame for connections later.

Step 7
Position the Ceiling Frame
- With a helper, position the frame within the shower walls with six inches of space below the ceiling, to make room for the fan’s duct, and three inches from the back wall.
- Prop the frame into position with a few 2x4s, then wedge it into place with shims.

Step 8
Secure the Frame
- Locate studs and drill through the frame.
- Pro Tip: If you can’t find studs through the tile, track them down on the backside of the wall and transfer the measurement to the front.
- Use a tile bit to drill holes through the tile so the frame can be fastened with large screws into the studs.
- Note: You’ll need to drill holes through the tile for the plumbing and electrical cable too.

Step 9
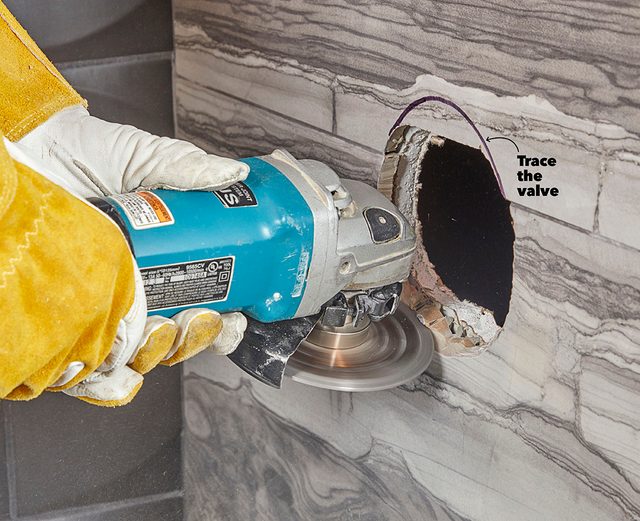
Cut the Tile to Fit the New Valve
- To make room for the Grohe rough-in box, we cut a hole 5-3/4-in. in diameter.
- Pro Tip: The best tool for this is a diamond hole saw, but one that big costs close to $100. I opted to use an angle grinder with a diamond blade. This cut can be tricky; take your time.
Step 10
Install the Valve
- I cut an access hole in the wall behind the shower and installed the three-way shower valve.
- Then I used PEX pipe to supply the new rainfall showerhead and to connect to the old copper pipe.
- Note: Secure the valve with 2×4 blocking.

Step 11
Cover the Access Hole
- I fastened a frame to the drywall that I’d cut out earlier and attached the frame to the wall with trim screws.
- Pro Tip: To make the frame easy to remove, I didn’t plug the screw holes.

Step 12
Cap the Frame
- Cut a hole in the final PVC sheet for the fan and drill a one-inch hole for the shower head plumbing.
- Route electrical cables into the wall, then cap the frame with the PVC.

Step 13
Install the Bath Fan
- Make the electrical connections to the fan and attach the flexible exhaust duct to the fan.
- Slide the fan into the opening, screw it to the blocking and install the grille.

Step 14
Cover it All With a Panel
- Build a panel to be fastened three inches from the front of the drop ceiling.
- Use PVC to wrap the back and bottom, then screw the panel to the walls between the shower.
- After covering the front with the final sheet of PVC, caulk the corners and paint it to match the rest of your wall.

Step 15
Features Added to the Shower
- Lighted Bath Fan: A slim-fit fan allowed me to maintain enough ceiling height and use 2x6s for the ceiling frame. This Aero Pure fan includes an LED light ($145).
- Rainfall Shower: The epitome of luxury in a bathroom is an overhead shower. The plumbing is easy to run down the wall; all you need is a hole big enough for the pipe. This Rainshower 310 SmartConnect shower head lets you change the spray pattern with a remote you can mount anywhere in the shower.
- LED Accent Lights: These 12-volt dimmable LED light strips can be cut to any length and are easy to wire together. Most importantly, they’re rated for damp areas like a shower. Made by various manufacturers, a 16-ft. strip costs about $37. The lights are powered by a switch that has a built-in transformer to convert 120-volt power to the 12 volts needed for the LED light strips. Made by Kichler, the switch costs about $150.
- Three-way Shower Valve: This Grohe Grohtherm SmartControl valve ($475) lets you use the shower wand, tub spout, and rainfall showerhead all at the same time, individually or in any combination of the three.
Originally Published: September 01, 2020