


Car Trim: How to Repair Your Car’s Molding
Updated: Feb. 29, 2024
Carmakers long ago stopped using spring clips to attach car trim and molding. Instead, they use adhesive tape.
On This Page
What is a Trim on a Car
Car trims give vehicles their distinct looks, adding to the aesthetics and completing the design. But over time, factors like chemicals from car maintenance can wear out the adhesive that holds the trim in place. The good news? Fixing this is simpler than it might seem, and you can do it yourself!
Why Car Trims Come Off
Gone are the days when car trims and moldings were fixed in place with spring clips. Today, adhesive tape is the choice of many car manufacturers. While the tape works effectively, it isn’t invincible. It’s vulnerable to chemicals like wax and bug remover, which can weaken the tape’s bond. The result? Car trim that’s at risk of falling off.
Steps to Reattach Your Car Trim
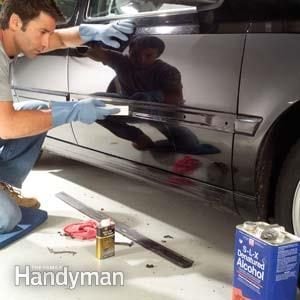
- Setting up: Ensure you’re working in a well-ventilated area, considering the potent adhesive remover you’ll be using.
- Position the Trim: First, place the car trim or emblem back to its original position. This is essential to ensure proper alignment when you reattach it. Use removable masking tape around the car trim to mark its position. This will serve as a template for repositioning later.
- Safety First: This task involves chemicals. So, put on nitrile gloves and a paint solvent-style respirator. This will protect your hands and prevent inhaling potentially harmful fumes.
- Remove the Old Adhesive: Pour a bit of adhesive remover along the top edge of the trim, letting it soak the tape for about five minutes. Use a plastic putty knife to gently slide under the trim, working it in a rocking motion to cut through the old tape. Continue adding the adhesive remover to ease the process.
- Clean the Residue: Once the trim is removed, ensure you eliminate every trace of the old tape and adhesive from both the car paint and the trim. A clean surface is crucial for the new adhesive tape to bond effectively.
- Apply the New Tape: It’s essential to avoid direct contact with the adhesive side of the tape. So, put on a fresh pair of nitrile gloves. Place the new tape to the car, following the inside edge of your earlier template. Press the tape firmly. Then, remove the top liner of the tape and position the trim above the template. Once perfectly aligned, press the trim onto the tape, ensuring it’s firmly in place.
Materials You’ll Need
- 3M 08984 Adhesive Cleaner and Remover: Priced at around $17, this will help in removing the old adhesive.
- 3M 03614 Scotch-Mount 1/2″ x 15′ Molding Tape: For approximately $8, this tape is perfect for reattaching your car trim.
These products can be found in auto parts stores with body shop supplies or online at Amazon.
With this simple DIY guide, you can ensure that your car’s trim and molding are securely in place, enhancing the vehicle’s appearance and ensuring it looks as good as new!