


Planning to install a garden path? Let us point you in the right direction.
Stone Paths, Pavers or Gravel: Which Type of Garden Path Is Best?

Updated Aug. 31, 2024
A garden path enhances any backyard. Learn about design factors, limitations and installation techniques for gravel, stone, brick and pavers, along with attractive edging options.
We tend to spend a lot of time planning the parts of our gardens and backyards. Flowers, trees, vegetables, bushes and shrubs come together to make a calm, beautiful outdoor oasis. One part of landscape design that’s easy to overlook is the space between the living elements, something that pulls together the different parts of the garden and lets the features really stand out.
One way to create that space is with a garden path.
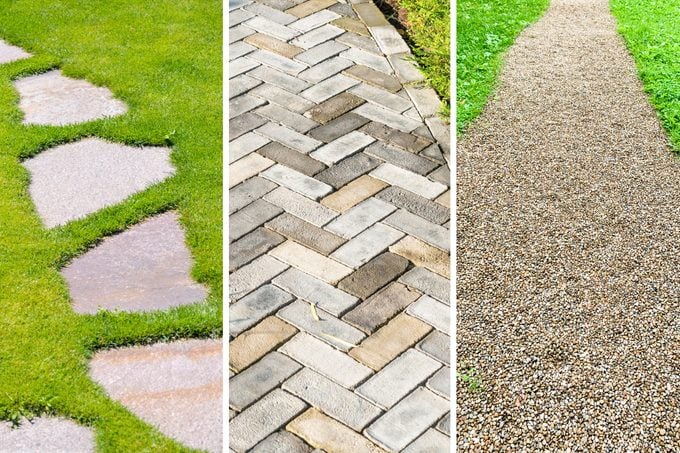
Paths aren’t just negative space, though. They’re the perfect mix of form and function, giving you a route to enjoy your natural elements as well as a means of access to care for them. There are several ways to create a garden path. Three of the most popular include gravel, stone and pavers. Ultimately, choosing a type of path comes down to individual preference, but there are a few additional factors to weigh before you build your own.
On This Page
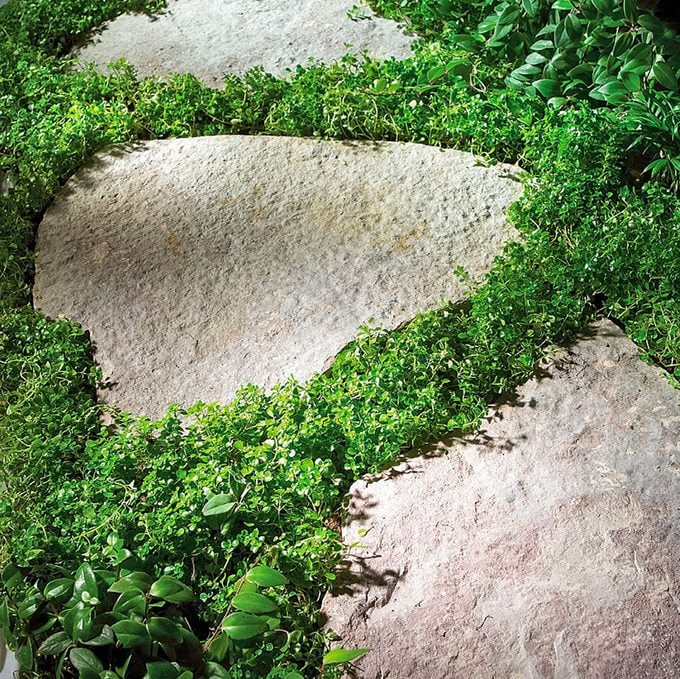
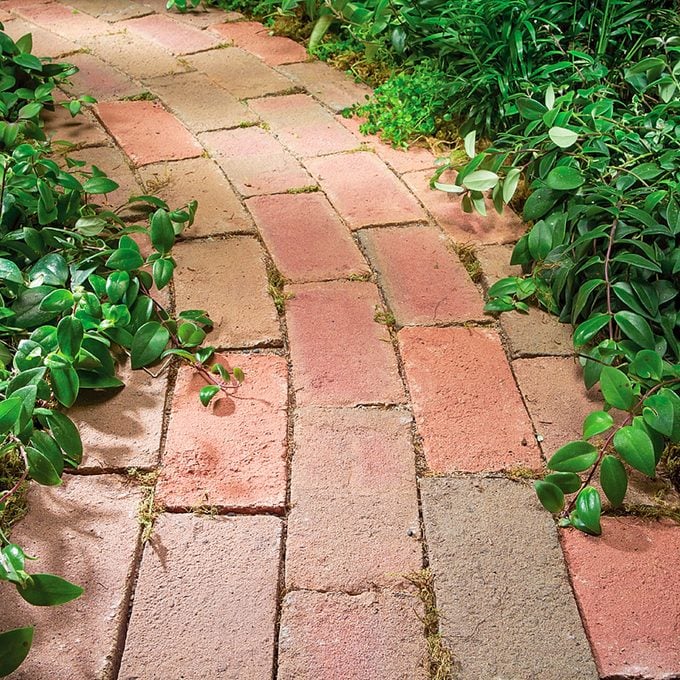
Stone Paths
Stone paths are highly decorative and easy to lay. You fit them like a long, freeform puzzle. Stone rich in color and texture. Each piece is unique. And it’s timeless: A path installed yesterday may look as if it’s been there for generations. It’s the most expensive path material. This stuff is heavy, but surprisingly easy to install. In most cases, you simply set each piece on a layer of sand and level it. In high-use areas, fit each piece more tightly to lessen the chance of tripping.
Design factors
Best use: Stone is highly decorative and good for light to moderately heavy traffic. Best for foot traffic. It’s not so good for bikes, wheelbarrows and lawn mowers. The rough, uneven surface is difficult to shovel in winter.
Versatility: Ideal for minimal disturbance of gardens and lawn. Great for around trees because you don’t have to disturb the roots. Good material for an indecisive gardener—it’s easy to shift the entire path for a new rosebush!
Longevity/maintenance: The stones will last forever. You may have to lift and reset them if they dip or stick up too high.
Drainage: Let steppingstones follow the lay of the land. Water will run off into the joints. For tightly fitted stone, pitch the path about 1/4 in. per ft. to the side. Slopes: Build stone steps to match the path. Buy riser stones and large tread stones from the stone supplier.
Types of stone
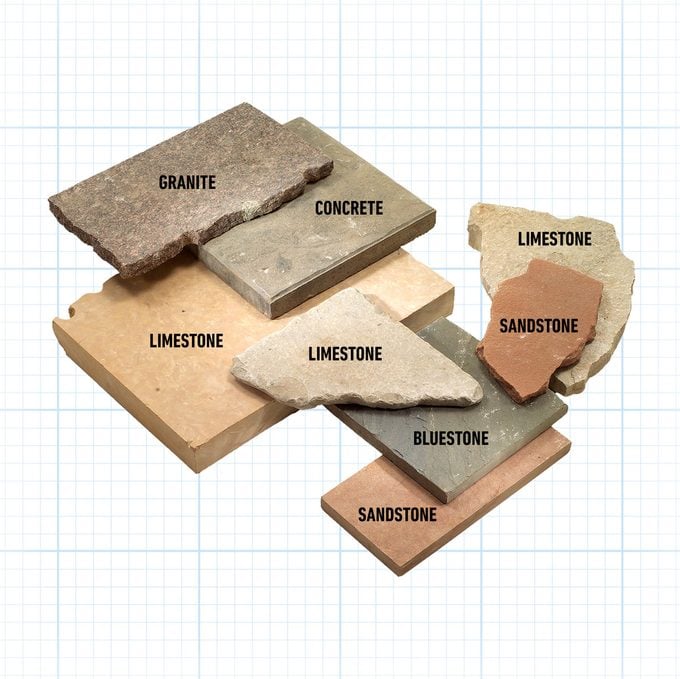
Limestone, granite, sandstone and slate are the most common types, all available in various colors, sizes and shapes. Set them apart as steppingstones or fit them tightly for a more solid pathway. Select material that’s at least 1 in. thick to avoid cracking.
Sizes
- Steppers are small (15 in. across or less), light and easy to handle, but laying them is slow because you have to fit and level each one. Steppers are prone to wobbling and have to be reset more often than larger stones.
- Flagstones are large (24 to 48 in. across) irregular pieces. They’re slightly more expensive than steppers, but they’re versatile. You can always break a big piece to make smaller ones for tighter fits. Their size and weight helps keep them stable, and they’re less likely to shift and need resetting.
- Cut stone is the most expensive but easiest to fit tightly. It looks especially good when set between borders. However, cut stone will probably require more cutting to achieve the more exact fits.
Order your stone from a landscape or masonry supplier. The supplier will tell you how much coverage (square feet) to expect per ton.
How to make a stone path
Setting stone is a lot like putting together a big, heavy jigsaw puzzle. You first skim and flatten the proposed pathway, then dump in and smooth out a couple of inches of sand as a setting bed. Patience is essential when it comes to fitting. Spread out the stones and pick and choose for a pleasing pattern. The stones will weigh 60 to 200 lbs.! Like moving any heavy object, we recommend using a dolly to move stones into place. Finish by filling all the joints tightly with sand, soil or mulch (packed in). Plant a ground cover in the joints for an attractive appearance and to help hold the soil in place.
Gravel Paths
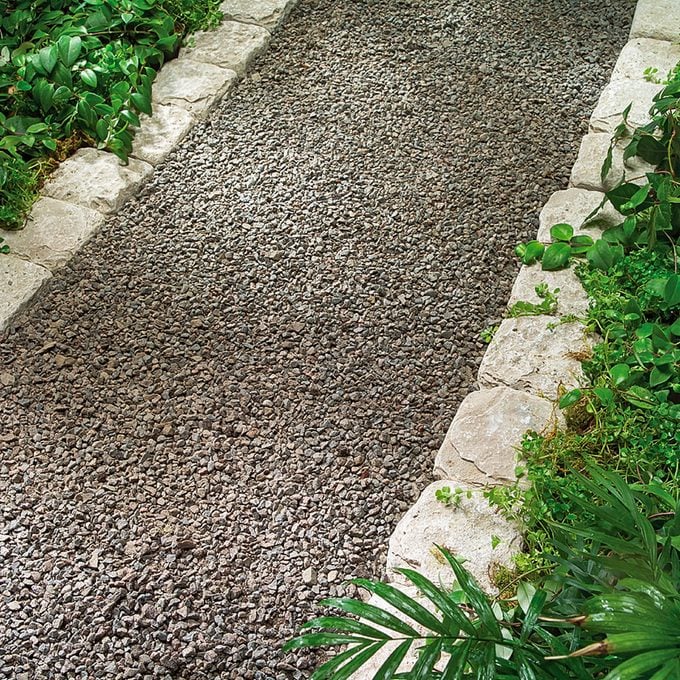
Gravel is the easiest to handle and least expensive path material. It feels soft underfoot, but it’s solid enough to handle a loaded wheelbarrow. And although it looks informal, it can complement a formal garden, especially if you add a stone border.
But gravel has several limitations. It’s not ideal for a walkway right to the back door—pebbles will stick to your shoes and end up on the kitchen floor. It’s not the best choice if you have to shovel snow off it in winter. You’ll end up picking rocks out of your garden and yard. And it’s tough on bare feet! Ask yourself if a gravel backyard is right for you.
Design factors
Best use: Gravel paths are best for light to moderate foot traffic.
Longevity/maintenance: A gravel path will last indefinitely, but it needs upkeep. To keep it looking sharp, rake it and pull weeds monthly. Every few years, top-dress it with a few buckets of new gravel.
Drainage: No special sloping needed. You can follow the grade of your yard, but avoid low spots.
Slopes: Avoid steep inclines. A heavy rain will wash all your hard work away. For steps, use timbers or stone.
Borders for gravel paths
Include a border in your plans. It’s essential for containing the gravel.
Metal edging: Thin metal edging offers a crisp, clean, “borderless” look. To contain the gravel, set the edging 1 in. higher than the path. Anchor it with the metal stakes provided. Metal edging is available in green or brown painted steel or aluminum in 8-ft. and 16-ft. lengths. Cut it with a circular saw equipped with a metal-cutting blade or a hacksaw.
Stone: Almost any stone can be used to border a path. Landscape suppliers will have several types. If possible, fit the stones tightly for a smooth appearance. Install the stones on an inch or so of gravel, then set them with a whack from a rubber mallet.
Brick: The brick border is a traditional style. Set the bricks upright at an angle or flat in the ground. Install them in a 2-in. sand bed, then surround them with the gravel and soil to lock them in place.
Types of gravel
Landscaping gravel types come in many sizes and colors. Ask for gravel that compacts well. It’ll typically have stones ranging in size from 3/4 in. down to a powder. Smaller stones (3/8 in.) are the most comfortable underfoot. Larger (3/4 in.) stones stay put better during rainstorms. Buy your gravel from a landscape supplier or directly from a quarry.
[https://images.tmbi.com/wp-content/uploads/wwwroot/tfh/step-by-step/fh03apr_plapat_03.jpg]
![[https://images.tmbi.com/wp-content/uploads/wwwroot/tfh/step-by-step/fh03apr_plapat_03.jpg]](https://images.tmbi.com/wp-content/uploads/wwwroot/tfh/step-by-step/fh03apr_plapat_03.jpg)
How to build a gravel path
Laying a gravel path is mostly shovel and wheelbarrow work. You first flatten the pathway with a spade, skimming off sod if you’re crossing a lawn. Then set the borders and pour in about 3 in. of gravel. You’re moving a lot of weight. A strong back is essential—enlist a neighborhood teenager to help out. Have the gravel dumped on your driveway. Shoveling gravel off a lawn or tarp wastes time.
Pavers
Pavers have been around since the Romans cut stones and placed them on a gravel bed to make incredibly durable roads. They can withstand heavy use. Modern versions are made from concrete, clay or stone. A paver path is a labor-intensive project that requires the rental of a heavy plate compactor for proper installation. But the result is a permanent, tight-fitting, relatively smooth path that rivals solid concrete for durability.
Pavers are designed to lie in a tight pattern. Colors and patterns vary widely.
Design factors
Best uses: All-around excellent material for paths, walks and even driveways, since paver construction can withstand heavy weight. They’re highly decorative. You can choose from a variety of colors and patterns, creating anything from a formal English garden walk to an ancient-looking cobblestone path.
Versatility: Ideal for straight or curved paths. However, since pavers require a compact gravel base, changing the path later is a huge job. Use with caution around mature trees, so as not to damage the roots.
Longevity/maintenance: This type of path will last a lifetime. To avoid weeds, sweep off dirt so it doesn’t accumulate in the joints. Every few years, sweep more sand into the joints to keep the pavers secure.
Drainage: Set the path to drain at 1/4 in. per ft. to the side. Set the pavers slightly above the surrounding grade. Slopes: Pavers can be laid on steep inclines (if you can walk up it, pavers can be laid on it), but don’t use them for steps. Use stone, concrete or wood for the steps instead.
Types of pavers
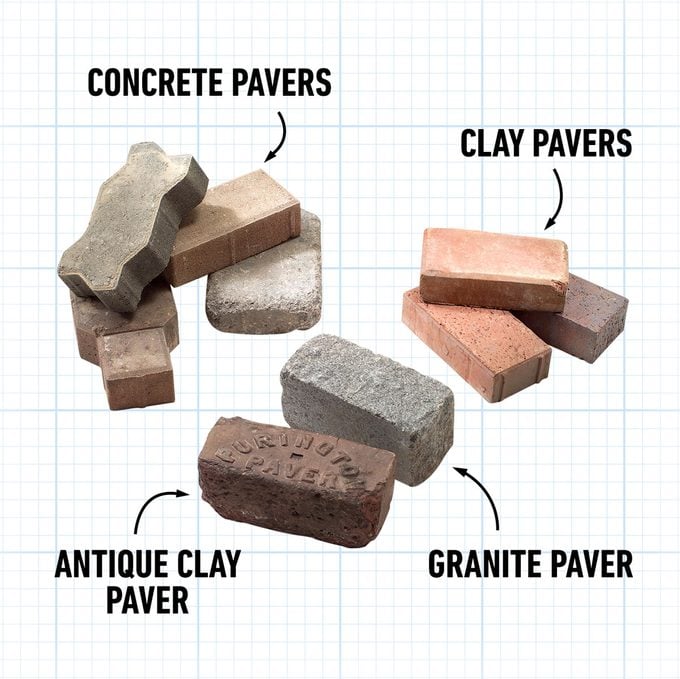
Concrete pavers are the most common and diverse, available in different colors and shapes. You can arrange each shape in a number of patterns. They have beveled edges for easier fitting and shoveling. Expect them to last 30 years or more. The color will fade slightly as they weather.
Clay pavers were commonly used for streets in the 1900s. Many versions are available today, from soft-textured molded styles to crisper “wire cut” types. Color retention and durability are excellent. Set them perfectly even; the edges on some types can chip. Be sure what you buy is a paver, not a house brick, which is softer and will deteriorate. Stone pavers are the most expensive, at least twice the price of clay or concrete pavers. They’re often tumbled to make them look old. They’re incredibly hard and difficult to cut, but they’re attractive and will last a lifetime.
You’ll find the largest selection of all types of pavers at a landscape, brick or stone supplier. You can usually find concrete pavers at home centers as well.
How to build a paver path
Setting pavers is a lot of repetitious work and isn’t a job for a novice. You first dig a pathway about 9 in. deep and fill and compact the base material (gravel that packs well) with a special plate compactor.
Then you lay the edging, spread and level a bed of sand and drop in the pavers. You usually have to cut some pavers to fit with a saw and diamond blade. To finish, you set the pavers with the plate compactor and then sweep sand into the joints.
Originally Published: April 16, 2024