


Got a window that could use some sprucing up? How about more storage space? Learn how to do both in one fun project!
A day
Intermediate
$20-$40
Introduction
Here's a way to add a little extra space to your windows.Tools Required
- 18-gauge brad nailer (optional)
- A 23-gauge pin nailer
- Air compressor
- Belt sander with 80-grit belt
- Caulking gun (optional)
- Compound miter saw
- Eye and ear protection
- Finishing brush
- Half sheet sander with 180 and 220-grit paper
- Jointer
- Parallel jaw clamps x4
- Pencil and paper
- Random orbit sander with 120-grit paper
- Shop vac
- Table saw
- Tape measure
- Thickness planer
- Utility knife
Materials Required
- 3/4- x 5-in. board
- Industrial grade double-sided tape or 18-gauge brad nails
- Two-inch-long 23-gauge pin nails
- Wood finish of your choice
- Wood glue
Some of my fondest childhood memories involve window stools installed on the sills of old-fashioned double-hung windows in a rustic cottage facing a lake.
Each summer, I’d ride my bike down to that lake to visit Alice and Mike, a lovely elderly couple who were like adopted grandparents to me. One of my favorite parts of these visits was digging into the fresh apple, raspberry or blueberry pies Alice always seemed to be baking. Somehow, every time I arrived, she’d have one cooling on her window sill.
It wasn’t until I was much older that I realized each sill had a sort of built-in shelf called a window stool, giving her space to set cooling pies and other items.
The instructions below show how to make and install window stools over existing window trim. My window trim includes a decorative rectangular strip on the inside and outside edges of the casing.
Retrofitting a window stool over this sort of large, old-fashioned trim can be tricky, requiring a lengthy list of woodworking power tools and some precise cuts. But the results are well worth it. If your trim is more modern and simpler, you may not need all the steps and notches you’re about to see.
Either way, this step-by-step guide will get you to the finish line.
Keep in mind the stool shown in Figure A and the photos below are for larger-scale casing that’s 3/4-in. thick and four inches wide. For modern, slimmer casing that’s about 7/16-in. thick and 2-1/4 in. wide, the stool should project from the wall only about 2-1/2-inches
Want to revive this useful detail of window construction at your place? Keep reading and learn how to make new window stools so you can have somewhere to set cooling pies or anything else you like.
Project step-by-step (7)
Step 1
Measure window jamb and trim details
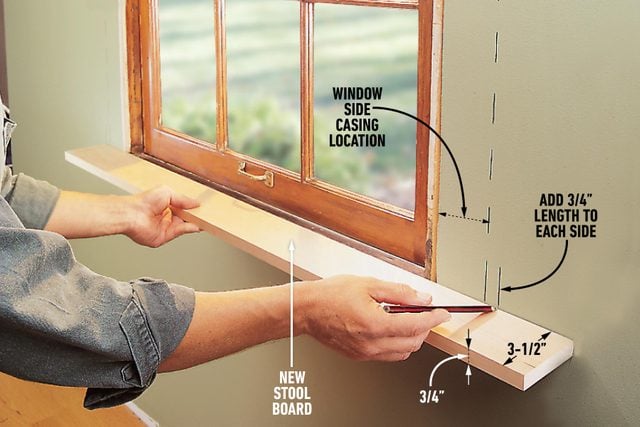
- Measure all pertinent length and width figures on the window sill.
- Be sure to include the width, depth and thickness of the sill, plus the width and thickness of the trim casing and any raised decorative strips it may have.
Step 2
Cut parts to length and width
- With a table saw, rip cut one of your 3/4- by 5-in. boards to the same width as your window sill.
- Use a compound miter saw (aka a chop saw) to cut the ripped board to width. Cut it to the exact length needed to fit snugly between the two vertical sides of your window jamb.
- Cut additional pieces of board to length and width as needed to protrude beyond the window sill and into the room, meshing seamlessly with any existing window trim. You’ll join these pieces together later.
- Decide how far you want your window stool to protrude beyond the sill. I chose 1-5/8-in. for mine.
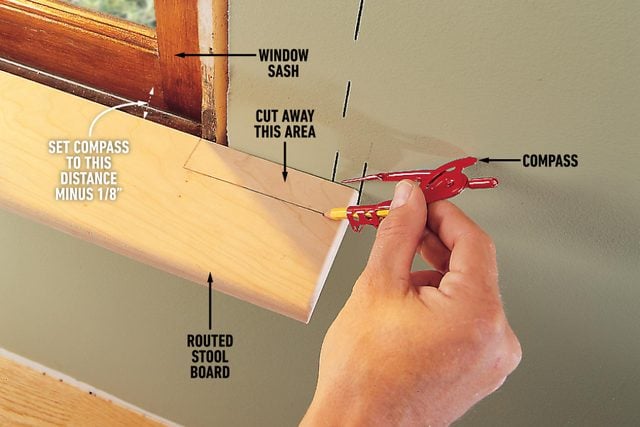
- If your trim casing is only one flat piece of wood bordering the window with no decorative edge strips, you’ll only need to join two pieces of wood together. Decorative strips on your trim (as shown in the photos) mean your window stool will feature three or more separate pieces of wood edge-glued together. This approach makes it much easier to build a window stool with precise notches around the existing trim.
Step 3
Plane parts to desired thickness
- Decide on the finished thickness of your window stool.
- Use your tape measure to determine different thicknesses on your window sill. Be sure the thickness you choose doesn’t obstruct the opening and closing of the window. Since you’re working with 3/4-in. lumber, this will be the maximum thickness possible.
- Plane down all window stool parts to the thickness you’ve chosen.
Step 4
Join parts together
- Do a dry fit to make sure the parts you’ve cut fit tightly over your windowsill, working around any pre-existing window trim.
- Laminate the pieces together edge to edge with wood glue.
- Reinforce the wet glue joints with two-inch 23-gauge pin nails fired from a pin nailer hooked up to an air compressor.
- Use four or so parallel jaw clamps to ensure all glue joints are tight.
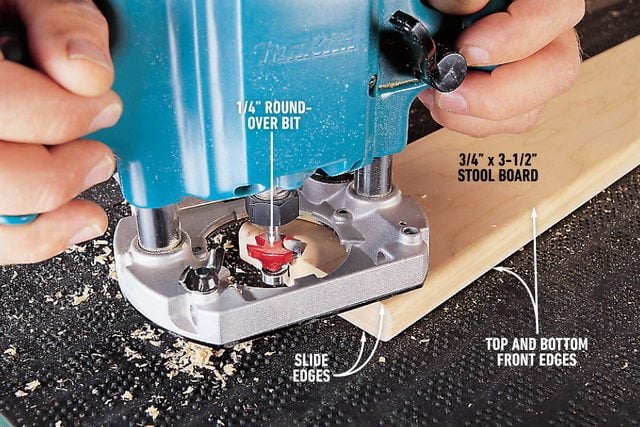
Step 5
Sand
- Wait a few hours for the glue to grab, then remove the clamps.
- Flush up all glue joints using a belt sander with an 80-grit belt.
- Continue sanding with a random-orbit sander and 120-grit paper, then switch to a half-sheet sander with 220-grit paper.
- Lightly ease all sharp corners by hand with a piece of 220-grit paper.
Step 6
Apply finish
- Carefully vacuum all surfaces of the window stool.
- Apply a finish of your choice. I used cherry colored oil-based stain to match my window jamb.
- Apply more coats as needed.
Step 7
Install window stool
- Decide if you want to install your window stool in a way that’s permanent or removable.
- If you prefer removable, use industrial-grade double-sided tape to stick your stool to your window sill.
- If you prefer permanence, use an 18-gauge brad nailer hooked to your compressor to join the stool to the sill.

Originally Published: June 20, 2017