What to expect when outfitting your vehicle with off-grid capabilities, including solar roof panels, a charge controller and a battery power bank.
8-12 hours
Advanced
$2000 - $3000
Introduction
We've had our van for almost four years. After finding ourselves camping often in remote areas, we decided to take the leap and install off-grid battery charging capability. For this project, we chose the Renogy 400-Watt Premium Solar Kit, and here's how it went.
Note: This project includes basic instructions for installing solar panels on the roof, a solar controller inside the van and a two-battery power bank. Because there are many types of setups for these systems, if you want to do this, your first step should be to figure out the size of the system you need, diagram where you would like the components installed in your camper van, and order the kit(s) appropriate to your setup.
Danger: Though 12V batteries might not seem scary, these are high-energy electrical systems. If you're not trained in this type of work, hire a professional to make your wiring connections. Wire sizes, lengths and circuits are all extremely important and vary between systems and setups. Incorrect installation could result in death, loss of property or serious injury. Please, always put safety first!
Watch How To Install a Solar Power System in a Van Camper
Tools Required
- Box wrench set or pliers and an adjustable wrench
- Drill and various bits (9/64 inch 5/16 inch 3/8 inch)
- File
- Grinder with abrasive disk
- ladder
- Multimeter
- Safety glasses
- Screw or impact gun with Phillips bits
- Screwdrivers (Phillips and standard)
- Socket/ratchet set
- Tape measure
- Wire cutters
- Wire strippers
Materials Required
- #8 x 1-inch stainless steel pan head Phillips screws (100)
- Adhesive sealant
- Battery and inverter cables
- Electrical tape
- Necessary and properly sized fuses and or breakers
- Solar kit components
- Wire clamps (plastic 3/8 size)
Project step-by-step (7)
Step 1
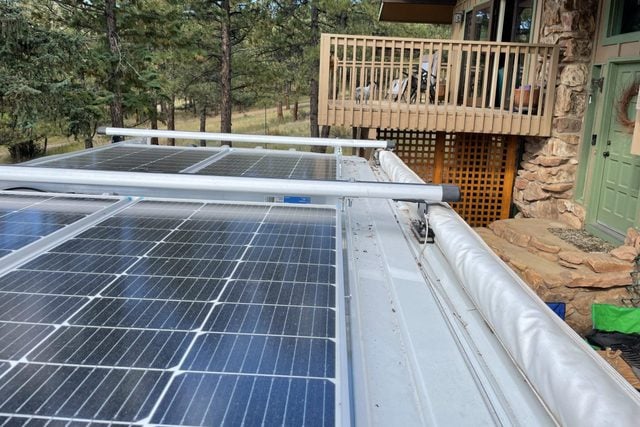
Install the rooftop solar panels
- Place the solar panels on the roof according to the pre-project planning diagram you created and install the brackets.
- If attaching brackets to your van roof with adhesives, be sure to clean the area with acetone or something similar to ensure a good surface bond. If attaching to an existing roof rack with hardware, properly tighten all nuts and bolts and use lock washers so everything stays snug.
Pro tip: Keep in mind these panels will be exposed to wind and weather. Select the location and attachments to maximize the strength of the installation, and pay attention to aerodynamics. The lower they are positioned on the roof, the better.
Step 2
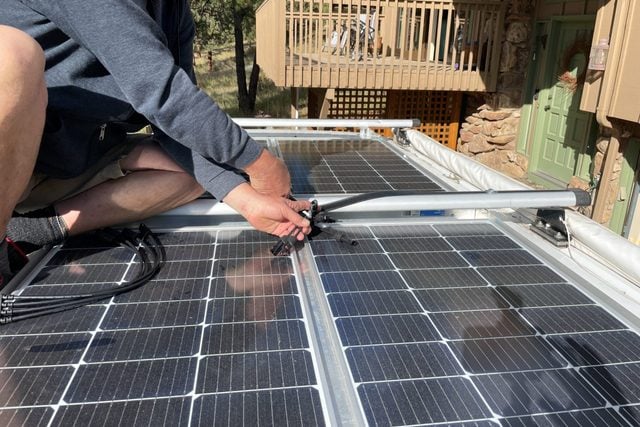
Route and attach the solar panel wires
- Wire the individual solar panels together. Your method will depend on whether you’re wiring them in series or parallel. We wired in parallel, so we connected the positive wires together, then the negative ones. Our kit came with connectors to combine the four positive wires into one wire, and another to combine the negatives. That meant only making a hole in the roof the size of two wires instead of eight — super helpful.
- Next, install any inline fuses required by the manufacturer on the positive wire. This fuse plugs inline to the positive-side wire.
- Select where you want your entry hole for the wires into the van, and route the wires accordingly. We ran ours down the driver’s side rear corner because we had a clear run from the roof to the floor. Most people drill a hole in the roof to feed the wires to the inside. Some manufacturers supply waterproof enclosures; others you can find online.
- Attach the panel wiring securely between the entry point and the panels. This can be done with wire ties, screws with wire clasps or adhesive sealants.

Step 3
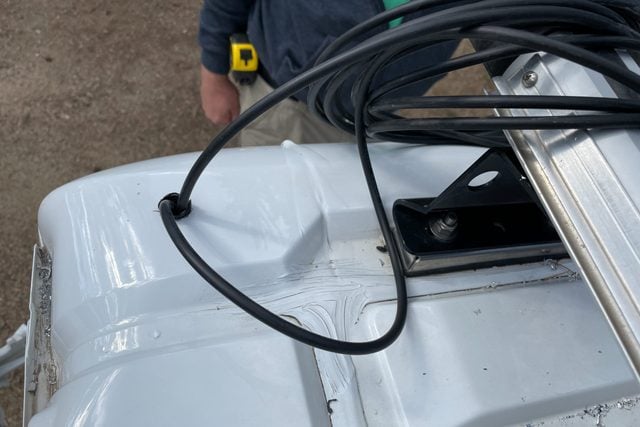
Make an entry hole in the roof and route the wires into the van
- Drill the hole through your roof. We used a 3/8-inch drill bit, then expanded the hole by moving the drill in a circular motion. Take care to stop pushing on the drill immediately when it penetrates the roof skin, to avoid hitting wires or other components.
- Use a file to smooth down any jagged metal from drilling the wire hole.
- Use a section of rubber tubing or plastic wire loom conduit to give the wires smooth entry through the metal. Remember the metal still may cut or strip the wiring when you pull it through the roof. We chose a 1/2-inch plastic wire loom to slightly compress and force the wires through the hole, with the loom sticking up past the metal on the roofline about a quarter-inch and about an inch below the metal hole.
- Push the wires into the hole, one at a time, and have a helper pull them down from inside the van. Make sure the wires are moving freely without damage. Once the wire is completely inside the van, leave the exposed section with just enough slack to secure them on the roof.
- Weatherproof the entry hole. Sometimes this can be done with a waterproof entry “gland,” but we couldn’t due to the shape of our roof. I modified a PVC plumbing fixture and sealed it with an adhesive sealant like Lexel or Sikaflex. Make sure to be thorough or your new roof will leak!
Step 4
Place and install the interior components
- Install the solar charge controller, batteries and wiring according to the pre-project planning diagram you created. Do it in an area that’s dry with some airflow. We placed our controller adjacent to the solar panel wiring entry point to minimize the length of wire and for practicality. We used #8 stainless steel panhead screws. Pro tip: Pre-drill each hole with a 9/64-inch bit. This prevents the wood from splitting and makes starting the screws easier. In wood, a partial pre-drill is all that’s required.
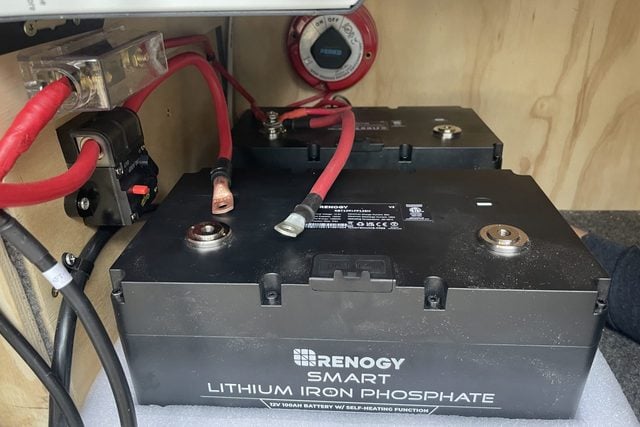
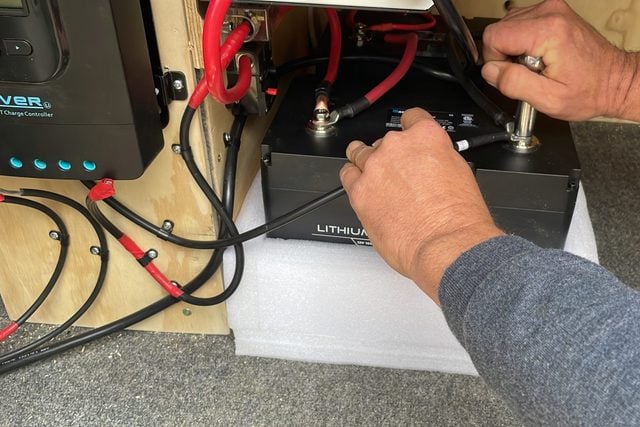
- Place your batteries. Ideally, create a space with some vibration-dampening capability that meets battery venting specifications and allows for firm securement of the batteries. We used Renogy LiPo batteries, which don’t need to be vented and don’t release gasses. Other types of batteries need to be vented because they release hydrogen gas. Those absolutely must be in their own compartment, vented to the outdoors and separated from the other system components.
Step 5
Connect batteries to solar controller and activate them
- Connect the batteries together to make a battery bank. We put ours in parallel, meaning the voltage stays the same but the capacity increases with each battery connected. Whenever connecting or disconnecting DC voltage items, always remove the cables from the negative (black) terminal first, then from the positive (red) terminal. When connecting them, do it in the opposite order to prevent sparking at the positive terminal.
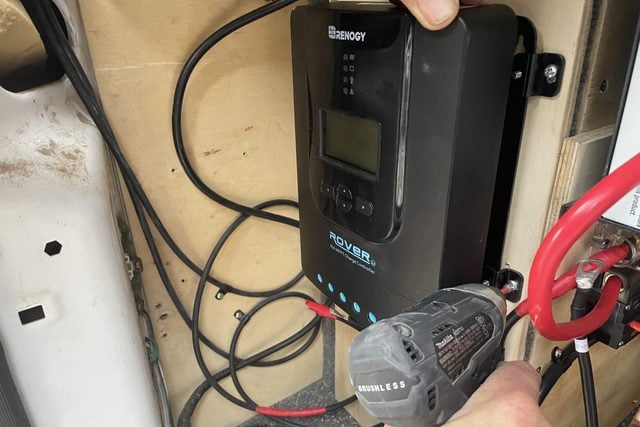
- Connect the battery bank to the solar controller. We chose the Renogy Rover 40-amp Li solar controller, which has a positive and a negative wire input in the bottom of the unit for the battery connection. We attached our negative wire first, then our positive. Tighten your connections to make sure the wires are firmly attached. Note: This controller could be damaged, possibly destroyed, by connecting the solar panels to the controller before connecting the batteries. Check the specs on your controller so you don’t inadvertently damage it.
- Activate your batteries, if necessary. Our Renogy batteries have a “sleep” mode for storage or long periods of no usage. They came with a corded switch that plugs into the battery. To activate, push and hold the button for a couple of seconds. The button will illuminate from a dull blue (inactive) to a bright blue (active).
- Check the solar controller to ensure the batteries are properly connected. Our unit has a display screen for this, but other units come with an indicator light or audible signal. Follow the manufacturer’s instructions.
Step 6
Connect solar panel wiring and confirm operation.
- Connect the positive and negative leads from the solar panels to the solar charge controller. Our unit has a positive and negative port where the panel wires attach. We secured the negative lead first, then the positive. Follow your manufacturer’s instructions since this may vary with other units.
- Check the solar controller to verify the solar panels are connected to the system. Our controller shows us this on the display screen.
Step 7
Remember all systems are custom
Different products and systems all vary on how they should be arranged. They require a plethora of configurations, wire sizes, fuses and possibly circuit breakers and switches. For this reason, we did not get more deeply into the specifics of our system.
We also installed an inverter, which provides our camper van with 12V DC as well as household 110V AC power. When we’re plugged into the grid, this unit also charges our solar batteries.
For every component you install, it’s imperative you follow the manufacturer’s instructions closely and carefully, as well as consult with or hire a professional electrician. Be safe and enjoy the sun!