


How To Install an Off-Grid Solar Power System

Updated: Dec. 19, 2023
Run power where you need it.
Three Days
Intermediate
$2000 - $3000
Introduction
The sun has been sharing its energy with us for a long time, and we should utilize some of it. You can start small — you don’t have to cover your entire roof with solar panels. A compact off-grid solar array is a fantastic solution for RVs and campers, and can be an easy way to run power to an outbuilding.
A small solar array can provide convenient power to a remote location, like our greenhouse. It will reduce your carbon footprint. And you can even expand the array as your needs grow.
Tools Required
- basic electrical tools
- Cordless drill
- heavy-duty lug crimpers
- Multimeter
- Socket set
- specific tools for solar installation
Materials Required
- 1/0 gauge cable
- 10 gauge cable
- 3/4” plywood
- shrink tubing
What is a Solar Array Design?
- Solar power is a straightforward process. Photons emitted by the sun are absorbed by semiconductor materials in photovoltaic (PV) cells. This generates a flow of electrons which are converted and stored in batteries as potential energy. An inverter makes the stored power usable. Simple, right?
Off-Grid Vs. Grid-Tied Systems
- True off-grid systems aren’t connected to the power grid, so they need a bank of batteries. RVs, campers and outbuildings are perfect candidates for an off-grid system.
- A grid-tied system lets the energy generated from the solar array power your home. But when the sun goes down, the power grid takes over.
- The benefit of a grid-tied system? If you generate more power than you use, the excess goes into the power grid and the utility company pays you for it.
- The downside: If the power goes out in your neighborhood, you lose power, too. These systems automatically shut off during a power failure to protect the line workers.
Project step-by-step (14)
Choosing Batteries
- More sources than ever exist for batteries, but most originate overseas. I wanted strong customer support with a simple phone call, and Dragonfly Energy/Battle Born Batteries provides that and more. Based in Nevada, it offers domestically assembled lithium iron phosphate (LiFePo4) batteries.
- Its heated battery was a perfect choice for the greenhouse’s Northern location. Here are our favorite greenhouse heaters.
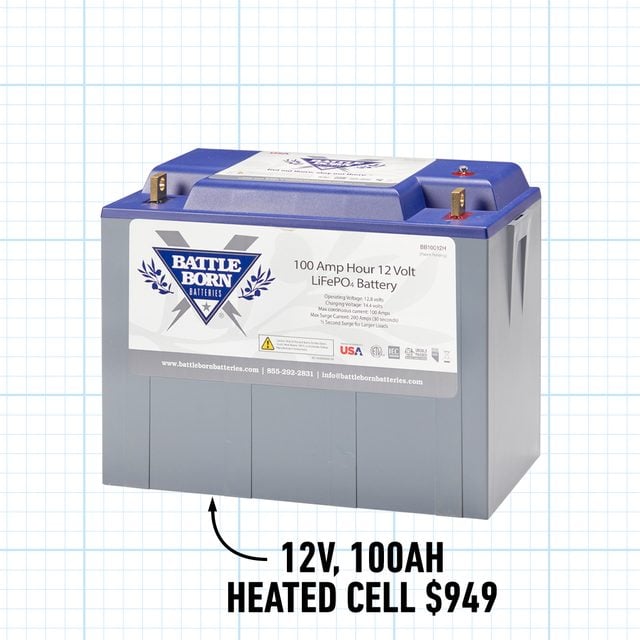
Lithium Iron Phosphate
- Battle Born lithium batteries feature an integrated management system that protects the cells; they can’t be overcharged or overdrawn. The batteries cost more, but with their high charge cycle specs (1,000 to 3,000 cycles), they still have the highest cost-to-benefit ratio.
Lead Acid
- Many types of lead acid batteries, including flooded, gel and absorbent glass mat (AGM), are available.
- They cost less than LiFePo4 batteries, but the drawbacks of lead acid outweigh that advantage
- They’re heavy, making them a poor choice for mobile installations.
- With their shorter life span (300 to 1,000 cycles), you’ll pay more for them over time.
Amp-Hour Ratings
- Battery capacity, measured in amp-hours (Ah), refers to the amount of energy a battery can store.
- A 100Ah battery can deliver 100 amps for one hour or 25 amps for four hours or 50 for two. You get the idea.
Series vs. Parallel
- Wiring batteries in series doubles the voltage while keeping the capacity the same.
- Alternately, wiring the terminals in parallel keeps the voltage the same while doubling the stored capacity.
Right-Size Your Battery Bank
Use this simple equation to determine battery bank size.
- List all AC loads in watts (W) in the table below and calculate the total watt-hours (Wh) per day.
- Multiply that number by the days of autonomy (DoA) — that is, the average number of days you expect complete cloud cover.
- Then divide that number by the voltage (V) of the system.
- This is the amp-hours (Ah) your battery bank should have.
AC Load (W) x Hrs./Day
Wh/Day x DoA = Total Wh
Our Greenhouse Loads
| AC Load | W | x | Hrs./Day | = | Wh/Day | x | DoA | = | Total Wh |
| 14′ wall fan (2) | 132 | x | 2 | = | 264 | ||||
| Ventilation fan | 50 | x | 2 | = | 100 | ||||
| LED lights (24) | 15 | x | 2 | = | 30 | ||||
| 394 | x | 3 | = | 1,182 |
Find the total Wh
394 Wh/Day x 3 DoA = 1,182 Total Wh
Find the necessary Ah
1,182 Total Wh / 12V = 98.5Ah
Based on these equations, our battery bank needs at least 99Ah to accommodate this simple system. I chose to double this number to allow for growth and went with this heated battery kit.
Make The Power Distribution Center
- I configured the panel in my workshop first, attaching all the elements on a small plywood panel that I sealed with oil-based paint.
- I used 3/4-in. washer-head screws to mount the solar charge control module, power inverter, shunt, bus bars and fuse block.
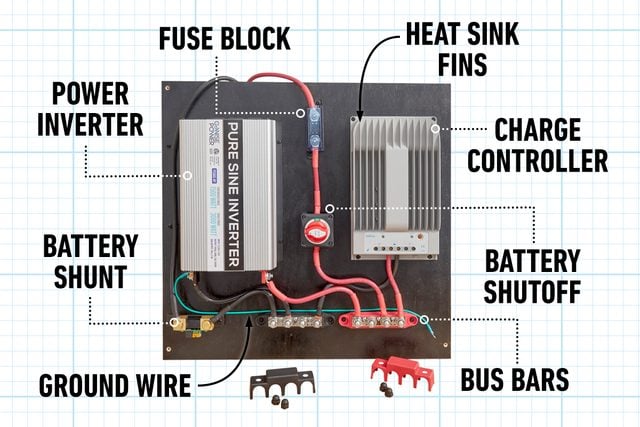
Power inverter
- Choose a power inverter that gives you plenty of room to grow.
- Pure sine wave inverters provide a power signature even cleaner than the power grid.
- Modified sine wave inverters may cause issues with delicate electronics such as computers; it’s best to avoid this type.
Battery shunt
- A battery shunt lets you monitor the health of the battery charge.
- It needs to be connected to the negative lead between the battery and the inverter.
Fuse block
- In-line fuses protect the system from overloads and power spikes. I used a standard fuse block with a 200-amp fuse mounted directly in line with the positive side of the system.
Charge controller
- I chose to use the EPEVER 40-amp solar charge controller.
- It has an integrated heat sink design to keeps things cool, and heavy-duty wire terminals. It’s programmable for use with any type of battery.
Battery shutoff
- A kill switch for the batteries and on/off switch for the power inverter provide a quick way to safely work on the system.
Bus bars
- Terminal blocks organize the cables and permit expansion.
Making Cables
Battle Born supplied me with pre-made battery interconnects. But every solar power installation will be different, so don’t count on premade cables working for you. Carter suggests 1/0-gauge cable for connecting the batteries to each other. Here’s how to make your own.
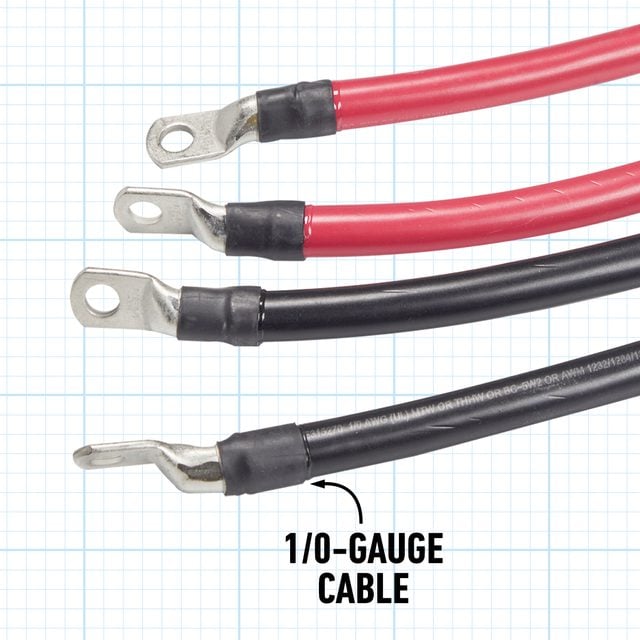
Strip the cable
- Automatic wire strippers are great for smaller-gauge cables, but won’t work with these larger cables.
- Using a utility knife, I rolled the cable on the bench top just enough to score the insulating jacket.
- Pro tip: Don’t press too hard or you’ll cut the copper.

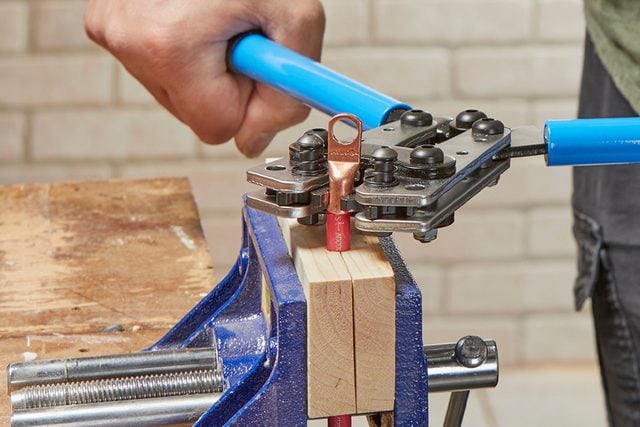
Crimp the cable lugs
- To crimp the heavy-gauge lugs, I used these large lever-action crimpers ($40 online) and a quick jig I made to hold the cable steady.
- The best way to do this: Lightly crimp, rotate and repeat. Trying to crimp all at once often produced an ugly result.
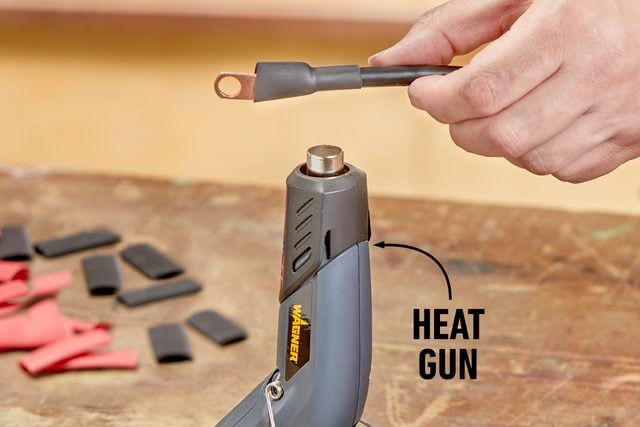
Protect the ends with heat shrink tubing
- To protect the crimped ends of my cables, I used double-walled adhesive-lined 3:1 shrink tubing.
- Cut the tubing to 1-1/2-in. long and heat it until it completely shrinks around the crimped cable end.
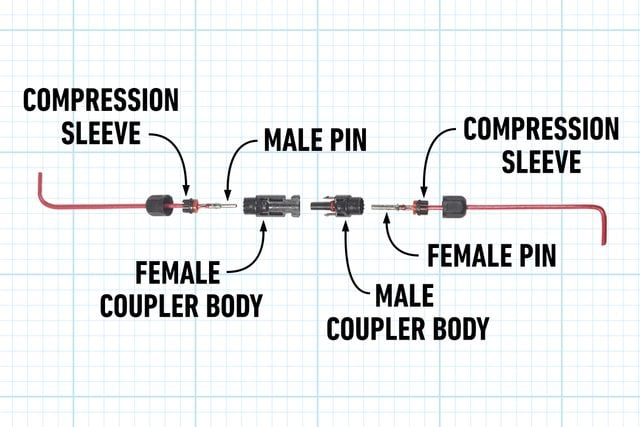
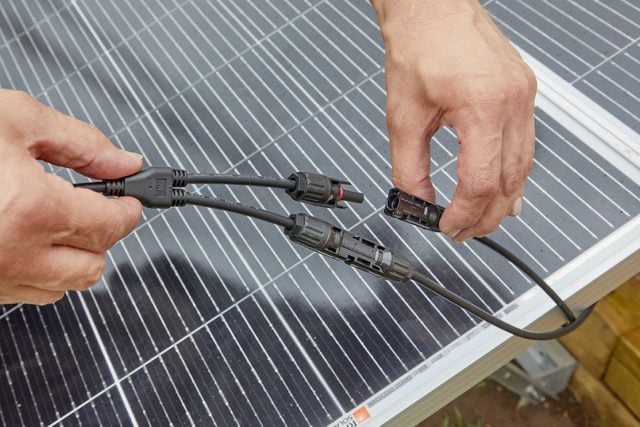
Terminate MC4 connectors
- MC4 connectors are the standard for photovoltaic panels. They’re rated IP67 waterproof and are easy to terminate with the right tools.
- Crimp the contacts to the cable and assemble the MC4 housing with an MC4 termination tool.
Mount The PV Panels
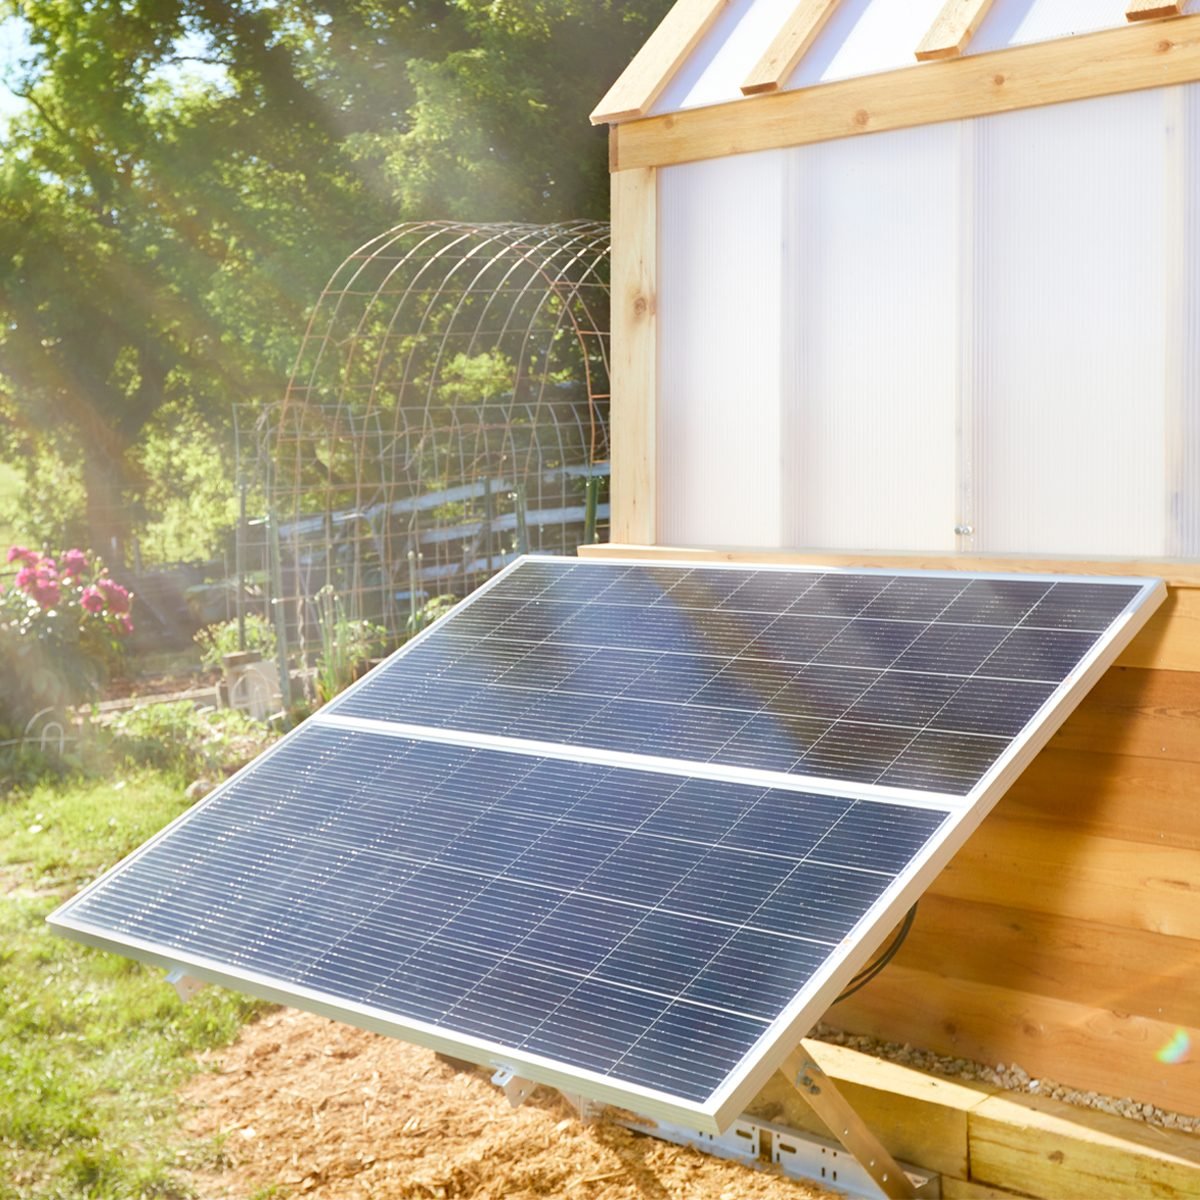
Find a sunny spot
- I had planned to mount the PV panels on the roof of our greenhouse because the structure faced almost perfectly south.
- I decided that wasn’t necessary and mounted them near the ground.
- For this project, I went with 200 watt, 12 volt panels from Rich Solar.
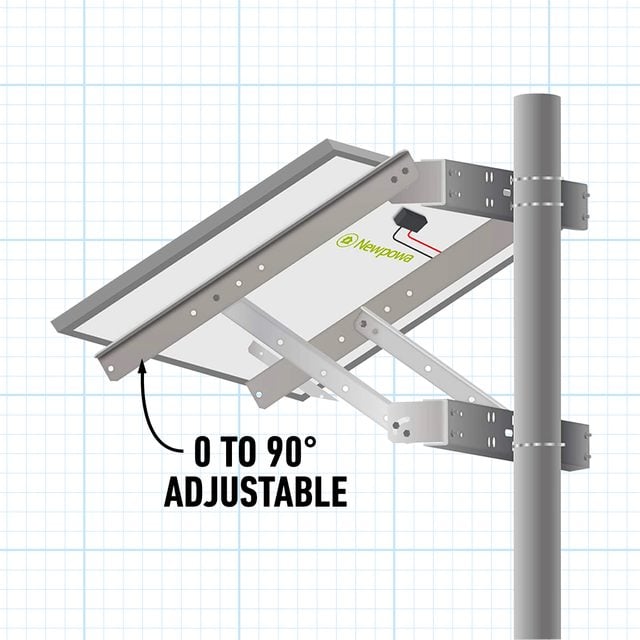
Mount on a stand
- I mounted the adjustable bracket stand ($150 online) to the foundation wall of the greenhouse and did my best to angle the panels to the sun’s position in the midday sky.
- The optimum angle will change seasonally. This bracket makes those adjustments easily.
Run wire
- I used 10-gauge cable to connect the 12V, 400W array to the power distribution panel — only 20 ft. away.
- To avoid power loss, longer runs need heavier-gauge cable.
- Pro tip: Cable length/gauge charts are readily available online.
Make The Final Connections
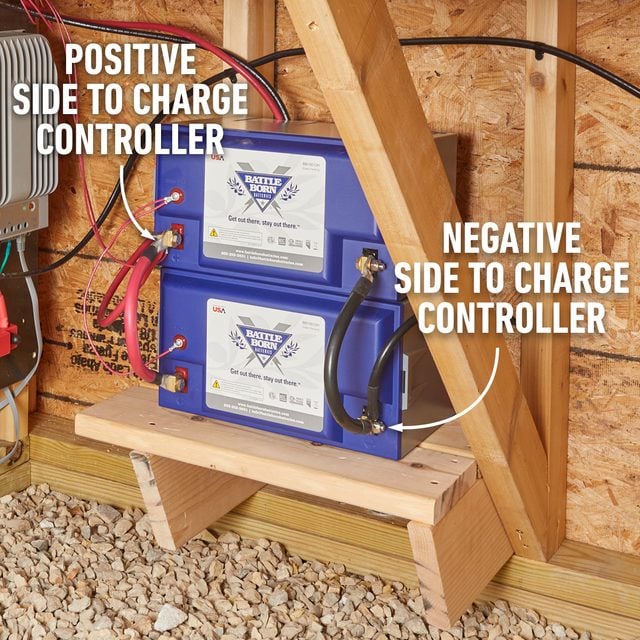
Make the battery stand
- Because there is no liquid in lithium batteries, you can lay them in any position. This makes it easy to configure multiple batteries.
- I stacked two batteries near the power hub on a small ledge made from scrap wood.
Attach the cable entry plate
- I mounted a pass-through box designed for MC4 connectors on the exterior of the building. This allows the panels to be easily disconnected from the structure if needed.
- On the interior side, run the 10-gauge cable to the solar charge controller.
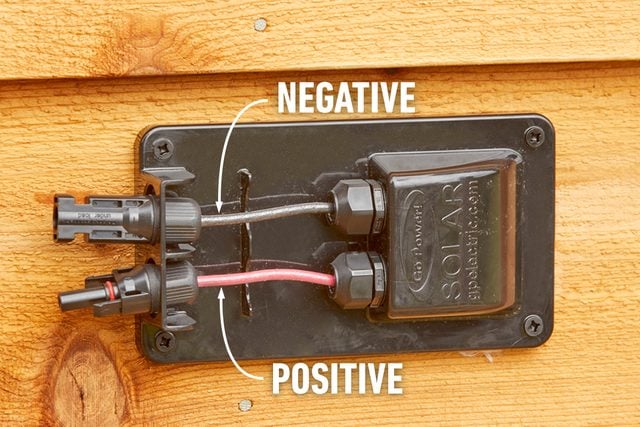
Determine polarity
- Before plugging the leads from the PV array into the entry plate, check the polarity of the cables with a multimeter.
- The positive lead should connect to the positive side of the entry plate. That should follow all the way to the positive terminal on the solar charge controller.
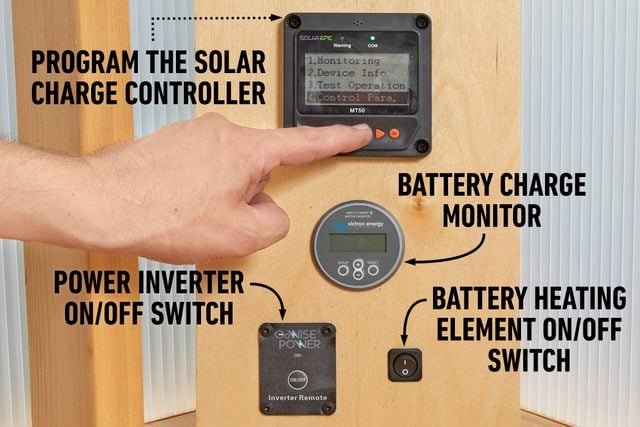
Program the solar charge controller
- Connect the batteries to the controller and plug in the MT50 remote interface.
- Consult with the manufacturer to determine the settings for your batteries.
Meet the Expert

Eric Carter is a technical sales specialist with Dragonfly Energy and Battle Born Batteries. He explores the country and camps off-grid in his Sprinter van powered by Battle Born Batteries.
Originally Published: July 27, 2022