


Need more counter space in your workshop? Here's a DIY solution.
Multiple Days
Intermediate
$251-500
Introduction
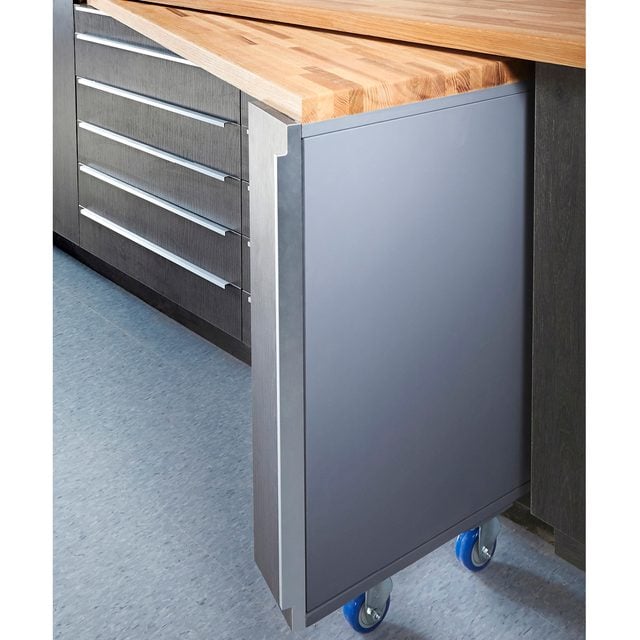
This swing-out countertop is there when you need it, gone when you don’t.
Most workshops just don’t have enough horizontal work space. Sometimes the fix is as simple as adding another bench or table. But in a garage, cars take up all the floor space.
This swing-out butcher block counter is a great solution. It pivots from under your current countertop, giving you more space when you need it. You’ll have to modify cabinets, which is easy if you’re installing new cabinets. For existing cabinets, you’ll have to remove them first.
Tools Required
- Circular saw and cutting guide (or table saw)
- Drill/driver
- Finish nailer
- Table saw
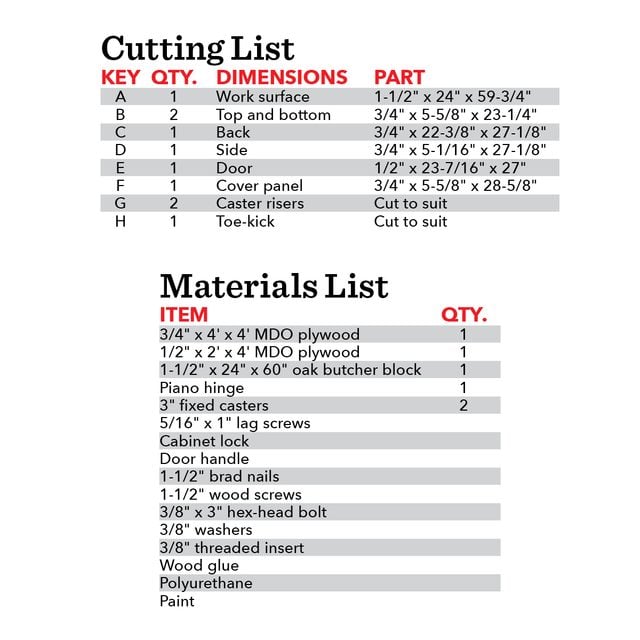
Materials Required
- 1-1/2" brad nails
- 1-1/2" wood screws
- 1-1/2" x 24" x 60" oak butcher block
- 1/2" x 2' x 4' MDO plywood
- 3" fixed casters
- 3/4 x 4' x 4' MDO plywood
- 3/8" threaded insert
- 3/8" washers
- 3/8" x 3" hex head bolt
- 5/16" x 1" lag screws
- Cabinet lock
- Door handle
- Paint
- Piano hinge
- Polyurethane
- Wood glue
Watch How To Build a Swing-Out Countertop
Project step-by-step (17)
Step 1
Secret Cabinet
This hidden door hides a small storage space that you access with a magnetic latch.
Step 2
Cut down the cabinets
Pull out the cabinets and shorten them to accommodate the thickness of the work surface (A) plus 1/4-inch. If you’re working with an existing bank of cabinets, you’ll also need to modify the width to create about a six-inch gap. The gap allows space for the swing-out to rotate and for the narrow leg cabinet that supports the end of the work surface.
Step 3
Reinstall the cabinet tops
After you’ve cut down the cabinets, reinstall the tops to make the cabinets rigid again. The partial tops of these cabinets came out easily, so I was able to reuse them. If your cabinet tops cover the entire opening and you have to cut them out, you’ll need to make new ones.
Step 4
Cut down doors and drawers
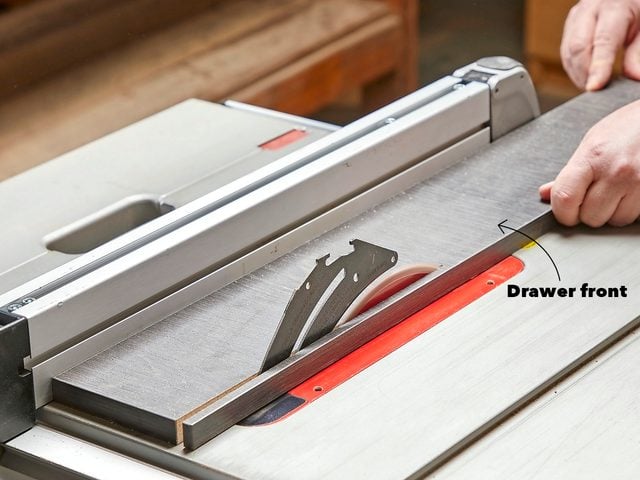
Once your cabinets are reassembled, you’ll need to tackle the doors or drawers. My cabinets had only drawers, so I just made the top drawers shallower, cut down the drawer fronts and reattached them.
On a table saw, it’s easy to trim down drawers. Just set the fence for the height you need and push the drawer through, cutting one side at a time. If you need to resize doors, you might have to relocate a hinge.
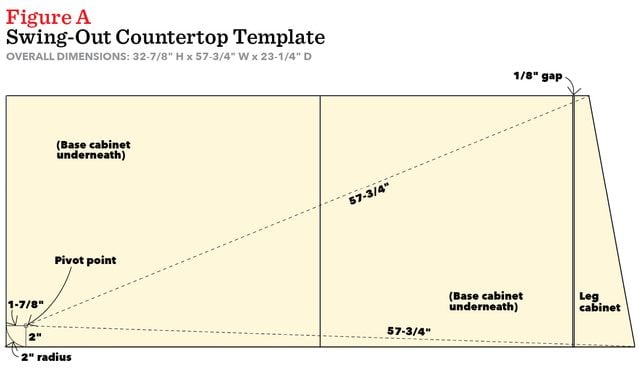
Step 5
Make a template
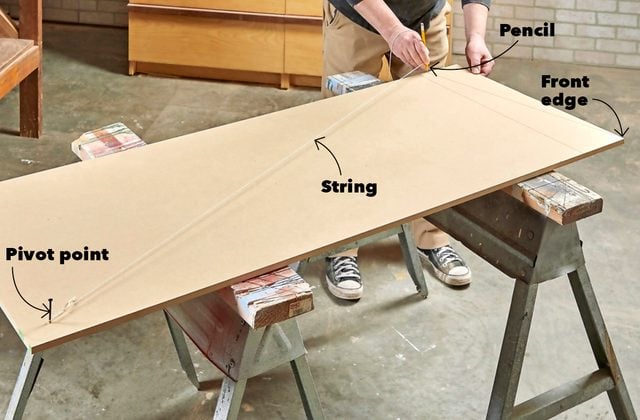
From a piece of plywood or other inexpensive sheet stock, cut a template (see Figure A). Make it as wide as your cabinets are deep and as long as the space between your full-height end cabinets, minus 1/4-inch.
Drive a screw into the pivot point. Loop a length of string around the screw and wrap the other end around a pencil, making the string long enough so the pencil just touches the end of the template at its front edge. Using the string-guided pencil like a compass, mark this distance at the back edge of the template.
Make a straight line connecting the front corner with the mark at the back edge, and then make the angled cut. Cut a two-inch radius on the pivot corner. Use this template to lay out the work surface and the leg cabinet.
Step 6
Cut the work surface
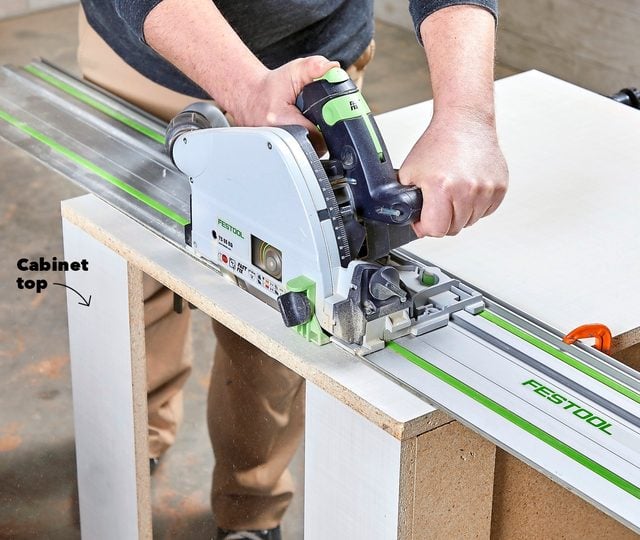
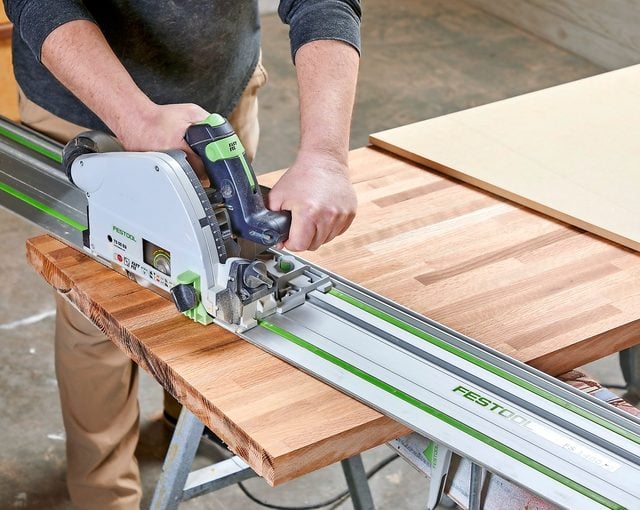
Trace your template onto the work surface blank, then cut the angle and the radius. My butcher block had a 1/4-in. round-over on the front edge, so I used a router to give all the other edges the same profile after cutting the finished size and shape. Here’s how to install a butcher block countertop.
Step 7
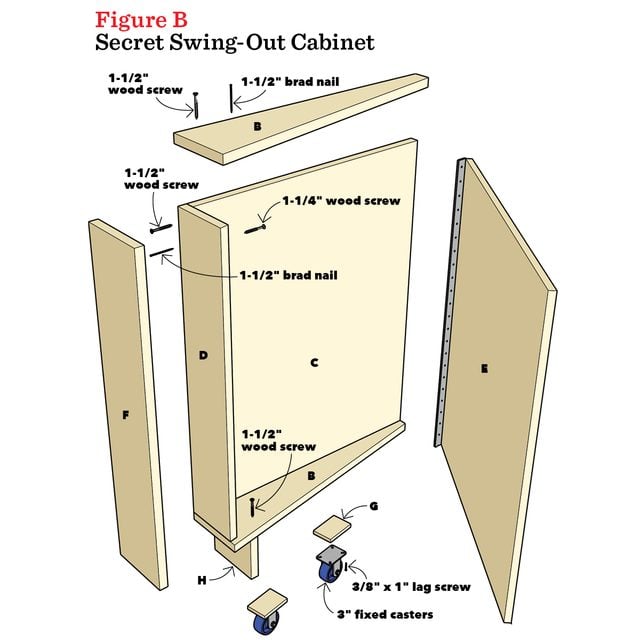
Cut cabinet parts
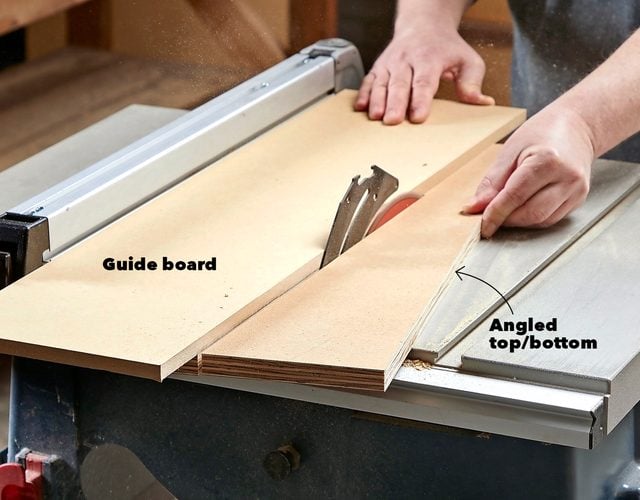
Cut all the cabinet parts (see Figure B and the Cutting List). Your cabinet’s height may differ, depending on your casters and the toe-kick height. You can cut the triangular top and bottom (B) with a circular saw, but this table saw method guarantees accuracy.
Draw the top and bottom on a blank, then tack a straight guide board on the line, overhanging the edge of the blank. Set your fence so you’ll cut on the line with the guide board against the fence. Be sure to cut on the correct side of the line! With the first piece cut, your offcut also has an angled side, so you can cut the other part with a straight rip.
Caution: Use your guard for this cut. Ours was removed for photo clarity.
Step 8
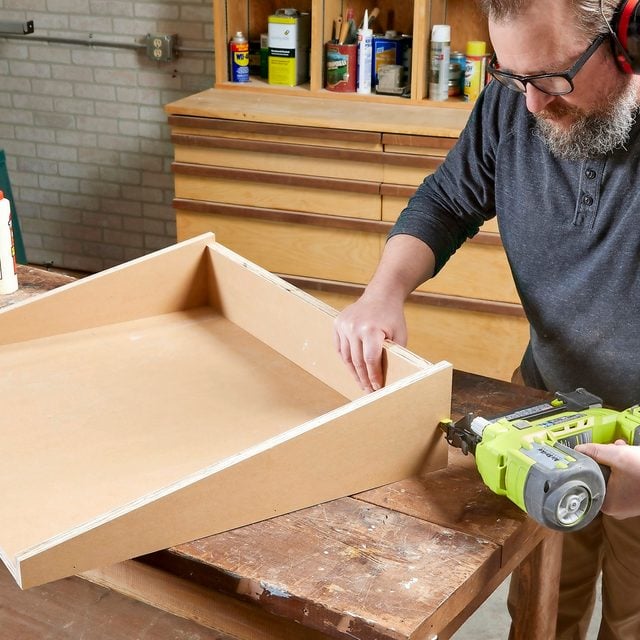
Assemble the cabinet
Tack all the parts together using glue and 1-1/2-in. brad nails. Add 1-1/2-in. wood screws for strength. Fill the nail and screw holes as needed, as well as any voids in the MDO edges. When the filler is dry, sand the cabinet and door up to 150-grit. Prime and paint.
Step 9
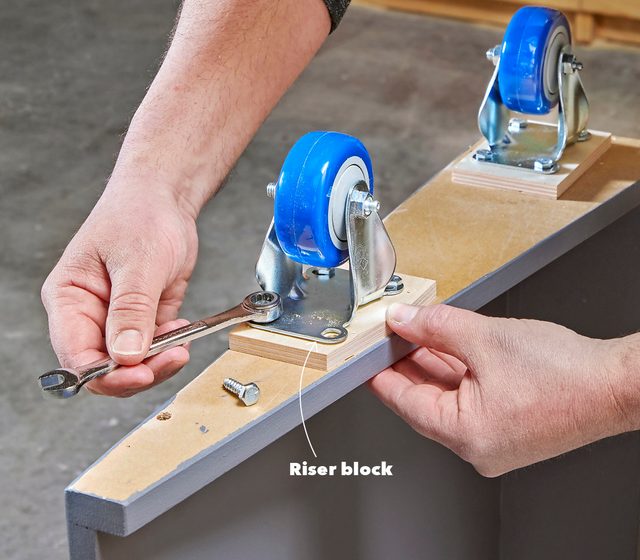
Attach the casters
Mount casters on the bottom of the cabinet — parallel to the cabinet’s angled side — using lag screws or through-bolts. To get the casters to match the height of the cabinet’s toe space, I added 3/8-in.-thick riser blocks. I used fixed casters; swivel casters would give a very narrow base of support, particularly with the front caster mounted behind the toe-kick.
Step 10
Fasten the cabinet to the work surface
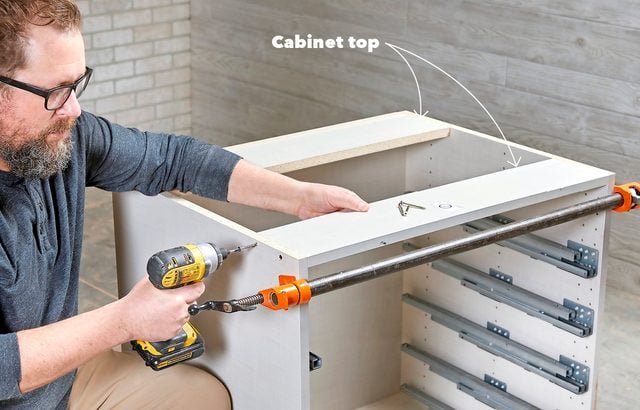
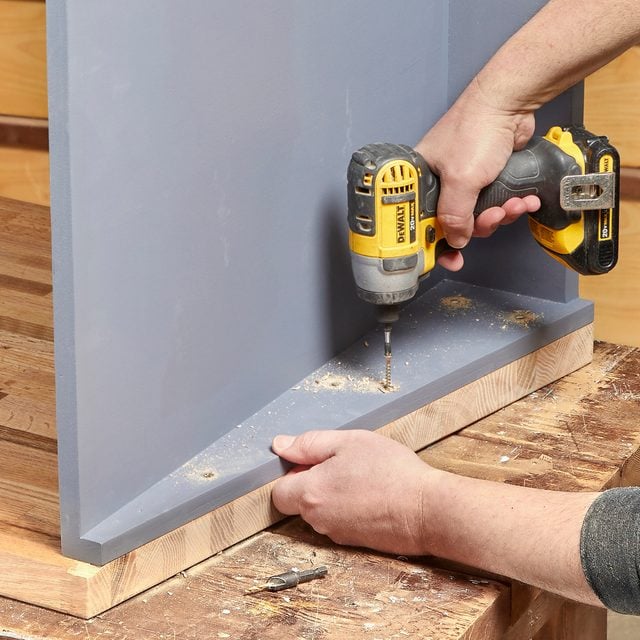
With the work surface upside-down on a bench, set the cabinet in place. Predrill countersunk clearance holes through the cabinet top, and pilot holes into the work surface. Attach the cabinet with two-inch wood screws.
Step 11
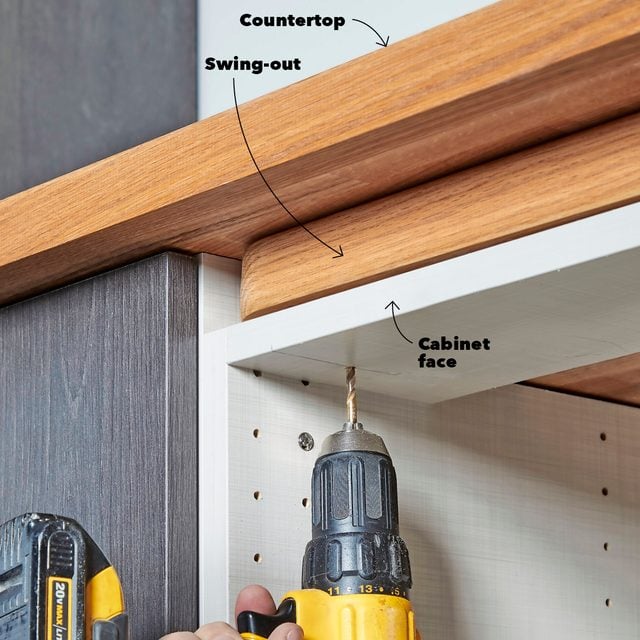
Drill a hole for the threaded insert
Slide the swing-out assembly into position, flushing its front edge with the cabinet faces and allowing a 1/8-in. space at each end. Mark the pivot location on the underside of the cabinet top, and then drill a pilot hole through the cabinet top and the work surface, continuing until your bit marks the bottom of the countertop.
Pull the assembly out and enlarge the hole in the work surface to 3/8-inch. Enlarge the hole in the cabinet top to 1/2 in., and continue that 1/2-in. hole one inch into the underside of the countertop.
Step 12
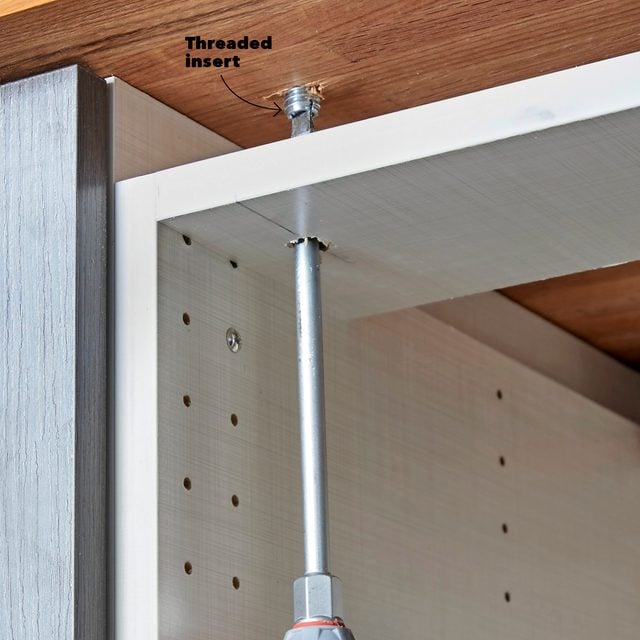
Install the insert
Hold the threaded insert in place with your fingers or needle-nose pliers. Stick a screwdriver through the cabinet hole, then drive the threaded insert into the countertop until it’s flush with the bottom surface. A drop of dish soap on the threads makes the insert easier to drive. If you torque on it too much, you could damage the insert’s interior threads.
Step 13
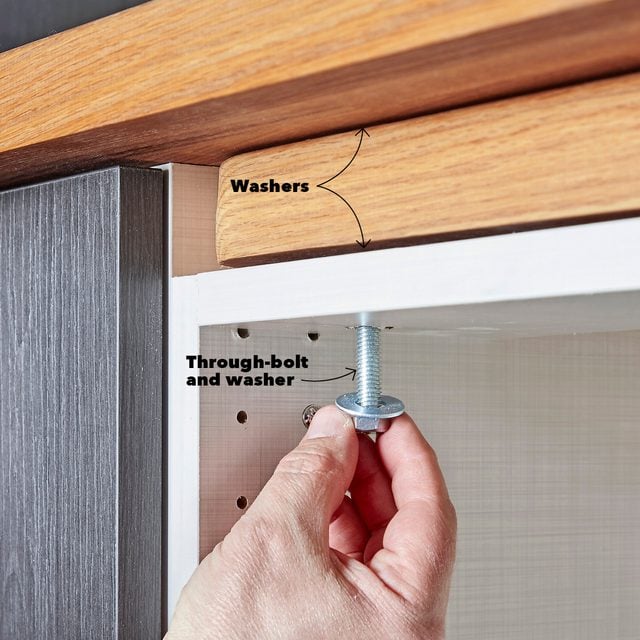
Fasten the swing-out to the counter
Slide the swing-out assembly into place. Slip a fender washer on the through-bolt, then insert it into the pivot hole, slipping washers between the cabinet and the work surface and the work surface and the counter. It’s a bit tricky to position the washers. Move them as needed using a putty knife. With the washers in place, drive the bolt into the threaded insert.
Step 14
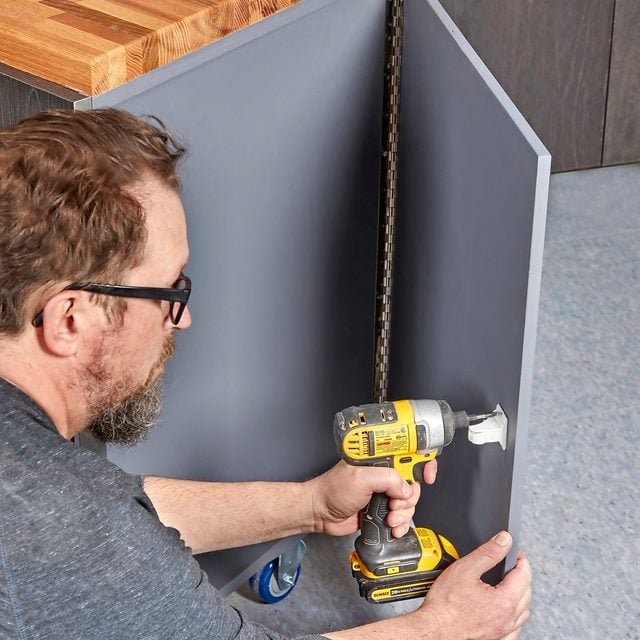
Install panel hardware
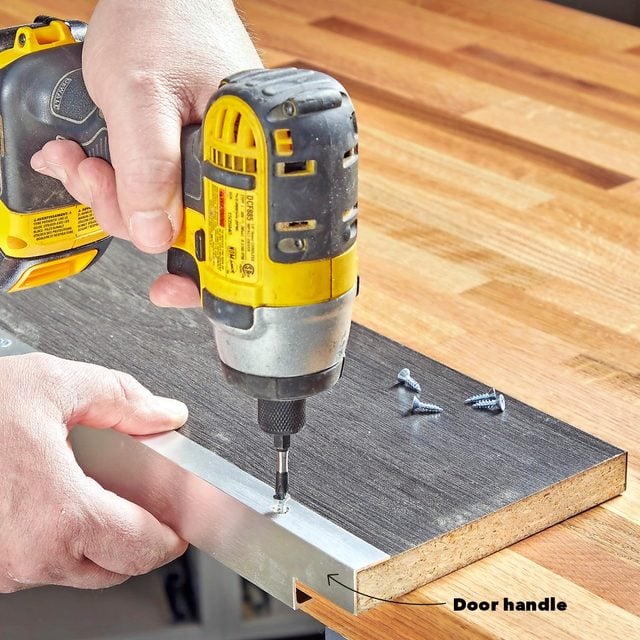
Cut the cabinet cover panel (F) to size and attach your hardware. We used extruded aluminum handles on these doors. I had to shorten the handle to make it fit this cover panel. Carbide-tipped blades cut aluminum easily. It’s noisy, but it doesn’t hurt the carbide teeth.
Step 15
Attach the panel
Predrill countersunk pilot holes through the cabinet, then drive screws in just far enough so their points protrude about 1/8-inch. Push the swing-out into place again. Position the cover panel so it lines up with the adjacent doors or drawer fronts, then give it a couple thumps with your fist so the screw points mark their location on the back of the panel. Pull out the swing-out assembly, locate the panel on the screw point indents and drive the screws from inside the cabinet to attach the panel.

Step 16
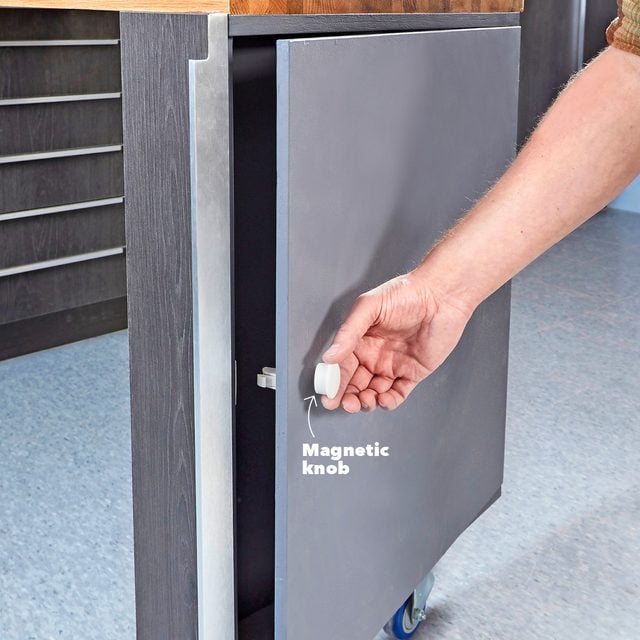
Install the lock
The cabinet door’s handle needs to be a flush mount, because anything protruding would prevent the assembly from rotating into its space. I took it a step beyond flush mount and installed a simple toddler-safety magnetic catch. There’s no visible hardware on the exterior.
Once the catch is installed, hold the magnetic knob (included) over the catch to release it and open the door. The lock isn’t strong enough to keep out serious thieves, however, only the mildly curious.
Step 17
Secret door
Hold the knob over the latch to unlock the door. Stash the knob in a secret location.
Originally Published: May 27, 2021