


Build a sturdy, foldable hammock stand for minimal cost in one afternoon. Here's how.
A half day
Intermediate
$101–250
Introduction
All you need is an afternoon to put this hammock stand together, and you'll have plenty of time to enjoy it when you're done!Tools Required
- 2 inch Forstner Bit
- Adjustable Square
- Adjustable wrench
- Circular saw
- Drill
- Drill bit set
- Hacksaw
- Hearing protection
- Impact driver
- Miter saw
- Safety glasses
- Speed square
- Tape measure
Materials Required
- 1-1/2 in Galvanized Tee (2)
- 1-1/2 in x 10-ft Galvanized pipe
- 1-1/2 in x 6 in Nipples (2)
- 1/2 in Nuts & washers (4)
- 1/2 in x 12 in Carriage bolts (4)
- 1/4 in x 3-1/2 in Lag Screws (12)
- 10-ft 2x6 (1)
- 3-in. deck screws
- 3/8 in Eye bolts (2)
- 8-ft 2x6 (2)
- 8-ft 2x8 (1)
- Carabiners (4)
- Chain (3-ft)
It’s almost time to take advantage of the warm weather by unpacking your patio’s hammock so you can enjoy some horizontal relaxation in your backyard oasis.
You might be wondering where to hang your hammock if you don’t have appropriately spaced trees or deck joists. The good news is that you don’t need either of those. With this portable, foldable DIY hammock stand you can enjoy the fresh air mocking around in your hammock. Then, once you have finished relaxing, simply fold it back up and store it until the next time you need it. P.S. We tried the Yellow Leaf Hammocks, and we’ve never been more relaxed.
Safety Considerations
This DIY hammock stand supports 400 pounds of weight in the hammock. However, the surface on which the hammock stand is set up, the weight capacity of the carabiners and hammock, and the age and storage practices of the stand can all affect its capacity.

Project step-by-step (21)
Step 1
To start, you’ll need to get the lumber cut down to size.
-
Cut two eight-foot 2x6s to seven feet.

Step 2
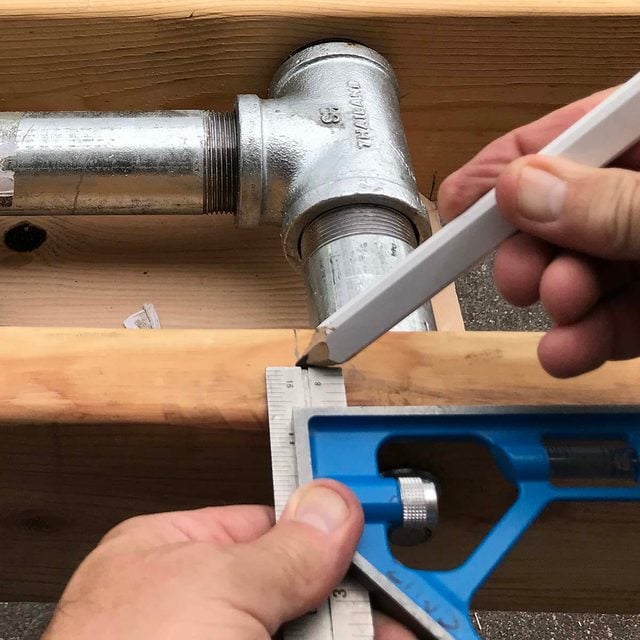
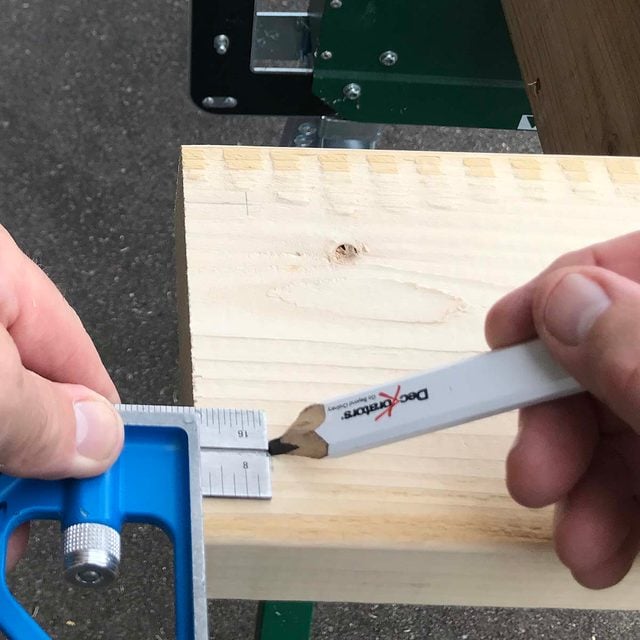
Inside Rail Layout
- On both seven-foot 2x6s, make a mark the board eight inches in from the end and cross the mark at 1-5/8-in. up from the bottom.
- Make another mark on the end of the board 2-3/4-in. from the bottom, and draw a line at a 45 degree angle.
- Make a reference line for where the top ends at 6-3/16-in.
 .
.
 .
.

Step 3
Cut 45 Degree Angles
- Cut the 45 degree angles with a miter saw.

Step 4
Drill Two-Inch Holes
- Drill two 3/4-in. deep holes on the inside of each board at the eight-inch mark, using a two-inch Forstner bit.

Step 5
Cut 2×8 Top
- Cut a 45 degree angle on the end of the 2×8, using a circular saw.
- Measure from the long point of the 45 degree angle and make a mark at 71-9/16-in.
- Cut the board to length at the long point of the 45 degree angle.
- Pro Tip: Use a speed square to guide the circular saw.

Step 6
Cut the Pipe
- Cut the 10 foot pipe in half at five feet using a reciprocating saw or hacksaw. A heavy-duty pipe cutter works well, also.
- Cut the two 6-in. nipples to 4-1/4-in., leaving you with two 1-3/4-in. and two 4-1/4-in. pieces.
- Pro Tip: Clamp the pipe to a sturdy surface or sawhorse before cutting.
- Alternative option: Use two 4-in. and two 2-in. nipples. They will be slightly undersized for the two-inch hole because of the threads and will cost more.
- Pro Tip: Clamp the pipe to a sturdy surface or sawhorse before cutting.

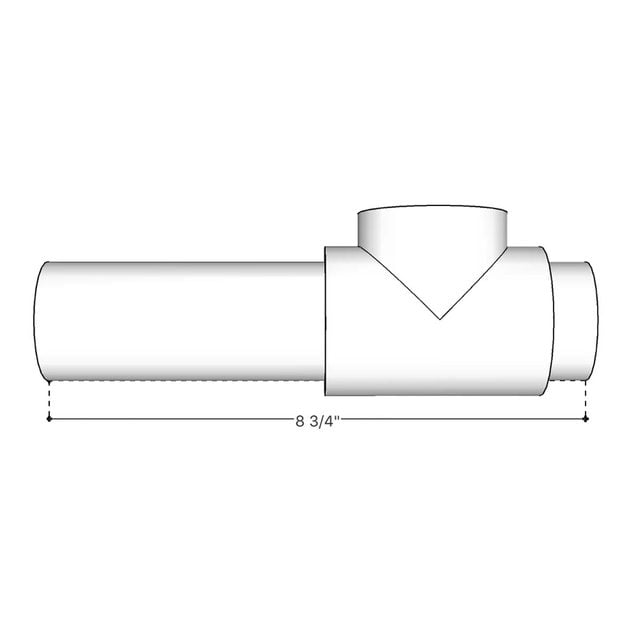
Step 7
Assemble the Tees
- Screw the 4-1/4-in. and 1-3/4-in. pieces into the two ends of the tee.
- The outside dimension of the tee assembly should be no more than 8-3/4-in.
Step 8
Attach Top to Rail
- Lay the top upside down and place the inside of the rail to the edge of the top at the 6-3/16-in. reference marks.
- Attach the rail to the top using #10 x 3-1/2-in. deck screws every 12 inches.

Step 9
Install Tees and Rail
- Lay the top and rail assembly on its side with the top pointing up.
- Install the two tee assemblies in the two-inch holes in the opposite orientation of each other.
- Place the other rail on the top edge guiding the tees into the two-inch holes.
- Attach the rail using #10 x 3-3/4-in. deck screws.

Step 10
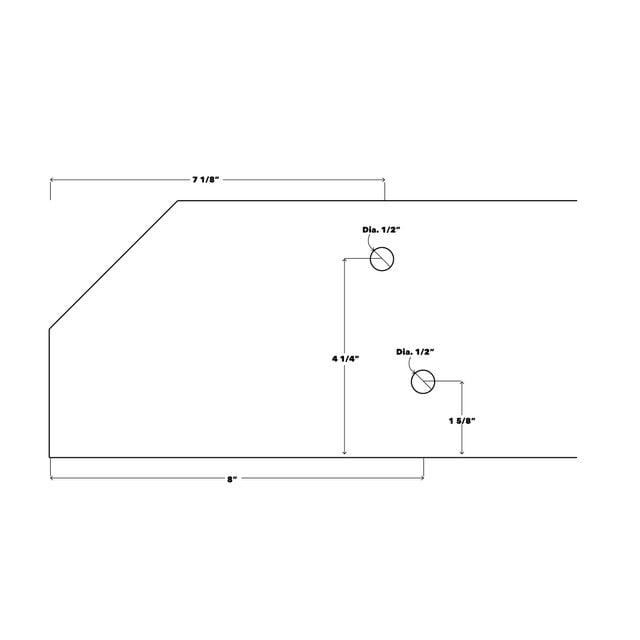
Outside Rail Layout & 1/2 Inch Holes
- Measuring from the end, make a mark at 7-1/8-in., then cross the mark at 4-1/4-in. from the bottom.
- Make another mark eight inches from the end and cross the mark 1-5/8-in. from the bottom.
- Repeat this on each end of the two rail boards.
- On each rail board, drill four 1/2-in. holes at the marks you made.
- Pro Tip: You may want to drill a 3/16-in. pilot hole before drilling the 1/2-in. hole, or use a 1/2-in. spade bit or brad point bit.

Step 11
Install Carriage Bolts
- Insert four 1/2 x 12-in. carriage bolts into the 1/2-in. holes on the rail through to the other rail.
- Install flat washers and 1/2-in. nuts, tighten with a 3/4-in. wrench.


Step 12
Install Pipe Arms
- Rotate the tees so they face each other, then tip them up a bit.
- Thread the two five-foot pipe arms into the tees.
- Tighten with a pipe wrench or plumber’s pliers.


Step 13
Drill Pipe for Eye Bolts
- Drill a 3/8-in. hole one inch from the end of each pipe.

Step 14
Install Eye Bolts
- Insert an eye bolt into the 3/8-in. hole. Secure it with a lock washer and nut.
- Optional: Cap the ends of the pipes with a 1-1/2-in. PVC cap.

Step 15
Rail Bottom Holes
- On the rail closest to you, measure from the left and make marks at 9-1/2, 12-3/4 and 26 inches.
- On the same rail measure from the right and make marks at 9-1/2, 22-3/4 and 26 inches.
- On the other rail farthest from you, measure from the left and make marks at 9-1/2, 22-3/4 and 26 inches.
- On the same rail measure from the right and make marks at 9-1/2, 12-3/4 and 26 inches.
- Using an adjustable square set at 3/4-in., mark the center of the board at each mark you made.
- Drill twelve 3/16-in. pilot holes two inches deep at the marks you made.


Step 16
Feet Layout and Drill
- From your 10-foot 2×6, cut four 30-inch boards.
- Set your adjustable square at 3/4-in. and draw lines on the face at one end of each of the 30-inch boards.
- Set your adjustable square at one inch and make marks from the sides crossing the 3/4-in. lines.
- Make the third mark at 9-1/2-in. from the end and one inch from the side.
- Drill a 1/4-in. hole at each mark.
- Repeat on all four feet.
- Optional: Cut a 45 degree angle on the outside ends facing up, on each foot.


Step 17
Install the Feet
- Attach all four feet to the bottom rails at the holes you drilled in step 14, using a #16 x 3-1/2-in. Power lag screws through the holes you drilled at 9-1/2-in. on the foot.

Step 18
Feet Closed
- Swivel the feet closed and move the hammock stand to where you want to set it up.

Step 19
Hammock Stand Set-Up
- Swivel the feet to their open position.
- Lift the pipe arms out.
- Swivel the feet so the two 1/4-in. holes at the end of each foot line up with the 3/16-in. pilot holes on the bottom of the opposite rail.
- Attach each foot to the rail with two #16 x 3-1/2-in. Power lag screws.


Step 20
Attach the Hammock
- With a helper, flip the hammock stand onto its feet.
- Attach the hammock with carabiners and chain to the eye-bolts on each pipe arm.
- Note: Most campsite hammocks include carabiners and adjustable straps. Prior to purchasing carabiners and chain, confirm the span of your hammock and any attachment accessories it may include.


Step 21
Finish
- It’s a good idea to preserve the wood with a coat of deck stain or marine varnish.
Options
- Add a removable carriage bolt to the underside of each pipe arm through the rails to keep the pipe arms up in the air when the hammock is not attached.
- You can easily remove the pipe arms by screwing them out of the tees when the hammock stand is not in use.
Originally Published: August 22, 2020