


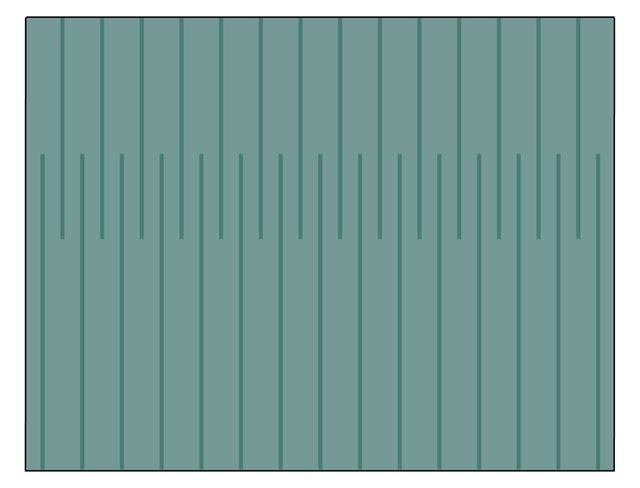
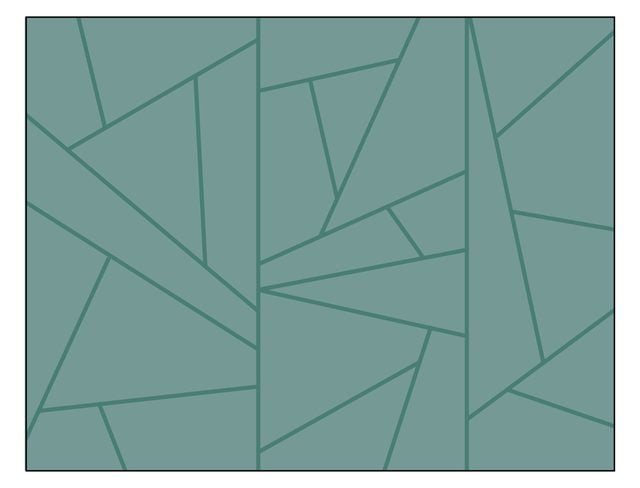
How to Build a Dynamic Accent Wall

Updated: Oct. 30, 2020
Turn a blank wall into a showpiece that transforms the entire room!
Multiple Days
Beginner
$51–100
Introduction
In June 1960, we applied a three-dimensional design to a wall by cutting and painting Styrofoam. Inexpensive and easy to work with, it was a good choice then. But now we have medium-density fiberboard (MDF). It’s inexpensive, easy to work with, takes paint well and is much more durable than Styrofoam. Once you’ve created your design, using this simple glue-and-stick application, you can finish it up in a weekend.Tools Required
- Finish nailer
- laser level
- miter box or miter saw
- Putty knife
- Speed square
- Table saw
Materials Required
- 1 gallon of paint
- 1/2" x 48" x 96" sheet of MDF
- Brad nails
- fast-tack construction adhesive
- sparkling compound
The original wall from 1960:

Project step-by-step (14)
Step 1
Sketch Out Your Design
- Make a scale drawing of your wall and sketch different designs until you’re satisfied. The internet is a good source of inspiration.
- Note: A CAD program like SketchUp makes this process easy and accurate, but pencil and paper is fine, too.

Step 2
Paint the Wall
- Choose your color and paint the entire wall.
- Pro tip: It’s easier to paint it before the strips are attached. The results look better too.

Step 3
Rip the Strips
- Using your design plan, estimate how many linear feet of strips you’ll need and rip them to 1-1/4-in. wide on the table saw.
- Pro tip: We used 1/2-in. MDF because when ripped into thin strips, it’s thick enough to create a shadow yet flexible enough to follow minor wall irregularities.

Step 4
Sand the Strips
- A sharp corner doesn’t hold paint well, so sand the sharp corners on the faces of each strip with a sanding block. It doesn’t take much — just enough to turn the sharp corner into a tiny bevel.

Step 5
Paint the Strips
- Spread out the strips on your work table and roll on a coat of primer.
- Pro tip: This is an important step with MDF; paint causes it to get really rough. Shellac-based primer is a good choice because it dries fast and sands very smooth.
- When the primer has dried, sand the strips with a 220-grit sanding sponge.
- Wipe off the dust and paint the strips. They’ll probably require two coats.

Step 6
Locate the Studs
- Find the studs and mark them with tape. We relied mainly on adhesive to hold the strips in place, but it’s helpful to know where the studs are.
- Pro tip: If a strip needs a little more convincing to stay put, you can shoot a brad nail into a stud.

Step 7
Lay Out the First Strip
- Set up a laser level to get the long lines accurate. We used a self-leveling cross-line model from Skil.
- Pro tip: The one we used doesn’t shoot a 45-degree line. But if you use a large Speed square and the level’s locking mechanism, you can set it at 45.

Step 8
Pro Tip: Living room-friendly miter saw
Running a miter saw in the house is a bad idea — it blows dust all over. But running to the shop for each cut doesn’t make sense either. So we made this simple “miter box” for a pull saw.
- First, make accurate 45- and 90-degree cuts on a 2×4 using a miter saw.
- Then glue and nail these pieces to a scrap of plywood, using the saw’s blade as a spacer.
- Now just clamp the miter box to a sawhorse right in the room where your accent wall is and make your cuts. No airborne dust, and no running back and forth to the shop!

Step 9
Glue the First Strip
- Cut the 45-degree angle on one end of the first strip, then glue the back.
- Apply glue sparingly so the glue doesn’t keep the strip from seating fully on the wall.
- Note: We used a fast-grabbing construction adhesive (Loctite Power Grab) for this project. It has a fast initial tack so it stays put as soon as you press it into place. If necessary, you can still shift it until it cures.

Step 10
Press the First Strip Into Place
- Line up the strip with the laser line, then press it against the wall.
- Pro tip: Since this first one is so long, tacking it on with a brad nail every two feet will help keep it straight.

Step 11
Add the Second Strip
- The first line in our design requires two pieces, butt jointed together.
- Make the 45-degree cut on the second piece, hold it in place and then mark the butt joint.
- Cut the strip to length and glue it to the wall.

Step 12
Outline the Big Shapes
- Continue marking, cutting and attaching strips to outline the large shapes, as you did for the first piece. Use the laser level and adhesive, nailing where needed.

Step 13
Fill in the Shapes
- Add the rest of the strips, proceeding from longest to shortest, filling in the large shapes.

Step 14
Finish Up
- Fill any gaps or nail holes with spackling compound.
- When the spackling compound has dried, sand it smooth and touch up with paint.


Originally Published: October 28, 2020