
How to Build a Living Wall with Movable Planters
Updated: Jun. 13, 2023Plant a vertical garden, and let the automatic watering system keep it thriving.

- Time
- Complexity
- Multiple Days
- Intermediate
The Perfect Patio Project
Every project has its benefits, but few projects bring as many bonuses as this one. Just consider all the features this wall can add to your deck or patio:
- Privacy. This wall blocks the view and—covered with plants—even muffles noise a little.
- Shade. At 7 ft. tall, the wall blocks late afternoon sun and screens the wind.
- Economical. We used cedar lumber and spent $1,800 for everything but the plants. Built with treated lumber, this wall will cost about $800. Whatever lumber you choose, the wall will cost about 40 percent less if you clad only one side. Even with the most expensive option, it’s a relatively low cost for a project that transforms a deck or patio.
- Color. Flowers and greenery enliven a bland deck or patio.
- Fresh Herbs. A steady supply, just steps from your kitchen.
- Easy to Build. Setting posts straight and plumb is the hard part of a project like this one. But with our process, positioning posts is goof-proof. The rest is a simple matter of screwing boards to the posts.
Tech Art


Planning your wall
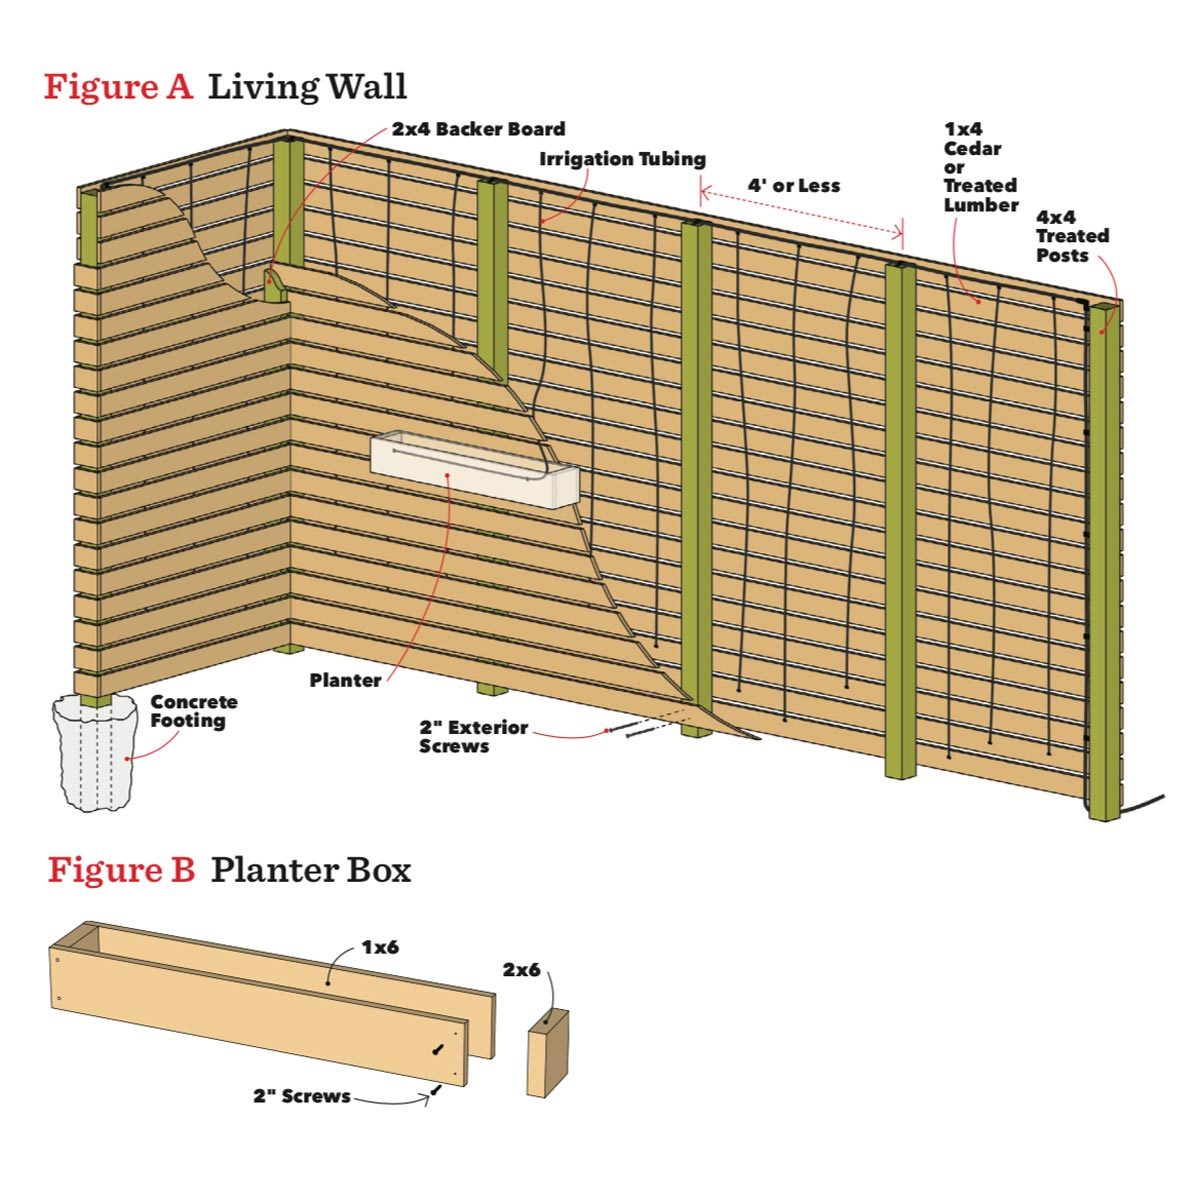
Our wall is about 16 ft. long including the small corner at the end. You can make your wall any length you want, but go with our height—about 7 ft. tall—or shorter. A 7-ft. wall will give you plenty of privacy but won’t be so tall that it gets wobbly, and 10-ft. 4x4s work well for the posts. Whatever the length of your wall, space your 4x4s no more than 4 ft. apart so they’re strong enough to support the planters, which weigh 20 lbs. or more. We clad both sides of our wall with cedar 1x4s spaced 3/4 in. apart. If your wall runs along the wall of your house or garage, you can skip cladding the side that won’t be seen.
Buying the materials
With the overall length in mind, do some math to figure out how many 4x4s you’ll need. Again, try to plan for a 4×4 every 4 ft. or less, adding one more for one end. You’ll need 21 1x4s for each side you clad. If you’re building a shorter wall, figure on three boards per foot of height. Your wall will look best if you buy lengths that will cover the entire wall without seams. We liked the look of rough-sawn cedar with an oil-based stain. But you could save a fair amount of money by using treated 1x4s instead of cedar. See the Materials List on p. 30 for more shopping information.
Project Directions:

1. Lay out the post locations
Drive stakes a foot or more beyond the end post locations. Push both 2×4 ribbons against the stakes and mark the ends so you’ll know where to reset them later. Lay out the post positions on both ribbons.
Building the wall
For dead-straight and foolproof post-setting, lay out, set and align your 4×4 posts using our 2×4 ribbon system (Photos 1 – 5). Once they’re all placed, pour two bags of concrete mix around each post, leaving a few inches at the top for adding a couple of gallons of water. There’s no need to hassle with premixing the concrete. By the next morning, the posts will be firm enough for you to start adding the 1×4 cladding. Begin cladding one side, making sure the bottom 1×4 is level. That 1×4 should be perfectly straight because if it’s wavy, the ones above it will be too. Don’t use the slab or patio as a reference; it’s likely sloped. Then add each row of 1x4s using a 3/4-in.-thick spacing block, fastening it with two 1-1/4-in. exterior trim-head screws into each post. Screw a temporary 2×4 stop board to the post at one end to keep the ends perfectly aligned (Photo 8). Leave off the last two rows of 1x4s so you can mark and cut off the 4x4s 8 in. above the last row you fastened (Photo 9). That’ll keep the 4x4s 1/2 in. below the top row to help hide the irrigation tubing that will run across the top of the 4x4s. Leave off the 1x4s on the other side of the wall for now to give you easy access for installing the irrigation system.
2. Mark the postholes
Drive stakes in the center of each post position, 2 in. away from the ribbon.

3. Dig the holes
Set the ribbon aside and dig 8-in.-diameter, 30-in.-deep holes at each stake.

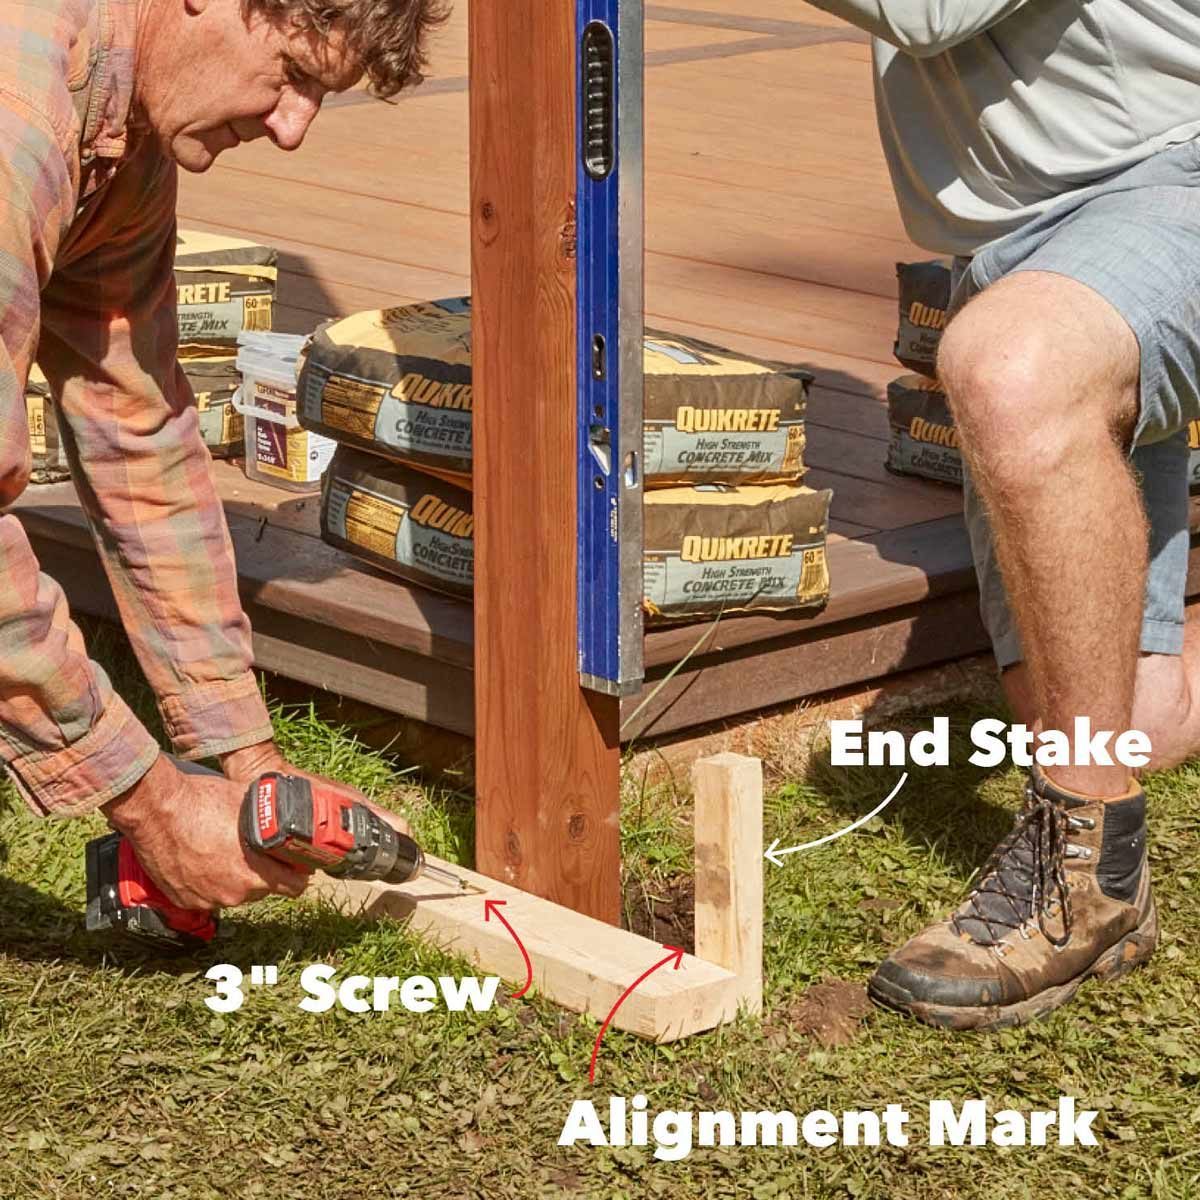
4. Set the end posts
Reposition the ribbons using the marks you made earlier (see Photo 1). Screw one of the ribbons to the end stakes. Then screw each end post to the ribbon while a helper holds the post plumb both ways.

5. Set the middle posts
Screw the top ribbon to the end posts, then set the middle posts, fastening each to the ribbons. Pour dry concrete mix into each hole, leaving the top 3 to 4 in. unfilled.

6. Brace the end posts
Replumb the end posts in both directions and brace them in place. Eyeball the middle posts to determine if they need to be plumbed and braced. The dry concrete will absorb soil moisture and slowly harden, so don’t leave this step for tomorrow!

7. Add water
Fill each posthole with a couple of gallons of water. If you used fast-setting concrete mix, you can resume the project after a couple hours. Otherwise, wait overnight.

8. Clad the first side
Level the first 1×4 and fasten it to each post with two screws. Space each row above that with 3/4-in. blocks. A 2×4 stop board aligns the 1x4s at the corner. At the other end, let the 1x4s overhang and cut them off later.

9. Trim the posts
When you have just two rows of 1x4s left to install, measure up 8 in. from the top of the one you just attached. Cut off the posts and then install the final two rows.

10. Install the irrigation system
Pierce the main line with a special hole punch and use a 1/4-in. barbed connector to attach the 6-ft. feeder lines. Don’t forget to plug the ends of the feeder lines.
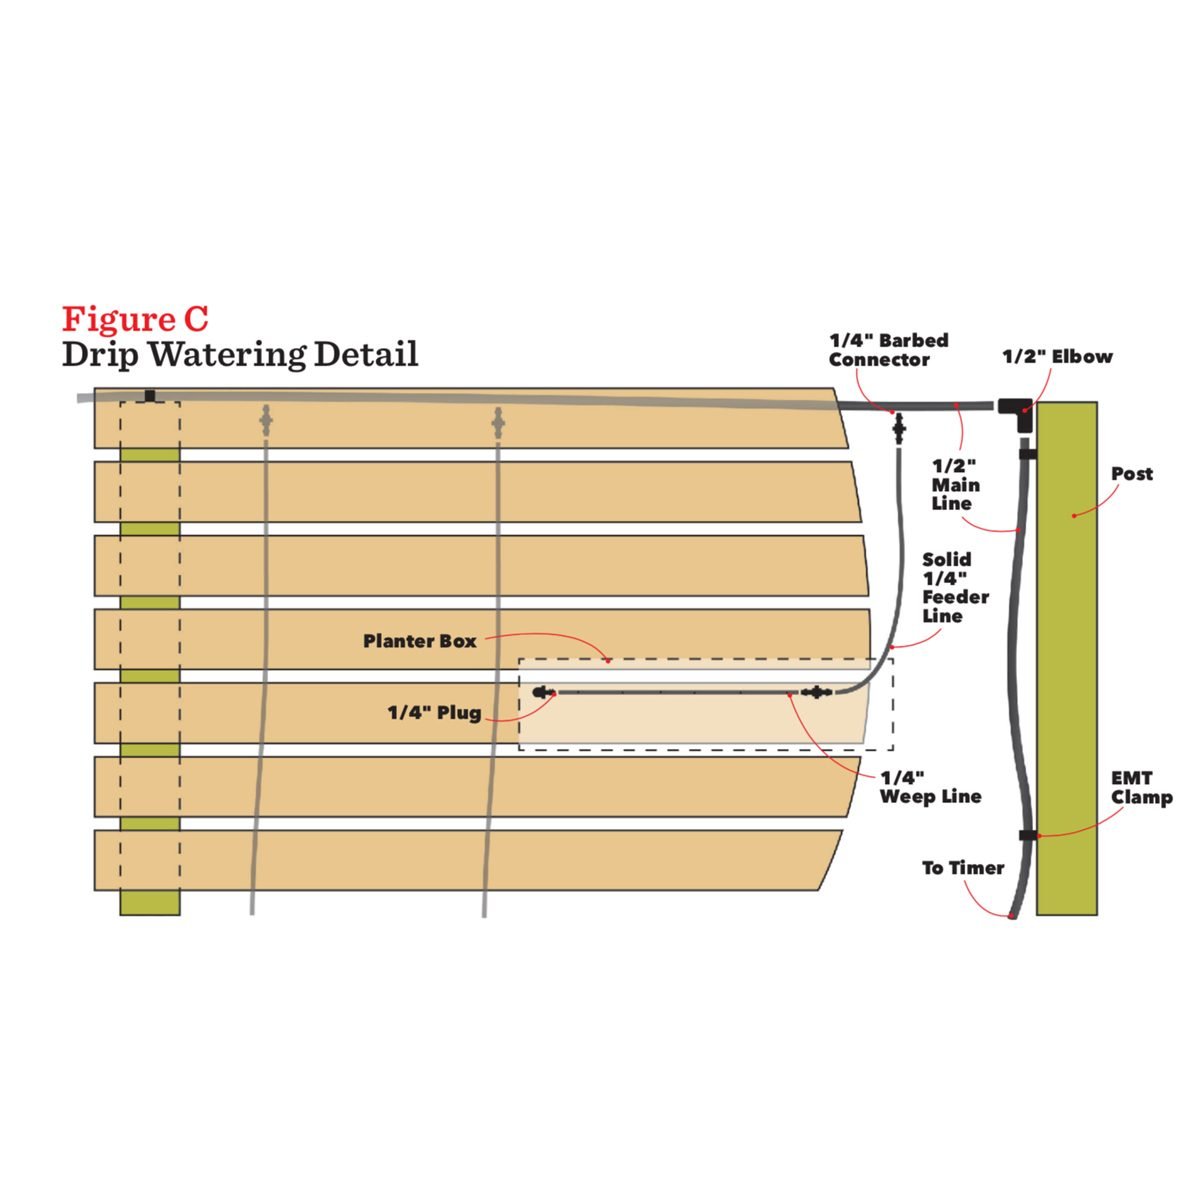
The irrigation system
We won’t go into detail about how to install the drip irrigation system in this article, but here’s an overview on how it works for this project. A timer valve at the hose bib meters the water going to the planters via a 1/2-in. vinyl line that runs up and across the tops of the 4x4s. We pierced that line (Photo 10) and plumbed in 6-ft.-long 1/4-in. feeder lines—three in each 4-ft. bay. Plug the ends of those lines for now. Once the planters are hung, you simply fish out a line just above each planter. Cut off the plug and replace it with an elbow. Slip a 1/4-in. weep line the same length as the planter over the elbow and plug the weep line. Any extra feeder lines can be used for more planter boxes. You’ll find everything you need for the irrigation system at any home center or nursery. The components will cost about $100.

11. Clad the inside corner
Clad one side, overlapping the inside corner post(s). Then screw a 2×4 over the 1x4s to act as a backer for the remaining 1x4s.

12. Cap the ends
Cut short lengths of 1x4s to finish off exposed post ends. Butt joints are best for these. Miters are tricky to cut and will open into ugly gaps later. Keep screws near the center to avoid splitting.

13. Build the planter boxes
Cut the 2×6 ends and 1×6 boards so that the completed planter frame will be about 1/4 in. wider and longer than the body of the plastic box liners. (The liner lips rest on the top of the boxes.) Join the parts with 2-in. screws.

14. Add the hooks
At both ends of each planter box, drill a 1/4-in. pilot hole 1-1/2 in. from the top. Turn the hooks with a box wrench. Cut away any vinyl coating with a utility knife.

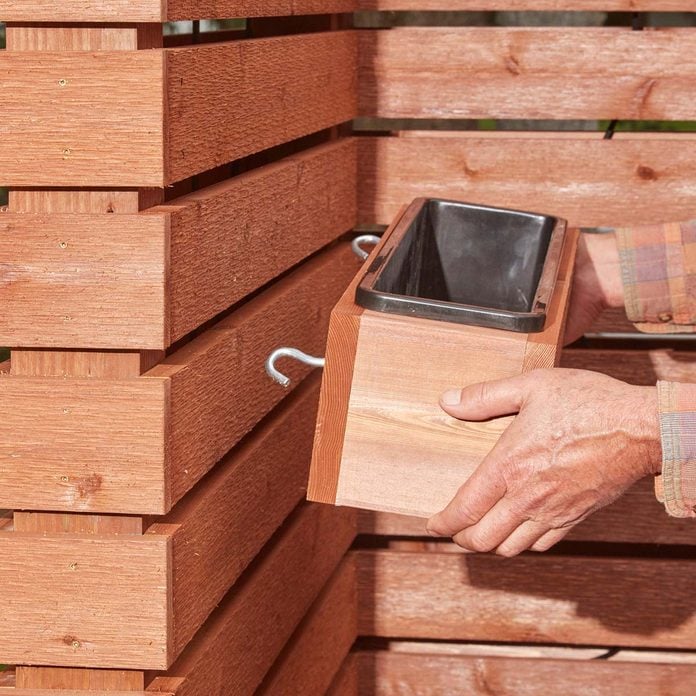
15. Test and adjust the hooks
Fine-tune the depth of the hooks by hanging the boxes on the wall. Turn them in as far as they’ll go while still hooking onto the 1×4. You’ll have to twist the hooks slightly sideways to fit them through the 3/4-in. slots.
Planter boxes
Go to the garden center and look at planter box liners. These thin-walled shallow plastic boxes hold the soil to protect wooden boxes from rotting. They come in a few different lengths. Pick narrow ones (6 in. or less). When filled with soil, wider ones may be too heavy for our system to support. Choose liners that are 5-1/2 in. deep or less so they won’t show below the wood boxes. The lip will rest on the top of the boxes and support the liner, soil and plants (Photo 15). Create a lush herb, veggie or flower garden with our favorite vertical garden planters and ideas.
Pre-finish the wood
If you want to use a finish on your wall, apply it before you start building. The posts and the back side of the 1x4s will show through all those cracks, so it’s important to finish all four sides of everything. We applied an oil-based stain with a 1/2-in. roller. The truth is that you’ll likely spend as much time staining as building the wall. (Three of us built this entire wall in one day.)

Living Wall Materials List
- Treated 10-ft. 4x4s: One for every 4 ft. of wall. (Don’t forget to add one more for the first post.)
- Treated 8-ft. 2x4s: One for each inside corner for backer boards (Photo 11).
- 1x4s: Select lengths to avoid seams if possible. You’ll need 21 for each side if you build your wall 7 ft. tall, or three for each foot of height for a shorter wall.
- 2x6s: 1 ft. for each planter box.
- 1x6s: Use your box liners as a guide to determine the best lengths and quantities. Don’t forget you need enough for both the back and the front.
- 2x4s: Ribbons for laying out and setting the posts. Choose straight ones a couple of feet longer than your wall.
- 8-ft. 2x4s: Get two for each corner and any end posts for bracing. (Cut some off the ends to use for stakes.)
Hardware:
- 1-1/4-in. exterior trim-head screws: 42 per post for attaching the 1x4s (84 if you’re cladding both sides).
- Small box of 3-in. trim-head screws: For bracing. 2-in. exterior trim-head screws: Eight per planter box.
- 5/16 x 3-3/4 in. hooks: Two for each planter box. 60-lb. bags of concrete mix: Two per post.
Plus: How to Build a Rain Garden in Your Yard
