


Add a bathroom in your basement without busting up the concrete floor.
Multiple Days
Intermediate
$1200-1300
Introduction
Need another full bathroom in your home? Here's a way to install one in your basement with a different kind of toilet and plumbing.Watch How to Add a Bathroom to a Basement the Easy Way
Tools Required
- Basic carpentry tools
- basic electrical tools
- Basic plumbing tools
Materials Required
- Framing lumber
- GFCI outlet
- PVC adhesive
- PVC pipe
- Saniflo SaniAccess 3
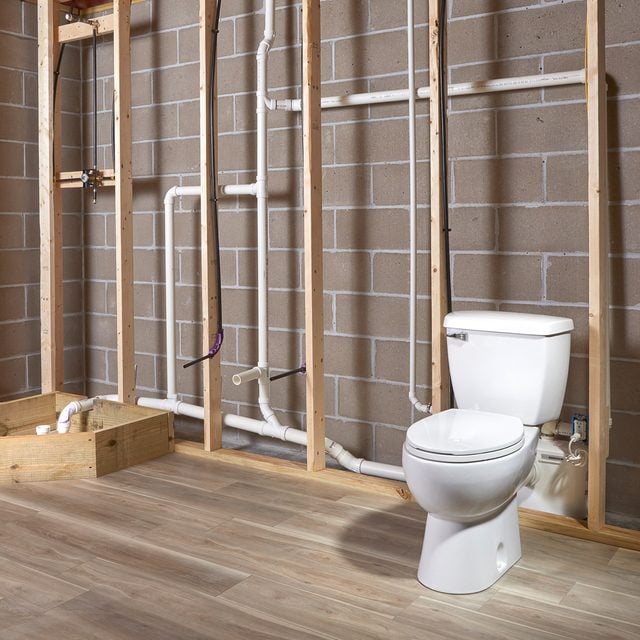
The addition of a full bathroom with a shower, sink and toilet can be a huge improvement to any home, particularly if you have only one bathroom and a growing family. It can also be a huge, expensive job.
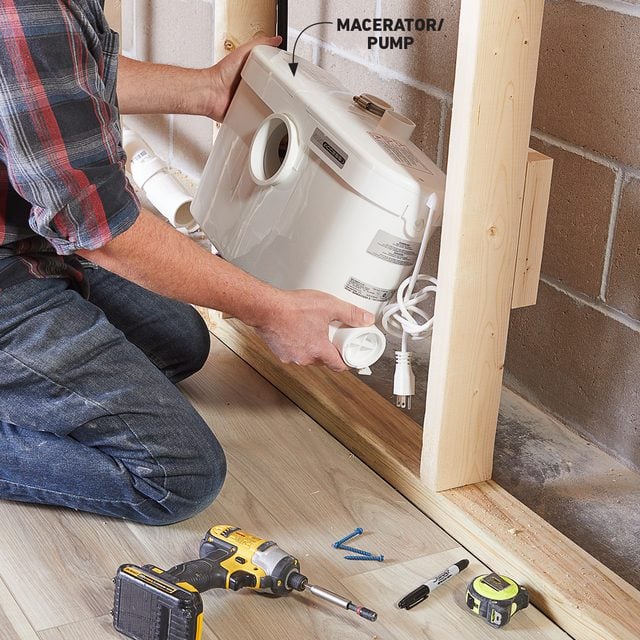
Upflow bathroom systems simplify the plumbing of a basement bathroom, putting this valuable home improvement job within reach of a DIYer. These systems include a macerator/pump that can be tucked into a wall directly behind a rear-discharge toilet.
All the fixture drains flow to the macerator/pump, which grinds solids and then pumps waste upward to connect to your main drain line, instead of relying on gravity. Shower and sink drains do use gravity to reach the pump, and those are easy installations.
What is a Macerating Toilet?
Think of it as similar to a garbage disposal in your sink. In a macerating toilet, waste is channeled to the macerator/pump, which reduces solids to be easily pumped through a 3/4-in. discharge pipe.
Our system, the SaniAccess 3 from Saniflo, includes a rear-discharge toilet and a macerator/pump with fittings. You’ll supply the rest of the standard plumbing pipes and fittings.
System Advantages
The biggest advantage of an upflow system is not breaking up a concrete floor to run floor drains. There are other advantages, too.
First, the discharge line is much smaller than a standard drain line, so you can fit it into places where a standard drain might not work. Second, you can install a bathroom anywhere. You don’t need to be concerned with how the toilet drain aligns with existing drain lines in your home.
Meet the Expert
Carmen Bossi, the president/founder of Saniflostore.com

Project step-by-step (10)
Step 1
Place the Macerator/Pump
Set the macerator/pump in place behind the wall framing. The unit needs to be on the same level as the toilet. Install the rubber feet and secure the pump to the floor.
If you’re in a cold climate, allow space between the pump and the wall for insulation. Insulation in front of the pump will help dampen the minimal noise from the macerator/pump.
Step 2
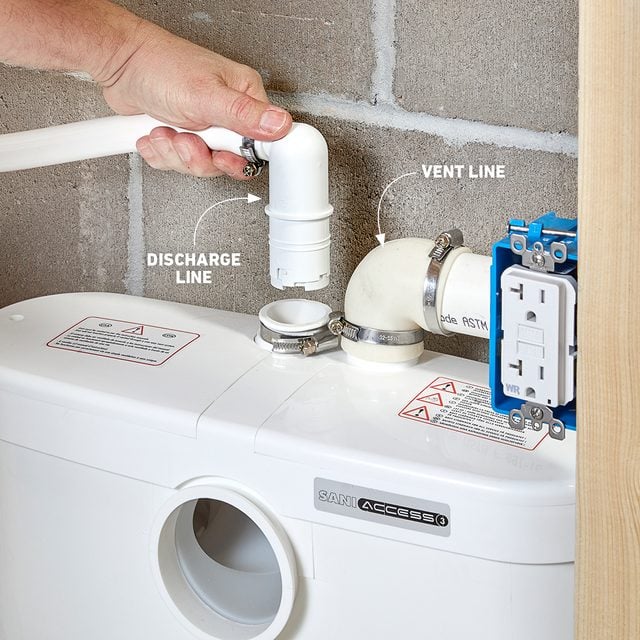
Install a GFCI Outlet
The macerator/pump needs its own GFCI outlet. Install the outlet inside the wall framing, near the pump. The outlet needs to be within 12 inches of an access panel and facing the room. Be sure to check local codes before installing this outlet.

Step 3
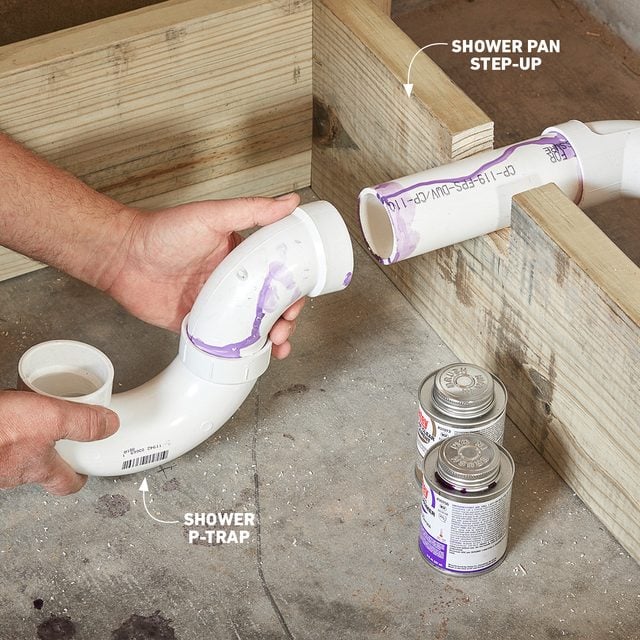
Build the Shower Pan Step-Up
With your shower plumbing in hand, calculate the height of the platform, including the P-trap as well as a 1/4-in. drop per foot of horizontal run to the pump. The minimum height is six inches, and that’s usually enough depending on your P-trap and the distance to the pump. You may need to add an extra step, depending on the finished height.
To lower the platform height, chip out some concrete for the P-trap. If your basement has low ceilings, you may need to consider a tub instead of a shower.
Step 4
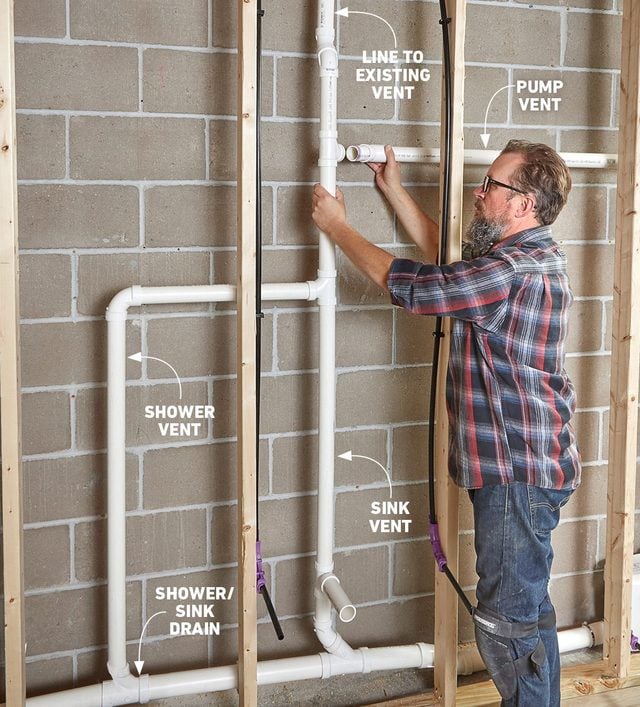
Connect the Shower and Sink Drains
Hook up the shower drain and run the pipe into the wall. Use an elbow to turn the pipe toward the pump. In our bathroom, the sink is between the shower and the toilet, so we tied in the sink drain on the way to the pump.
The pump has a drain entrance on both sides, so you can configure your bathroom however you like. In our case, we used a provided plug to cap the entrance on the other side of the pump.

Step 5
Install the Vents
Along the drain line, you’ll install a vent for each fixture. Connect these vents and tie them into the vent system on your existing plumbing. Mechanical vents won’t work with this system; only a free air vent can be used.
Step 6
Connect the Discharge to the Pump
Slip the flexible discharge tube onto its port on the pump and secure it with a hose clamp. At the end of the tube, you can install a shutoff ball valve. If you ever need to remove the pump, that valve will prevent backflow.
After the first hard 90-degree turn from the pump, any turns in the discharge pipe need to be sweeping — no more hard 90s. Use a sweep elbow or two 45-degree elbows instead.
Step 7
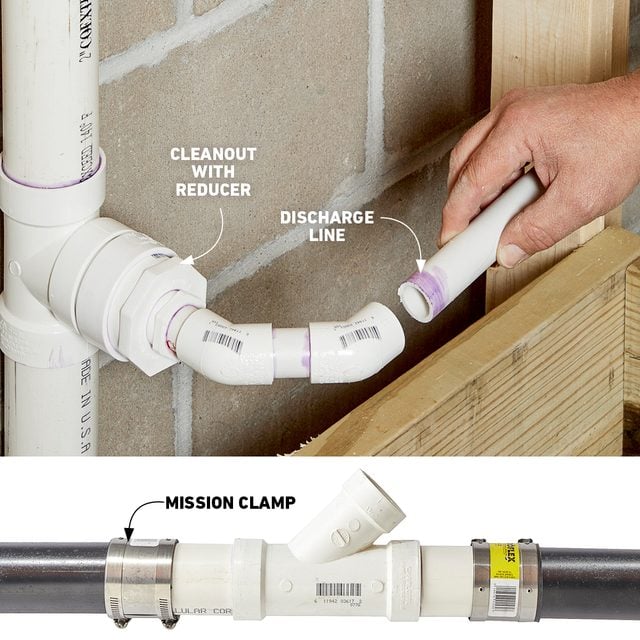
Connect the Discharge to the Main Sewer Line
The discharge line can run horizontally at first, but for no more than 18 inches before it turns vertically. After the first vertical turn, the pipe can run horizontally again but not make another vertical or diagonal turn. The total run from the pump to the main sewage line must be a minimum of three feet.
The easiest place to tie into the main drain is at a cleanout using a reducer fitting. If that’s not an option, you can install a Y-fitting (not a T-fitting) on any horizontal run, but the discharge must enter the pipe from the top or side. No other lines can feed into the discharge from the pump.

Step 8
Discharge Options
If you have a cleanout in a convenient spot, you can connect the discharge there. Just remove the plug and install a reducer to connect the 3/4-in. discharge pipe.
If your drains are steel pipe, you’ll need to cut out a section and install a Y-fitting using mission clamps. You can’t use the type that just have hose clamps, though — only the fully banded type.
Step 9
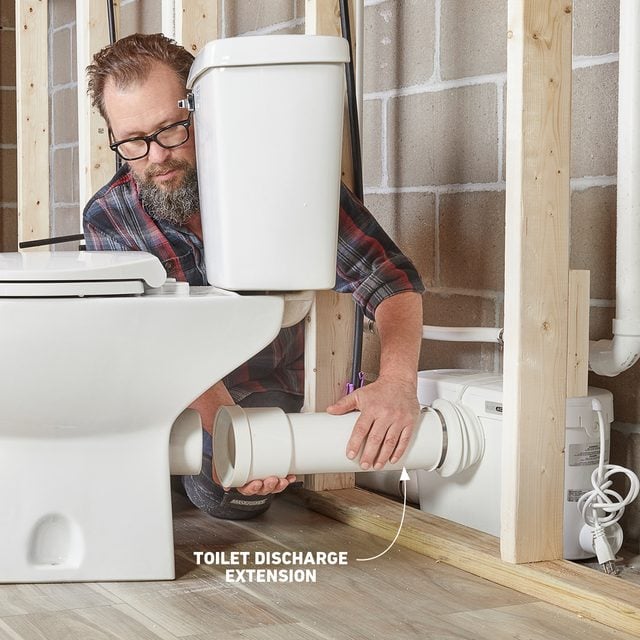
Connect the Toilet
Set the toilet into position, then connect the flexible boot to the toilet’s discharge port. Next, connect the boot on the other end to the pump. Make sure the connection boot faces the right direction. Zip ties keep the boot in place, as this is a drain, not a pressurized supply line.
- Pro tip: Making a straight cut on a large-diameter pipe starts with an accurate line. Wrap a piece of cardboard with one straight edge around the pipe and mark your line with a Sharpie.
- Pro tip: To make the cut, first saw all the way around the pipe just enough to remove the mark. Keep sawing a little deeper each time around until you’re through the pipe.
Step 10
Install the Toilet
Mark holes on the floor through the holes on the toilet base. Slide the toilet out of the way, then drill the holes for the supplied concrete anchors using a correct size masonry bit. Slide the toilet back into position, and then install the lag screw anchors. Make sure you know the cost of toilet installation.
Use shims under the toilet as needed to keep it from rocking. Be careful not to overtighten the bolts; you can crack the toilet.

Originally Published: November 09, 2021