


Increase safety, speed and accuracy with shop jigs.

7 Shop Jigs for Better Woodworking

Updated Nov. 14, 2023
On This Page
Bridle Joint Jig

A bridle joint is much like a mortise-and-tenon joint, but the mortise is open on one end. So instead of chiseling a recess into the wood to accept the tenon, you cut a slot in the end of the board. This jig makes both cuts of a bridle joint in 3/4-in. material and allows you to adjust for slight variations in material thickness.
Cut a kerf in the base
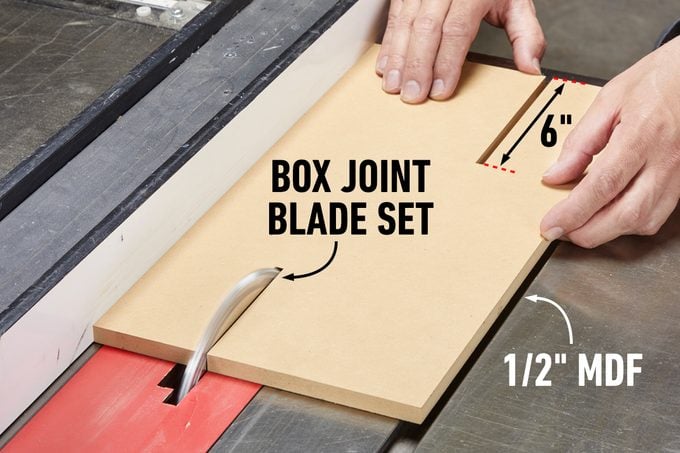
Set the fence three inches from the blade using your tape measure; the table saw gauge won’t be accurate with this blade set. Cut a slot about six inches long on both sides of the base. I used a box joint blade set because it cuts a perfect 1/4-in. slot, but a dado blade works, too.
Glue the upright support

Keeping the part square, glue one support flush with the edge of one slot; this is for cutting the tenon. Glue the opposing support exactly 1/4-in. offset from the slot; this is for cutting the mortise.
Attach the stop
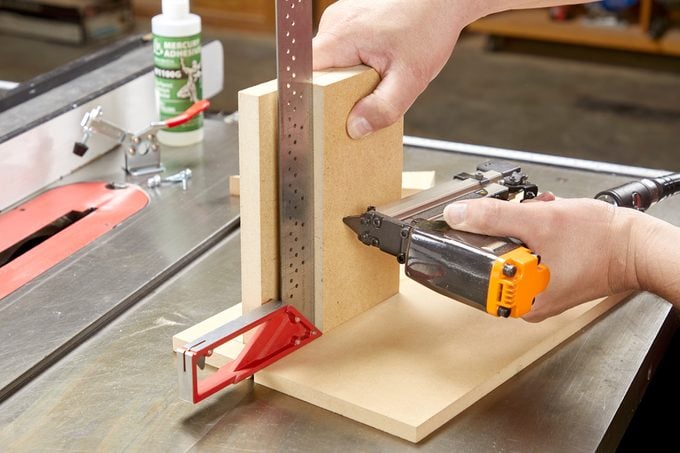
Attach the back stop to the upright support. I used a square against the leading edge and 23-gauge pins to tack it. You could add glue, but the screws mounting the toggle clamps will provide plenty of strength.
Attach the toggle clamps
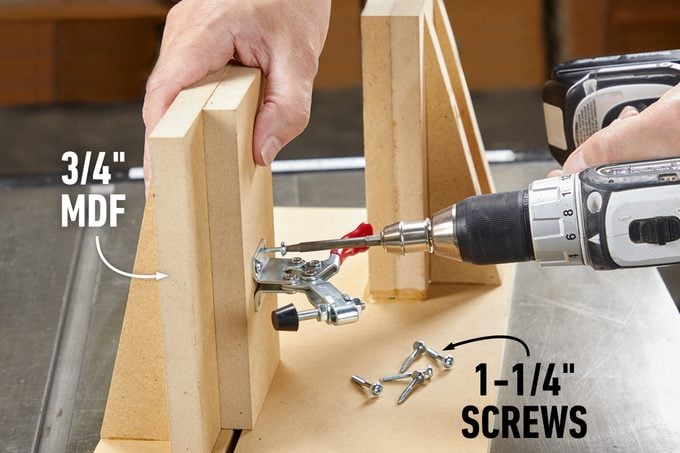
Position the toggle clamps three inches up from the base and attach them with 1-1/4-in. washer-head screws. I used a self-centering bit to predrill the mounting holes, but this isn’t absolutely necessary.
Providing support
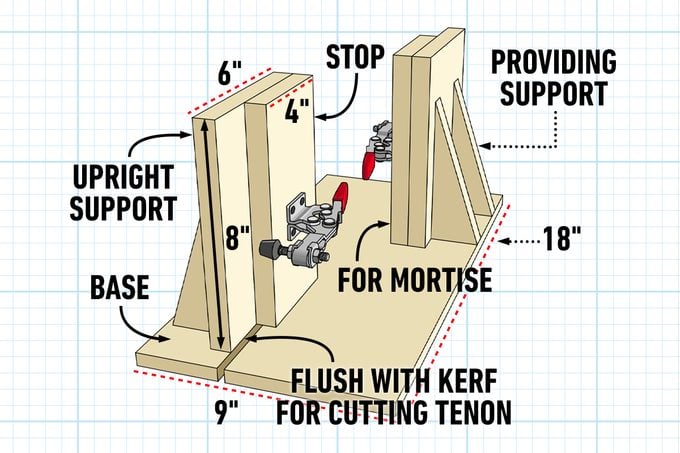
Cut some triangular braces for the upright support and attach them with a generous amount of CA glue. I put a square against the upright supports to ensure they stayed perfectly plumb to the base.
Pro tip
Not all stock is exactly 3/4-in. thick. With masking tape, make fine adjustments to get the slot perfectly centered. Adding the same amount of tape to the other side of the jig makes the tenon just the right size.
Splining Jig
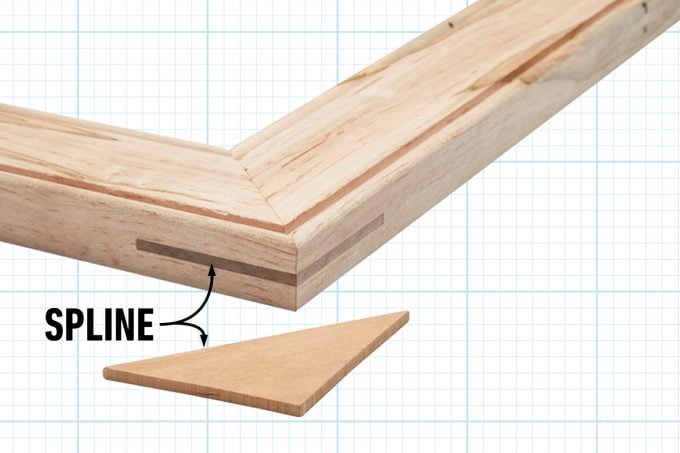
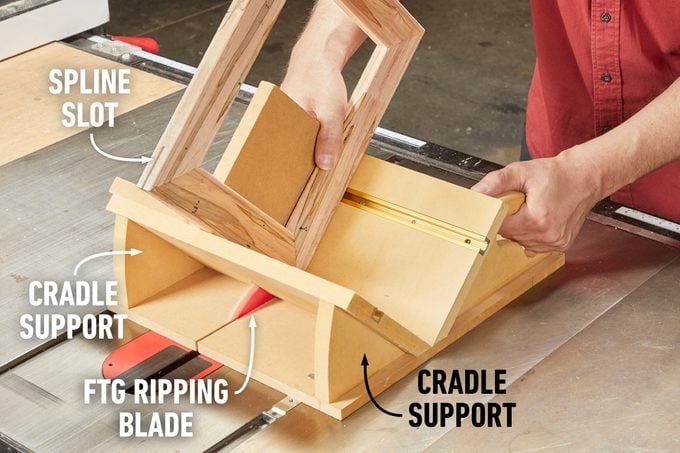
Splines are great for strengthening a mitered joint. With this jig, I can safely cut spline slots on the corners of picture frames and boxes using a ripping blade with a flat-top grind (FTG).
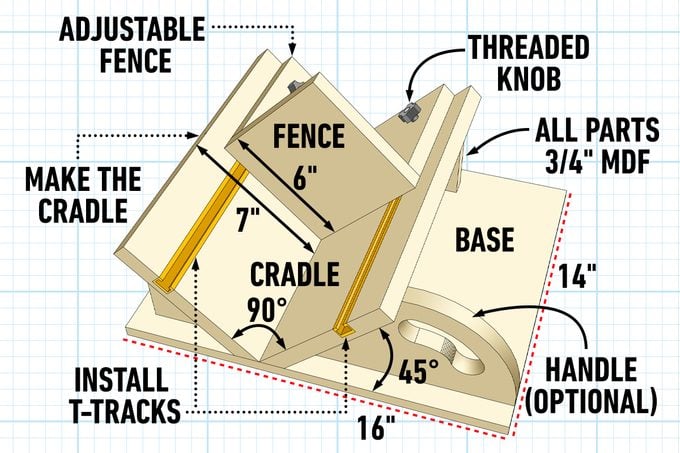
Make the cradle
I cut the bevel and the dado slots in an 8- x 24-in. piece of medium density fiberboard (MDF). Then I cut that in half to make the two sides of the cradle.
Install T-tracks
The T-tracks embedded in the cradle allow me to firmly secure the fence. I attached the T-tracks with 1/2-in. No. 6 screws.
Adjustable fence
Make the fence from three parts, with holes drilled for T-bolts. This lets me to hold the work securely while making the cut, keeping my fingers away from the blade.
Door and Drawer Pull Jig
Store-bought jigs for marking drill points for door and drawer pulls are fine, but they’re not well suited for larger pulls. I make my own jigs and design them for drilling instead of marking. This eliminates a step and ensures every pull aligns perfectly with the door edge every time.
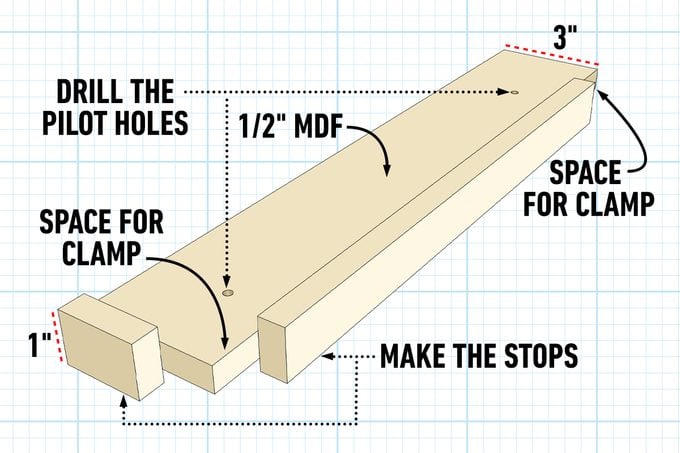
Make the stops
Attach the stops to the jig with a little CA glue. I like to use 23-gauge pins to add strength. Overhang the edge guide on both sides; this makes the jig usable on right- or left-hinged doors. Leave space at the corner and the top for two spring clamps.
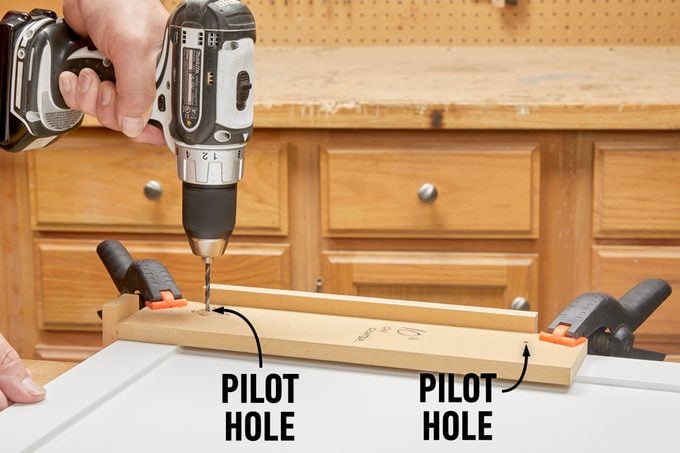
Drill the pilot holes
Mark the hole spacing with a combination square. Drill a 7/32-in. hole with a drill press if you have one. The holes need to be as straight as possible.
Picture-Framing Jig
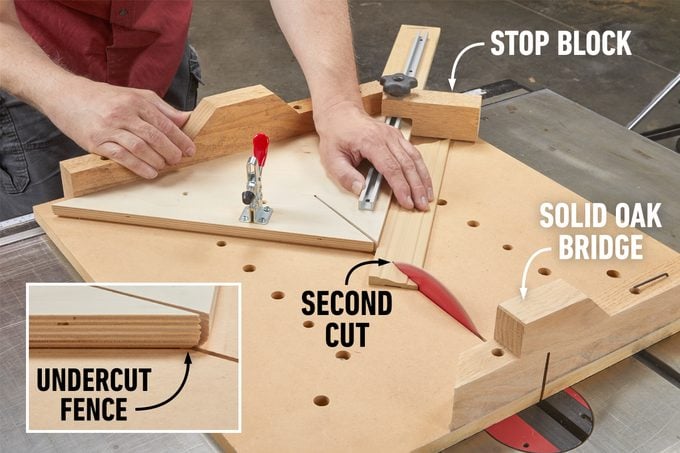
This jig makes cutting mitered parts on the table saw repeatable and accurate. Similar to the table saw DIY Crosscut Sled I made for the April/May ’22 issue, this one has a permanent 45-degree fence.
The toggle clamp holds the stock for the first miter cut. Make the second miter cut on the left side (shown). The stop block ensures the opposing sides of the frame are precisely the same.
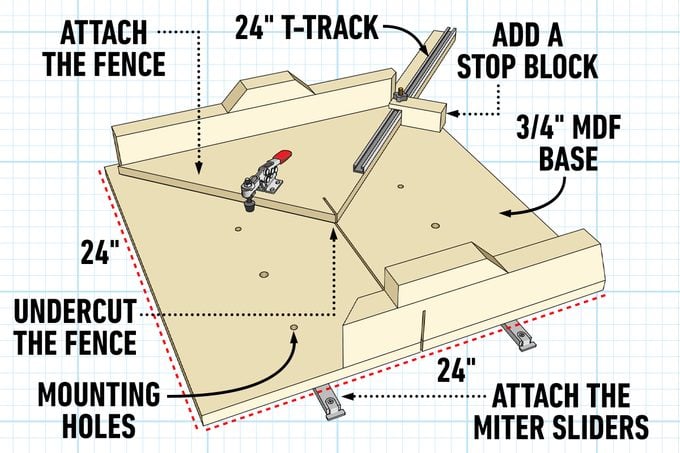
Attach the miter sliders
INCRA miter sliders attach to the base with bolts from the top. Drill the holes slightly oversized to allow for small adjustments.
Undercut the fence
Take the extra step and undercut the bottom edge of the fence material. This will prevent debris from getting trapped there and affecting your cuts.
Attach the fence
Once the miter sliders are attached, cut a kerf halfway into the base. Glue the triangular fence at a 45-degree angle to the kerf. Add a toggle clamp to the left side and a T-track to the right.
Add a stop block
Store-bought flip stops won’t work for this jig because when the part is on that side of the jig, the miter cut will be away from the fence. Our stop block is solid oak three inches wide.
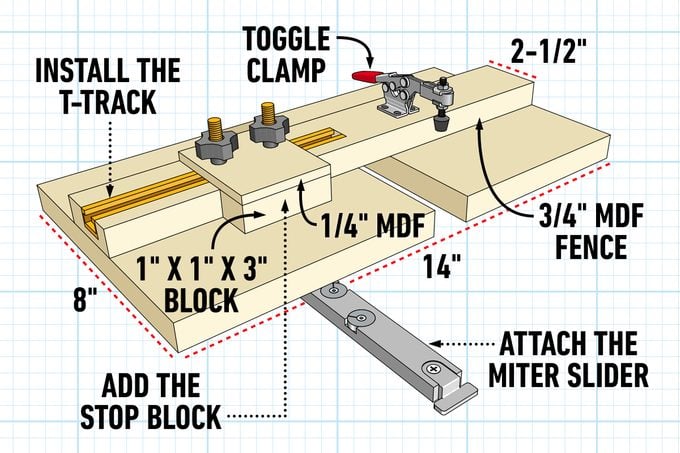
Half-Lap Jig
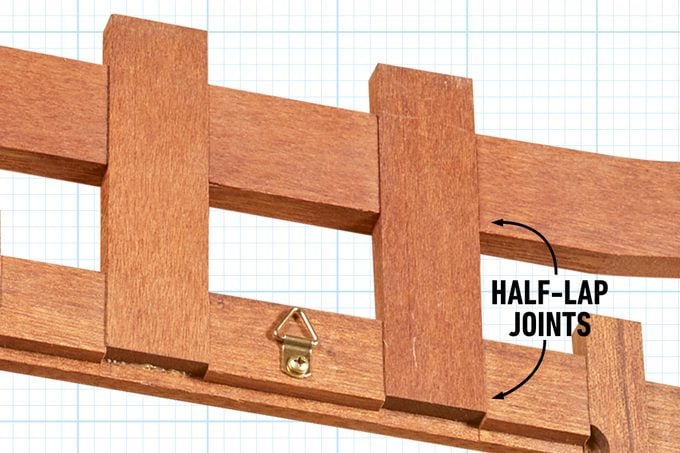
I made this jig for a production run of custom frames I sold at local karate dojos. Inspired by Japanese architecture, the exacting design required 20 half-lap joints per frame! All these joints had to line up perfectly, and this jig made it a breeze.
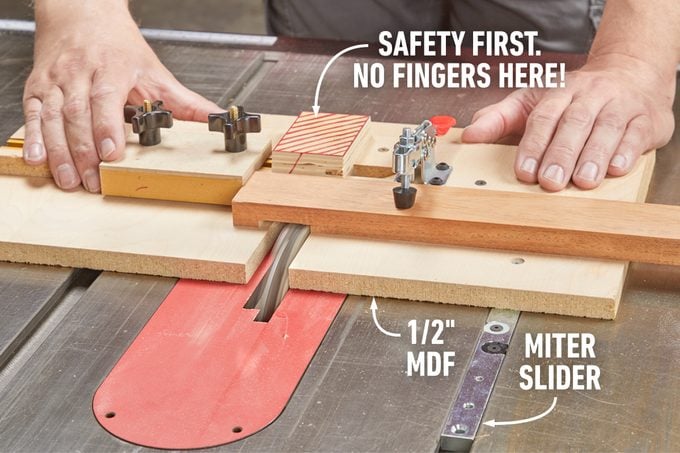
Attach the miter slider
Attach a miter slider to the bottom of the jig. I used an INCRA miter slider on this jig, but it’s small enough for a light-duty slider.
Install the T-track
I cut a dado slot in the fence for the T-track, which the stop block slides in. This doesn’t have to be precise.
Add the stop block
I used two T-bolts and knobs on this stop block to keep it from wobbling side to side. To make the stop block, glue two parts together. After the glue dries, mark the center line for the T-track and drill the 1/4-in. holes for the T-bolts.
Sacrificial Fence
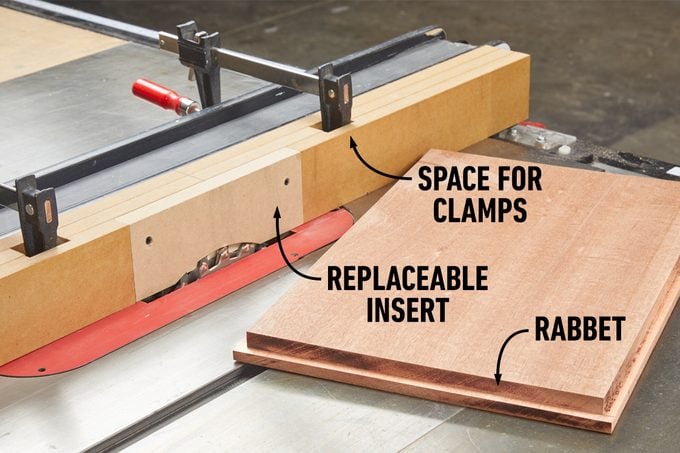
When you’re making a rabbet cut, the last thing you want to do is cut into your table saw fence! This simple jig is made from three layers of MDF, with spaces for two clamps.
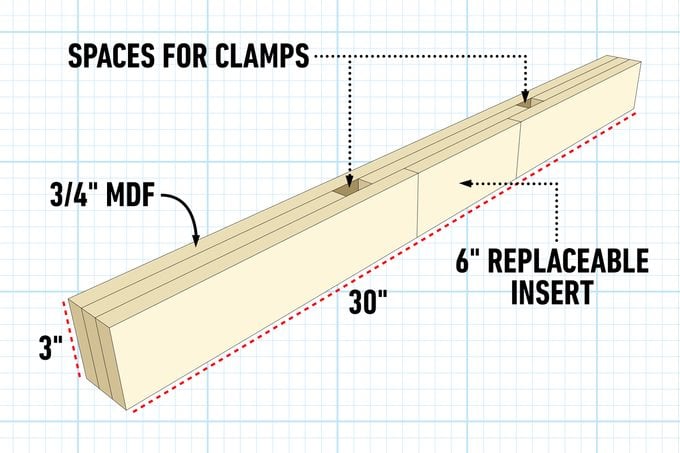
Six-inch replaceable insert
Sacrificial fences get used up, so I took this design one step further and added a replaceable insert. Replacing the insert once it gets chewed up extends the life of the fence.
Spaces for clamps
Any clamps will work, but you might need to add middle layers for your clamps to fit.
The story stick
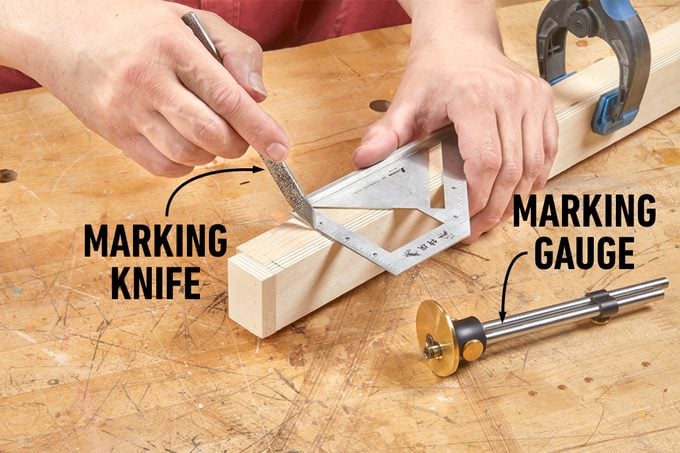
Perhaps the simplest jig in any shop, the story stick can revolutionize the way you work. It simplifies any measuring or marking task, like the mortise locations on these stiles. Clamp the story stick to your parts, then transfer the lines directly to your parts.
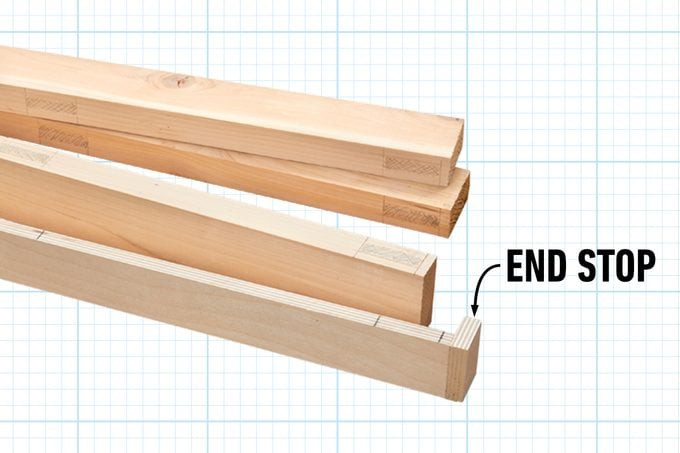
Save your scraps
A story stick can be made from just about any long strip of wood. Plywood scraps are perfect.
Increase accuracy
A stop block on one end and a strong spring clamp keep the story stick stable while you mark your part.
Make your mark
I use a marking knife to mark for mortises like these. It’s much more accurate than a pencil. Set the knife in the mark on the story stick, slide the square up to it and score your mark. It doesn’t get any more accurate than that!
Jay’s Jig Kit
No shop is complete without a way to make jigs. These tools help me every step of the way.
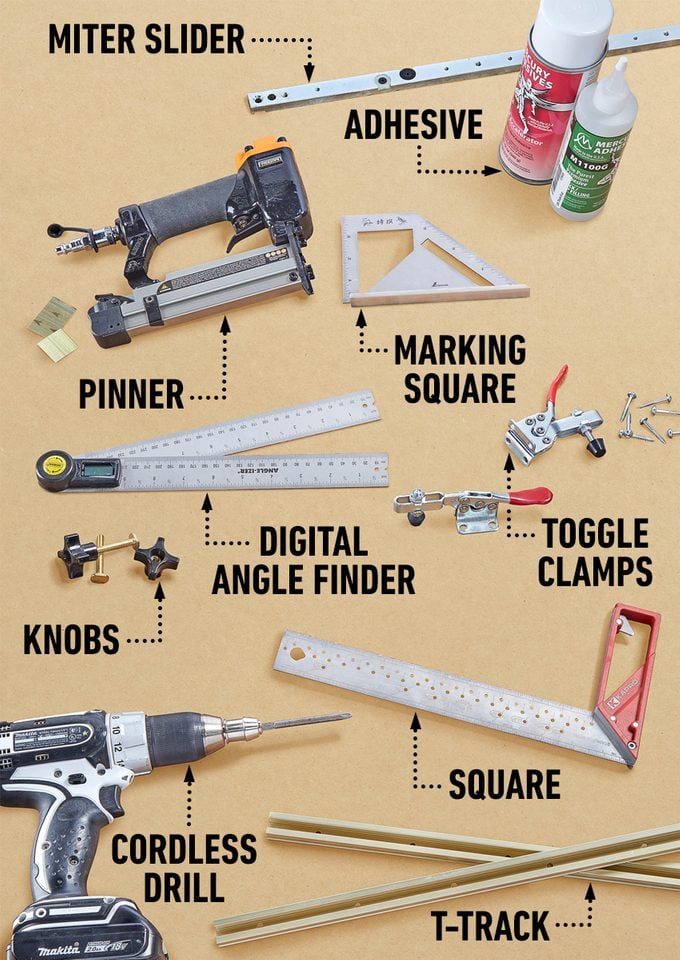
Miter slider
INCRA miter sliders are made of steel and come in 18- and 24-in. lengths.
Pinner
A 23-gauge pinner is a perfect companion to CA glue.
Marking square
This marking square from japanwoodworker.com is good for more delicate marking tasks.
Adhesive
I use thick CA glue and accelerator on every jig I make.
Digital angle finder
I use this to check angles that aren’t 90 degrees.
Knobs
Find all the knobs you need at Rockler or Woodcraft. I use 1/4-20 threaded knobs.
Square
An accurate square is essential for making accurate jigs.
Cordless drill
My trusty sidekick, this drill has helped me make countless jigs.
T-track
There are lots of T-track options but I prefer the INCRA brand
Shopping for materials
For knobs and handles, T-tracks and anything else you need to make quality jigs, Rockler and Woodcraft have the best selections.
Originally Published: August 01, 2022