


Learning to weld opens up new worlds. Gerrilyn Kujawa, a welder based in Minnesota, talks about getting started and the steps for making great welds.

Learn MIG Welding Tips From a Pro

Updated Sep. 06, 2023
On This Page
Meet the Expert

MIG Welding Equipment
Choosing a welder
- Kujawa says the $200 MIG welders at home centers are fine for occasional light use, but you’ll need a better one to tackle thicker material or larger projects.
- If you’re want serious about welding, plan to spend $400 to $600 for a good machine that will last.
Power considerations
- To weld thicker material, you need a machine with a higher amp output. A 120-volt welder, powered by a conventional outlet, can weld metal up to 5/16-in. thick.
- You’ll need at least a 20-amp (preferably a 30-amp) circuit. If you think you’ll be working with material thicker than 1/4-in., get a 240-volt machine and a 50-amp circuit to match.
Secondhand savings
- Kujawa also suggests beginners look into used equipment, which isn’t as costly.
- Pawn shops and Craigslist are great places to look. When purchasing a used machine, always test it.
- Look inside to see if there are any obviously burnt wires, and make sure the buttons, knobs and display function properly.
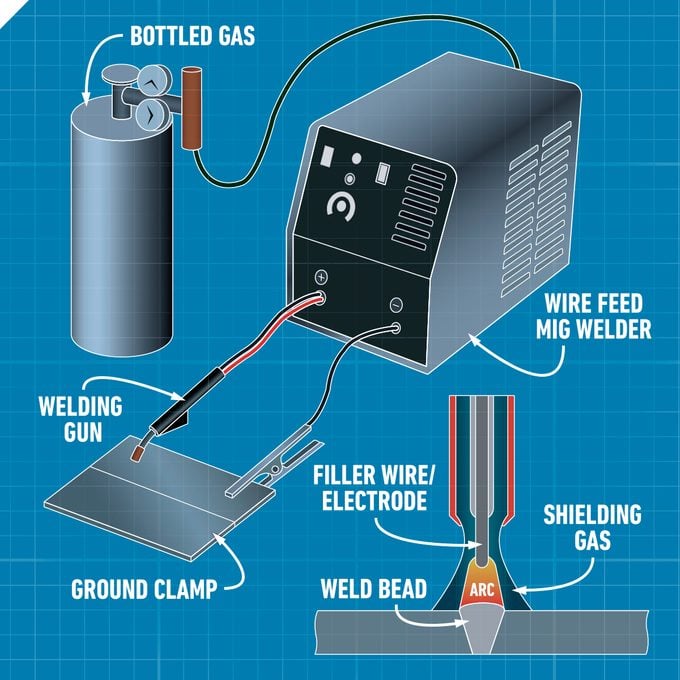
Wire feed MIG welder
- The wire spool is inside the machine or in a separate wire feed box. This feeds the wire through the gun when the trigger is pressed.
Bottled gas
- For a MIG setup, you’ll need a bottle of gas, typically CO2 or a CO2/argon mix. Straight CO2 is the cheapest option. Adding in argon creates a better-looking weld. A filled tank costs $80 to $160 depending on the size and the gas mixture.
Ground clamp
- The ground clamp completes the electrical circuit to create the arc. It’s important to clamp it to clean metal to get the best results.
Welding gun
- Pressing the trigger activates the shielding gas, feeds the filler wire and applies electricity, creating the arc.
Build Your Skills
Practice with a caulking gun

- Kujawa learned this trick from a fellow welder — use a caulking gun and cardboard to practice welding movements. It’s safe and not intimidating. Move the tip back and forth consistently to lay down the bead with evenly spaced puddles.
Weld a 90-degree joint
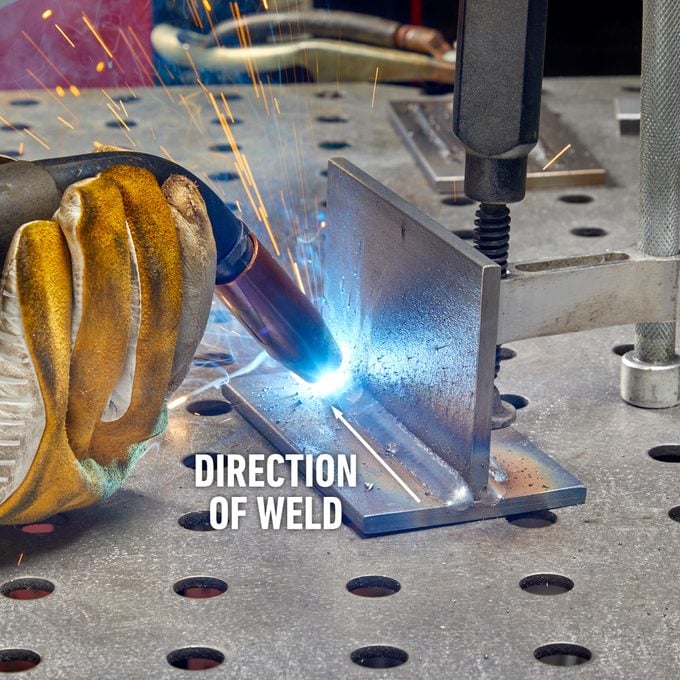
- Tack the joint using a magnetic jig. Start your bead by holding the gun at a 45-degree angle to the parts. For the push technique, tilt the gun 10- to 15-degrees in the direction of the weld. Be sure to remove your magnet before welding the entire joint — the heat will destroy it.
Prep your material

- A weld is only as good as the surface prep. Kujawa uses an angle grinder to clean the surface area of any oxidation or contaminants. Joints must have a tight fit to ensure the weld is deposited evenly between both material surfaces.
Weld some straight beads
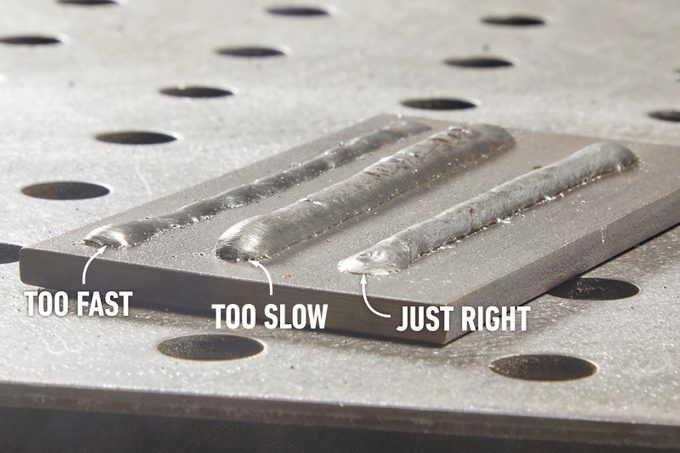
- Run some beads on a flat piece of scrap metal to practice your welding rate. Hold the tip at various angles and play with speed. This helps you form puddles easily and allows you to reach proper depth.
Be patient
- Expect to make mistakes — that’s how we learn. Most important, have fun and enjoy it! You’ll find your way with time and practice.
The 5 Basic Welding Parameters
Also known by the easy-to-remember acronym CLAMS:
Current
Referring to the amperage, this generally dictates the size and penetration of the weld.
Length of arc or “stick-out”
The distance the arc or electrode is from the workpiece.
Angle
The orientation of the gun in relation to the workpiece. This should typically be 10- to 15-degrees toward the direction of the weld.
Manipulation
The way you move your gun affects the physical qualities and look of the weld. For a “weave,” sweep the puddle back and forth, resulting in a weld resembling a braid.
Speed
Move too slowly and the bead will pile up on itself and look lumpy. If you go too fast, the shielding gas won’t have a chance to protect the weld, making it prone to failure.
Weld Safely!
Welding can be dangerous work, and Kujawa takes every safety precaution available.
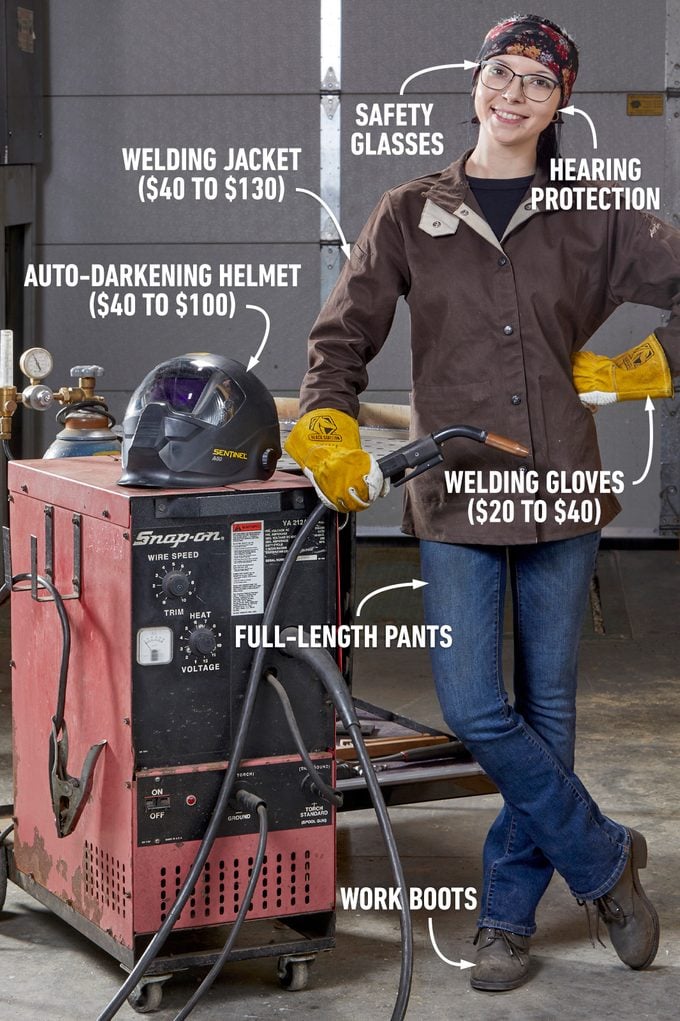
Safety glasses
Eye protection is a must for all power tool use. It’s especially critical for welding, because hot metal bits are likely to go airborne.
Hearing protection
Earplugs or earmuffs — the choice is yours. Many welders choose earplugs because they don’t interfere with welding helmets.
Welding jacket
This does more than make you look cool. Made from thick leather, these jackets (costing $40 to $130) prevent sparks and molten metal from burning your clothes or skin.
Auto-darkening helmet
These helmets ($40 to $100) let you see normally through the face shield until the gun sparks. As soon as the shield detects a spark, it darkens to protect your eyes.
Welding gloves
Thick leather gloves ($20 to $40) with a long cuff protect your hands and forearms from sparks and molten metal.
Full-length pants
Wear durable pants such as denim, or use welding chaps.
Work boots
Steel- or composite-toe work boots are a smart choice.
Apron (not shown)
An apron ($20 to $50) protects your clothes during other tasks, such as grinding or cutting.
Kujawa’s Everyday Tools
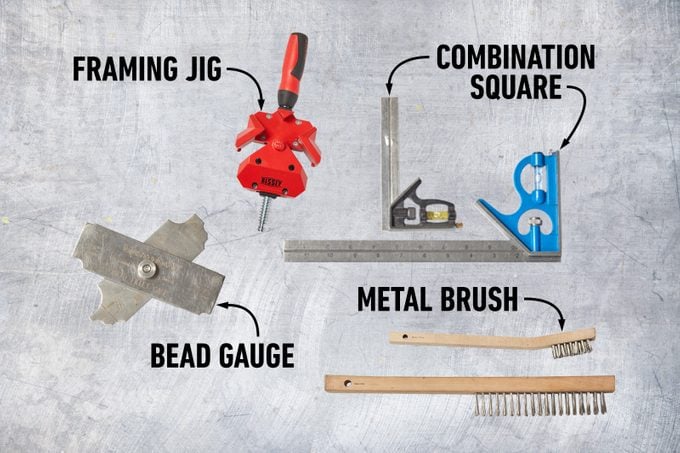
Framing jig
A framing jig is indispensable for holding parts at a 90-degree angle for tack welding.
Bead gauge
Helps you determine the size of your bead. This is the perfect quick-reference tool.
Combination square
This tool lets you mark square and angled lines on steel.
Metal brush
These are the go-to tools to clean parts before and after welding.
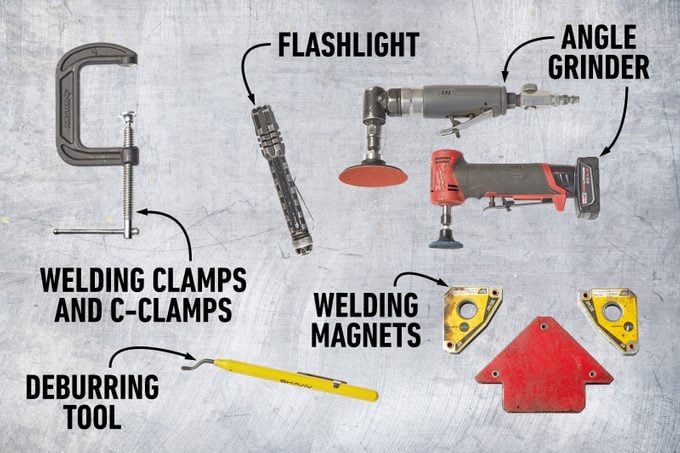
Welding and C-clamps
Welders use all kinds of clamps to hold materials in place for tack welding. You can’t have too many.
Welding magnets
Welding magnets ($10 to $50) hold parts together at precise angles while they’re being tack-welded.
Angle grinder
You’ll use an angle grinder ($30 to $100) to clean surfaces, shape parts before welding, and grind and refine the bead after welding.
Deburring tool
This removes the wire edge left on a piece of steel after it’s been cut.
Flashlight
Helpful for close inspections or to make it easier to see things when your hood is down.
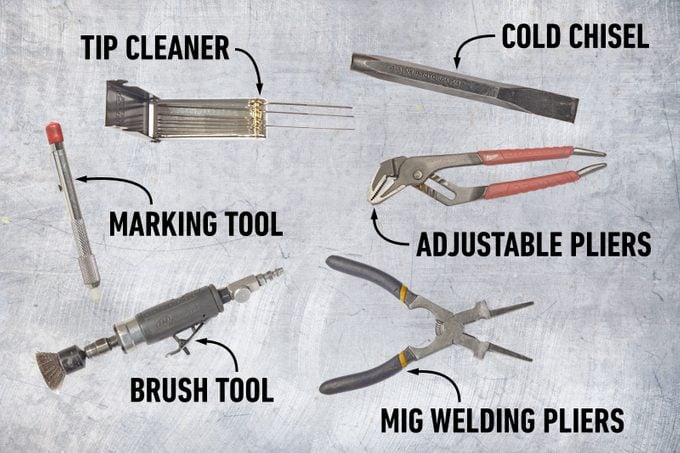
Marking tool
Pencil lines don’t show up on steel. Kujawa uses chalk instead.
Mig welding pliers
These needle-nose pliers are used to install new nozzles, clean splatter and cut feed wire. Here’s everything you need to know about MIG welding.
Tip cleaner
An essential tool for MIG and TIG welders to clean the tips of a welding torch.
Brush tool
Where a grinder is too much, this brush tool helps clean the weld.
Cold chisel
Removes slag in tight places where a hammer can’t quite reach.
Adjustable pliers
Good for so many things. Every welder should have a pair.
Originally Published: June 07, 2022