
How to Build a DIY Chain Link Dog Kennel
Updated: May 08, 2023
Find the best size, fencing, flooring and housing for your dog with these dog kennel plans
On This Page
Dog Kennel Plans Step 1: Plan the size of your outside dog kennel
For sound guidance and tips for building first-class outdoor dog kennels, we contacted Lisa Peterson, director of communications for the American Kennel Club. She gave us dog kennel design advice and also mentioned some of the most common mistakes for dog kennel plans.
We were hoping to get a sizing formula. But it turns out there’s no such thing. Kennel sizing is based on how much time your dog will be spending in the kennel and how much room you have to spare. If your dog is going to be outside all day, he needs a larger kennel so he can run and exercise. If you make it too small, he’ll take every opportunity to “get even” with you and your neighbors with nonstop barking and other bad behaviors. So larger is better for a dog run. As you can tell kennels for dogs vary for dog to dog.
Figure A: Outdoor Dog Kennels
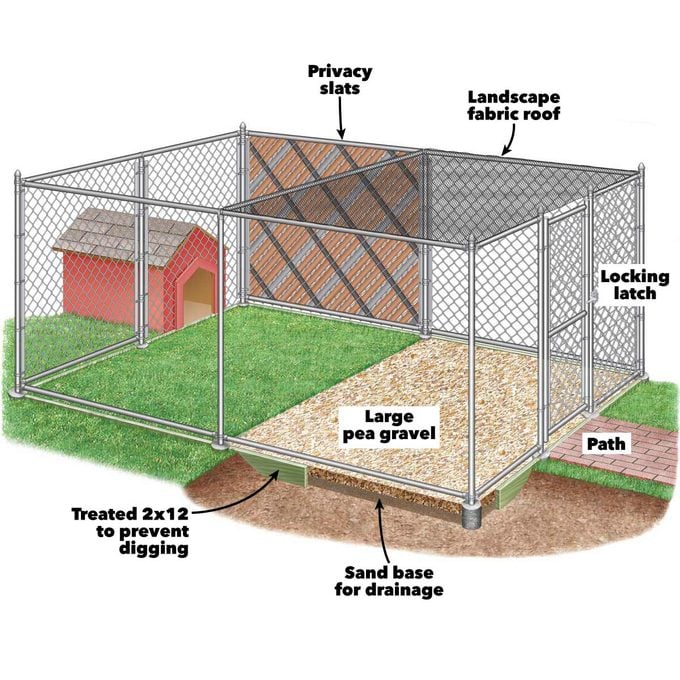
Outfit your outdoor kennel with the proper flooring and drainage, a shady area and a windbreak. Pick up all the materials at your local home center.
Dog Kennel Plans Step 2: Choose dog kennel fencing materials
For walls and doors, chain link fencing is your best bet (4 ft. tall minimum, and taller if you have a larger dog). It’s affordable and easy to assemble, and you can buy premade wall and door sections at any home center. Buy a spring-loaded “snap clip” to secure the swing-down latch (some dogs can figure out how to open those latches and escape). Here are a few tips to help you install a chain link fence.
If your dog is a digger, you’ll have to embed a “direct burial” treated 2×12 below the fence. Or bury the fence itself about 1 ft. into the soil (see Figure A). Those methods aren’t foolproof, but they’ll usually prevent a “great escape.” Screen off any sides that face streets or sidewalks by sliding privacy slats through the fencing. That’ll cut down on barking and overall stress.
Learn how to fix chain link fence here.
Dog Kennel Plans Step 3: Choose the dog kennel flooring
When it comes to flooring material for kennels for dogs, concrete may seem like the best choice because you can slope it for drainage and it’s easy to clean. But it’s actually a mistake. The hard floor will, over time, cause calluses, worn pads, splayed toes and painful joints. Instead, Lisa recommends either large pea gravel (some dogs eat smaller gravel) or large flat stones (flagstone). The irregular shapes actually help your dog develop stronger paws. But before you throw down gravel or set the stones, take the time to install a sand base for drainage at least 6 in. deep if you’re building on clay. Then lay down landscaping fabric to prevent weed growth. You’ll probably scoop out gravel along with the poop, so it’ll need replenishing every year. If you have enough space, the ultimate dog oasis is a grassy area within the kennel.
Several companies offer composite flooring materials for dog kennels. It definitely looks better than gravel and is easy to clean. But if your dog likes to chew things, it’s not a good choice—unless, of course, your vet does free surgery. Plan on a surfaced path to the kennel. If you just have grass, you’ll soon have a muddy path. All that mud will get tracked into the house.
Dog Kennel Plans Step 4: Plan for a doghouse or shading
Finally, dogs need protection from the elements. Dog kennels plans need to consider how long your pet will be outside. A doghouse isn’t mandatory, but if you don’t provide one, you should at least install a small roof and a windbreak. Dogs can withstand cold, but not cold and wind or rain. An elevated cot will get them off a freezing cold or searing hot floor. Even if you include a doghouse, provide other shaded areas in the kennel (landscape fabric stretched across the top works well).
When placing a doghouse, avoid the common DIY mistake of setting it in a corner (the roof is a perfect launching pad for a jump-over). Instead, locate it outside the kennel with an entrance hole cut through the fence. Or place it in the center of the kennel. If you’re stuck with a corner location, make the fence higher in that area to prevent jump-outs. If you want some ideas for doghouses, then check out these incredible doghouses.
Required Tools for this Outdoor Dog Kennel Project
Have the necessary tools for this DIY kennels for dogs project lined up before you start—you’ll save time and frustration. Check out the dog kennel plans:
- Shovel
- Gloves
- Adjustable wrench
- Circular saw
- Hacksaw
- Level
- Lineman’s pliers
- Posthole digger
- Spade
- Tape measure
- Wheelbarrow
Required Materials for this Outdoor Dog Kennel Project
Avoid last-minute shopping trips by having all your materials ready ahead of time. Here’s a list.
- Chain link fencing and gate
- Concrete
- Landscape fabric
- Pea gravel
- Privacy slats
- Sand
- Sunscreen and/or dog house
- Treated 2x12s