
How to Fix Bifold Closet Doors
Updated: Apr. 02, 2024Four easy fixes for common bifold door problems
- Time
- Complexity
- Cost
- An hour or less
- Beginner
- Less than $20
Adjust bifold closet doors that stick
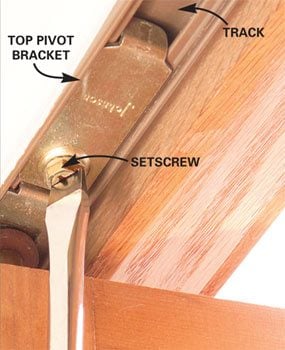
Photo 1: Adjust the top pivot bracket
Here, we’re working with wooden bifold closet doors. To start, loosen the top pivot bracket setscrew with a screwdriver. Slide the bracket in the track until the door is parallel to the jamb. Tighten the setscrew firmly.
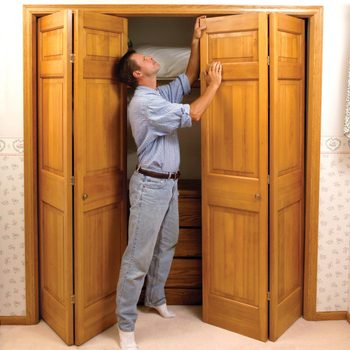
Are you frustrated with bifold closet doors that don’t close smoothly, or never open without sticking, scraping or binding? Chances are they’re out of alignment in the door frame. The fix is usually simple and often takes less than 10 minutes.
First close the door and look along the edge of the door as it lines up with the frame (opening photo). The door edge and frame should line up nice and parallel. Even if it’s off by only 1/4 in., the door will probably bind. Most often the problem is a loosened top pivot and bracket, which allowed the door to slip sideways out of alignment (Photo 1).
Open the door and then loosen the setscrew for the top bracket slightly with a screwdriver. Then close it again. Push or pull the top of the closed door to align its edge parallel to the frame. Close the door to check for smooth operation and to see how the doors meet. Open the door gently so the pivot doesn’t slip, then tighten the setscrew. You may have to repeat these steps a few times with both doors to get the “perfect” result.
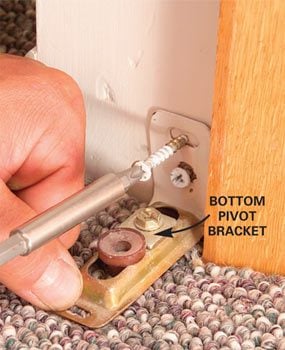
If the door binds against the lower part of the frame, check the bottom pivot and bracket next. (Look for a worn edge on the door and scrape marks on the door frame.) The bottom pivot often loosens and slips. Either raise the door slightly to shift the pivot in or out, or loosen the setscrew and shift the bracket seat (Photo 2), depending on the type of hardware you have. (See “Replacement Parts” for types.)
Sometimes the entire bracket comes loose because the mounting screws are stripped, broken or missing (Photo 2). You’ll need to remove the door to fix these. Test the door for smooth, non-binding operation by opening and closing it several times. You may have to readjust the top pivot bracket to make the door parallel to the frame again.
The top roller guide rarely needs attention, but make sure that it runs smoothly in the track. Apply a light coating of wax or silicone spray to eliminate any sticking.
Replacement Parts
If you need to replace worn, broken or missing parts, look for exact replacements at home centers or hardware stores. If you can’t find what you need, be creative. As long as the parts are basically the same size and shape, they should work fine. You may need to redrill the pivot holes to fit a larger pivot, or plug and redrill to fit a smaller one.
Trim bifold closet doors that bind on carpet
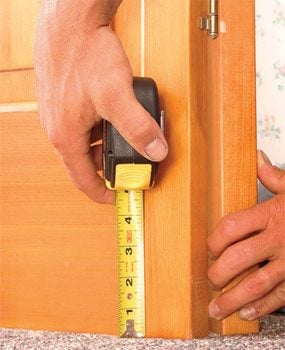
Photo 1: Mark the door
Measure up 1/2 in. from the highest point on the new carpeting and mark the door.
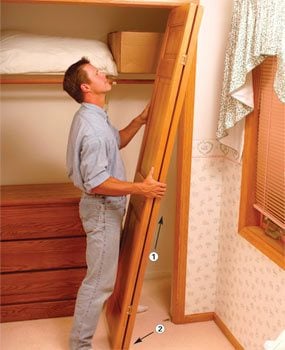
Photo 2: Remove the door
Open the door completely and lift it to compress the top pivot spring (1). Swing the door bottom out from the bottom bracket (2). Pull the door down and out of the top pivot bracket.
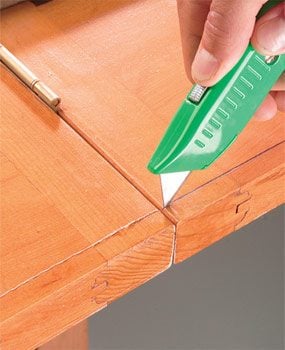
Photo 3: Score the cutting line
Mark the cutting line on the backside of the door and then score the line with a utility knife to reduce splintering.
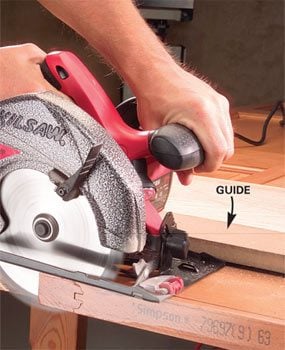
Photo 4: Trim the door
Clamp a cutting guide to the door, mount a crosscut-type blade in your saw and cut slightly to the outside of the line.
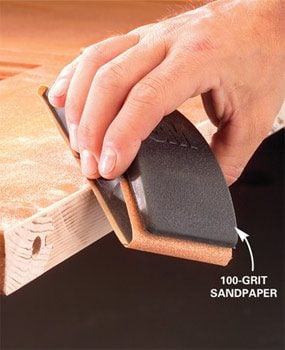
Photo 5: Sand the cut edge
Knock the sharp edges off the fresh cut with sandpaper. Add a coat of sealer to the raw edge to prevent swelling. Remount the door.
Adding carpet or changing to a thicker pile may cause the bottom of a bifold door to scrape and bind along the floor. First try to raise the door to clear the carpet using the bottom pivot adjustment. But usually you have to trim off the door bottom.
The easiest way to measure a bifold door for cutting is with the door slightly opened. A half inch of clearance is adequate (Photo 1).
Removing a bifold door doesn’t always go as smoothly as Photo 2 shows. Sometimes the top pivot doesn’t compress enough to free the bottom pivot. Turn the bottom pivot height adjustment to lower it, if possible. Or gently lift the door off the lower bracket with a flat pry bar. As a last resort, loosen the top pivot bracket setscrew and slide the top away from the door frame.
To replace the door, follow the steps in Photo 2 in reverse order. Check for proper alignment.
Lay the door face down on a worktable. Cut from the backside of the door to leave a clean cut on the front. You can reduce splintering by first scoring the cutting line (Photo 3) and, using a guide, sawing slightly to the outside of it (Photo 4). Bevel the cut edges with 100-grit sandpaper (Photo 5).
Cutting the door will shorten the bottom pivot hole. You may have to redrill to deepen it.
Extend the bottom pivot the same amount as the door was shortened, using the height adjustment screw. (See “Replacement Parts”)
Tighten a loose knob
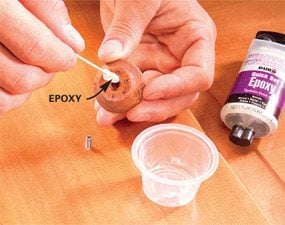
Glue a loose pull
Add a drop of epoxy to repair a loose door pull. Screw it on and allow it to set for 24 hours before use.
You can fix that wiggly knob so it won’t come loose again! Simply put a drop of epoxy into the knob hole before reattaching the knob. And add a washer under the screwhead inside, if the screwhead is pulling into the door. Allow the epoxy to set up for 24 hours before use.
Bifold doorknob fix
You’re supposed to mount hollow-core bifold doorknobs along the edge closest to the hinge because that area is reinforced with solid wood. But that’s also a “pinch zone,” so many people mount the knobs in the middle of the hollow section. Eventually the screw head pulls through the thin veneer and the knob dangles out the front side. The fix is easy. Just buy a 3/16-in. x 1-in. fender washer at any hardware store. Remove the screw. Slide the washer down to the screw head and reinstall.
Fix a cracked corner on bifold closet doors
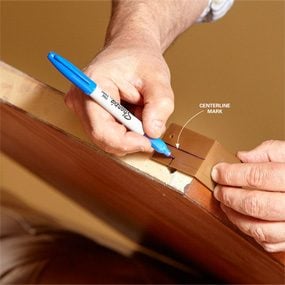
Photo 1: Mark the hole location
Hold the brace along the door edge with the triangular area on the back of the door. Then mark the anchor/pivot pin hole centerlines.
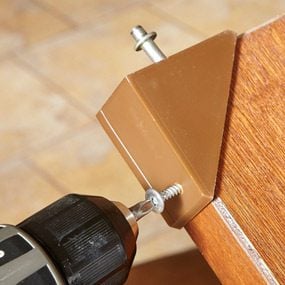
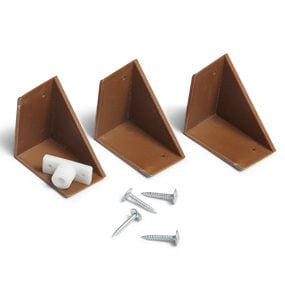
Slam a bifold door too many times and you can split the wood where the top and bottom anchor and pivot pins sit. Then the door either sags or falls out of the track. You can try gluing and clamping the wood, but the wood can split again in a different spot. Or you can fix the problem permanently by installing corner braces. Buy a corner brace kit at a home center or from Amazon. Take the old anchor/pivot pins to the store to match up to new ones.
Start by marking the anchor pin hole location on the new brace (Photo 1). Then finish the corner brace installation (Photo 2) and install the door.
Every product is independently selected by our editors. If you buy something through our links, we may earn an affiliate commission.
Required Tools for this Project
Have the necessary tools for this DIY project lined up before you start—you’ll save time and frustration.
- 4-in-1 screwdriver
- Circular saw
- Sanding block
- Straightedge
- Tape measure
- Utility knife
Required Materials for this Project
Avoid last-minute shopping trips by having all your materials ready ahead of time. Here’s a list.
- 100-grit sandpaper
- Epoxy glue
