
Cheap Workshop Storage Solutions You Can DIY
Updated: Oct. 20, 2023
Tame the clutter and work smarter with these ingenious (and inexpensive!) workshop DIY storage tips.

Air Tool Station
A 2-1/2-gallon bucket is all you need to cleverly store air tools and hoses on a wall right by the air compressor. Screw a 3/4-in. plywood shelf inside the bucket to create two storage areas, then attach the bucket to the wall with a couple of screws and washers. Load up the bucket with nailers, nails, tire pressure gauges and other accessories and coil the hose around it. This is one of our favorite clever storage ideas.
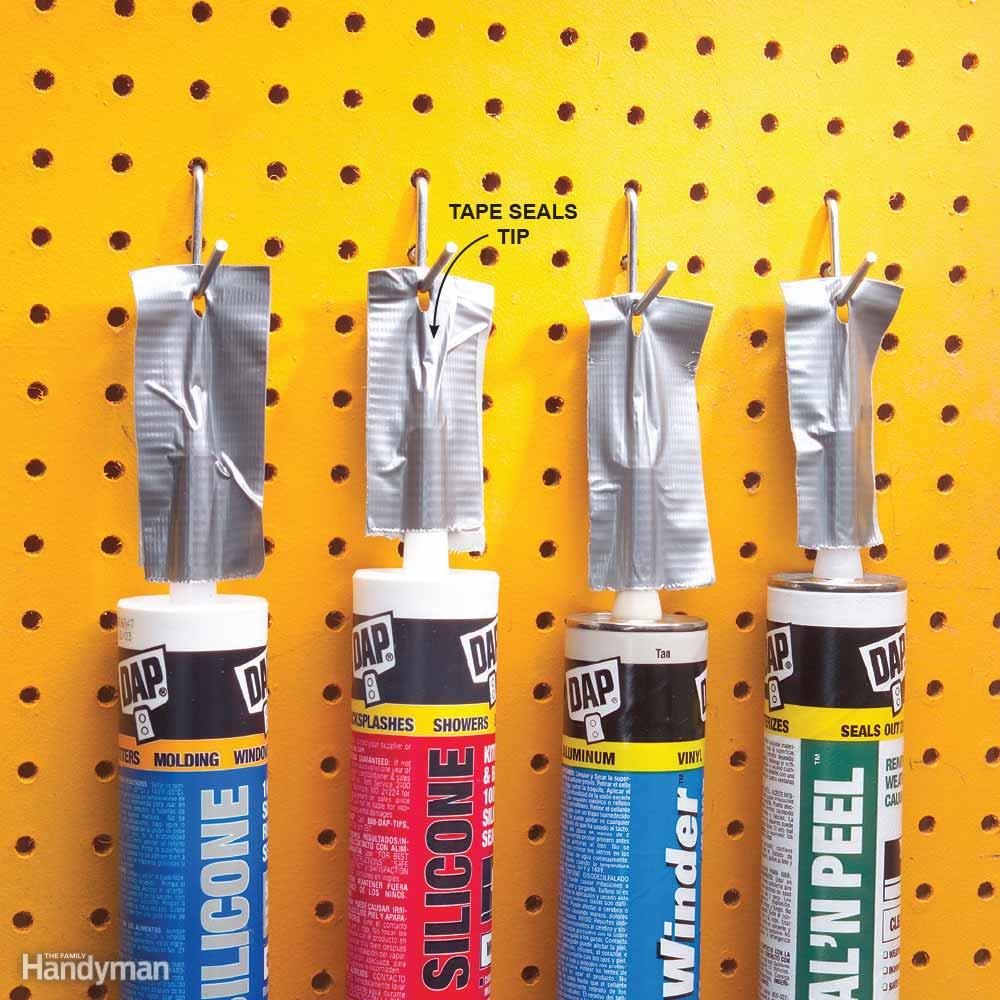
Sealed and Stored
Here’s a slick shop storage tip to keep partially used caulk tubes well sealed and at hand in your workshop. Fold a piece of duct tape over the open tube to seal it, leaving a few inches of extra tape. Drive a nail through the tape and hang the tube on pegboard.
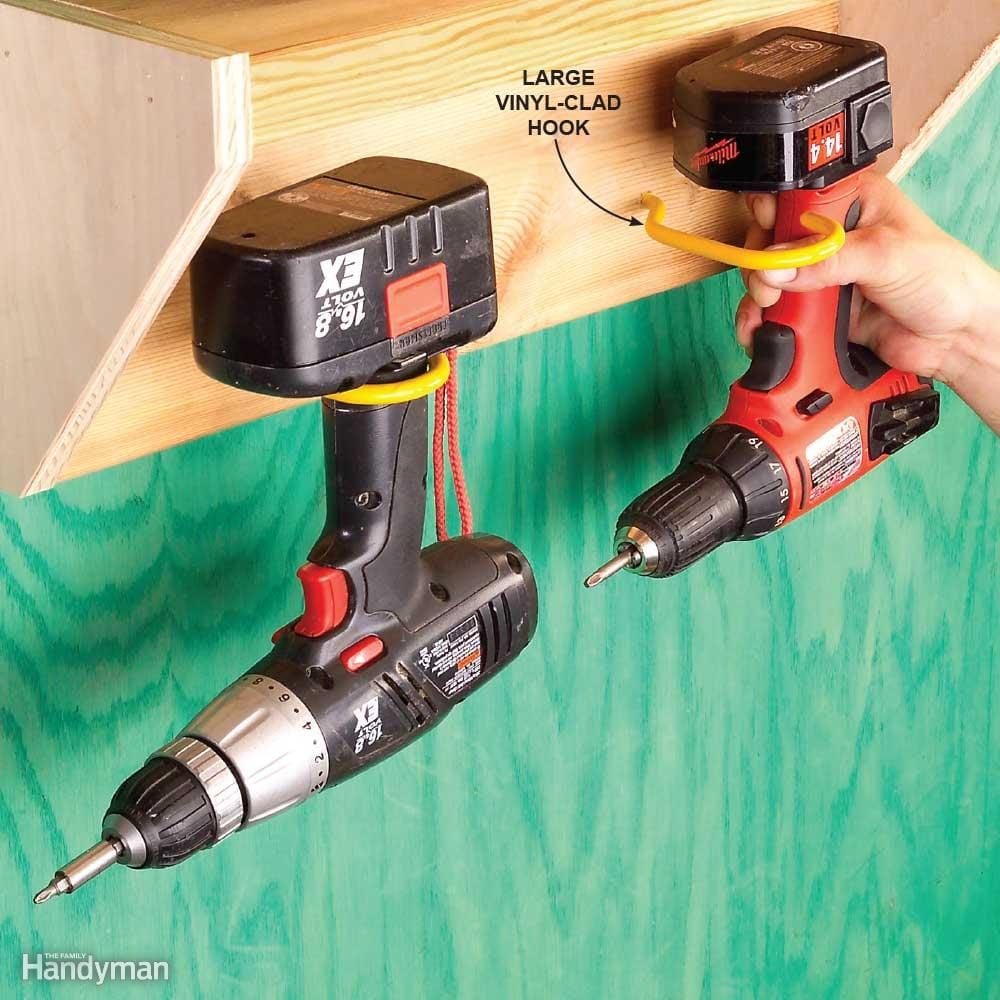
Drill Hangout
Those big hooks that are often used to hang bikes also make slick drill hangers. Get them at any home center for a couple of bucks apiece. Take it up a notch and build this drill dock with plywood. Give this super-simple shop storage idea a try today.
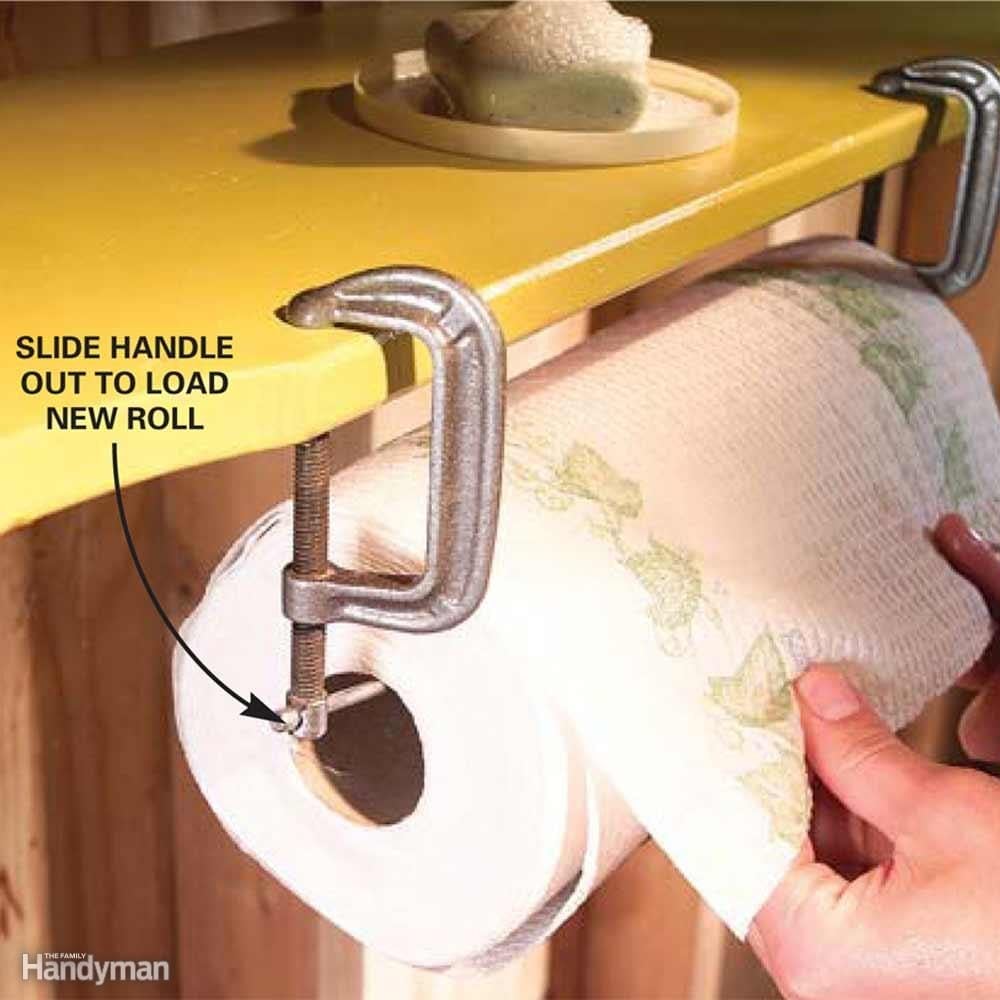
C-Clamp Paper Towel Rack
Create an instant DIY paper towel dispenser in your shop with two C-clamps. Position and clamp them a roll’s width apart in a convenient spot, hold up the roll and push in the handles to hold it. Buy slick-looking C-clamps and install them in the kitchen, then fib to visitors about your chic designer hardware.
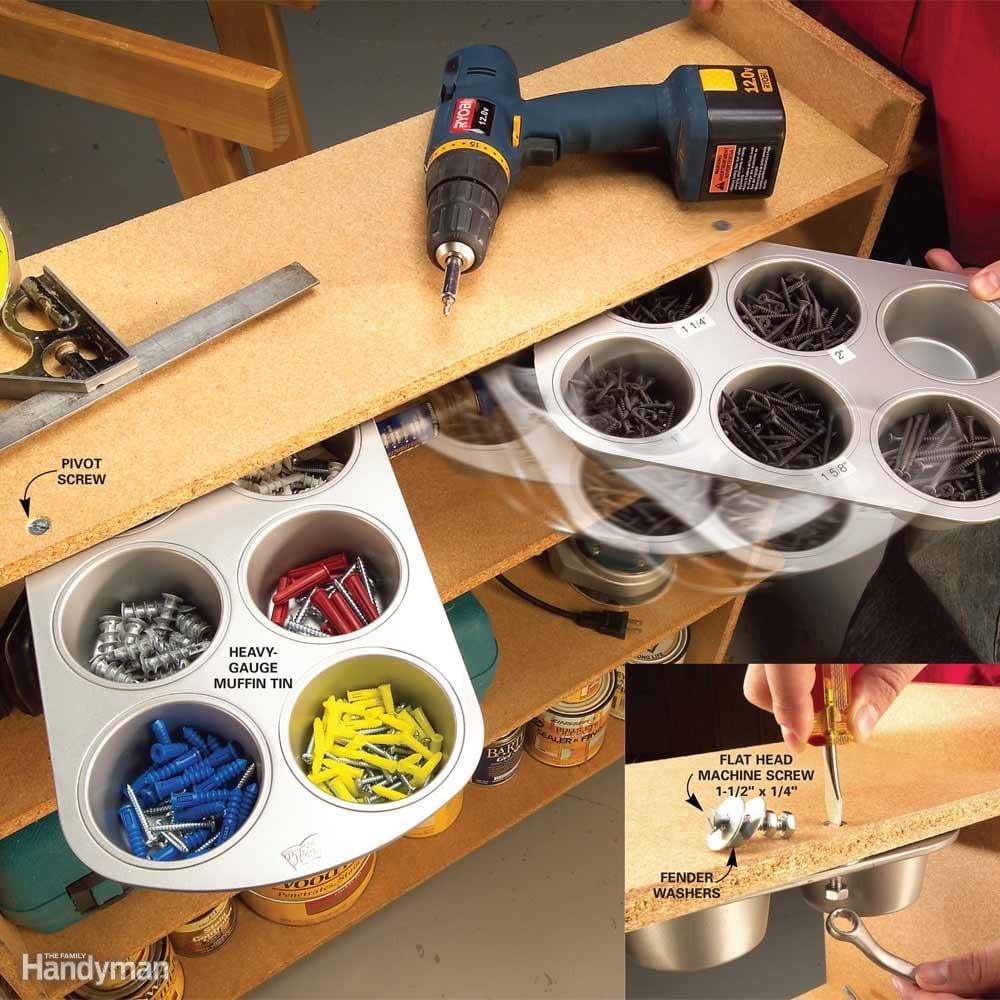
Muffin Tin Hardware Bin
Work surface cluttered with miscellaneous nails, screws, hardware, whatever? Clean it up and still keep that stuff at your fingertips.
Attach a muffin tin under a shelf with a single 1/4-in. x 1-1/2-in. flat head machine screw. The tin pivots out from beneath work surfaces to organize and serve up any little doodad you frequently use. And you store all that little stuff without using up a single square inch of workspace. For best results when installing your muffin bins:
- Use muffin tins made from heavier gauge metal.
- Drill and countersink a 1/4-in. hole in the shelf top, so the top of the screw is flush with the shelf.
- Place 1/4-in. fender washers above and below the rim of the muffin tin.
- Tighten two nuts against each other on the underside so the threads won’t loosen.

On-a-Roll Pegboard Doors
Maximize hand tool storage in a tool cabinet with this slick DIY project. The key to this project is a 4-ft.-long by-pass sliding door hardware set (about $15 at a home center).You mount 1/4-in. pegboard onto it, making sure to provide enough room (2 in.) to hang tools on the pegboard and still allow it to slide by the door in front.
The trick is to insert 1/2-in. plywood spacers in the roller hardware as shown. You can use the floor bracket that comes with the slider hardware to maintain the same 2-in. clearance at the bottom of the cabinet. For door handles, simply drill a couple of 1-1/4-in. holes in the pegboard with a spade bit. Now pop in the pegs and hang up your tools. Learn how to build a DIY hardware organizer.
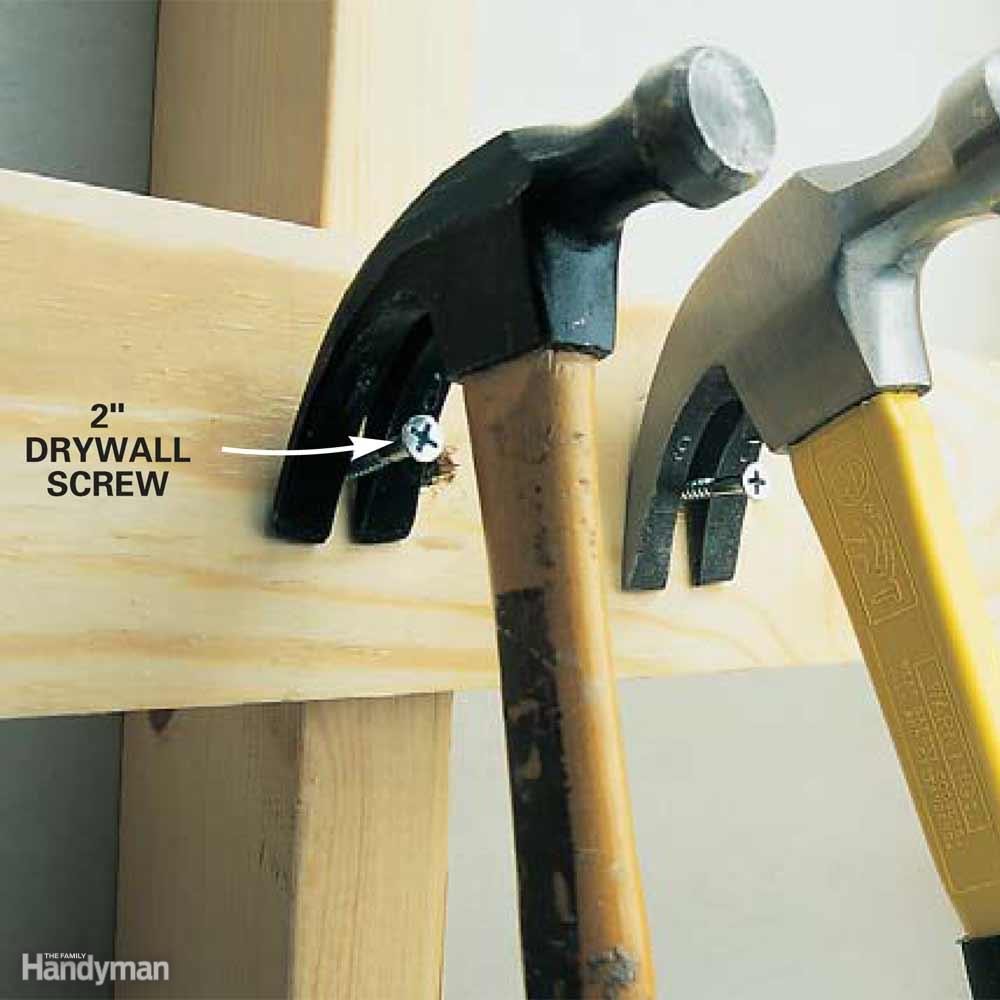
Quick-Draw Hammers
This is probably one of the cheapest storage solutions you’ll find! Here’s an instant DIY rack for hammer storage in your shop. Drive 2-in. drywall screws into a board and tack it to a shop wall. Hook the hammers on the screws so it looks like they’re ready to pull out a nail. The hammer claw’s V-notch interlocks tightly with the screw threads so the hammer won’t fall off, and the handle angles toward you for an easy grasp.

Adjustable Drawer Partitions
You can restore order in messy workshop drawers with 1/4-in. plywood partitions and self-adhesive sponge tape weatherstrip (sold at home centers). These clever drawer dividers will organize your tools, tape and twine, and you can easily inch them sideways to accommodate larger items. For the strongest grip, use spongy ‘closed cell’ weatherstripping.
Apply weatherstripping to the sides of the drawers as shown, then cut the partitions long enough so they squish firmly into the rubber on both ends. A good rule of thumb is to make the partitions 1/4 in. longer than the inside measurement between the weatherstripping.
To install a partition, hold it at an angle to the front and back sides, then rotate it into position.
Gutter Bins
Here are a couple of clever ways to use leftover gutter parts. Build small bins with the scrap gutter lengths, end caps and corner pieces. Mount the bins to a wall or workbench edge to hold parts and tools or serve as a dustbin. Or, screw downspout sections to a board and mount it on the wall to store wood dowels, bar stock and other long, thin items.

High-and-Dry Plywood
To keep plywood and other sheet goods off a damp garage floor, try this DIY wood storage solution: Cut some 2-in.-wide plywood scraps and screw them together to form T-blocks. If snow, slush or rain sneaks in on the car tires and gets the floor wet, the wood is safe and dry.
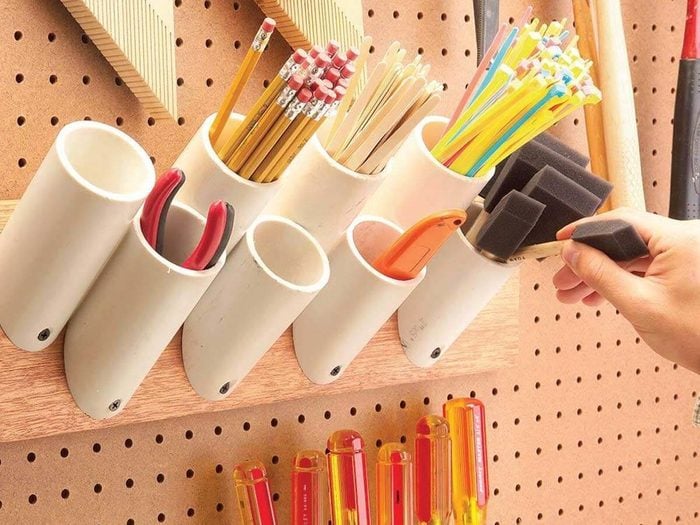
Storage Pockets for Skinny Things
Saw off short pieces of 1-1/2-, 2- or 3-in. PVC plumbing pipe with 45-degree angles on one end. Screw them to a board to hold paint brushes, pencils, stir sticks and just about any other narrow paraphernalia in your shop. Mount them by drilling a 1/4-in. hole in the angled end, and then drive a 1-5/8-in. drywall screw through the hole into the board.

Flip-Through Storage Rack
Unless you live in an art gallery, wall space is always at a premium. Build this book-like storage rack, and expand your wall space exponentially. Grabbing a tool is as easy as flipping through a magazine.
Mount two parallel 2x4s on the wall spaced 24 in. apart. Cut the leaves from 3/4-in. plywood and hang them from the 2x4s with 3-in. door hinges. Fur out the hinges with 3/4-in. plywood blocks so the pages can pivot without binding. Mount the leaves at least 4 in. apart to allow room for them to fold back. Let your imagination run wild creating holders for your various tools.
For you pegboard fans, sandwich a 1×3 frame between two pieces of pegboard. Now your collection of hooks and holders will work with this tool storage system.

Pegboard Shelves
Here’s a slick way to store a whole cluster of tools on pegboard with only two pegs. Cut some 2-1/2 in. wide mini shelves; drill holes or slots for router bits, screwdrivers, chisels and files; then drill a couple of 1/8-in. holes in the edges for the 1/8-in. diameter pegs. With a vise and pliers, bend the pegs to about 85 degrees and hammer them into the holes. Be sure the pegs fit tightly in the wood so the shelves can’t fall off.
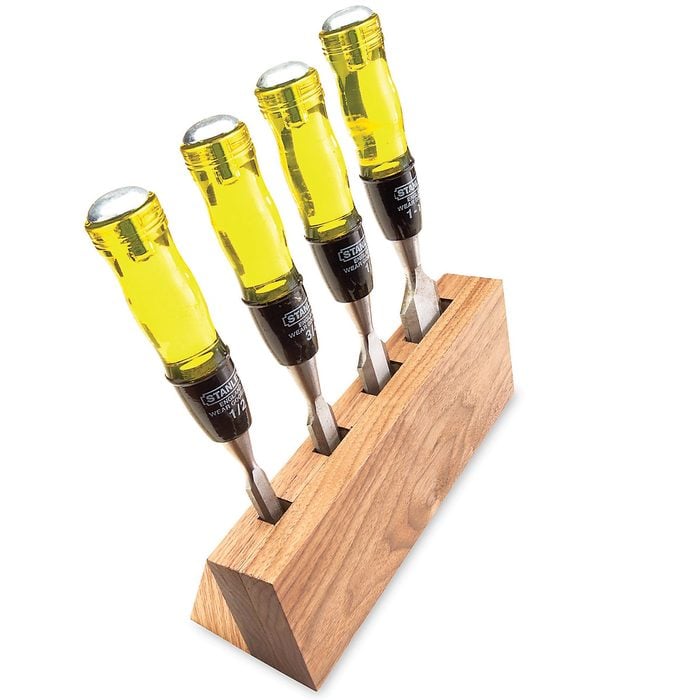
Tabletop Chisel Storage
Here’s a neat tabletop chisel storage idea that’s a snap to build from scrap boards. It angles the handles toward you for easy reach.
Start with a 4-in.-wide board. Using your table saw, cut stopped slots to match the width and depth of each chisel (plus some wiggle room). Screw or glue on another board to create the pockets, then run the lower edge of the doubled board through a table saw with the blade set at 15 degrees. Now cut three triangular legs with 75-degree bottom corners and glue them to the pocket board. If you like, drill a few holes through the boards for pegboard hooks so the holder is easy to store on the wall.
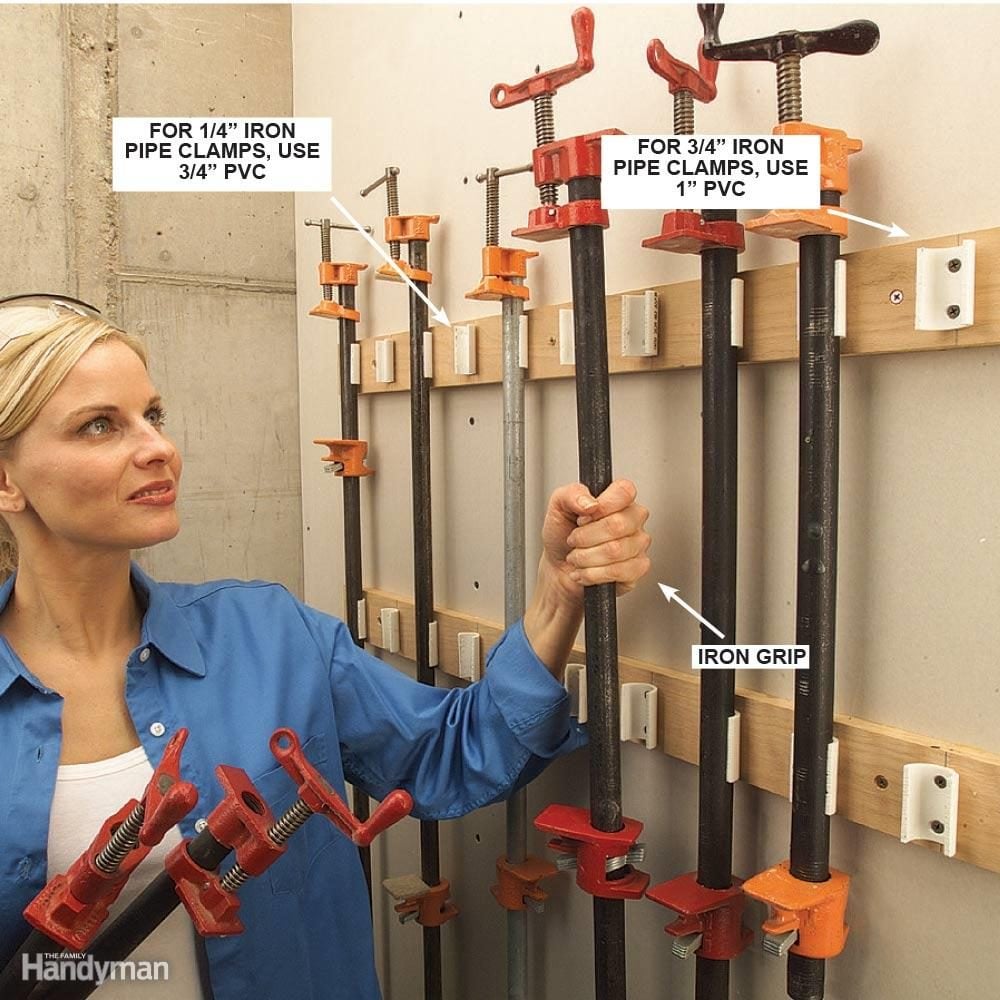
PVC Pipe Clamp Rack
Are your pipe clamps missing in action right when you need them? Never again, thanks to this slick snap-in, snap-out storage rack, made from PVC pipe. For 1/2-in.-diameter iron pipe, use 3/4-in. PVC, and for 3/4-in.-diameter pipe use 1-in. PVC.
To make the rack, cut 2-in. lengths of PVC, and with a hacksaw or band saw, slice them lengthwise about 3/16 in. past the diameter’s center line. This creates the gripping action to firmly hold the heavy iron pipe. Drill and countersink two holes in each PVC piece, then space and screw them along a pair of 2-in.-wide boards. Attach the upper board to your shop wall and snap a pipe clamp in either end to position the lower board for screwing to the wall.