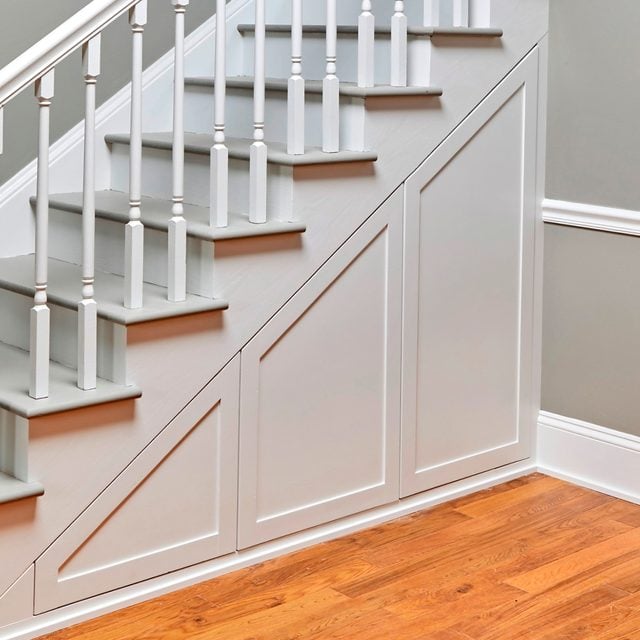
Organized, easy-access storage — and lots of it!
Multiple Days
Intermediate
$501-1000
Introduction
Need extra storage space? You might already have it right under your feet! Builders rarely utilize the space under a staircase; it’s much easier to just wall it in than to make custom pullouts. But you can reclaim that wasted space in a couple of weekends. I built three pullouts to store everything from shoes to coats and backpacks. You can customize this design to get just the type of storage space you need.Tools Required
- 2-ft. Level
- Brad nail gun
- Caulk gun
- Circular saw
- Combination square
- Drill driver
- Framing square
- Orbital sander
- Putty knife
- Table saw
Materials Required
- 1 x 6 x 8-ft. poplar-3
- 1-1/4-in.trim screws
- 1-1/4-in.wood screws 2-in. and 2-1/4-in. construction screws
- 1/2 x 48 x 96-in. Baltic birch plywood - 2
- 18-gauge brad nails: 5/8-in.;1-1/4-in. and 2-in.
- 3/4 x 48 x 96-in. veneer-core birch plywood-1
- 34-in. Extra Heavy Duty drawer slides (500 lb.)-3 pr.
- fast-tack construction adhesive
- Primer-1 qt. Satin enamel paint-1 qt.
- Shims
- Spackling compound or wood filler
- Waterborne polyurethane-2 qt.
A Great Idea Made Better!

My design is similar to one we featured 65 years ago. The building process was much the same, but I upgraded the plywood, used modern ball-bearing slides, and chose concealed push latches for a clean look. Hidden behind the paneled wall is a lot of accessible, organized storage space.


Project step-by-step (17)
Step 1
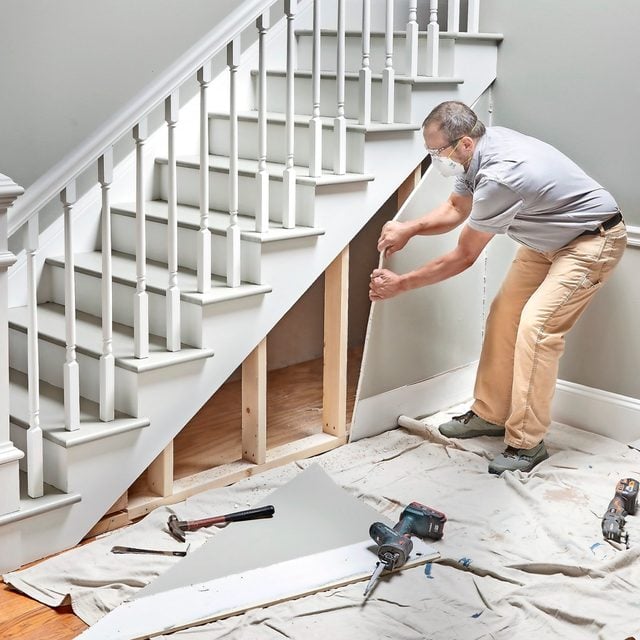
Open the Wall
- Pry off the baseboard, then remove the drywall.
- I cut out a small section of drywall first, so I could see inside and verify that there were no wires or other obstructions in the cavity.
- If there is an existing outlet, you’ll have to relocate it. I used a reciprocating saw to cut the drywall, taking care not to cut into the stair stringer.
Step 2
Reframe the Opening
- Remove the studs, salvaging what you can for reframing.
- Attach a stud at each end of the opening, and divide the remaining space into three openings of equal width.
- Cut and attach the two inner studs, making sure they’re plumb and accurately placed.
- To be sure that my pullout wouldn’t hit the baseboard on the adjoining wall, I installed that tallest stud and trim 1-1/2-in. away from that corner.

Step 3
Build the Drawer Slide Supports
- Assemble the T-shaped drawer slide supports using glue and finish nails.
- Then add 1-1/4-in. wood screws for strength.
- The available depth under my stairs was 36 inches, so I used 34-in. drawer slides.
- Subtracting 3-1/2-in. for the stud plate left 30-1/2-in. for the slide support length.

Step 4
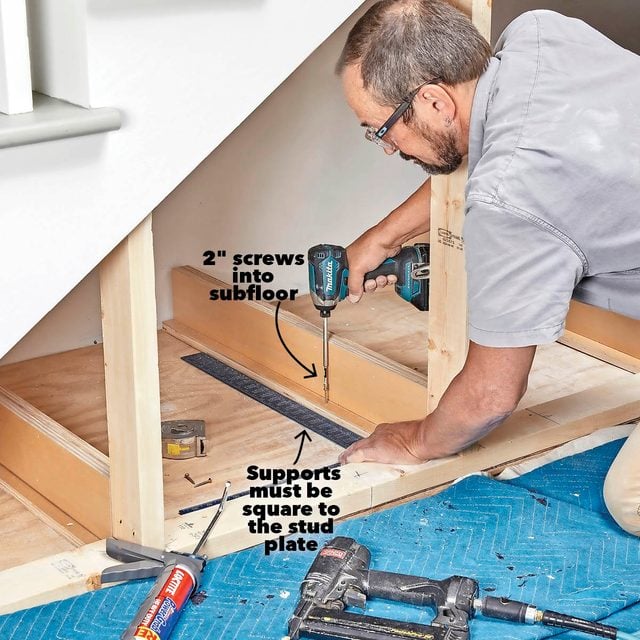
Install Slide Supports
- Attach the slide supports directly behind the studs using construction adhesive and two-inch screws.
- Use a framing square to make sure the supports are square to the bottom plate so the drawer slides won’t bind.
Step 5
Add Furring Strips and Trim
- I chose inset drawer faces, but wanted their faces and trim flush with the skirt board.
- Note: This meant adding 1/2-in. furring strips to the adjoining wall stud and floor stud plate before attaching the trim.
- The drawer faces cover the other three studs, so they didn’t need furring strips — just 1/4-in.-thick trim. I primed and painted the trim pieces before applying them.

Step 6
Make a Template
- Building for this angled opening was tricky. A full-size plywood template of the opening proved helpful for calculating drawer and drawer front sizes.

Step 7
Assemble Drawer Boxes
- To calculate the drawer width, measure the opening, then subtract the thickness of two drawer slides. Make the drawers as deep as the drawer slide length.
- Make each drawer box 3/4-in. less than the height of the opening, for 3/8-in. clearance top and bottom.
- Glue and nail the boxes together, adding trim screws later for strength.

Step 8
Re-saw Frame Stock
- Applying a hardwood frame to the face of 3/4-in. plywood is an easy way to simulate a frame-and-panel drawer front.
- Rip the frame stock to width, then re-saw it into 1/4-in.-thick stock.
- Pro tip: Set your saw’s fence to 1/4 in., then raise the blade to cut just over halfway through the board. Make the first pass, flip the board — keeping the same side against the fence — and finish the cut. Use a push stick as you get close to the blade.
- Note: You can skip this step if you can find 1/4-in.-thick lumber at your local home center.
- Pro tip: Set your saw’s fence to 1/4 in., then raise the blade to cut just over halfway through the board. Make the first pass, flip the board — keeping the same side against the fence — and finish the cut. Use a push stick as you get close to the blade.

Step 9
Sand Out Any Saw Marks
- Sand out any saw marks with a random orbit sander.
- Pro tip: A new or newly sharpened saw blade all but eliminates them.
- Mark the sanded surfaces for gluing so the factory sides face out on the drawer fronts.

Step 10
Apply Frames
- Cut the drawer fronts to size, and the frame parts to rough length.
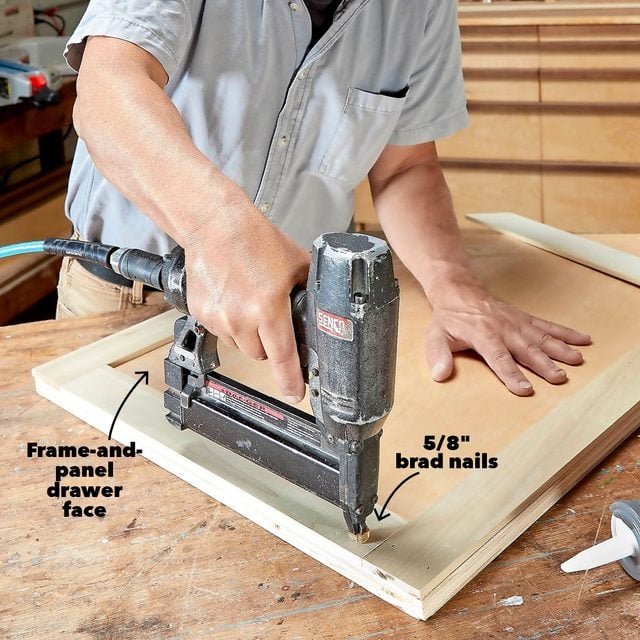
- Mark, cut and attach the frame pieces, using glue and 5/8-in. brad nails.
- Pro tip: For accuracy, instead of taking measurements, hold each piece in place, then mark and cut them to length. Run the two vertical sides, or “stiles,” long to hide the end grain of the horizontal rails.
Step 11
Fill the Edges
- Fill any voids and gaps on the drawer front edges with putty or spackling compound.
- Fill the nail holes on the faces as well.

Step 12
Sand the Drawer Fronts
- Once the filler has dried, sand the drawer fronts. I used 120-grit sandpaper on a block for the edges, and a random orbit sander for the large surfaces. Soften any sharp edges.

Step 13
Paint the Drawer Fronts
- Prime the frames, then apply two coats of paint.
- Pro tip: Because I used prefinished plywood for the drawer fronts, I didn’t need to prime them. I just reduced the gloss with 120-grit sandpaper before painting.
- The backs of the drawer fronts only need paint around their perimeter, about three inches in from the edge, as they’re mostly covered by the drawer boxes.

Step 14
Install the Drawers
- Set the slides 3/16-in. back from the face of the finished furring strips and attach them to the supports, making sure they’re level.
- These heavy-duty slides don’t come apart, so the mounting procedure is a bit different.
- With the slides extended, set the back end of the drawer on a 3/8-in. shim in the opening.
- Then using a 2×4 and shims, level the drawer and attach the slides to it.

Step 15
Position the Drawer Fronts
- Drive a couple of screws through each drawer from the inside, until the points poke through.
- Set the drawer fronts on two shims that create an equal gap, top and bottom, and lean them into the opening. Adjust the gaps around the drawer front by sliding it right or left and raising or lowering it with shims.
- Note: I usually eyeball the gap, but you can mark the gap on a shim and use it as a gauge for all the fronts.
- Once the gap is set, push the drawer front against the protruding screws, leaving two indents. Drill pilot holes at these points.

Step 16
Attach the Drawer Fronts
- Drill and countersink holes where the marking screws were, then attach the drawer fronts with 1-1/4-in. wood screws. Verify that the gap is still correct, then add more screws.
- Note: I used eight on the large front, six on the middle one and four on the small one.

Step 17
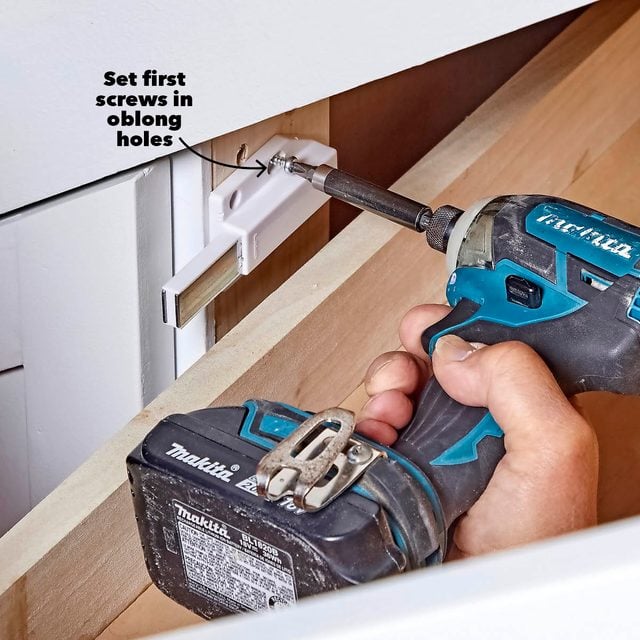
Install The Push Latches
- Attach the push latch in its approximate location using the two oblong holes.
- Stick the latch plate magnetically to the end of the fully extended latch. Push the drawer front in until it contacts the plate.
- Hold the plate while pulling the drawer front and plate free of the latch.
- Mark the plate location and attach the plate.
- Test the latch, adjust it as needed and then install the final two screws.