


How to Install a Three-Way Smart Switch
Updated: Aug. 07, 2023
Use these step-by-step instructions to make your three-way switches smart.

An hour or less
Intermediate
$51–100
Introduction
Smart switches add convenience and flexibility to your life. Turning your lights on and off remotely from your phone not only saves energy, but also brings security for those times you forget to leave on a light when you're out at night or away for the weekend. Installing a three-way smart switch differs from a standard three-way switch. The following steps will guide you through the installation of a smart switch with existing wiring.Tools Required
- 4-in-1 screwdriver
- Electrical tape
- Needle-nose pliers
- Non-contact voltage tester
- Sharpie(indelible marker)
- Wire stripper/cutter
Materials Required
- 14-2 NM Cable(Romex)
- Leviton WiFi Remote Switch
- Leviton WiFi Smart Switch
- Wire nuts
Project step-by-step (10)
Step 1
Turn Off Power
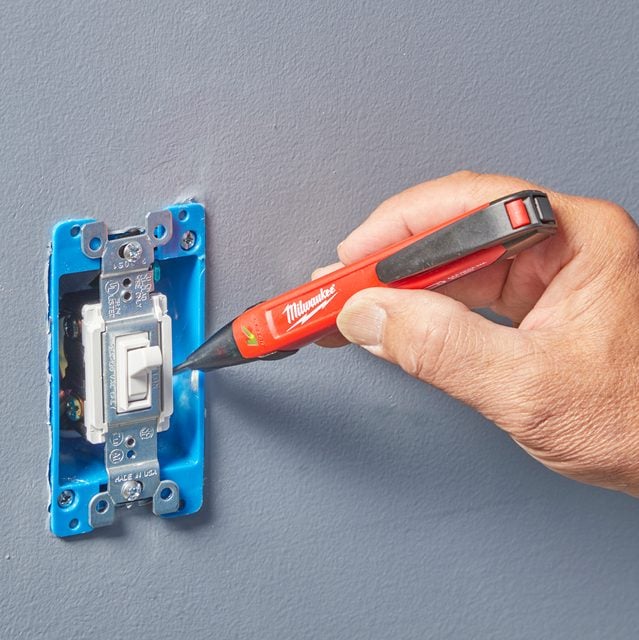
- Locate the three-way switch circuit in your service panel and turn off its breaker.
- Confirm that you found the correct breaker by checking both switches using the voltage detector.
Step 2
Identify Black Terminal Wires
- Once you pulled both switches out of the boxes, you’ll see that there are four wire terminals.
- Locate the terminal with the black screw that’s marked common on the switch.
- Mark the wire attached to this screw on each of the two switches with a piece of electrical tape.

Step 3
Identify Traveler Wires
- On each existing switch, you will see the two travelers connected to opposite terminals. These terminals are usually brass colored, and the wires connected to them are typically black and red, but not always.
- Identify these wires as Traveler 1 and Traveler 2.
- Pro tip: Mark one of them with a Sharpie to clearly distinguish between the two.

Step 4
Disconnect and Prep Wires
- Remove all wires from your existing switches.
- The Leviton Smart switches require a straight wire that’s stripped back 5/8-in.
- Straighten any hooked wires and be sure they are stripped accordingly.
- Pro tip: If you have more than the required three inches of wire protruding from your box, snip off any hooked wires and re-strip them to get a straight and fresh wire end.

Step 5
Find the Line Feed
- Making sure your prepared wire ends are not touching each other, turn the designated breaker back on.
- Carefully use your voltage detector on each of the wires marked with tape to see which one is hot. This hot wire is your line feed; that’s where you will install your main smart switch.
- The other box with the taped wire that’s not hot is your load connection which goes to your light fixture or outlet.
- Note: This is where you will install your remote smart switch.
- Once you find the line feed, turn the breaker back off.

Step 6
Install Main Smart Switch
- Now that your breaker is again turned off, look in the box with the line feed for the white neutral wires spliced together.
- Remove the wire connector and add the five-inch-long white jumper wire included with your new smart switch.
- With the three neutral wires spliced together, attach the other end of the jumper wire to the WH terminal on the switch. The line feed wire marked with tape attaches to the BK terminal.
- The two traveler wires connect to either the YL/RD or RD terminals.
- Note which traveler wire is attached to each of these terminals, (i.e. Traveler 1 is connected to YL/ RD, Traveler 2 is connected to RD, or vice versa).
- You’ll need to know this when you wire the remote switch.
- Note which traveler wire is attached to each of these terminals, (i.e. Traveler 1 is connected to YL/ RD, Traveler 2 is connected to RD, or vice versa).
- Attach the ground wire to the green terminal to complete the wiring of the main switch.

Step 7
Install Remote Switch
- In the box with your load connection, again attach a jumper wire from the spliced white wires to the WH terminal on the remote switch.
- Note: The traveler that was attached to the YL/RD terminal on the main switch will be attached to the matching YL/RD terminal on the remote switch.
- The traveler that was connected to the RD terminal on the main switch is then spliced together with the load wire that’s marked with tape in this box.
- Note: The traveler that was attached to the YL/RD terminal on the main switch will be attached to the matching YL/RD terminal on the remote switch.
- The remaining BK and RD terminals on this remote switch remain disconnected and are there for different applications of this switch.
- Finally, attach the ground wire to the green terminal.

Step 8
Tape Terminals
- To avoid any arcing from bare terminals to ground wires or metal boxes, wrap your re-wired switch with electrical tape.
- Carefully fold your wires into the box as you re-install the switch.

Step 9
Check Manual Operation
- Turn your power back on and check your installation by operating the switches manually.
- Pro tip: It’s best to know that normal operation has been restored before connecting to WiFi and using the Phone app.

Step 10
Connect to WiFi
- Connect your phone or tablet to the same WiFi system that your smart switch will be operating on, and then download the app.
- Follow the prompts within the app to set up the full wireless operation of your three-way switch.
- Pro tip: Most smart switches allow you to connect to smart speakers like Alexa or Google Assistant, allowing you to further benefit from your installed three-way smart switch.
