


Upgrade your standard wall outlets to a USB outlet for simpler electronic charging.
1 - 2 hours
Beginner
$20-50
Introduction
Need more charging ports around the house? Here's what to do.
We all want things to be more convenient, especially when it comes to our electronics. A quick way to simplify charging your electronic devices is by replacing your standard 120-volt wall electrical outlet with a USB wall outlet. Also known as smart outlets, USB outlets avoid the hassle of needing charging adapters to plug into the outlets to charge your electronic devices.
Outlets with AC and USB outlet ports come in various configurations and cost less than $50 at home centers and online. After you decide on a configuration that suits your needs, the choice is simple: Get the outlet with the highest amperage output in that configuration. The amperage determines the charging speed and the size of the appliance that can be powered. When you plug in your phone or device, the USB port will recognize it and deliver only the amount of amperage the device can handle. If that recognition doesn’t happen, the USB charging port will deliver only .5 amps, a safe amount for any device.
For my project, I installed a 15-Amp USB outlet with two AC receptacles, two USB-A, and one USB-C charging port. Most of my personal devices are now using USB-C charging ports, so I wanted a newer USB outlet that contained at least one USB-C port for convenience.
When deciding where to install USB outlets in your home, I recommend picking locations where you usually charge your devices such as a bedside table, kitchen counter, or in a home office. If you’re tired of frequently searching for bulky wall adapters or struggling to find available outlets, it might be a good idea to consider installing a USB outlet.
When to call a pro
You can easily learn how to install a USB outlet. Just follow these instructions carefully and take your time. However, if you’re not familiar with electrical work and feel uncomfortable, it’s best to play it safe and hire an electrician to avoid any potential risks.
Tools Required
- Flathead screwdriver
- Needle-nose pliers
- Non-contact voltage tester
- Phillips screwdriver
- Wire stripper/cutter
Materials Required
- Electrical tape
- Outlet wall plate
- USB wall outlet
Watch How to Install a USB Outlet
Project step-by-step (8)
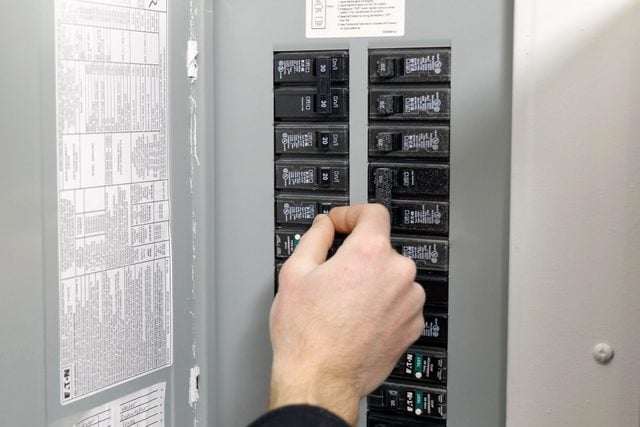
Step 1
Turn off power
From the circuit breaker, turn off the power by switching off the breaker circuit for the particular area in the home you will be working in.
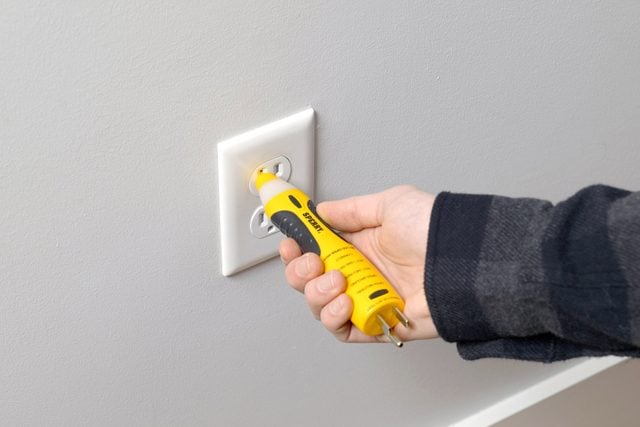
Step 2
Check for power
Verify the outlet has no power by using an electric voltage detector. This tool can be picked up at any hardware store and is worth every penny to have peace of mind that the power is off when you are working on electrical projects.
Step 3
Remove old outlet
With a flathead screwdriver, remove the outlet wall plate. Detach the outlet from the wall electrical box with a screwdriver. Save the screws in case you need them later to secure the new USB outlet.
Step 4
Disconnect wiring
Slightly pull out the wired outlet to make it easier to reach the wires that need to be disconnected. I recommend taking a quick photo of the wiring in case you need to reference the wiring placement later. With a screwdriver, disconnect the screws that are securing the wires.
Step 5
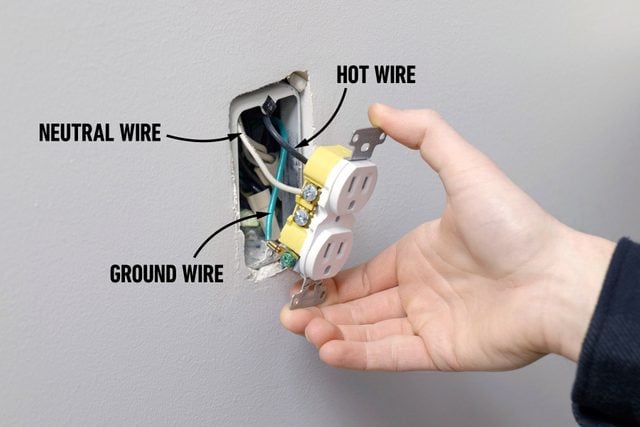
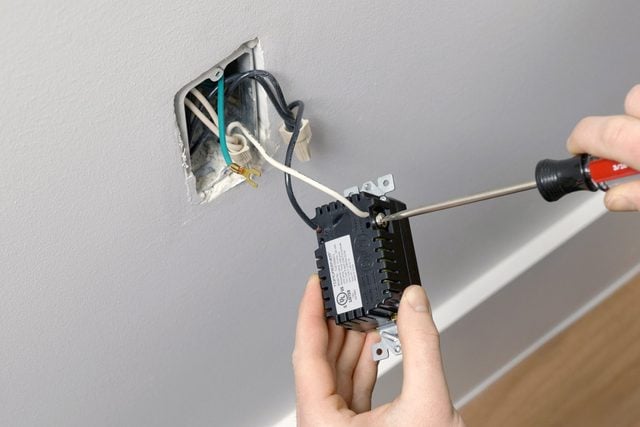
Connect USB outlet
In a standard outlet, there will be three electrical wires in the existing box: a hot wire, a neutral wire, and a ground wire. In most cases, wires can be identified by their color. Hot wires are black, neutral wires are white, and ground wires are copper or green. New USB outlets come with instructions that map out where each wire needs to be properly connected to the outlet.
You may need to trim and re-strip the wire if the wire ends look shabby or if you are switching from a screw terminal connection in your previous outlet to a push-in connector on the USB outlet. Here’s how:
- First, make sure there is enough wire in the box to trim some.
- Strip about 1/2-in. of sheathing off the wires (if you are using push-in connectors) and 3/4-in. off the wires if you are using screw terminals.
- When connecting to screw terminals, create a small loop at the end of the wire with your needle nose pliers and ensure that the loop is placed on the terminal so that it tightens around the screw as it is screwed down.
- Pro tip: “I recommend using the screw terminals instead of the push-ins,” says Ally Childress, a licensed electrician from Dallas, Texas, who spent years doing lighting and power distribution on large building projects. “Push-ins tend to loosen over time, increasing the chance of arcing within the electrical box.”
Once you’ve identified where the wires should be placed, secure the wires into the outlet by fastening the screws with a screwdriver until tight. Wrap electrical tape around the device, covering the screw terminals.
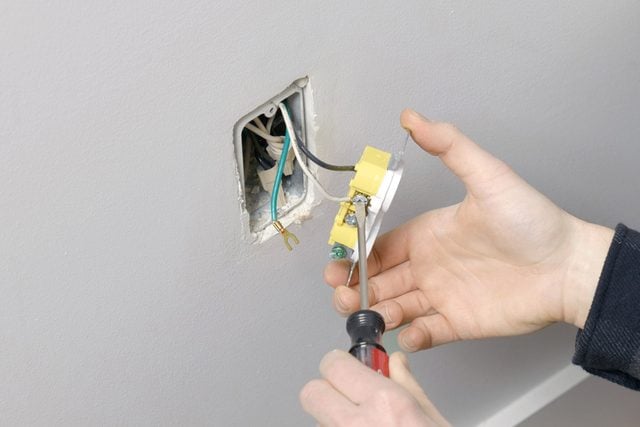
Step 6
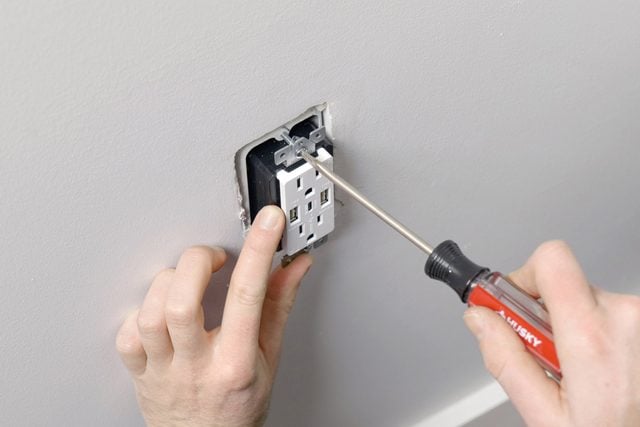
Mount USB outlet to wall box
Mount screws are typically included with your new USB outlet. You can also often use the original screws that secured the old outlet. Gently push the wires back into the wall box, then use a screwdriver to fasten the outlet to the wall box.
Once the outlet is secure, attach the outlet wall plate cover with a screwdriver. If your outlet doesn’t look straight, you may need to adjust the outlet slightly by loosening and re-tightening the screws to make sure the outlet is level.
Step 7
Turn on power
Go back to your circuit breaker and turn the power back on by switching the breaker circuit to the original ON position.
Step 8
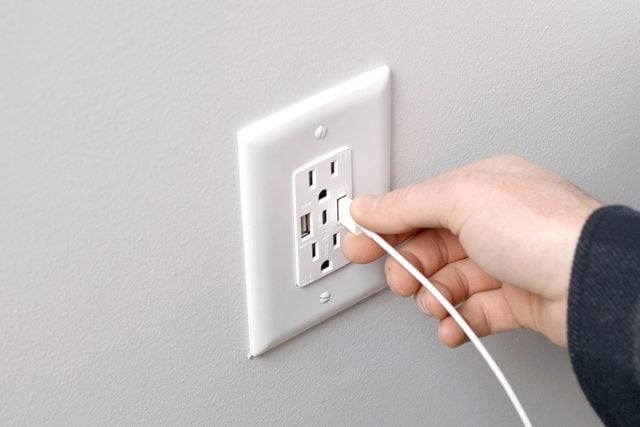
Test the USB outlet
Once power is on, test the outlet with the electric voltage power detector. Continue testing the outlet by plugging in a device to see if it begins to charge. I recommend testing each port to make sure they are all working properly. If the device does not begin charging, the outlet may not be correctly wired or a wire is loose and needs to be re-tightened.
Frequently Asked Questions
Can I add a USB outlet to any existing outlet?
USB ports don’t draw much power, so you can add a USB outlet to any existing outlet except a switched outlet or a dedicated outlet for an appliance, such as a stove or refrigerator. Before you shop for a USB electrical outlet, determine whether your wire gauge is 12- or 14-gauge; you’ll need the same size wire for your new outlet. For reference, 12-gauge wire is about the thickness of a nickel, and 14-gauge is about the thickness of a dime.
Once you’ve chosen your power source outlet, switch off the breaker for that circuit. Keep in mind that electrical codes contain strict rules about how many wires, connectors, switches and outlets can go in a junction box. Since you’re adding wires, your existing box may not be large enough according to code.
Will USB outlets take slower to charge devices?
USB charger ports in a wall outlet share the total amperage output. Phones typically take 1-amp. A tablet might take up to 2.4amps. With two charger ports sharing 3.6 amps, you’re covered for charging a phone and a tablet. If you have two devices each requiring 2.4 amps, however, charging will be a bit slower.
Do USB outlets require special wiring?
No special wiring is required when installing USB outlets. Follow the same procedure you would use when installing standard outlets. Before you shop for a USB electrical outlet, determine whether your wire is 12- or 14-gauge; you’ll need the same size wire for your new outlet.
Originally Published: February 28, 2019