How To Replace a Bike Chain

Updated: May 18, 2023

That shiny chain on your bike won't last forever, and eventually you'll need a new one. Here's how to replace a bike chain.

Next Project
Time

An hour or less

Complexity

Beginner

Cost

Less than $100

Introduction

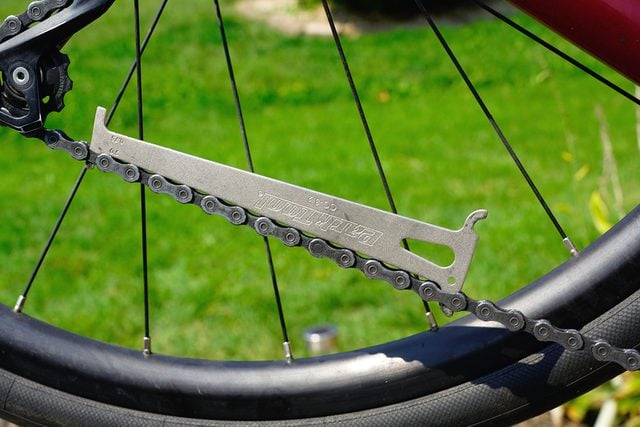
Out of all the major components on your bike, your chain will wear out the quickest and need replacing the most often. Why? Your drivetrain — the chain, derailleurs, cassette and crankset — works best when in perfect unison. But the more you pedal, the more the chain's internal pins and rollers stretch and wear.

As the wear worsens, the chain no longer fits perfectly over the cassette cogs and crankset chainrings. That causes the bike to shift poorly and prematurely wear down the rest of the drivetrain.

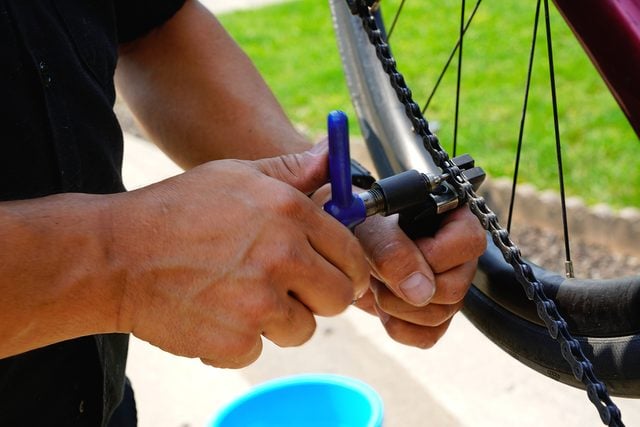
Many experts suggest replacing your chain every 2,000 miles or so, but if you're properly maintaining and lubing the chain you can extend that mileage number. Luckily, replacing a bike chain is relatively easy with some basic tools.

Tools Required

  • Chain breaker
  • Chain checker
  • Chain hook
  • Quick-link pliers (if your chain has a quick link)

Materials Required

  • New chain
  • Quick link

Project step-by-step (4)

Step 1

Check Your Chain for Wear

  • Insert the chain checker tool (see photo) but don’t force it! If the ends fit relatively easily into the links and it sits flat along the chain, it’s time to replace it.
  • I use this Park Toolchain checker. The .5 percent side is for 11-speed and higher chains, while the .75 percent side is for 10-speed and below.

Checking Bike Chain For WearRobert Annis for Family Handyman

Step 2

Remove the Old Chain

  • Put your bike in your work stand, drivetrain out.
  • Shift the bike gears so that you’re on the smallest cog on the cassette and your smallest chain ring.
  • Look at how the chain threads around the rear derailleur pullies. Remember that, because that’s how you want it when you replace the chain later. Also notice how taut the chain is. If this is your first time replacing your chain, it’s smart to take a photo for reference.
  • See if your chain has a quick link, also known as a master link. If you’re not sure what a quick link looks like, it’s a little different than the standard links (also called side plates), with a notch next to one of the pins. That makes for easy removal and reattachment. If your chain has a quick link, remove it by squeezing both sides of the link toward each other with quick-link pliers. When disconnected from the chain, the quick link should be in two halves, with a pin on either side.
  • If the chain doesn’t have a quick link, use a chain breaker to remove one of the connecting rivets. Insert the chain link into the slots, then line up the tool’s knob with the chain rivet. Turn the dial, forcing the knob into the rivet hole. Keep turning until the rivet pops out. The chain can now be removed.
  • If your bike’s cassette is filthy, now is the time to remove the rear bike wheel so you can clean or replace the cassette.

Removing Old Bike ChainRobert Annis for Family Handyman

Step 3

Size the New Chain

  • Make sure you have the correct chain for your drivetrain. If you have a Shimano-brand 11-speed chain, you’ll need an 11-speed chain. I try to match the manufacturer as well, but Shimano and SRAM chains are mostly interchangeable. KMC makes a great and often less expensive alternative.
  • Measure the new chain and the old chain next to one another. To account for the slight chain stretch, make sure the side plates match up on each chain. Because I’m paranoid, I’ll usually count the links to make sure they’re the same. (If you plan to use a quick-link on the chain — which you should, because it can make deep cleaning and trailside repairs easier — be sure to account for that extra link when doing your measurements.)
  • After double-checking to make sure everything’s correct, use the chain breaker to remove the extra links. Here’s how to clean a bike chain.

Sizing New Bike ChainRobert Annis for Family Handyman

Step 4

Install the New Chain

  • Drape the new chain over the smallest chainring and the smallest cog on your cassette. If there’s lettering etched onto the chain, make sure it’s facing outward.
  • Thread the chain into the rear derailleur by pulling it down across the right half of the top pulley and the left side of the bottom one.
  • Use a chain hook to keep the chain connected and taut long enough to install the quick link or insert the connecting rivet.
  • Using the quick-link pliers, position the jaws of the tool inside the two pins of the quick link and spread them apart. You should hear a click or feel them pop into place. Use a new quick link with the new chain. Many companies include the quick link with the chain, but if not, you can pick one up for a few bucks.
  • If you decide against a quick link, the chain should have a special connecting rivet included. Use the chain breaker to push that rivet into position, being careful to get it flush on the outer half. The outer rivet end should be at the same depth as the other rivets along the chain. The protruding end of the rivet can be snapped off with the chain breaker or standard pliers.
  • Confirm the bike chain works properly by running through the gears. There should be little to no slack when in your small chainring and smallest cassette.

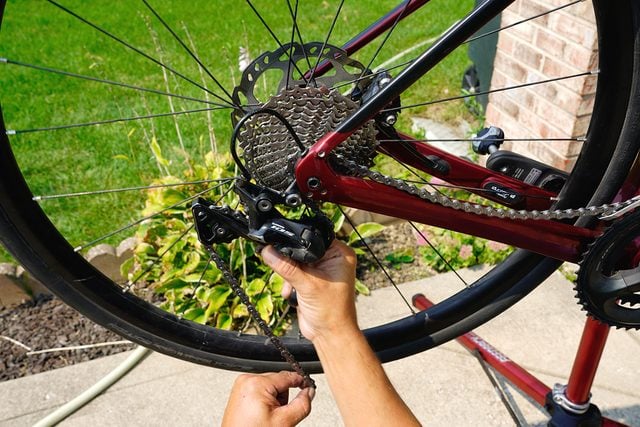
If everything seems to be running properly, time for a test ride!

Installing New Bike ChainRobert Annis for Family Handyman