
Troubleshooting Dead Outlets and What to Do When GFCI Won’t Reset
Updated: Feb. 07, 2024
Try these electrical tests before calling an electrician.

Introduction
Usually when an outlet goes dead, the fix is something simple and you can save the cost of a service call by doing the work yourself. We'll show you what's involved in troubleshooting a dead outlet. This article covers how to start your search for the problem by checking in the most likely places. If that doesn't work, we'll show you where to look for loose connections that may be to blame, and how to fix them.Tools Required
- 4-in-1 screwdriver
- Flashlight
- Needle-nose pliers
- Safety glasses
- Voltage tester
Troubleshooting the Outlet
When an outlet goes dead, it’s easy to jump to conclusions and assume the worst. But more often than not the problem is something simple, and you can save the cost of a service bcall just by taking a few steps to trace the cause. Don’t worry if you’re not comfortable doing electrical work. Better than half the time, you’ll solve the problem without even lifting a tool.
We’ll show you how to start your search for the problem by checking in the most likely places. If that doesn’t work, we’ll show you where to look for loose connections that may be to blame, and how to fix them.
Of course, there will always be electrical projects DIYers should not take on. But if you take these steps first, there’s a good chance you’ll find the solution.
Watch this video to learn what to do first when you find a dead outlet.
Check for Simple Solutions First
Shortly after moving into our house, we had an electrical problem. The outdoor outlets and bathroom lights didn’t work. I knew enough to check for tripped circuit breakers and GFCI outlets. But I couldn’t find the problem. I was just about to start pulling apart the wiring when I double-checked the main panel and noticed the GFCI circuit breaker up in the corner.
Sure enough, the GFCI breaker was protecting the bathroom and exterior outlets and needed to be reset. Don’t jump to conclusions, the fix for a dead outlet is usually simpler than you think.
Project step-by-step (17)
See if Other Outlets are Dead
Before you head for the circuit breakers, take a few minutes to check if other outlets, lights or appliances are affected.
- Switch lights on and off and test nearby outlets for power.
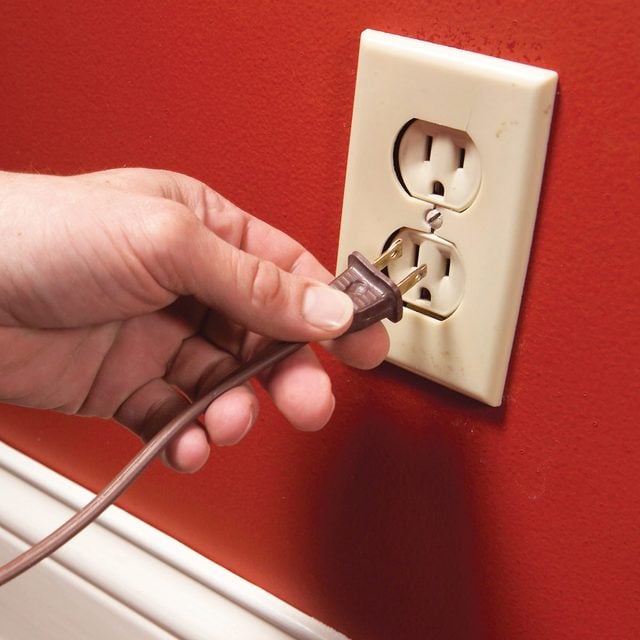
- Use an electrical tester or plug in a lamp to test the outlets.
- Unplug lamps and appliances from dead outlets.
- Pro tip: Mark dead outlets with a piece of masking tape so you’ll be able to find them again after you’ve turned off the power.
Check the Circuit Breakers
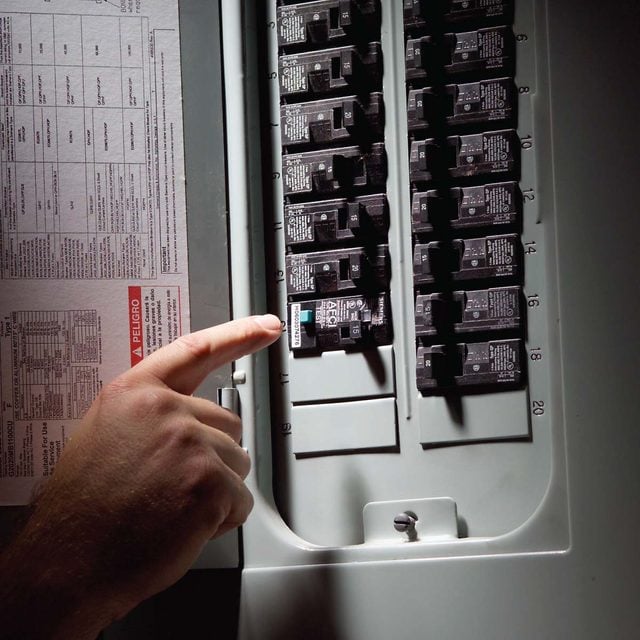
- Locate the panel and open the metal door to reveal the fuses or circuit breakers.
- Pro tip: The photos below show a typical main panel and the process for resetting a tripped circuit breaker.
- Remember to turn off your computer before you switch the circuit breakers on and off.
Look for Clues in the Circuit Breaker Box
- Search for tripped circuit breakers.

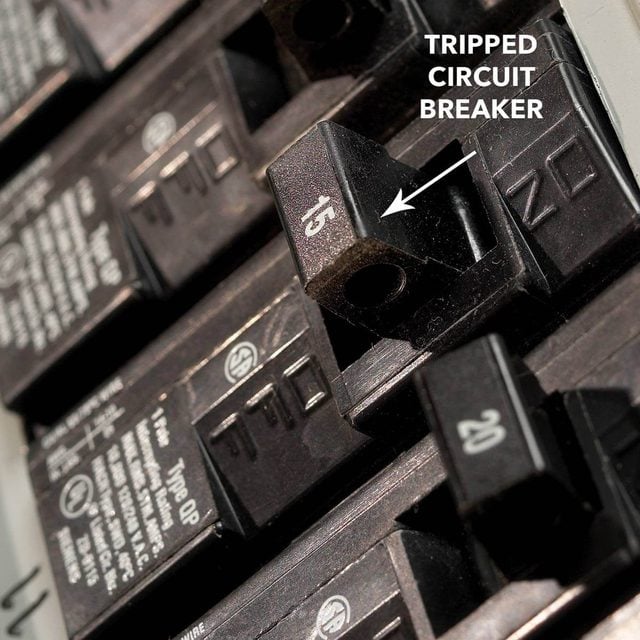
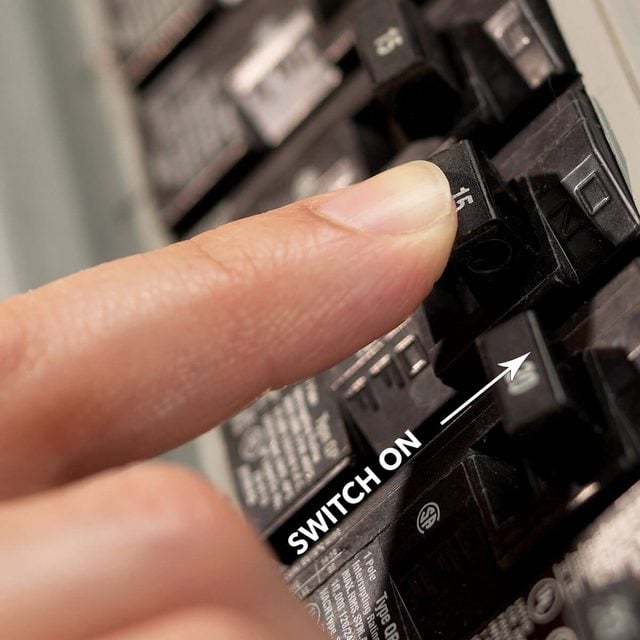
Find the Tripped Breaker
- Locate tripped breakers by looking for breaker handles that aren’t lined up with the rest.
- Push the breaker handles toward the “on” position.
- Pro Tip: Tripped breakers will “give” a little rather than feel solid.
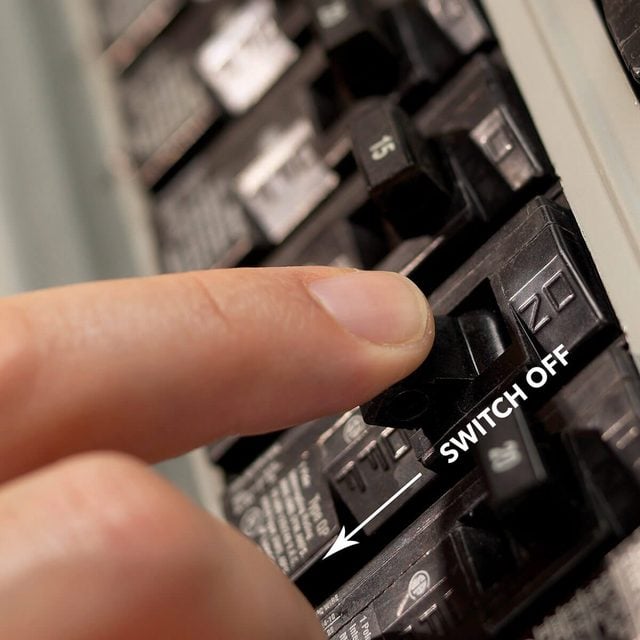
Resetting the Breaker
- To reset your circuit breaker, first switch it off.
- Don’t just flick the handle; press the handle firmly to the “off” position.
- Pro Tip: You should hear a click.
Push the Breaker to Reset It
- Reset the breaker by pushing the handle firmly to “on.” It should line up with all the rest.
- Pro Tip: If it “pops” back to the tripped position, there’s a problem in the wiring or in something that’s plugged into the circuit.
- Tripped circuit breakers aren’t always apparent. If you don’t see a tripped breaker, firmly press every breaker to the “off” position. Then switch them back on.
- If the tripped breaker won’t reset without tripping again, there could be a potentially dangerous short circuit or ground fault condition.
- Tripped circuit breakers aren’t always apparent. If you don’t see a tripped breaker, firmly press every breaker to the “off” position. Then switch them back on.
- Pro Tip: If it “pops” back to the tripped position, there’s a problem in the wiring or in something that’s plugged into the circuit.
- If the breaker won’t reset, switch the circuit breaker off until you’ve located the problem.
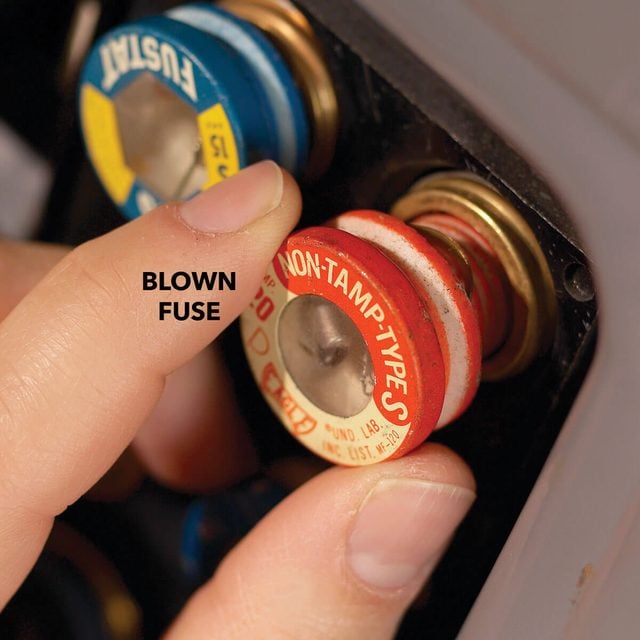
Detail of a Blown Fuse
- Replace burned-out fuses.
- Look inside the fuse for charred glass or a broken filament — evidence of a blown fuse.
- Replace the blown fuse with one of the same type and amperage.
- Pro tip: In most cases, a tripped circuit breaker is caused by a temporary overload on the circuit or a short circuit in some device plugged into the circuit. But in rare cases, a loose wire in an electrical box could be causing the problem.
- Follow the photos below, to look for and repair loose connections.
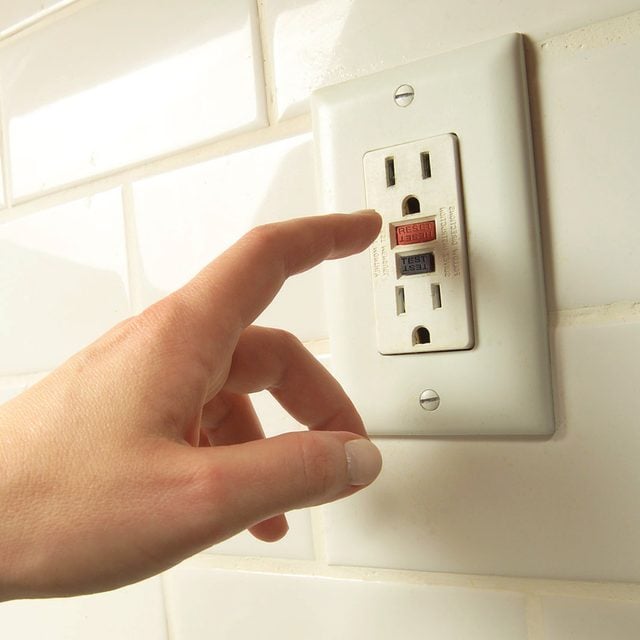
Check the GFCIs
- GFCI (short for “ground fault circuit interrupter”) outlets, those unusual outlets with the test and reset buttons, are required in areas of the house where shock hazards are greatest.
- Pro tip: GFCI’s protect against deadly electrical shocks by sensing leaks in the electrical current and immediately tripping to shut off the power.
- It’s easy to overlook a tripped GFCI as the source of a dead outlet problem.
- Pro tip: That’s because in areas where GFCI-protected outlets are required, electricians often save money by connecting additional standard outlets to one GFCI outlet.
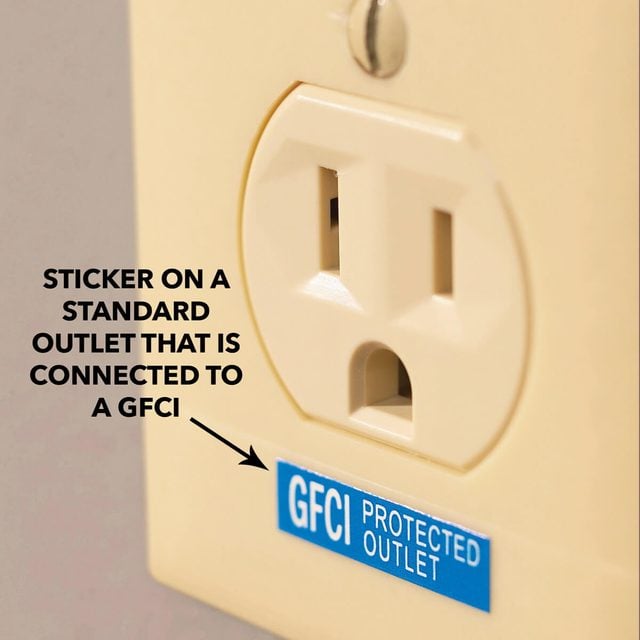
Identification Label
- Protected “downstream” receptacle should be labeled if they have GFCI protection.
- A current leak at any one of the outlets will trip the GFCI and cause all of the outlets connected to it to go dead.
- Pro tip: These GFCI-protected outlets are supposed to be labeled, but the label often falls off.
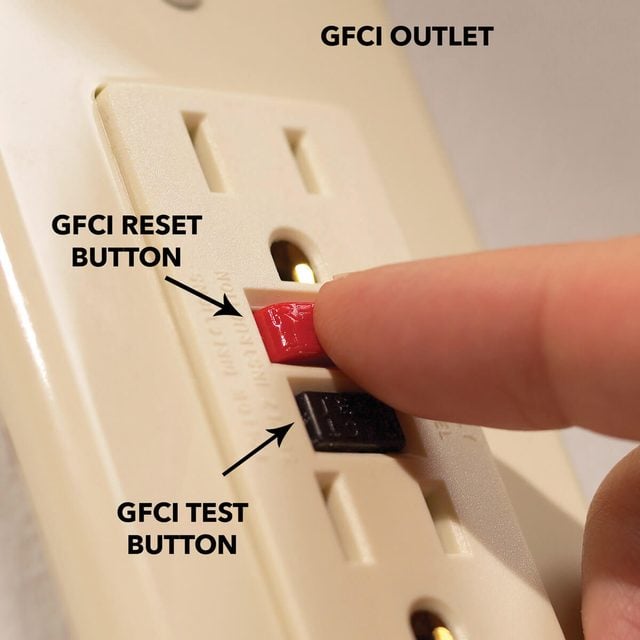
Push Reset Button
- Look for GFCIs in bathrooms, kitchens, basements, garages and on the home’s exterior.
- Test every GFCI outlet you find and reset it.
- If the GFCI won’t reset or the button doesn’t pop out when you press the “test” button, there may be no power to the GFCI or you may have a bad GFCI.
- Pro tip: If the “reset” button trips again every time you press it, there may be a dangerous current leak somewhere on the circuit.
- In either case, solving the problem requires additional electrical testing that we won’t cover here. It is probably time to call a professional electrician for help.
- Pro tip: If the “reset” button trips again every time you press it, there may be a dangerous current leak somewhere on the circuit.
- If a GFCI won’t reset and didn’t power up your dead outlet, then the last resort is to look for loose connections.
Still No Power? Look for a Bad Connection
If checking the breakers and the GFCI won’t reset and you haven’t restored power to the outlet, the next step, without getting into circuit testing, is to remove the outlet from the box and look for loose connections. We’ll show you three common types of loose connections:
- Loose terminal screws
- Loose stab-in connections
- Loose wires at wire connectors.
You may find one or more of these when you remove your outlet and look in the electrical box.
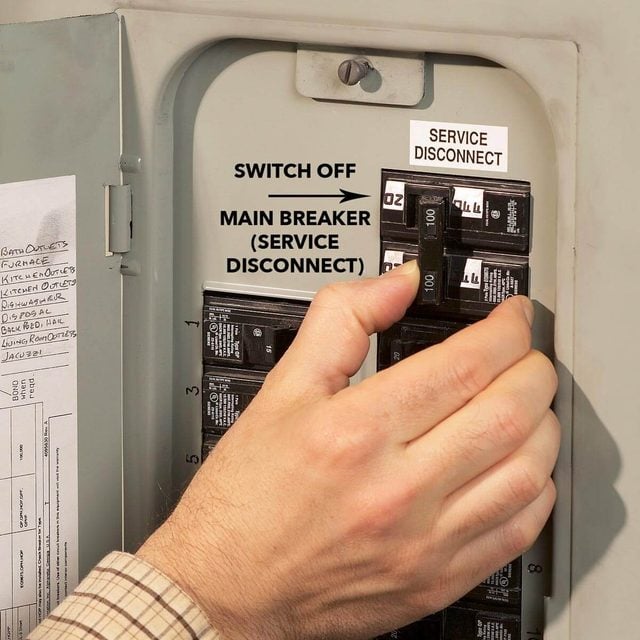
Turn Off the Main Breaker
- First make sure all computers are turned off and everyone in the house knows you’ll be turning off the power.
- Then switch off the main circuit breaker.
Check for Loose Wires
- Inspect the screw terminals for broken or loose wires.
- Carefully bend the wire at each screw terminal to see if it’s loose (it will turn under the screw or the screw will move).
- Also look for broken, corroded, or burned wires or screws.

Install a New Outlet
- If you do discover a loose connection at an outlet, whether it’s at the screw terminal or a stab-in connection, replace the electrical outlet with a new one.
- Pro tip: Loose connections almost always create excess heat that could damage the outlet and lead to future problems.
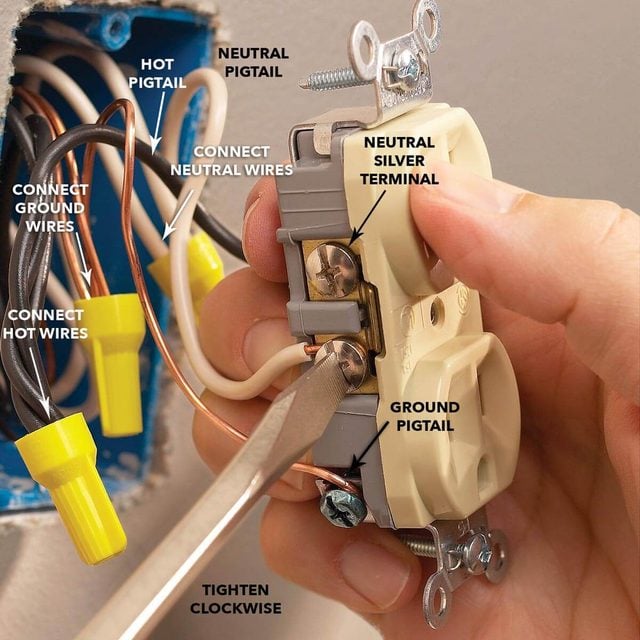
- Install a new outlet by bending a loop in the ends of the hot, neutral and ground wires.
- Connect the hot (black) wire to the brass screw, the neutral white wire to the silver screw and the ground wire to the green ground screw.
- Loop the wires clockwise around the screws and tighten.
- If the outlet you’re replacing is wired like the one shown in the photo, with pairs of hot and neutral wires (wires under all four screws), connect the pairs of like-colored wires along with a third six-inch length of wire, called a pigtail, under one wire connector.
- Then connect the loose end of each pigtail to the appropriate outlet screw.
- Pro tip: This method reduces the chance that a loose connection under a screw will cause a problem with other outlets on the circuit.
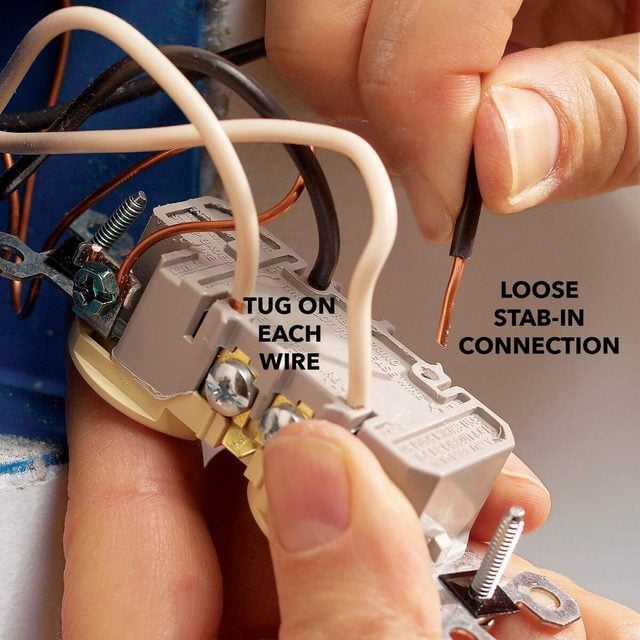
Loose Wires at the Stab-in Connections
- As a timesaver for electricians, some outlets can be wired by pressing stripped wires into holes on the back of the outlet.
- This wiring method is allowed by the electrical code, but can loosen over time and cause problems.
- Look for these stab-in connections as you troubleshoot your dead outlet.
- This wiring method is allowed by the electrical code, but can loosen over time and cause problems.
- Tug each wire to check for loose connections.
- If you find loose stab-in connections, don’t just reinsert the wire.
- Instead, re-cut and strip the wire and connect it to the screw terminal on the side of the outlet.
- Or better yet, cut and strip all of the wires and connect them to a new outlet (see illustration below).
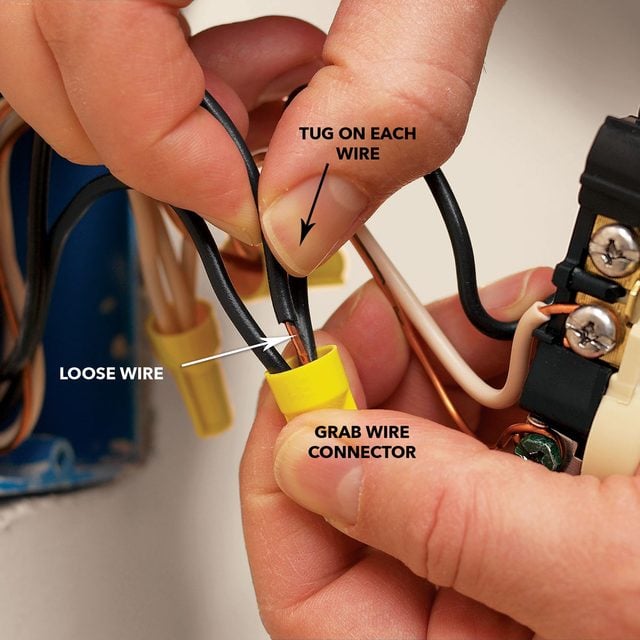
Check Wire Connectors for Loose Wires: Tug Wires at Connectors
- Grab the wire connector.
- Tug on each wire in the bundle to see if any are loose.
- If you discover a loose wire, remove the wire connector.
- Cut and strip the wires in the bundle to expose 1/2- to 3/4-inch of fresh copper wire.
- Pro tip: Check the instructions on the wire connector container for the exact stripping length.
- If you don’t find any loose connections in this box, expand your search to other outlets in the vicinity.
- Start with the ones you marked earlier with masking tape.
- Make sure to turn off the main circuit breaker when you’re checking for loose connections.
- Start with the ones you marked earlier with masking tape.
Reinstall the Connector
- Gather the wires, making sure their ends are lined up, and twist on a new wire connector.
- Twist clockwise.
- Match the connector to the number of wires by reading the label on the wire connector packaging.
- Switch the main circuit breaker back on.
- Now test the outlets again to see if you’ve solved the problem.
- Pro tip: If you still have dead outlets, it’s time to call an electrician.