
How to Replace Spark Plugs in Your Car
Updated: Apr. 15, 2024
Save big on car maintenance costs by changing spark plugs yourself!
A few hours
Beginner
$20-50
Introduction
Changing spark plugs takes about an hour (for a four-cylinder engine) and will save you at least a hundred bucks in labor if you do it yourself. In most cases it's a simple job that will help to maintain peak performance and the highest possible gas mileage.Tools Required
- gap gauge
- Needle-nose pliers
- Rags
- Socket/ratchet set
- spark plug wire puller
- swivel socket.
- Torque wrench
Materials Required
- Anti-seize compound
- Dielectric grease
- Spark plugs
Project step-by-step (7)
Why Do Spark Plugs Need to Be Changed?
When a spark jumps the gap between two electrodes, it actually burns off (erodes) small amounts of metal from each one. Over time, the gap grows to the point where the spark can no longer make the jump. That’s when you get misfires, lower gas mileage, poor acceleration and, ultimately, the dreaded “Check Engine” light.
When to Check & Change a Spark Plug
Not all spark plugs are rated for 100,000 miles. In fact, some carmakers recommend replacement at 30,000-mile intervals. Always follow the spark plug service intervals shown in your owner’s manual to figure out when to replace spark plugs. But if you can’t remember when you last changed your spark plugs, you can pull them and check the gap and their condition. Once you’ve put in the labor to begin checking spark plugs, however, you might as well change them and establish a new baseline for the future.
Check out our favorite car diagnostic tools for DIYers here.
Signs of a Bad Spark Plug
Unlike manufacturers’ guidelines for oil changes, which are overly cautious, the recommendations for how often to change spark plugs tend to be overly optimistic.
For example, if you’ve already got 80,000 miles on a set of 100,000-mile plugs, they’re 80 percent worn and beginning to take a toll on engine performance and gas mileage. Worse yet, after that many miles there is plenty of spark plug wear, and spark plugs tend to seize in the cylinder head.
Removing a seized plug can be costly, especially if the threads in the cylinder head are damaged. So what are the benefits of changing spark plugs? When you consider the gas mileage falloff and the possibility of seized plugs, early replacement makes sense.
Do it Yourself or Take it to a Pro?
The answer depends on the type of engine in your vehicle. Some V-6 models require removing portions of the intake manifold to replace the spark plugs. If you’re not comfortable with that, take your vehicle to a pro. But if your engine affords easy access to the rear bank, you can probably do the job yourself. Just be sure you gap the spark plugs properly and use a torque wrench.
The tools shown are available at online suppliers and auto parts stores. While you’re there, ask the clerk for the spark plug gap and torque specifications for your vehicle. And buy a small packet of dielectric grease. It’s also important to ask about spark plug replacement cost before making an appointment.
Open Up and Clean Your Work Area
Start by removing the plastic “vanity” cover (if equipped) and the air cleaner assembly from the top of the engine.
- Label any vacuum hoses you remove so you restore them to the right place.
- Pro tip: Learn the top of a four-cylinder engine, or the banks on a “V” engine, before you remove other parts.
- Blast compressed air around the ignition coils to prevent crud from falling into the cylinders. Then blow any remaining loose dirt off the engine before you set out your tools and new plugs.
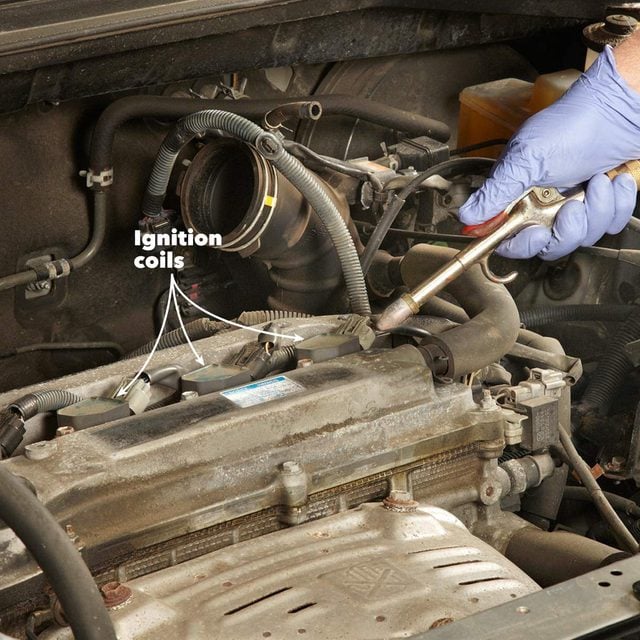
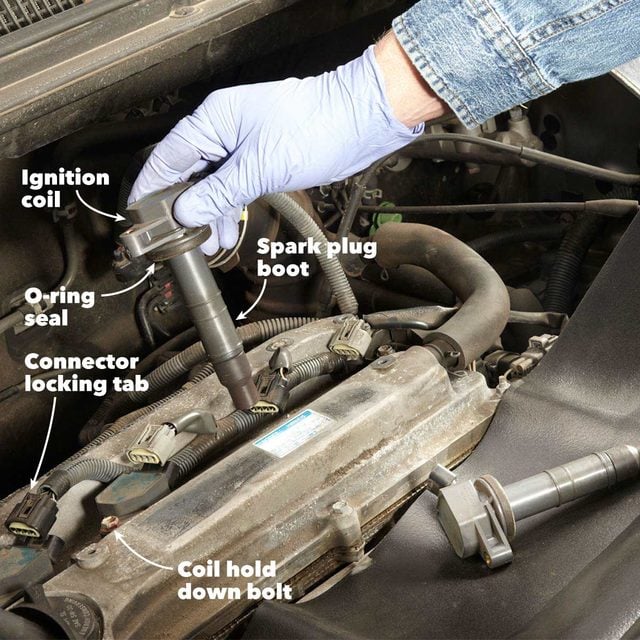
Remove the Ignition Coil and/or Boot
- Disconnect the ignition coil electrical connector by depressing (or pulling up) on the locking tab.
- Rock the connector off the coil.
- Remove the coil hold-down bolt and pull out the entire coil and boot assembly.
- Pro tip: Some COP systems have a detachable rubber boot and spring. If they don’t come out with the coil, retrieve them with needle-nose pliers and replace them with new parts. Then remove the old spark plug.
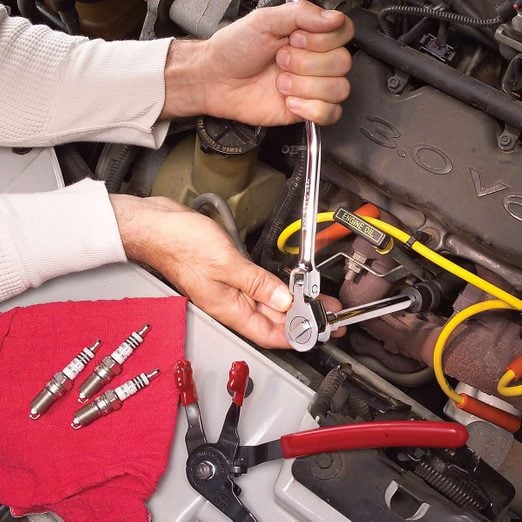
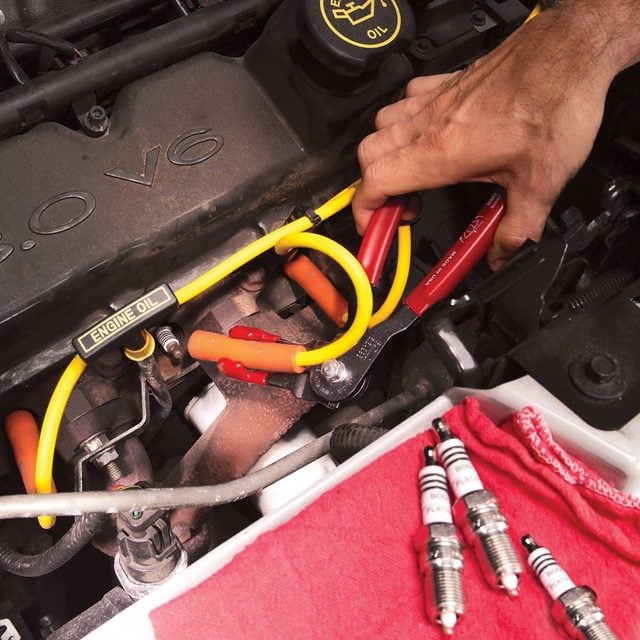
If your car doesn’t have COP ignition, the spark plug wire will end in a boot that attaches to the spark plug. A spark plug wire puller makes it easy to pull the boot off.
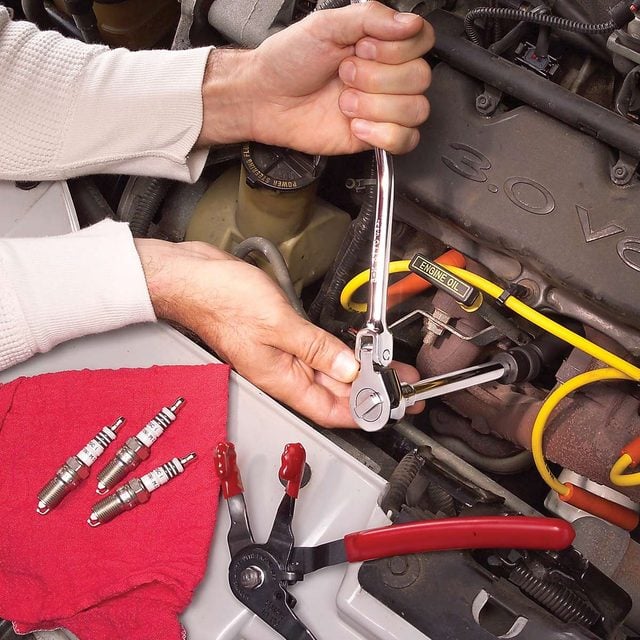
Unscrew the Plug
- Blow away the dirt and grime that’s settled on and around the plug since it was installed.
- Slide the proper size spark plug socket over the plug.
- Pro tip: A swivel head spark plug socket makes the job much easier. You’ll probably need an extension of some length to reach the plug.
- Rotate the plug counter-clockwise to loosen it.
- Pro tip: Not all engines leave the plugs as accessible as shown here. The more compact the engine compartment, the harder it will be to get to the plugs. But all plugs can be removed.
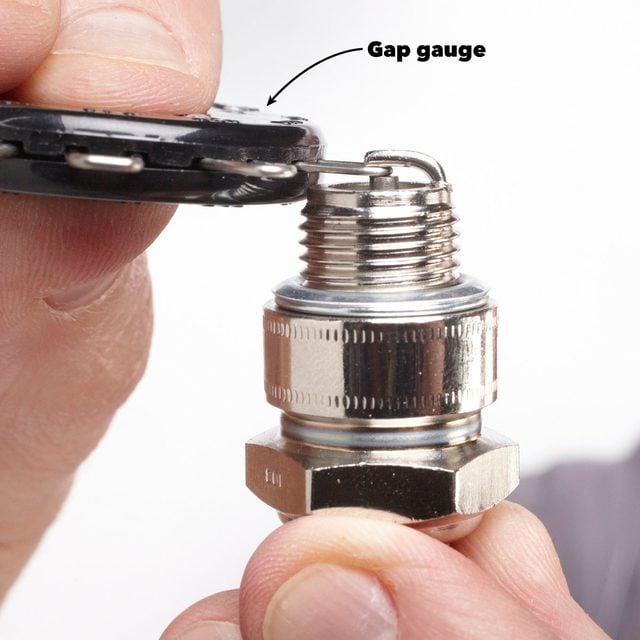
How To Gap a Spark Plug
Gap all plugs before installation using the manufacturer’s specs. Always check the spark plug gap before installing it.
- Slide the correct wire gauge (or gap gauge) between the electrodes. The wire should drag slightly between them.
- If the gap is too small, open it with the gap gauge by prying up.
- If the gap is too large, tap the side electrode lightly on a solid surface.
- Place a small dab of anti-seize compound on the plug threads and hand thread the plug into the cylinder head.
Install the New Plug
Proper spark plug torque is critical in today’s engines.
- Always use a torque wrench and the manufacturer’s spark plug torque specs. Insufficient torque can result in a plug blowing right out of the cylinder head, taking the threads with it. Too much torque distorts the plug.
- If you used anti-seize compound on the plug threads, reduce torque by 10 percent. If you don’t have a torque wrench, go to the spark plug manufacturer’s website to find manual tightening techniques and spark plug torque specs.

Lube the Spark Plug Boot and Button It Up
- Apply a thin coating of dielectric grease around the inside of the spark plug boot before reinstalling the coil. The grease prevents misfires and makes it easier to remove the boot in the future.
- Reinstall the ignition coil, hold-down bolt and coil electrical connector.
- Reinstall the air cleaner and vanity cover and fire it up.
Note: Follow the same procedure for non-COP ignition system boots.
