
How To Build a Birdhouse

Updated: Apr. 05, 2024
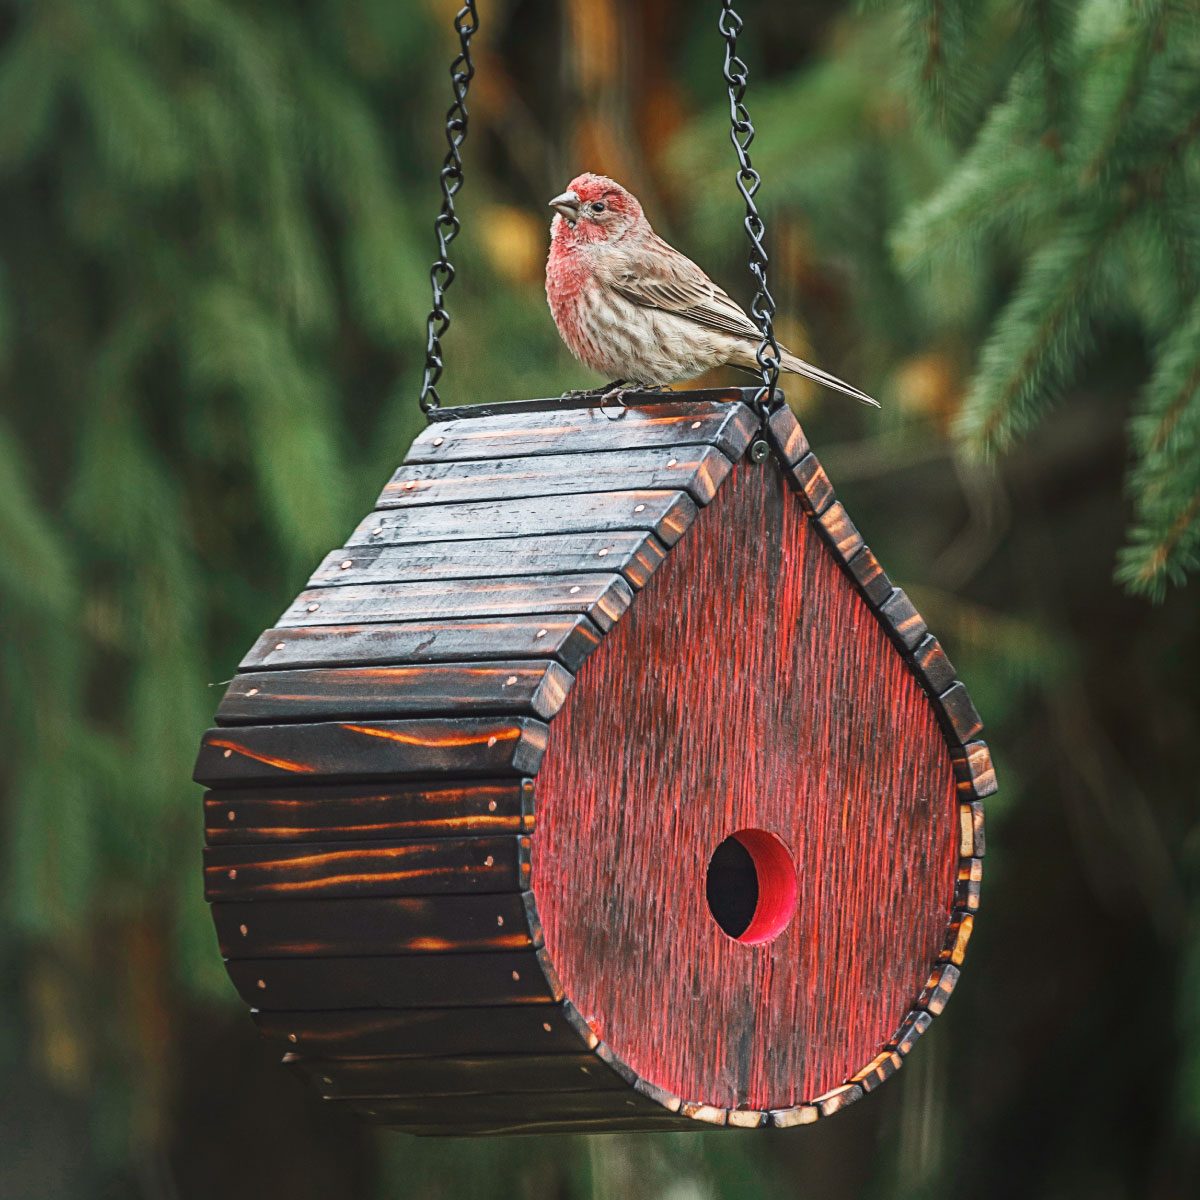
Get rid of that pile of wood scraps by making this distinctive DIY birdhouse.
A half day
Beginner
$10 - $60
Introduction
Looking for a weekend woodworking project to try Shou Sugi Ban? Build this birdhouse that's unlike any other.
Tools Required
- 1 1/8" Forstner bit or spade bit
- 1/16" Drill bit
- Awl
- Band Saw or Jig Saw
- Clamps
- Comb (optional)
- Drill
- Hot glue gun or double sided adhesive tape
- Measuring tape
- mitre saw
- Paint Brush for Stain
- Pliers
- Small fire extinguisher
- Small Hammer
- Small Propane tank with plumbers torch
Materials Required
- 1-in. screws
- 10-ft of 1/2”x 3/4” trim or molding
- 11-ft of 1/4”x 3/4" trim or molding
- 150-grit sandpaper
- 1x8x2' cedar board
- 3/4” copper nails
- Aluminum foil
- Carbon or Transfer Paper
- Chain or rope
- Exterior grade sealer
- Exterior wood glue
- Paint
- Paint Rags
Whether you’re a hardcore DIYer or an every-once-in-a-while crafty person, I’ll bet you have a small pile of scrap wood just laying around your workshop. You don’t want to throw it away, but you haven’t come up with the creative inspiration to do something with it.
May I offer the steps for how to build a cool birdhouse? It’s easy, fun and cost effective!
I’ve spent many a weekend morning with my cup of coffee in hand, observing birds at the feeder outside my kitchen window, and come to this conclusion: Birds are beautiful and truly curious creatures. They love to make homes, and we can save them time by providing a ready-made one — an easy, entry-level project.
I recently decided to make some birdhouses for my mom. I challenged myself to use what I had in my pile of wood scraps. I offer the same challenge to you, with some helpful hints to make the process more enjoyable. Building a birdhouse and hanging it in your yard is a wonderful way to say “welcome home” to your fine feathered friends.
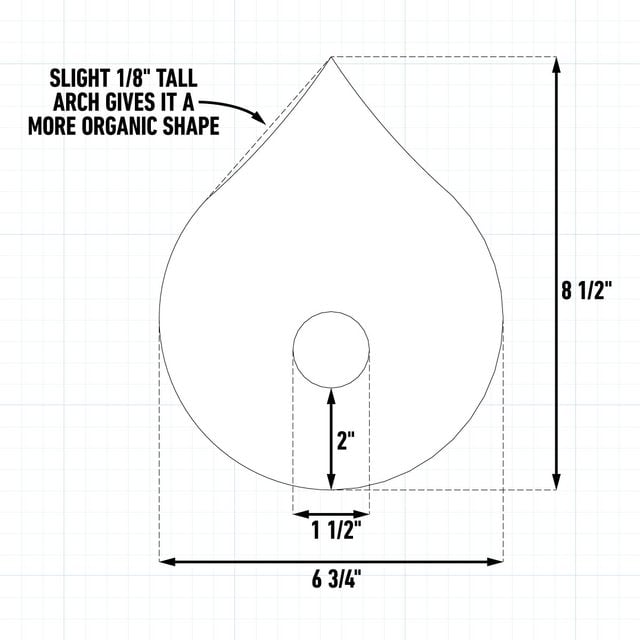
Teardrop Template
Cutting List
| KEY | QTY. | PART | DIMENSIONS |
| A | 2 | Front and back face | 3/4″ x 7” x 8-1/2″ |
| B | 16 | Roof pieces | 1/2” x 3/4” x 7” |
| C | 18 | Body pieces | ¼” X ¾” X 7” |
Project step-by-step (10)
Create a template and transfer to wood
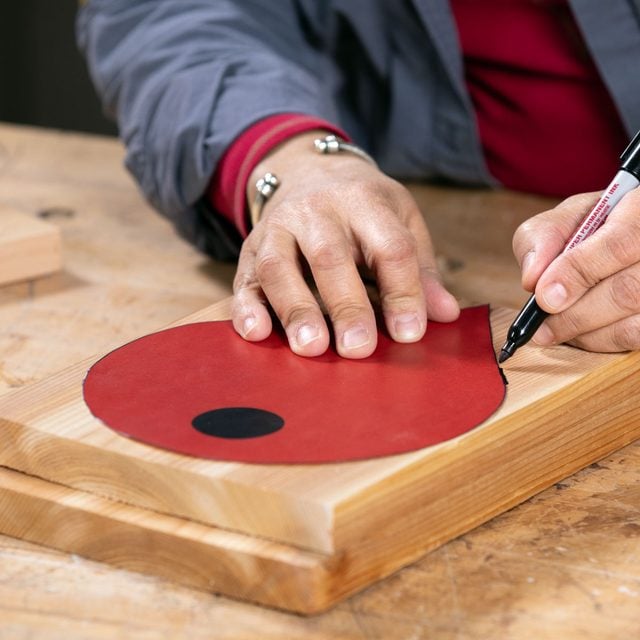
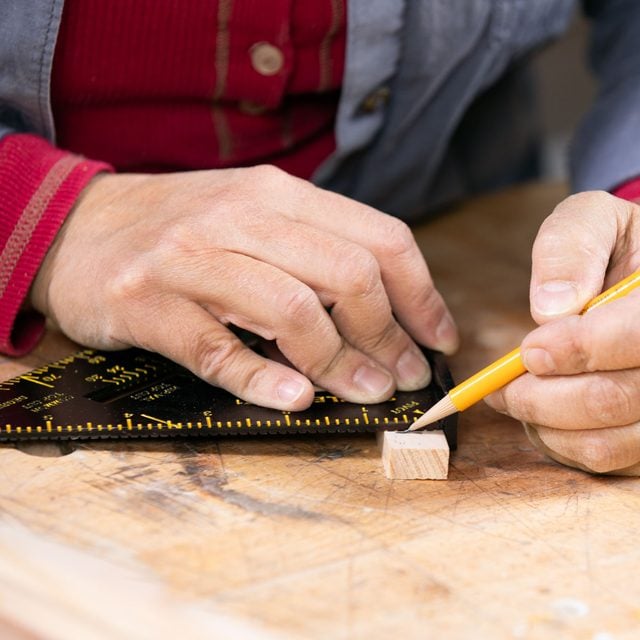
If your birdhouse has a round or more organic shape, you want the front and back face to be the same. Create a template like the one above. Then transfer it onto wood face pieces (A) by tracing over carbon paper, or simply cutting out the template and outlining it with a marker.
Pro tip: Templates don’t have to be complicated; there’s no need for a fancy computer illustration application. You’ll be amazed how easy it can be by using the line and shape tools in Microsoft Word.
Cut out the silhouette of front and back face at the same time
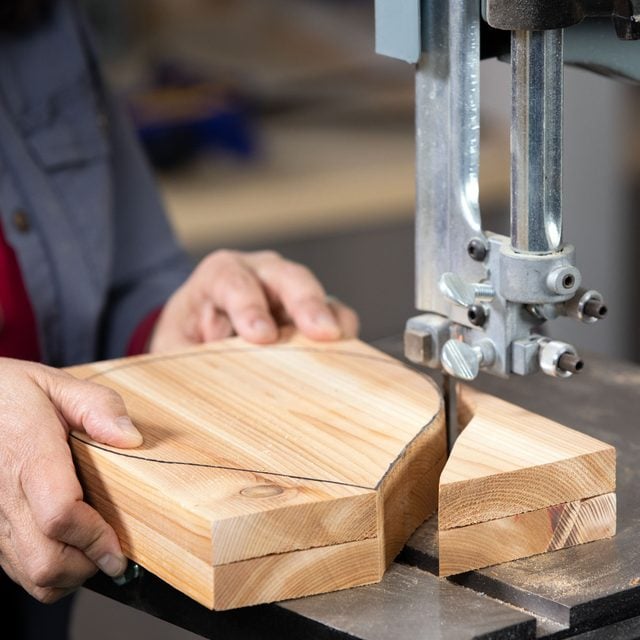
To cut out the exact same shape for the front and back faces (A), use a small dab of hot glue or double stick tape to secure the two pieces of wood together. Then cut them as one.
Using a jigsaw or band saw, cut out the silhouette you’ve drawn on your wood. Any adhesive residue left behind can be sanded back later.
Pro tip: For a more accurate shape, cut on the outside of the line, then clean up to the line using a sander with 150-grit sandpaper.
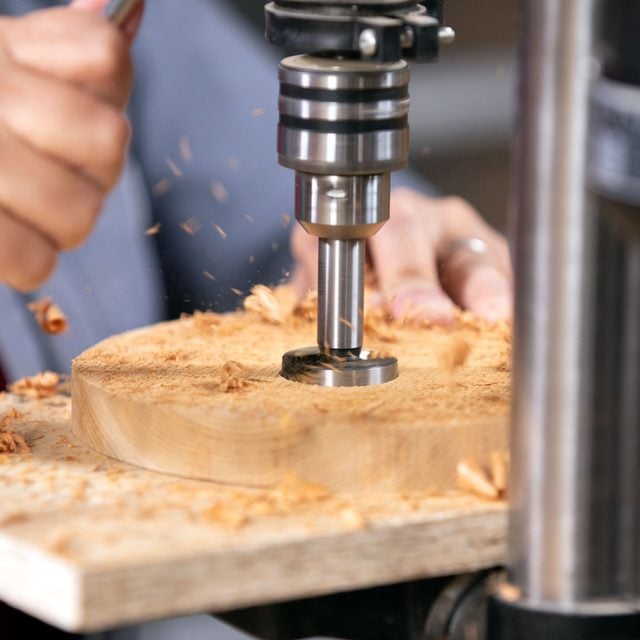
Drill birdhouse hole
Decide where you want to place your front entrance. Then, using a drill with a 1-1/2-in. Forstner or spade bit, drill through the front face (A) of the birdhouse. I used a drill press. If you use a drill, be sure to clamp down the wood so it isn’t moving around when you’re drilling.
Be conscious of placing the hole entrance more towards the middle. Four inches up from the bottom is probably ideal. I held mine two inches up from the bottom of the face to conform to the aesthetics, but don’t go any lower than that. When birds lay eggs, the little chicks can fall out if the opening is too low.
Pro tip: For a clean hole and to avoid blowout from the back side, place a sacrificial piece of wood under the wood you’re a drilling through.
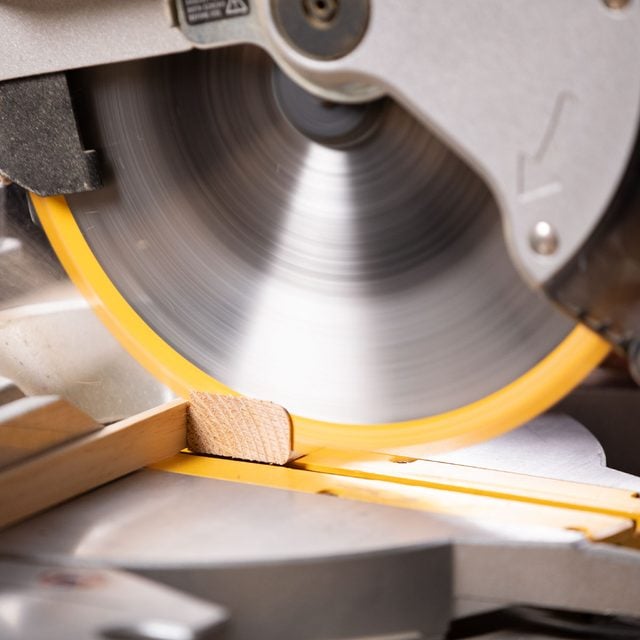
Cut trim pieces for roof and body
Make cuts for roof pieces (B) and body pieces (C) to go around the sides and base. (Refer to the Cutting List, or adjust according to your design.) These pieces will connect to your front and back faces (A) to create the shape.
To ensure your nail holes line up neatly, mark your trim piece so the nails land in the middle of the edge on the front and back faces (A). In my case, I decided 5/8-in. would work best. Use an awl or longer nail to tap and mark where you will pre-drill for the nails. I used a miter saw to quickly cut my small pieces.
Pro tip: To avoid smaller pieces of wood snapping or being pulled in by the force of the miter saw, use a sacrificial piece of wood in front of your smaller piece and cut through both at the same time. The sacrificial piece will hold your smaller trim in place as it’s being cut.
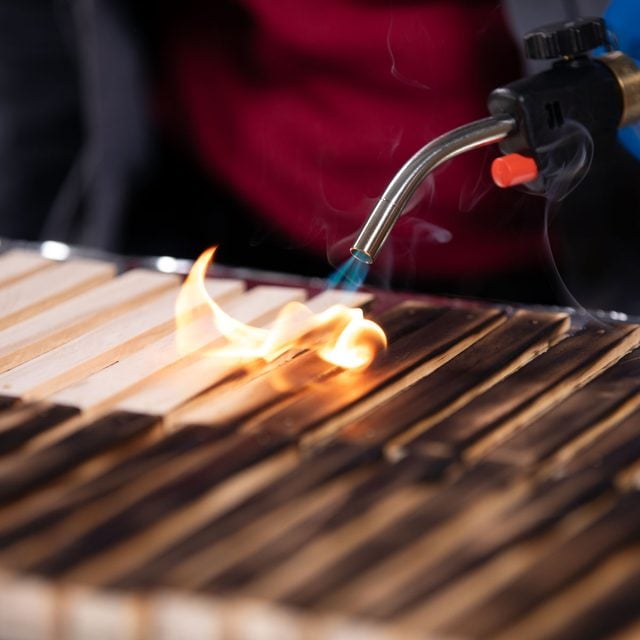
Shou Sugi Ban the pieces
Shou Sugi Ban is an 18th century Japanese technique of charring wood to waterproof and preserve it. This technique will create different effects based on how much or deeply you burn the wood. In this case, I burned the wood to define the grain and give it come color contrast.
Use a small propane tank with a plumber’s torch to burn/char your wood. Burn as dark or as light as you wish. I placed my wood pieces (A, B, and C) over some aluminum foil to avoid burning the surface I worked on. Keep a fire extinguisher handy.
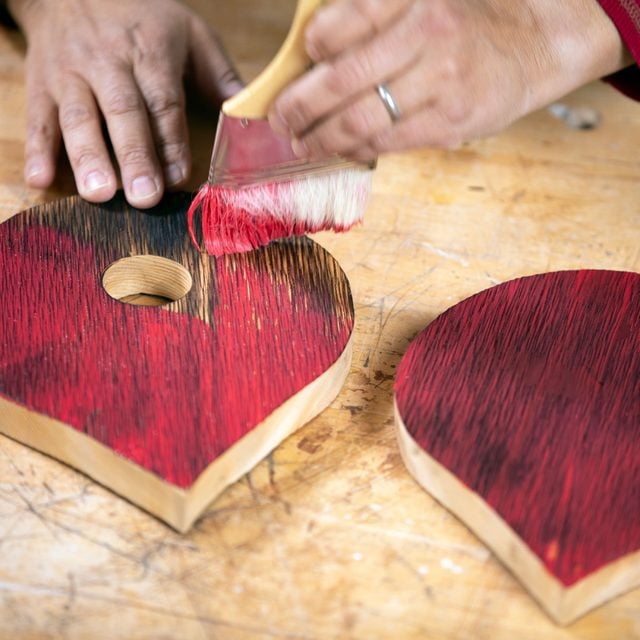
Apply color
After burning the front and back face (A), apply color or stain. In this case, I used a watered-down red paint. I simply added water to the paint to make it more viscous and transparent.
Brush on and wipe the excess off as if it were a stain. This technique will color the lighter shades of the wood and will be hardly noticeable over the black areas.
Apply paint/stain before you put the birdhouse together. This way you’ll achieve clean lines and avoid the frustration of cutting in with a brush at the roof line. Let dry before handling. When you’re done, you can easily touch up any scratches or dings.
Pre-drill the trim pieces
Using a drill bit slightly smaller than the gauge of your nails, pre-drill a pilot hole 5/8-in. in from the edge of your roof (B) and body (C) pieces, where you marked placement with the awl. This will leave a 1/4-in. overhang when attached to the front and back face (A).
Adjust your measurements according to the dimensions of your wood and how much overhang you want over the roof line. Ideally, nails should be driven into the middle of the thickness of your front and back face. I used my first drilled piece as a template to quickly drill the ends of the rest of my wood.
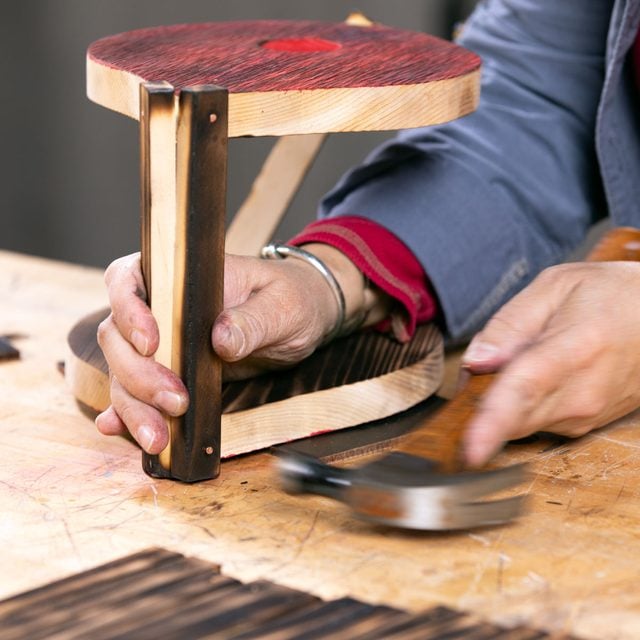
Nail the birdhouse together
To create the roof, start at the top of the roof line and hammer in the roof (B) pieces with copper nails. Connect the front face to the back face with the roof pieces (B) you pre-drilled.
Feel free to nail in a body piece (C) in at the bottom center of the teardrop. This will give you some rigidity and keep your spacing as you nail the roof on. Use exterior grade wood glue as you set the copper nails.
Repeat the process with the slightly thinner body trim (C) to create the rest of the body. And keep a wet rag handy to wipe up any glue drips.
Pro tip: Use a pliers or comb to hold each nail while you seed it with the hammer. Repeat until you have the roof connected to front and back faces.
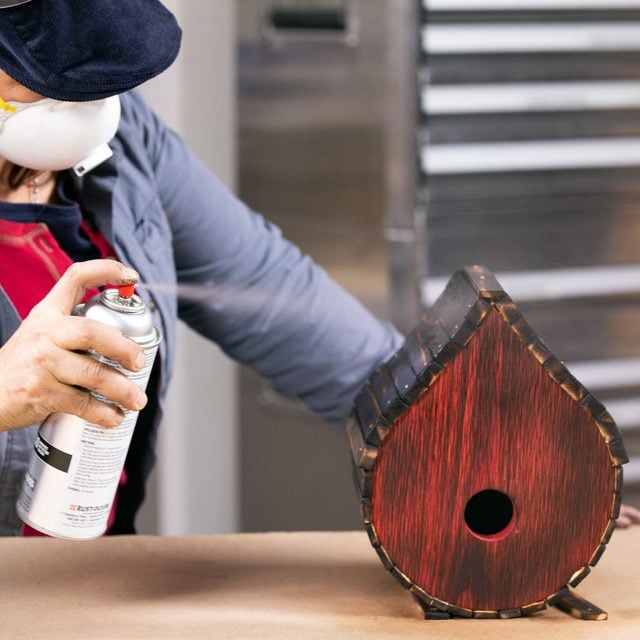
Finishing touches
To further preserve the wood, seal it with an exterior grade sealer or spar-varnish. Spray or brush-on sealers work equally well. I chose to spray it on.
Finally, to hang the birdhouse, add a length of chain. I attached it to the faces (A) at the peak of the roof with a pair of one-inch screws I had lying around the shop.
FAQs
What size hole is best for a birdhouse entrance?
The birdhouse hole diameter should be between 1- and 1-1/2-inches. If the hole is too small, birds can’t easily get in. Too big a hole allows predators access. To attract smaller songbirds, go with a 1-1/2-in. diameter.
How high off the ground should I hang the birdhouse?
It needs to be at least five feet above ground so it’s safe from raccoons and other unwelcome critters. But don’t make it too high or birds won’t nest there. Anything in the five-to-12-foot range should work.
Does my birdhouse need a perch at the entrance?
No. A perch helps predators enter the birdhouse. A bird can get in and out without a perch.
Originally Published: January 16, 2024