
22 Genius Hand Tool Hacks You Need to Know
Updated: Dec. 20, 2023
Hand tools are great, but they're even better when you use them creatively for things they're not designed to do.
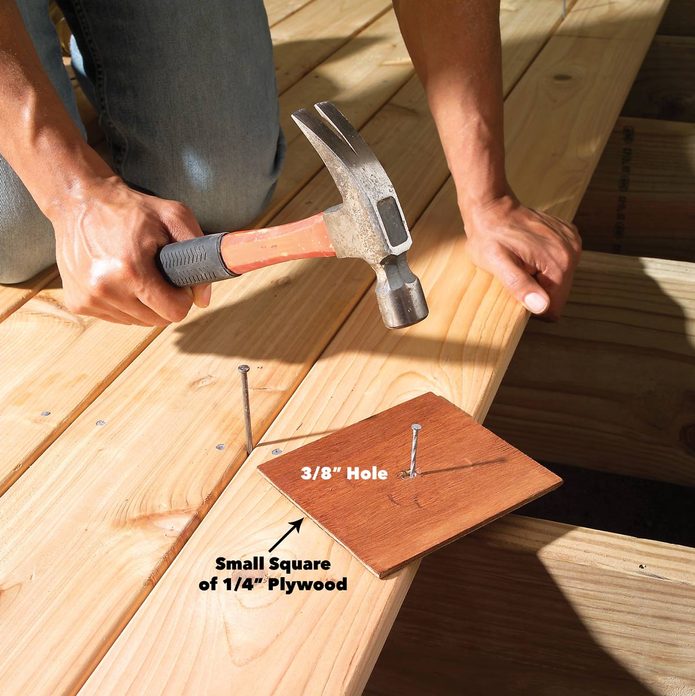
Avoid Ugly Hammer Marks
Nails are easier to drive if you take a full swing. But the downside is that if you miss the nailhead, you’ll leave a deep ‘elephant track’ in the decking. Use a 1/4-in. plywood cushion to protect the deck boards in case you miss with a hammer. It allows you to concentrate on nailing without worrying about denting the deck boards. Simply start the nail. Then slip a small square of 1/4-in. plywood over the nail and swing away. Remove the plywood for the last blow.
Testing Miter Cuts
An easy way to test whether your table saw is set to 45 degrees is to cut off a short length of your trim, then hold it to a square. A gap means your angle is off.

Circle Gets the Square
Here’s a magical way to trace arcs and circles for project parts. Tap two finish nails at the ends of a desired diameter, then rotate a framing square against the nails while holding a pencil in the square’s corner. Spray the underside of the square with silicone or rub on some paraffin so it’ll glide smoother. Then practice a little to get the feel of the three-point contact technique.
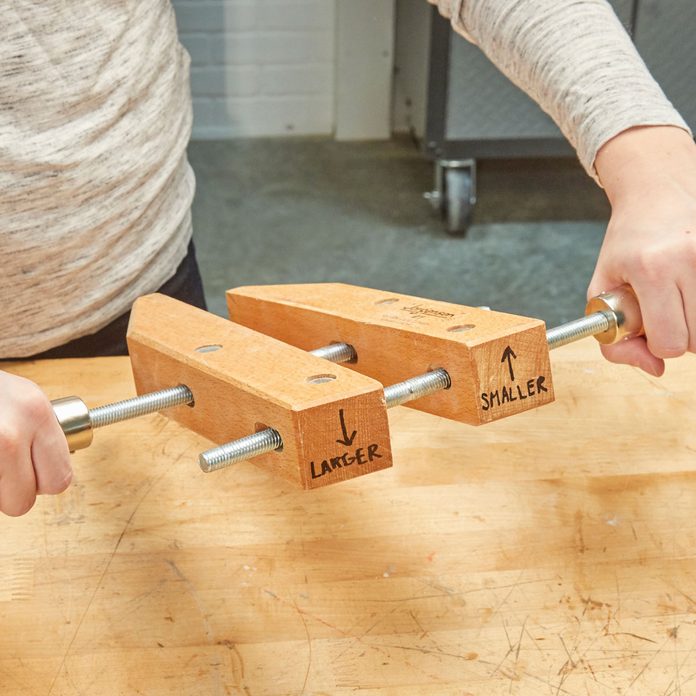
Which Way to Tighten Wood Clamps?
“Hand screw wood clamps are some of the most useful and versatile tools in my shop. But I always forget which way to rotate them to make them larger or smaller, and more than half the time I make the wrong choice. Now, I draw an up or down arrow on the clamp ends along with the words “larger” and “smaller”. No more guessing!” – Kenneth “Doc” Gregie
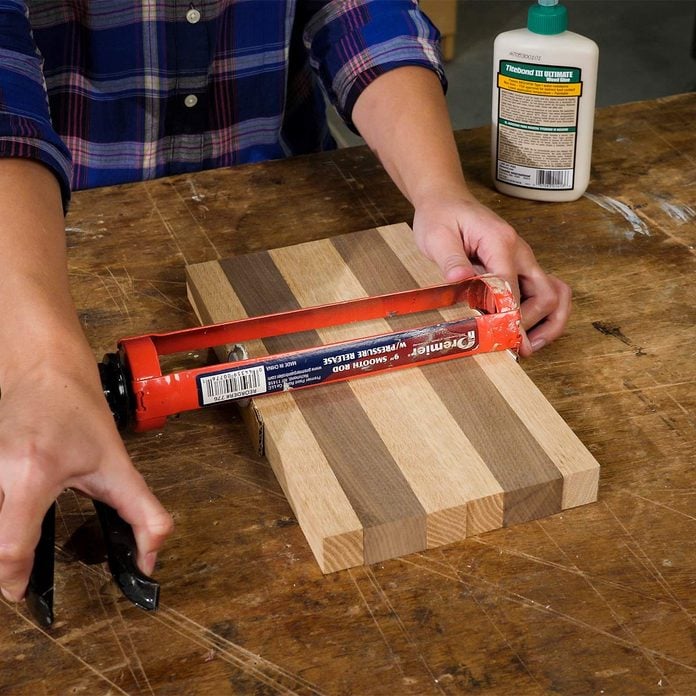
Caulk Gun Clamp
Did you know that you can use a caulk gun as a clamp? It’s perfect for gluing up small projects such as a cutting board. Just place a couple of pieces of scrap wood or cardboard at the ends of the caulk gun and then squeeze the trigger to apply pressure.

Customized Chuck Key
If you’ve ever scraped your fingers when tightening a drill chuck, you’ll love this tip. First measure the diameter and length of the chuck key’s handle and drill a matching hole in the end of a 4-in. x 3/4-in.-diameter wood dowel. Then hold the handle in a vise and tap the dowel onto the chuck with a hammer.
The advantages? Besides no longer scraping your fingers on the gears, you’ll have increased leverage with less effort and a much more comfortable grip when tightening the chuck.
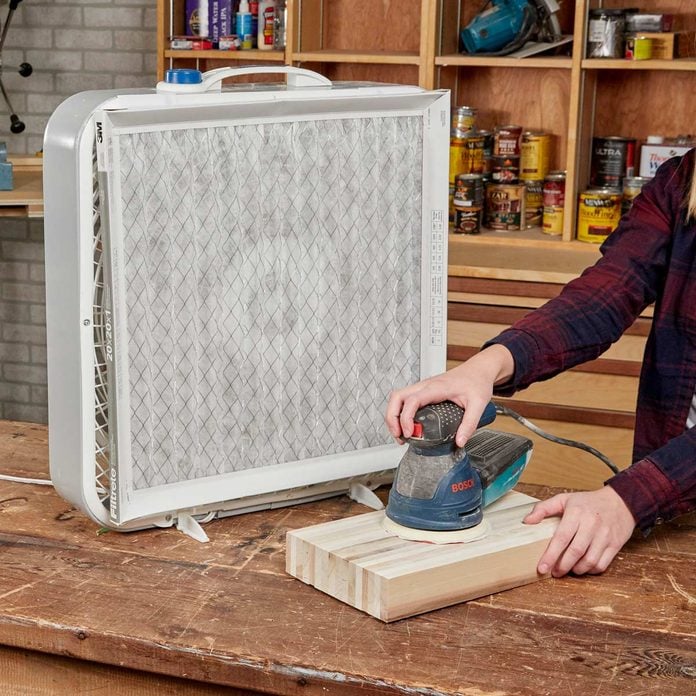
Saw Dust Filter Fan
My workshop doesn’t have air conditioning, and it gets pretty hot while I’m working. I used to blow a fan directly at myself, but it sucked in dust from around the shop and blew it at me. I had a few extra furnace filters lying around, so I tried attaching one to the back of the fan using hook-and-loop fasteners. This made a huge difference! Don’t use a super-high-performance filter, as it could cause the fan to have to work too hard to pull air through, resulting in an overheated motor. — Larry Brannock
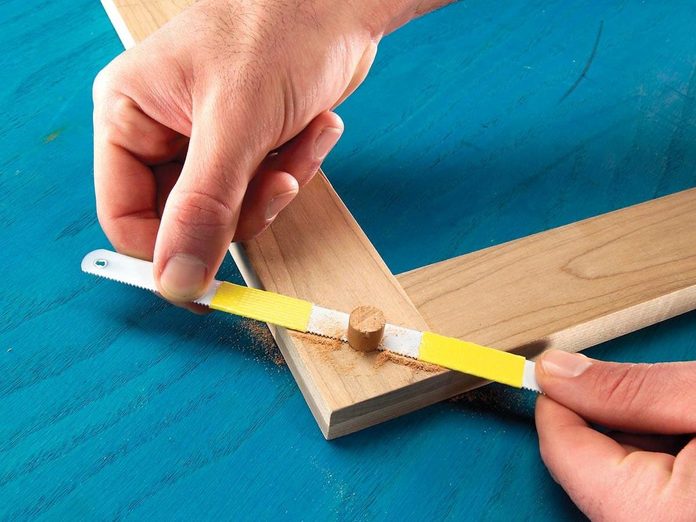
Flush-Cutting Hacksaw
Trim dowel plugs flush on fine furniture projects without scarring the adjacent surface. Apply a couple of layers of masking tape or a single layer of duct tape to a hacksaw blade with an untaped section between for sawing. While you’re sawing, the tape elevates the blade a smidgen so it can’t scratch the surrounding wood. After sawing, lightly sand the dowel to even it with the wood.
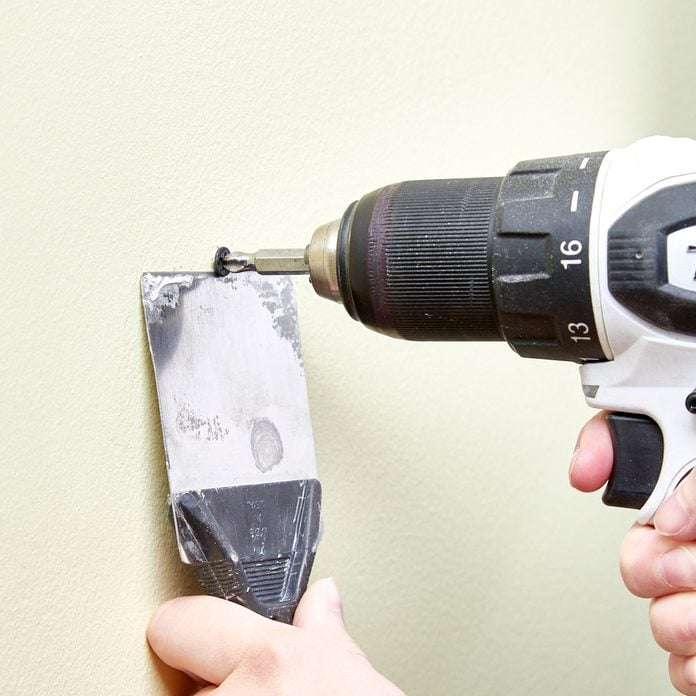
Putty Knife Hack
Drywall screws are very useful. Not only can you use them for their main purpose, but they’re ideal for attaching metal to wood, and many people use them instead of wood screws. However, if you try to remove a drywall screw that has missed the stud, it’ll just spin and it won’t come out. So, to get the screw to back out, stick the edge of a putty knife under the screw’s head and apply some outward pressure as you back out the screw. Viola! It will come right out with not hassle.
If you’re wondering how to sharpen garden tools. Here’s your answer!
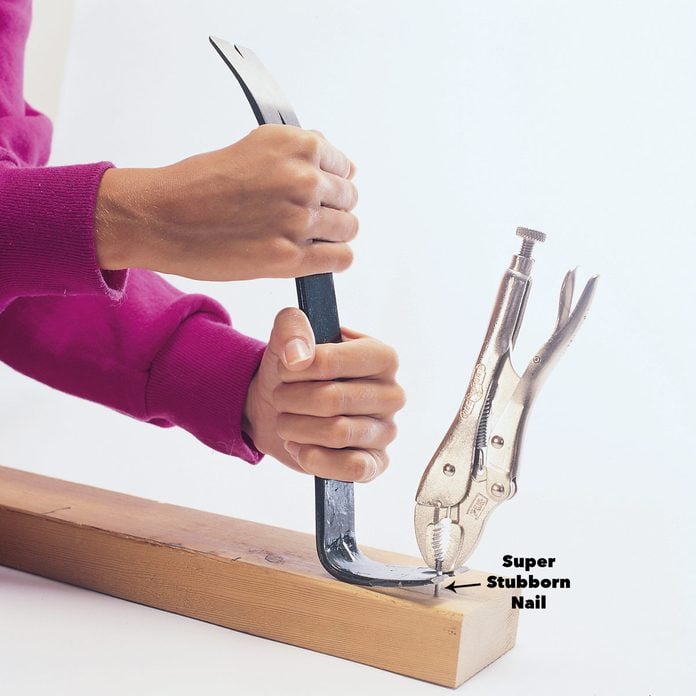
Last-Ditch Nail Pulling
If you’re trying to pull a nail and the head breaks off, try gripping the nail tightly with a locking pliers, then pull against the pliers.

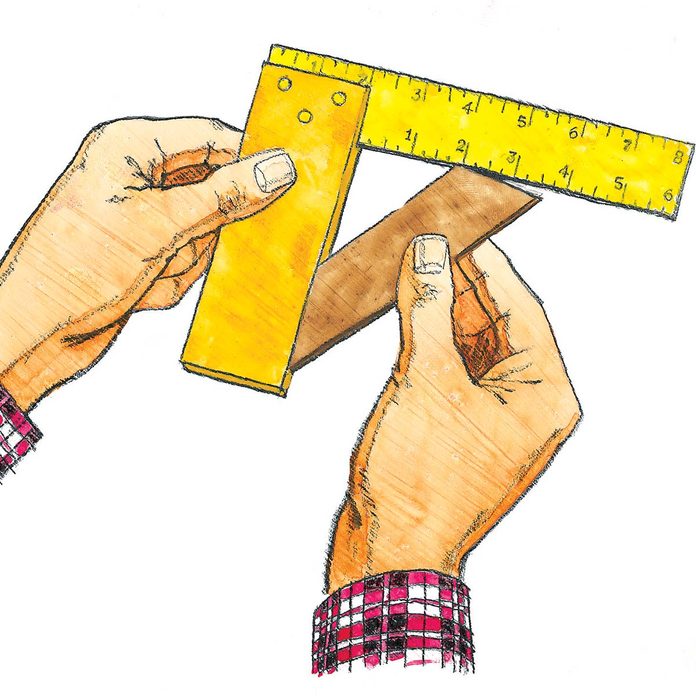
Adding a Key-Holed Ruler to Your Bench
You can mount a removable key-holed metal ruler on the front edge of your workbench, for both easy measuring on the workbench and for easy access for measuring and marking projects elsewhere. Simply drill keyholes (a larger hole with an overlapping smaller hole above it) in two locations along the ruler. After drilling the keyholes we sanded them smooth to get rid of the potentially dangerous sharp edges. Next, drill appropriately sized screws (ones that will fit into the smaller sized keyhole) to the front of the workbench and use the keyholes to mount the ruler to the bench with screws.
Also, it is important to note that we placed our screws in a location in which the ruler would lay flush with the edge of the workbench. This makes it extremely easy to use the ruler for quick project measurements because of its convenient location.
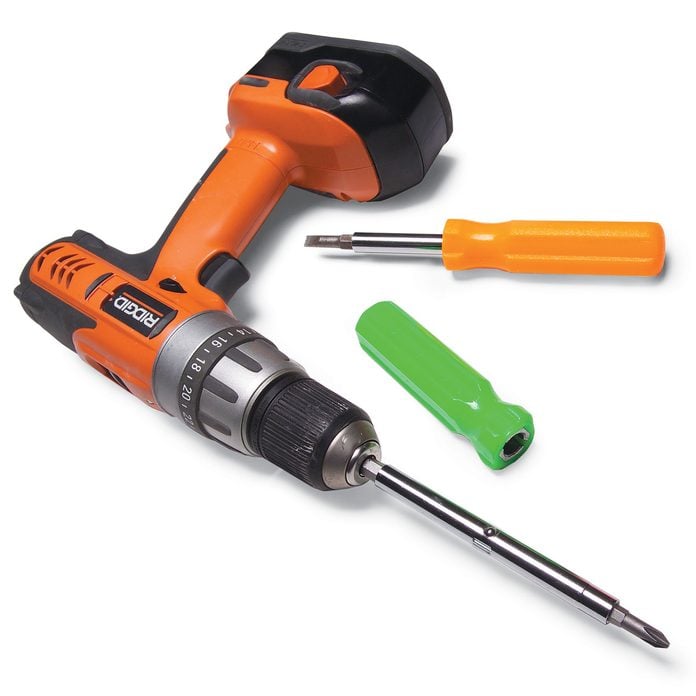
Long-Reach Screwdriver
When you need to extend the reach of your cordless screwdriver, just pull the shaft out of a four-way screwdriver and clamp it in the chuck.
Simple Curve Guides
Many woodworking projects require more than just straight line cuts to get the job done right. And instead of using complex math or a compass to figure out the curve for your project, use supplies you have laying around your workshop. You can use anything from a paint can to a tube of caulk to use as your curve guides. All you have to do is find an object with a circular bottom that is around the size of the curve you’d like; then place it on your project as a curve guide.
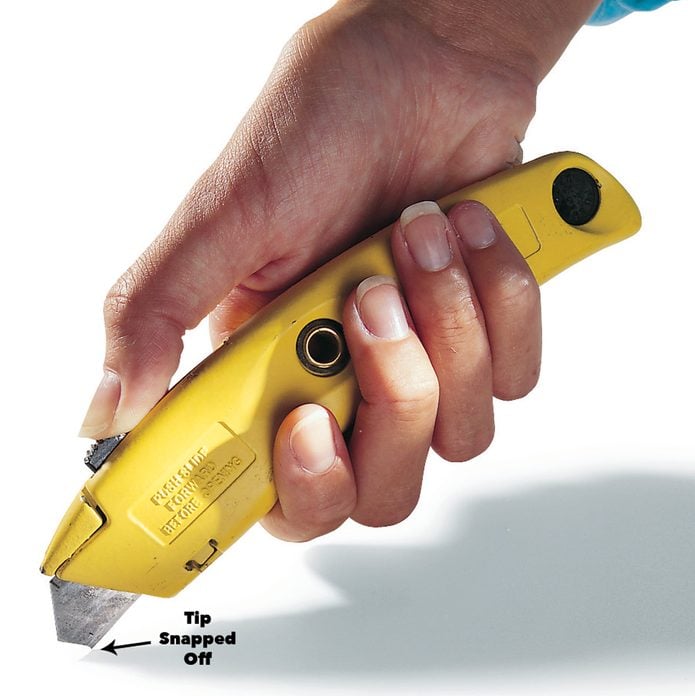
Longer-Lasting Utility Blades
Most often, it’s just the tip that gets dull on a utility knife. When it does, snap off the tip with pliers and you’re in business again. Wear eye protection, because sometimes a little piece of the blade goes flying.
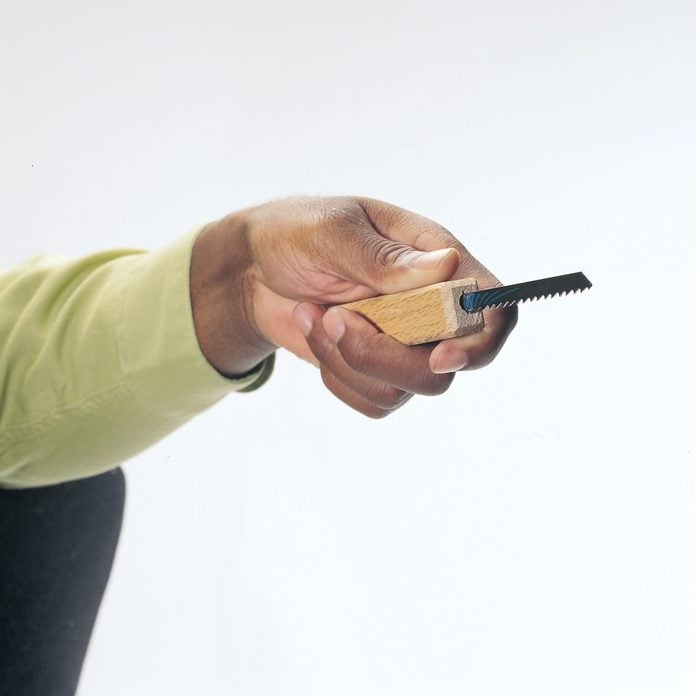
Mini Drywall Saw
A coarse jigsaw blade mounted in a scrap of wood makes a handy little drywall saw. It’s easy to carry and is good for cutting around electrical boxes and other tight spots.

No-Dent Finish Nailing
If you’re like me and sometimes hit the wood and not the nail when applying trim or molding, try this tip. With a thin-blade saw, saw a narrow kerf 1/4 in. into the end of a wood shim. Press a finish nail into the slot, hold the shim against the molding and then drive in the nail. The soft wood shim lets you deliver a final firm blow to leave the nailhead nearly flush with the surface. Next, set the nail just below the surface with a nail set and apply wood filler.
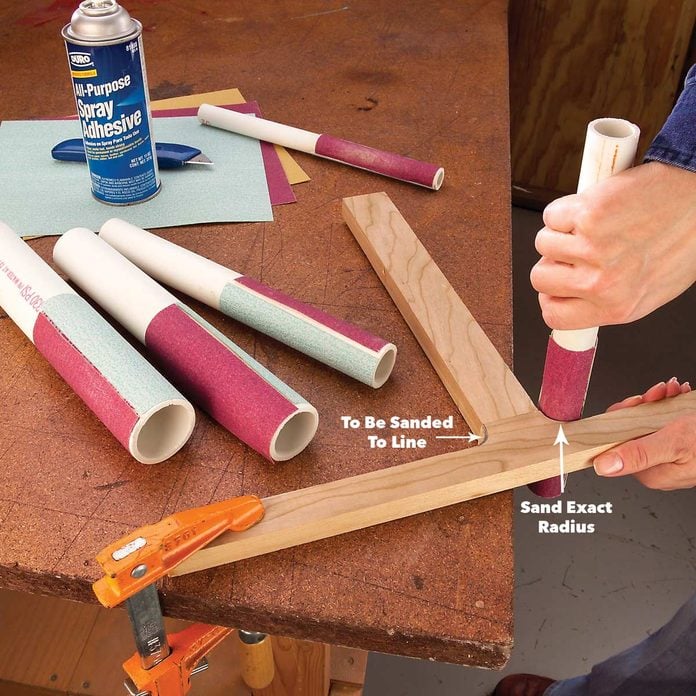
PVC Sanding Files
Stick sandpaper to cutoff pieces of PVC water pipe with spray-on adhesive and you’ll be able to sand concave curves to perfection. PVC pipe is labeled by inside diameter; here’s an index for the outside diameter of useful pipe sizes.
- 1/2-in. i.d. = 7/8-in. o.d.
- 3/4-in. i.d. = 1-in. o.d.
- 1-in. i.d. = 1-1/4-in. o.d.
- 1-1/4-in. i.d. = 1-5/8-in. o.d.
- 1-1/2-in. i.d. = 1-7/8-in. o.d.
To apply sandpaper to the pipe, spray both the paper and the pipe with a generous layer of adhesive. Let both surfaces dry several minutes before joining them. Use two grits on each pipe—80-grit for sculpting a precise radius, and 100- or 120-grit for finish sanding. When the sandpaper’s worn out, just pull it off, spray fresh adhesive on a new strip and go back to having fun.
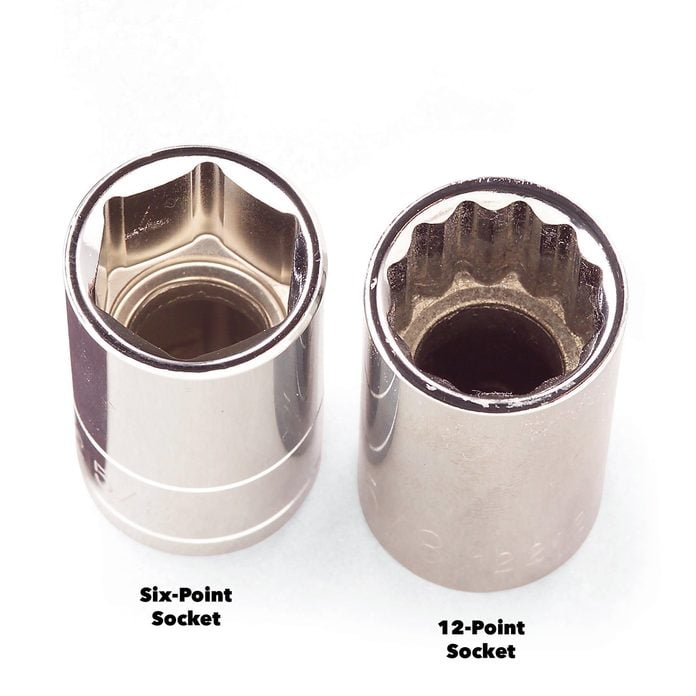
Six-Point vs. 12-Point Sockets
If mechanics swear by six-point sockets, why are there 12-point sockets? A 12-point socket is fine for most lightweight repairs, but heavy wrenching calls for a six-point socket. A six-point socket is much less likely to slip off a stubborn fastener or round over the corners. Here’s why: (1) Six-point sockets have thicker walls, so they’re less likely to flex. (2) A six-point socket is designed to contact the head of a fastener well away from the corners so contact is made on the thickest part of the socket and the flattest part of the fastener. This dramatically reduces the likelihood of slippage and rounding over the corners. And (3), the edges of a socket are angled back a few degrees to allow the socket to slide easily over a fastener. The angle is less on a six-point socket than on its 12-point counterpart, again providing more contact area inside the socket.
One last point. Most high-quality sockets are chrome plated to prevent rusting and make cleanup easy. However, after years of use, the chrome finish can flake off. Don’t use a socket if the chrome is peeling. The chrome will be as sharp as a razor blade. Any reputable tool company will replace a tool that has peeling chrome.
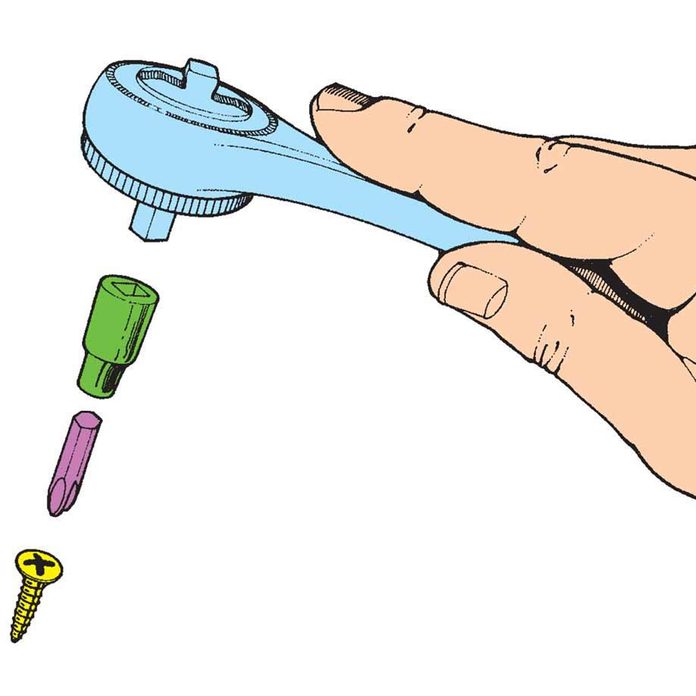
Socket Wrench Screwdriver
Sometimes there’s just no way to make even a short screwdriver work in a tight place. Use a Phillips head screwdriver bit with a ratchet wrench. The hex shaft of most bits fits into the 1/4-in. socket.
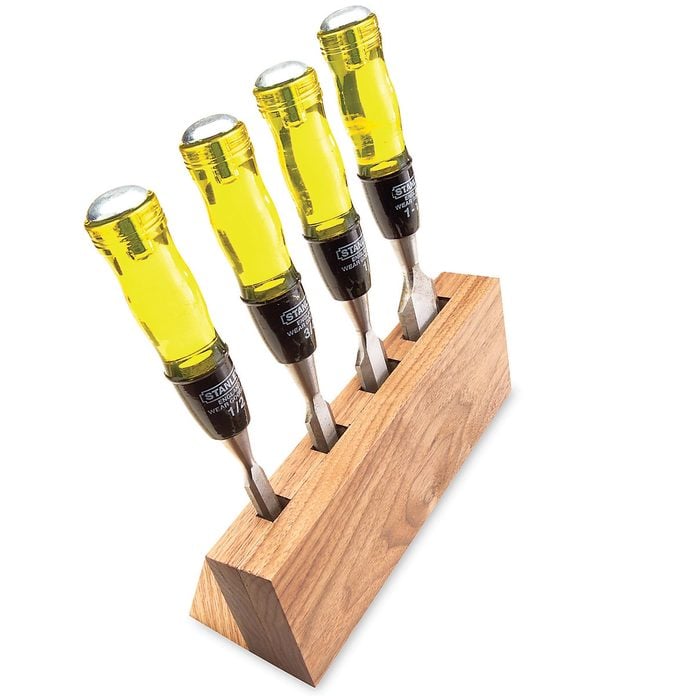
Tabletop Chisel Storage
Here’s a neat tabletop chisel storage idea that’s a snap to build from scrap boards. It angles the handles toward you for easy reach. Start with a 4-in.-wide board. Using your table saw, cut stopped slots to match the width and depth of each chisel (plus some wiggle room). Screw or glue on another board to create the pockets, then run the lower edge of the doubled board through a table saw with the blade set at 15 degrees. Now cut three triangular legs with 75-degree bottom corners and glue them to the pocket board. If you like, drill a few holes through the boards for pegboard hooks so the holder is easy to store on the wall.
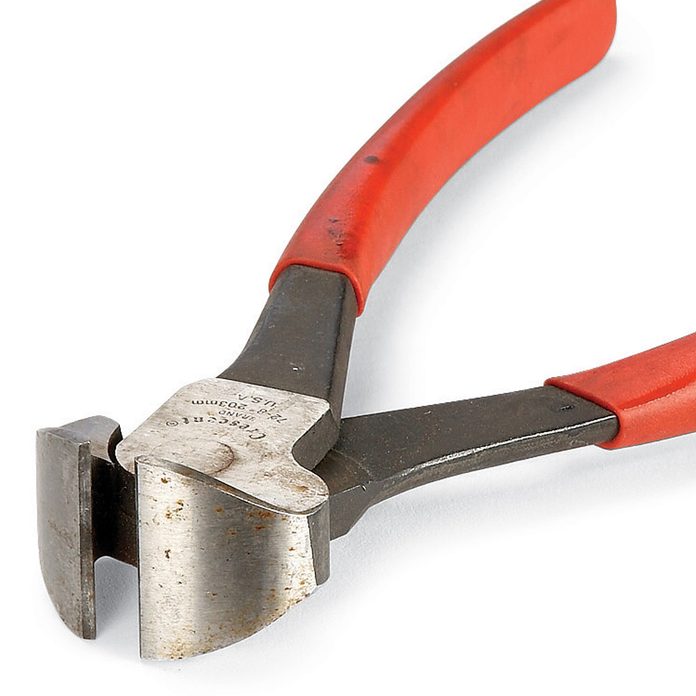
Use Nippers to Pull Trim
Keep a pair of ‘nippers’ in your pouch whenever you’re doing trim carpentry. When you pull trim from the wall, use them for pulling the nails through the back of the trim.
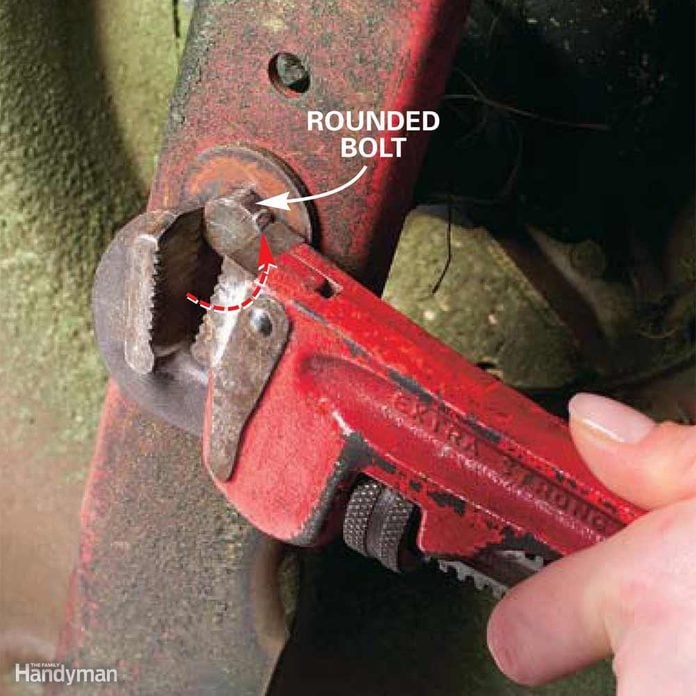
Loosen bolts with worn, rounded heads with a pipe wrench. The pipe wrench jaws dig in and grab the head so you can remove the bolt.