
How to Build a Shed: 2011 Garden Shed
Updated: Jan. 03, 2024
Introduction
In this article, we’ll show you the basics of how to build the shed and the sliding doors.
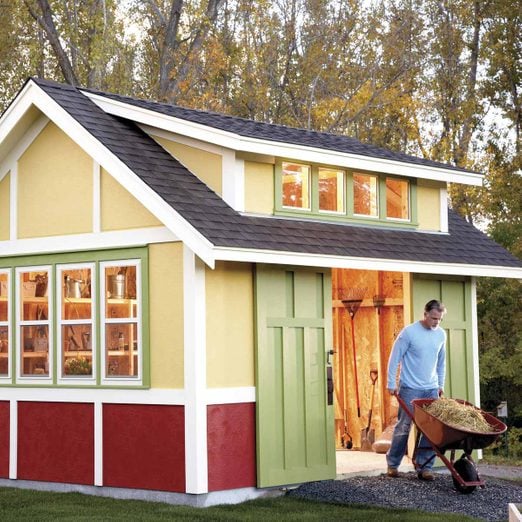
If you’re a gardener, you’ll love this 12 x 16-ft. shed. (And even if you don’t garden, I bet you could put all this space to work.) There’s plenty of room for all your tools and a planting bench under the windows. You can easily drive your riding mower through the huge sliding doors, or just open them wide for plenty of light and ventilation. Dormer windows provide overhead light, and a bank of end wall windows opens for even more fresh air. To reduce maintenance, we used solid PVC to trim the shed and build the sliding doors, and we covered the walls with fiber cement siding. The custom-size aluminum combination windows won’t require anything but occasional cleaning.
Long-Lasting and Low-Maintenance

We chose exterior materials that’ll keep this shed looking great for decades. First, we covered the walls with 4 x 8 sheets of 5/16-in.-thick fiber cement. If you plan ahead, you can order this James Hardie stucco-look HardiePanel prefinished. We chose to paint ours on-site. Fiber cement is known for its superior paint-holding ability, so we expect the paint job to last a long time.
All the exterior trim, as well as the door frames, are solid PVC by Azek. The 18-ft. lengths mean you don’t have to splice the fascia boards. And you don’t have to search through the lumber for straight, good-looking pieces—all of it is straight and good looking. PVC trim is a little spendy, but you’ll never have to replace it.
Money, time and tools
You can find most of the materials for this shed at home centers or lumberyards. However, the solid PVC trim boards may have to be special-ordered. We spent about $4,800 on the materials for this shed (not including the concrete slab), and the PVC trim accounts for a big chunk of that cost. If you substitute wood or composite trim, you could save about $1,000.
To build this shed, you’ll need standard carpentry tools, including a circular saw and drill. A framing nail gun, miter saw and table saw will save you some time and effort but aren’t necessary. We used a special Ridgid dust-collecting saw to cut the fiber cement siding, but a circular saw will also work.
If you’ve built a deck or other large construction project, you shouldn’t have any trouble with this shed. The framing is straightforward, and with a few helpers you should be able to get the shell up in a weekend. Then expect to spend three or four busy weekends completing the project.
Growing Gardeners

Tom Benson, principal of Pilot Knob Elementary School in Eagan, MN, couldn’t be happier. His magnet school for science, technology, engineering and math just started a raised bed gardening project for the kids and community. We were so impressed with the school’s program that we donated this shed to the cause.
Project step-by-step (19)
Getting Started
In most areas, you’ll need a building permit for a shed of this size. Check with your local building department to find out what’s required. You’ll probably have to locate the side and back lot lines so you can mark the spot for the new shed. For this you’ll need a survey or plot plan. Ask at city hall—there may be a plot plan on file. To avoid delays, start this process at least a month before you plan to build. After the plans are approved, take them, along with a materials list, to the lumberyard or home center to order materials and work out a delivery schedule.
When you’ve staked out the location of the shed on your lot, you’re ready to pour the concrete slab. We hired a contractor for this, but if you want to do it yourself, go to familyhandyman.com and search for “concrete slab” for complete instructions. A few days before you plan to dig, call 811 for instructions on how to locate buried utility lines.
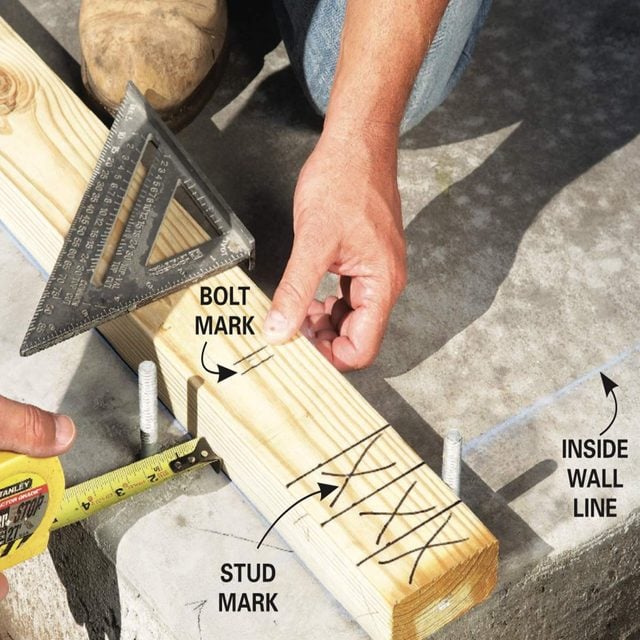
Prepare the Wall Plates
- Measure from the chalk line to the center of the bolt and transfer this measurement to the plate to mark for drilling the bolt holes.
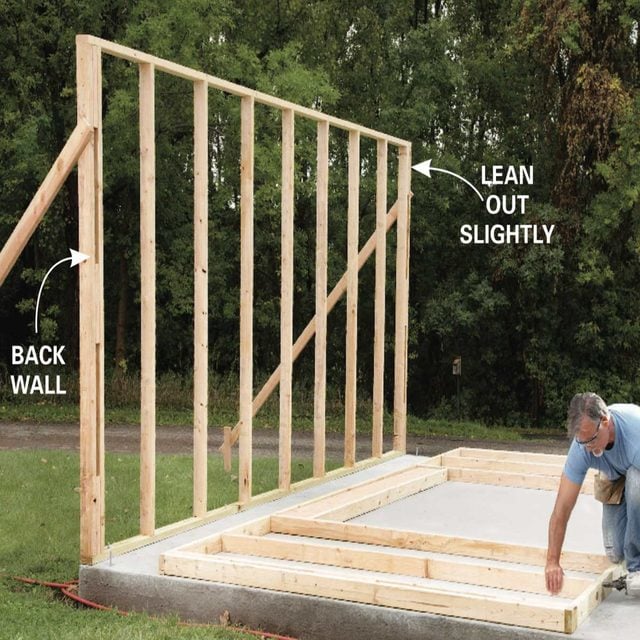
Build a Wall, Stand It and Build Another
- Frame the long walls first while the slab is wide open.
- Pro tip: When you stand and brace them, tilt them slightly outward. That gives you a little extra room when you stand the shorter walls.
Plumb and Brace the Walls
- Check for plumb with a long level at the corner.
- Push or pull the wall until it’s plumb.
- Then nail on a diagonal brace to hold the wall plumb until the sheathing is installed.

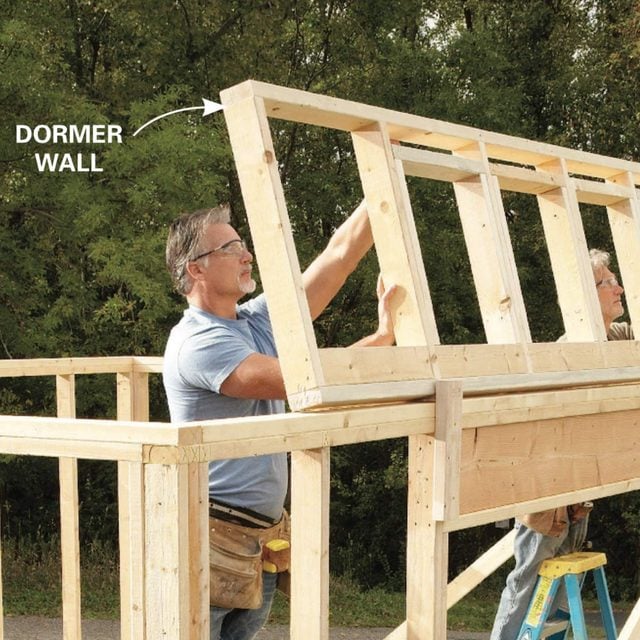
Set the Dormer Wall
-
- Note: Building the dormer wall separately simplifies wall framing.
- Set it into place above the door opening.
- Nail temporary blocks to the lower wall to keep the dormer wall from sliding off as you nail it.
How to Build a Game Day Shed
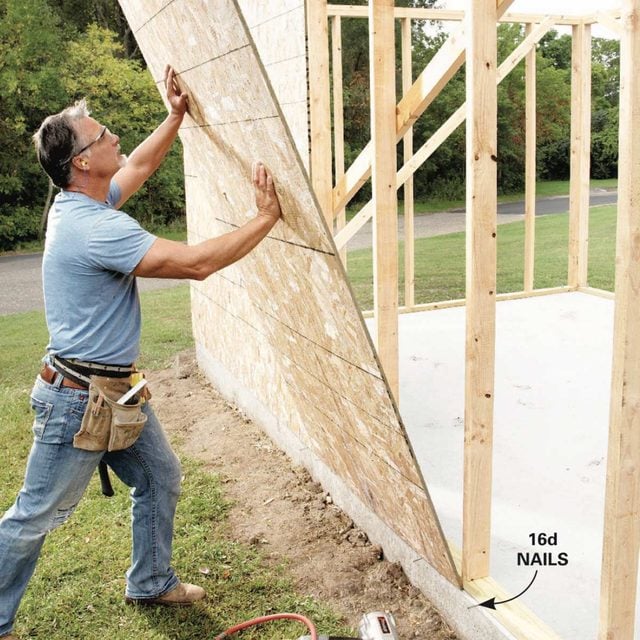
Sheathe the Walls
- Nail the sheathing to the studs.
- Pro tip: It’s simpler if you support the sheathing on 16d nails wedged between the bottom plate and the slab.
Build the Walls
After the concrete cures for several days, you can start building the walls.
- Chalk lines on the slab, 3-1/2 in. from the edges to indicate the inside edge of the walls.
- Cut the treated bottom plates and top plates to length and mark the stud locations on them.
- Build and stand the two long walls and temporarily brace them.
- Lean the tops out slightly to make room for standing the end walls.
- When all four walls are built and standing, nail the corners together, making sure the tops of adjacent walls are even with each other.
- Nail the second top plates to the tops of the walls, overlapping them at the corners.
- Plumb the walls and nail diagonal braces to the studs to hold the walls plumb until the sheathing is installed.
- Complete the walls by building the dormer wall and nailing it into place and installing the sheathing. Here are a few tips for turning a shed into a tiny hideaway.
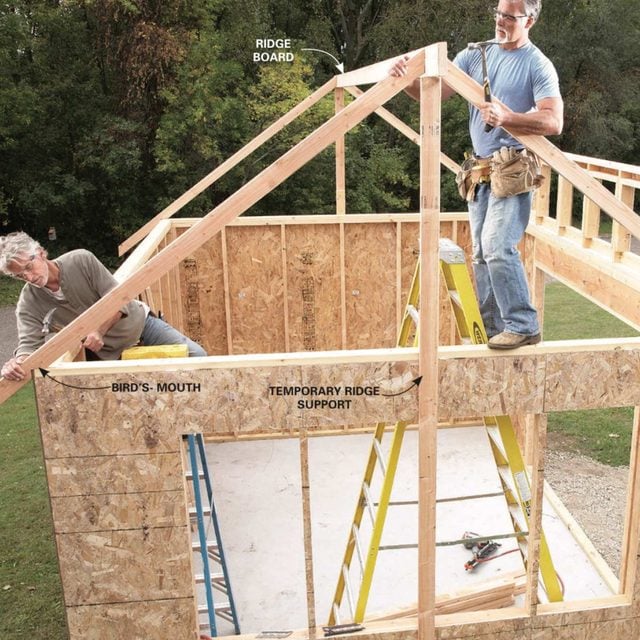
Frame the Roof
- Mark the rafter locations on the ridge board and prop it up with temporary supports.
- Nail the rafters to the ridge and top plate.
- Pro tip: Don’t remove the supports until you’ve installed the rafter ties.
- Before you install the rafters, sight down the walls to make sure they’re perfectly straight.
- Push or pull the top of the walls into alignment and support them with temporary braces fastened to the bottom plate of the opposite wall if necessary.
- Cut the ridge board to length and mark the rafter positions on it.
- Nail temporary 2×4 supports to each end of the shed with their tops 50-3/4 in. above the top plate.
- Support the ridge on these while you install the rafters.
- Install the rafters in pairs, lining them up directly over the studs.
- At the top plate, toenail through the bird’s-mouth into the top plate to hold the rafters temporarily.
15 Shed Building Mistakes and How to Avoid Them
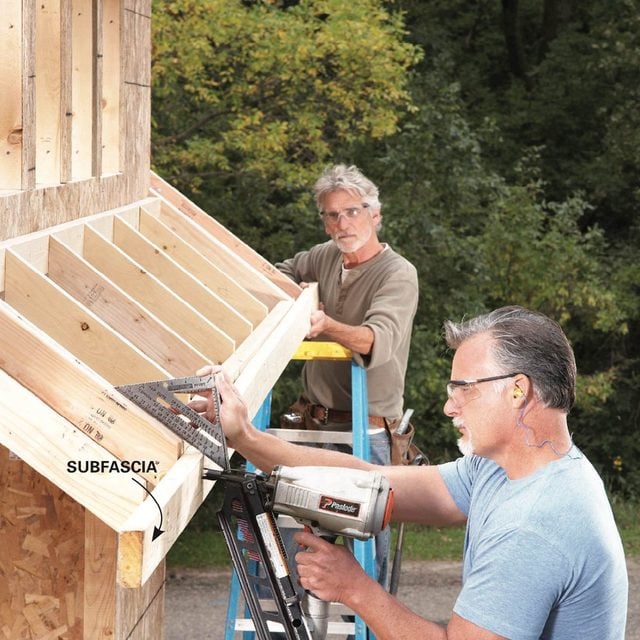
Nail on the Subfascia Boards
- Align the top of the 2×4 subfascias with the top of the rafters.
- Pro tip: Start nailing at one end and have a helper at the other end raise and lower the board to line it up while you nail it.
- Install metal hurricane ties (USP RT7 or similar; uspconnectors.com) at each rafter.
- Fill in the short rafters that form the overhang over the siding doors.
- Nail the 2×4 subfascias to the rafter ends.
- Pro tip: Remember to rip a slight bevel on the lower edge of the subfascia so the soffit boards will fit tight to the rafter tails.
- To prevent the 8-ft. section of roof over the sliding doors from sagging, bend 2-ft.-long perforated metal straps (Simpson LSTA24; strongtie.com) to fit along the top of the short rafters and up the wall.
- Drive 3-in. construction screws every 4 in. through the straps and into the framing.
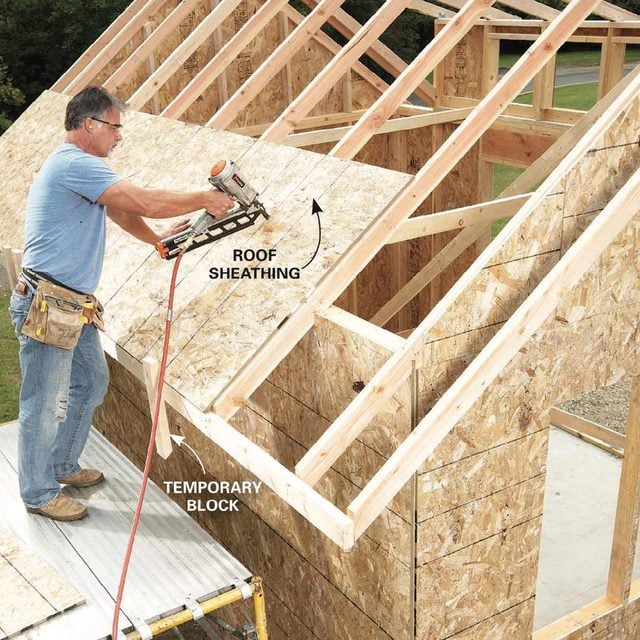
Sheathe the Roof
- Nail temporary blocks to the subfascia to hold the first row of sheathing in place. Space the sheets 1/8 in. apart.
- Note: If you don’t leave gaps, you might get ridges that show through the shingles when the sheathing swells.
Reader Project: Ultimate Garden Shed
Finish the Dormer Framing
-
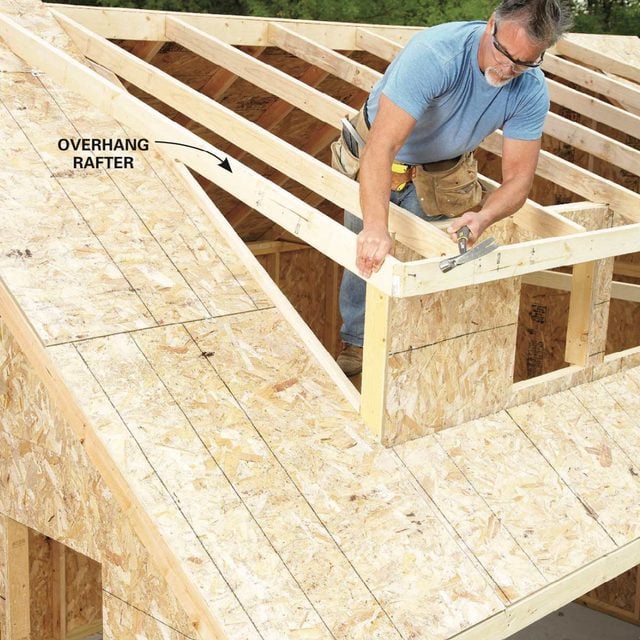
- Pro tip: Complete the sheathing on the main roof before adding the overhang rafter so you don’t have to notch the sheathing to fit around the rafter.
- Complete the roof framing by nailing the overhang rafters to the ridge and subfascias and installing 2×4 rafter ties between the front and the back walls to keep them from spreading.
- Sheathe the main roof before you install the overhang rafters on the dormer.
Schoolhouse Storage Shed
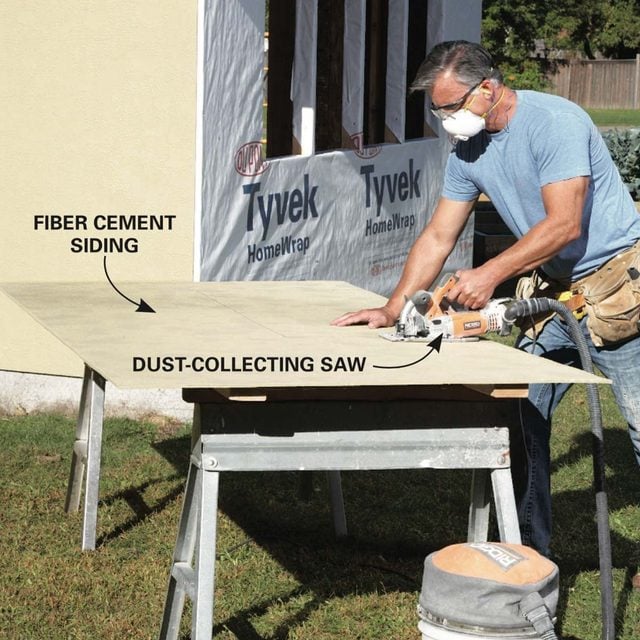
Cut and Hang the Siding
- Lay 2x4s over sawhorses to support the sheets while you cut.
- Pro tip: If you don’t have a special saw, use your regular circular saw with a carbide blade. Fiber cement is tough on blades, so don’t waste money on an expensive blade.
- Nail the siding to the studs.
Finish the Exterior Siding and Trim
We used James Hardie 5/16-in. stucco-look fiber-cement panels for the siding. (For installation guidelines, go to jameshardie.com and click on the “HardieZone for Homeowners”.)
How to Build a Shed With a Front Porch
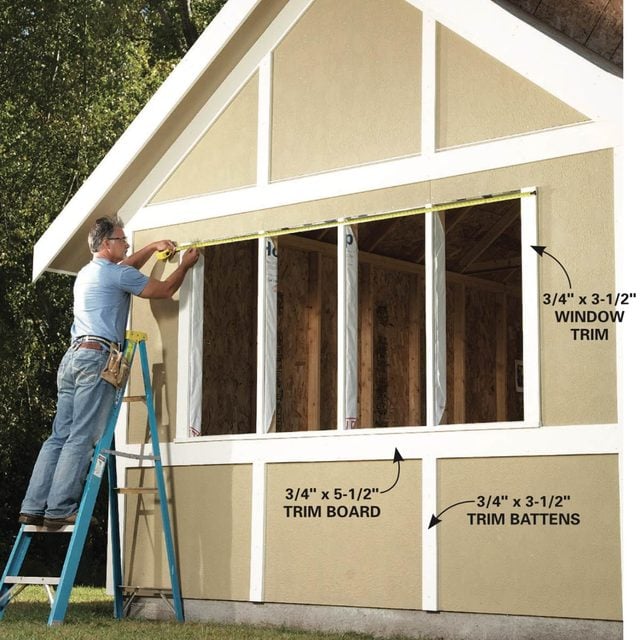
Trim with PVC Boards
- Cut and nail the PVC trim just like wood.
- Pro tip: Use a sharp carbide blade on a miter saw to cut it, and stainless steel or hot-dipped galvanized nails to fasten the trim to the framing.
- Battens cover all the siding seams.
- Butt horizontal 1x6s tight to the soffit boards on the underside of the overhang and wrap them around the corner to extend across the end walls.
- Wrap the corners with 1x6s butted to this horizontal band.
- Make the windowsills by ripping 10-degree bevels on lengths of 1-in. x 3-1/2-in. PVC.
- Pro tip: When you install the notched sill, put shims under the inside edge to tilt the sill at a 10-degree angle so the bevel cuts on the front and back are vertical.
- Install the horizontal board under the windows after the sill is in place.
- Finish installing all the horizontal boards, and the trim boards that run along the roof angle on the end walls.
- Cut and install the 1×4 battens to cover the seams in the siding.
Screw in the Aluminum Windows
- Apply a small bead of caulk to the stops and press the window against them.
- Slide the expanders tight to the opening and screw through them into the stops.
- Nail 1×2 stops to the studs on the sides and top of the window openings.
- Note: We set the stops 1 in. behind the back of the trim and mounted the side windows by screwing through the U-shaped expander into the stops. The fixed windows in the dormer didn’t have the expander channel, so here we set the stops even with the back of the trim and attached the windows by screwing through the thin flange into the stops. If you install another type of window, your stops may be in a different location. To order windows like ours, call Allied Aluminum Windows (763-571-3200). See the Materials List online for window ordering details.

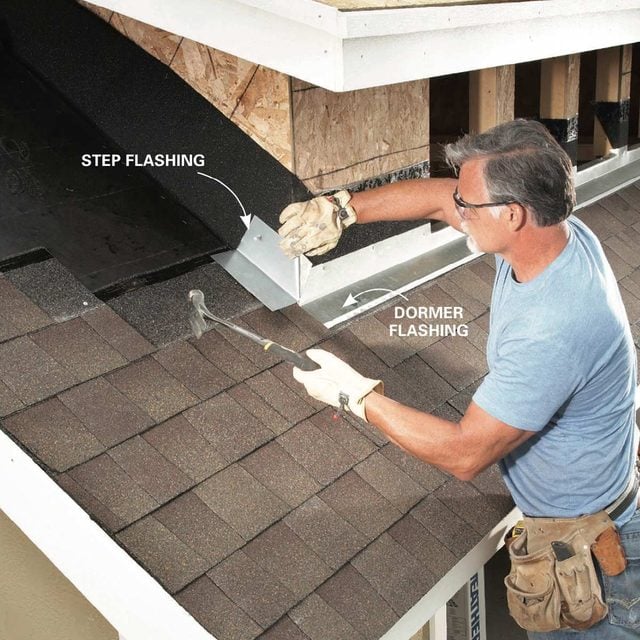
Roof Before Siding the Dormer
- Shingle the roof of the main structure before you side the dormer.
- Note: This allows the siding to go over the top of the metal flashings.
- Pro tip: On the gable ends, remember to install a metal Z-flashing at the horizontal joint between panels.
- Install the siding on the dormer after you’ve installed the dormer flashing, step flashing and shingles.
2010 Shed
Build the Doors
- Build the doors from PVC boards and fiber cement panels.
- Weld the overlapping PVC frame pieces with special PVC cement.
- Use screws to clamp the PVC and to provide extra reinforcement.
- Note: The sliding doors consist of two layers of 3/4-in.-thick PVC boards that overlap at the corners for strength.
- Use special Azek brand PVC cement and screws to join the parts.
- Fill the openings in the frame with 5/16-in. smooth fiber cement panels held in by 1/2 x 1/2-in. stops.
Dream Shed Made Easy

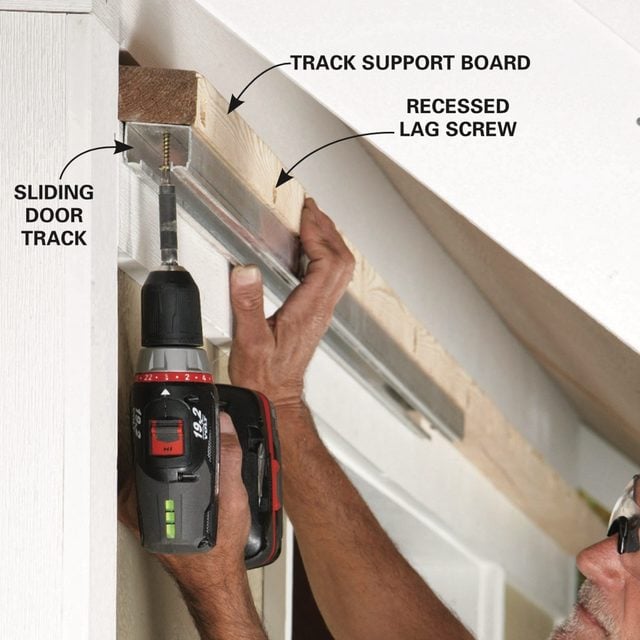
Mount the Door Track
-
- Pro tip: Use heavy-duty bypass door track and wheels to mount the doors. It rolls easily and is adjustable so you can line the doors up with each other.
- Mount the sliding doors to the shed with Johnson bypass door hardware.
- Attach the 2 x 1-1/2-in. track support to the wall with 4-in. lag screws driven into solid framing every 2 ft.
- Recess the lag screw heads so you can cover the support board with trim later.
- Screw the aluminum tracks to the support board.
- Hang the doors on the track and adjust the hangers until the doors are even with each other and hanging squarely in the opening.
- Pro tip: To prevent the doors from sliding off the end or going past the middle, screw wooden stops into the channel on each end and in the center. The center stop is also necessary to secure the doors when a lock is installed. To keep the bottom of the doors from swinging out, screw a section of 1-1/4-in. angle iron to the full length of each door bottom.
- Position a screw and washers on each side of the doors to capture the angle iron.
- Finish the installation by covering the track and mounting board with a 1×4 trim board.
Finish It Up
- Shingle the dormer and cover the ridge with ridge shingles.
- Note: For information on how to install shingles, go to familyhandyman.com and search for “roofing.”
- Paint the siding and trim.
- Pro tip: If you used solid PVC trim and want to paint it, make sure to use 100 percent acrylic exterior paint.
- To secure the sliding doors, mount a gate latch that accepts a padlock.
Materials List and Shed Construction Drawings for the 2011 Garden Shed are available for download above.