Search Results for: tiling


How to Reinforce Flat-Pack Furniture
At some point in our lives, we have all purchased ready-to-assemble (RTA) or “flat-pack” furniture. You know, the Ikea furniture, or other big box furniture that requires assembly and is commonly made of laminated particle board.
What Is Flat-Pack Furniture?
Flat-pack products are sold in separate parts and flat-packed in cardboard boxes (hence the term “flat-pack”) for ease of shipping and to take up less space in retail stores. This combination of factors reduces the price and makes the flat pack furniture more appealing. Unfortunately, not all flat-pack furniture is created equal.
Why Reinforce Flat-Pack Furniture?
The whole secret to furniture being strong and solid is in the joints or any connection where pieces come together. The main reason flat-pack furniture fails is that it is mostly made of particleboard, which is not as strong as solid wood.There is no glue or adhesive incorporated into the assembly process, which then guarantees it will fall apart easily.
You can reinforce flat-pack furniture and make it stronger in a number of simple ways. The question is when should you do it?Before the furniture is put together or after it is already assembled? Both can be done with slightly different approaches that will lead to stronger flat-pack furniture – that will last!
Where you reinforce flat-pack furniture and what you choose to reinforce it with is strictly a judgment call. There can be different ways to reinforce the same piece. The important part is to know your options and then incorporate the reinforcement in a way that doesn’t ruin the look and style of your piece of furniture.
By incorporating any or all of these tips to strengthen the connections/joints, you will ensure your furniture lasts as long as you wish.
Tips
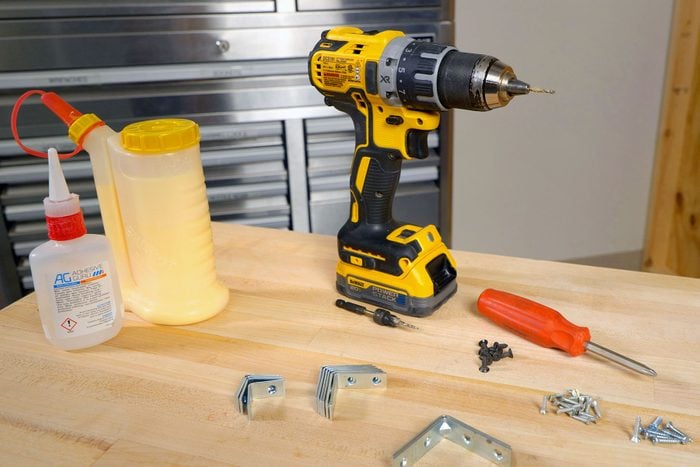
- Use construction adhesive, CA, or polyurethane glue when joining a painted or laminated and finished surface.
- Use wood glue to join raw wood surfaces.
- Use screws with matching finish washers for exposed screws.
- To stabilize the whole unit, remove the back panel and reattach using glue in addition to the nails.
- Bar clamps will make the process easier by securely holding things in place while the glue dries.
- To prevent splitting, be sure to pre-drill for any screws or dowels you are going to add.

How to Make a DIY Indoor Herb Garden
Want to combine your love of cooking, houseplants, and woodworking? Look no further than this simplest sleek indoor herb garden project. It’s a project that combines two things I love: indoor plants and cooking. There truly is nothing better than creating fresh flavors in the kitchen with fresh herbs cut just as you are about to make a dish.
Whenever I start to conceive any design, I always consider both form and function. Specific to the vision of my herb garden, I knew I needed a small footprint, which meant going vertical. Secondly, I wanted the ability to adjust the height of the pots as my plants grow or I change them out.
As I continued the process of creating my indoor herb garden, I knew wood was the first obvious choice for my frame. I chose to use threaded rods along with washers and nuts to support the weight of the potted herbs and make it so I could adjust the height of the pots.
Below is the exact layout of my design and the step-by-step process I used to build it. As a bonus, I’ll share how to make an organic stain to give your herb garden a worn, weathered, old-world look. Here’s to woodworking, cooking, and plants!
Cutting List
| KEY | QTY. | PART | DIMENSIONS |
| A | 1 | Base | 1-1/2” x 11-1/4” x 26” |
| B | 2 | Sides | 3/4” x 5-1/2” x 48″ |
| C | 1 | Top cap | 1-1/2” x 7-1/4” x 22-1/2” |
| D | 2 | Front/back top face | 3/4” x 3-1/2” x 28″ |
| E | 4 | Pot supports | 1-1/2” x 7-1/4” x 10” |