


From dull and dated to modern masterpiece in one weekend.
Multiple Days
Intermediate
Introduction
A fireplace is THE focal point of the room it’s in. The typical update is to paint it. Though that’s an easy improvement, I wanted something bolder and more modern, something that would transform the look and feel of the room. I decided to cover the old brick with oversize tiles. I also removed the hearth for a more streamlined look. I’d never done a project quite like this, but it all came together without major snags. And the results are even better than I’d imagined.Tools Required
- 3-lb. maul
- 3/4-in. round-notch trowel
- 5-gallon buckets
- Angle grinder
- Brick set chisel
- Chalk line
- Drill
- Margin trowel
- oscillating multitool
- rail tile saw (rental)
Materials Required
- 1/2" cement board
- 2 x 4 x 8 ft. board
- Cement board screws
- Duct tape
- Hardboard
- Metal edging
- Modified thin-set
- Painter's tape
- Porcelain tile
- Rosin paper
70 Years of Fireplace Projects

Family Handyman’s first cover story was “How to Repair a Brick Fireplace,” and we’ve been serving up fireplace projects ever since. We showed how to cover brick with tile way back in 1953. Since then, better tools and materials have made it much easier for DIYers to tackle a project like this. Tile manufacturing has improved too, with more choices available, like the large tiles we used for our modern fireplace makeover.
A Few Things We Learned
- Large tile carries an extra cost
- I chose Sofia Charcoal porcelain tile for its texture and consistent color, which made the seams almost disappear. The fireplace was about 60 sq. ft., but with large tile there’s a lot of waste. So I had to buy 90 sq. ft. at $9.20 per sq. ft., or just over $60 a tile.
- Tile costs vary a lot
- The total materials bill for my project was about $1,200. Tile was by far the biggest cost ($900), but you can find good-looking tile for less than half that price.
- Rent a tile saw
- For the 31-in. x 31-in. tiles I chose, I had to rent a large-capacity saw ($75 per day).
- Dive into something new
- In removing the hearth, I wasn’t exactly sure what I was getting into. I’m usually not a fan of exploratory demolition, but one of the best ways to learn how to build something is to first take it apart.
- Choose reinforced thin-set
- I used a modified thin-set ($60 per bag) that’s reinforced with fiber. It allowed the tile to stay put on the wall without sagging and provided an extended working time, so I didn’t have to rush.
- Wide-notch trowel
- Larger tile tends to be slightly cupped. To make sure the tile adhered well, I had to fill it with thin-set to compensate. I used a 3/4-in. round-notch trowel to be sure there was enough thin-set to adhere the tile.
- Mind the edges
- I opted to install the tiles tight together instead of leaving gaps for grout. To get these tiles to match up perfectly, I placed the factory edges of the tiles together and kept the cut edges on the outside.
- Beware of painted brick
- If you tile over a painted fireplace, you’ll be rolling the dice. If the paint peels, so will the tile. The safe approach is to remove most of the paint before tiling.
Project step-by-step (13)
Step 1
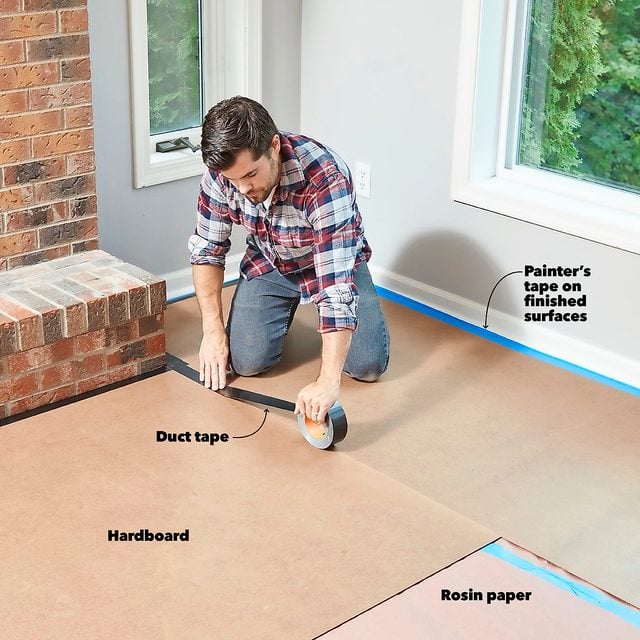
Protect Your Floor
This project calls for the ultimate floor protection.
- Start with a layer of rosin paper taped at the seams and edges.
- Then cut sheets of hardboard to fit around the fireplace and join them with duct tape.
- Pro tip: The rosin paper keeps granules that might get under the hardboard from scratching the wood floor, and the hardboard protects against dents.
Step 2
Chip Out the Corbels
- After removing the mantel (ours wasn’t even fastened), chip out the corbels with a maul and a brick set chisel.
- Note: These bricks were embedded, but I lightly chipped all the way around them and eventually they sheared right off.

Step 3
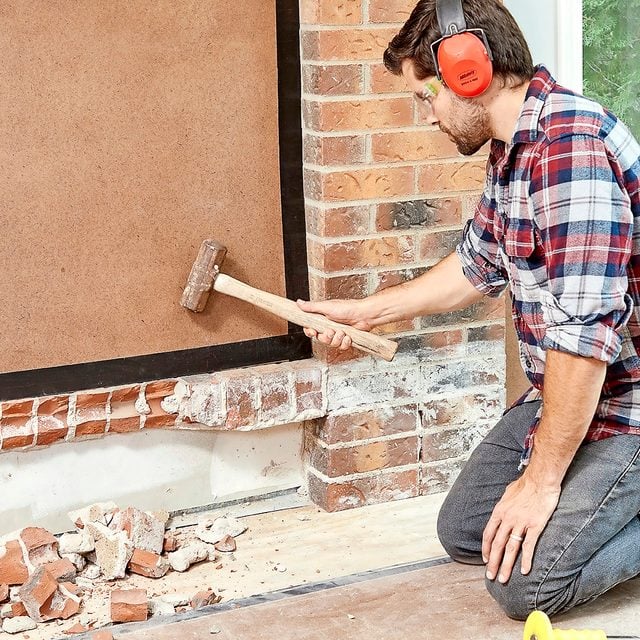
Bust Up the Hearth
- With a brick set chisel and a maul, start chipping away at the corner of the hearth.
- After peeling away the first layer, I thought the hearth was solid brick. But as I kept chipping, I found packed sand, broken bricks and even an old soda can holding up the rest of the bricks.

Step 4
Change of Plans!
Most DIY projects include some surprises and require on-the-spot problem solving. In this case, I had intended to leave the brick ledge underneath the firebox. But as I finished cleaning up the area, I noticed nothing was holding these bricks up. I decided to knock them down and rebuild the ledge.
Step 5
Fill the Empty Hearth Space
- To fill the void left by removing the hearth, I built up the ledge in front of the fireplace.
- I set the 2×4 ledge 1/2-in. inside the opening, screwed it to the floor and anchored it into the brick at the sides.
- Then I covered this space with 1/2-in. cement backer board.

Step 6
Cut the Tile
There are a few things to know about using a tile saw.
- Keep the blade cool with water and cut slow, especially through the last inch of tile.
- Pro tip: For notches, start with the tile saw and use an angle grinder or tile nippers to finish the cut.

Step 7
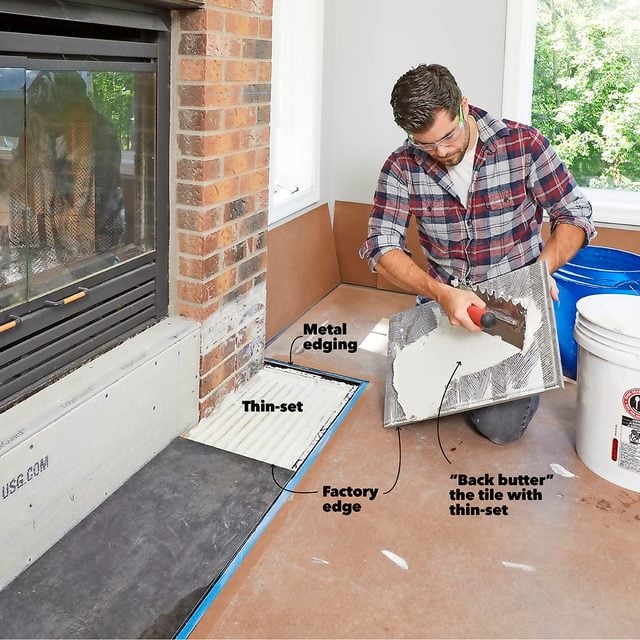
Tile the Floor First
- Cut metal tile edging to fit around the perimeter of the floor tile.
- Apply thin-set to the floor with a 3/4-in. round-notch trowel and press the metal edging into the thin-set.
- Starting with a full-width tile, spread a layer of thin-set on the back of it (called “back buttering”).
- Make sure the tile is centered and set it onto the floor. After the center tile is in place, cut and set the end tiles.
Here’s our list of the best fireplace tile ideas to help revamp your fireplace.
Step 8
Cut the Trim
- Instead of cutting the tile to fit the profile of the trim, cut the trim back and slip the tile against the wall. It’s much easier!
- To cut the trim, use a piece of tile and a piece of hardboard as spacers and a guide for your multitool.

Step 9
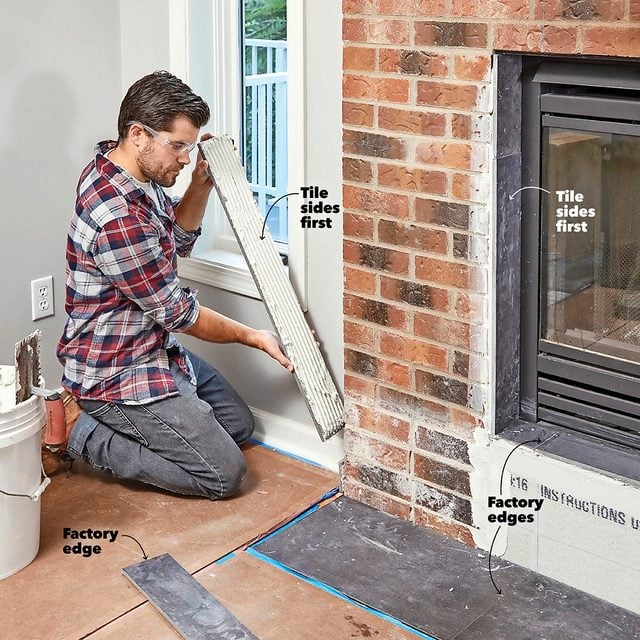
Then Start on the Sides
- Tile the sides first so the tile edges will be covered by the tiles on the face of the fireplace.
- Pro tip: Throughout this project, plan your cuts so that factory edges will meet other tiles and cut edges won’t.
- For the sides, that means the factory edges will be the top and bottom and the cut edges will go against the wall and flush to the face of the brick.
- Pro tip: Throughout this project, plan your cuts so that factory edges will meet other tiles and cut edges won’t.
Step 10
Embed the Edging
- Install edging over the sides of the fireplace and surrounding the firebox.
- Cover the edge of the tiles with metal edging.
- Spread thin-set near the corner and press the edging into the thin-set.
- Use a margin trowel to embed the edging and smooth the thin-set.

Step 11
Begin in the Middle
- I started with the middle tiles to make sure they were perfectly centered, level and plumb.
- After setting the lower tiles, I placed 2x2s within the fireplace box to prevent the next rows of tile from sliding downward.
- I finished tiling to the top and kept the supports in while the thin-set cured.

Step 12
Make Precise Marks
Cutting the tile around the fireplace is tricky. If the tiles don’t line up, you’ll notice, so precise cuts are important.
- Cut a tile to the proper width and dry-fit it into place.
- Mark precisely where it will meet the edges of the adjacent tiles and cut the notch away.

Step 13
Place the Rest of the Tiles
- Once the sides and center column of tiles are attached, the last few pieces go in pretty quickly.
- Wipe away any thin-set residue with a sponge and a 50/50 mix of vinegar and water.
- You’ll be able to remove the supports and use the fireplace after 48 hours.

Originally Published: October 29, 2020