


Get the most from your circular saw.

How To Use a Circular Saw: A Complete Guide

Updated Jun. 22, 2024
One of the most reached-for tools in my garage, the circular saw is an essential tool for DIYers of all skill levels.
The “circ” saw is über-versatile. If you need any kind of straight cut, a circular saw can do it. But there are some tricks for using one. Follow along to learn circular saw skills and to find out what type of saw you need in your shop.
On This Page
Circular Saw Safety
Always wear hearing and eye protection when using any power saw, and keep loose-fitting sleeves, long hair and hoodie drawstrings tucked away. When making a cut, keep your hands in front of and away from the saw — never behind it.
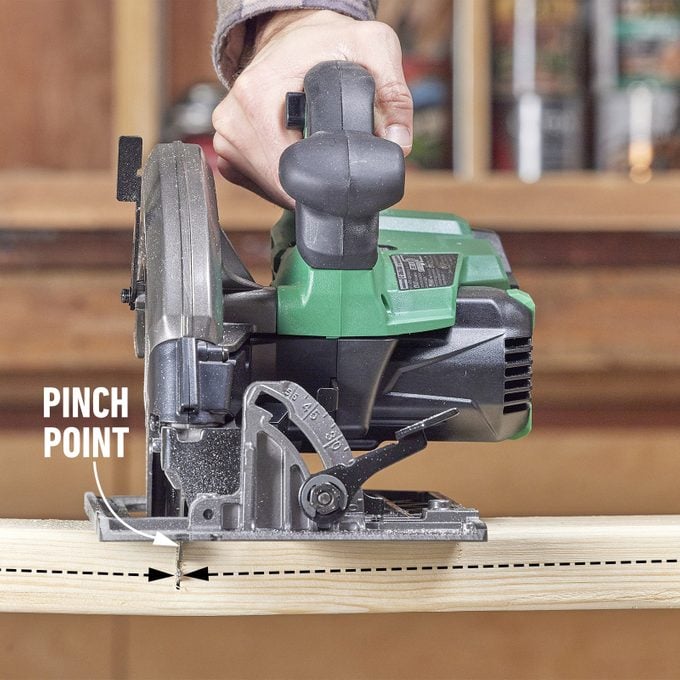
Don’t bind the blade
When a circular saw blade pinches or twists while making a cut, the blade can kick back toward you with force. This is usually avoidable.
Don’t rush, keep your saw cuts straight, and position the cutoff side of your workpiece to fall away from the blade. Never cut between supported ends, like the middle of two sawhorses, where the cut will fall into the saw blade.
Adjust blade depth
When a lot of the saw blade extends beneath your material, you increase the possibility of cutting something you don’t intend to cut. Set your blade depth so just a bit more than the teeth protrudes through the material.
Using a Circular Saw for All Kinds of Cuts
Whether you’re cutting 2x4s to length, breaking down plywood sheets into a manageable size, creating joinery or making angled and beveled cuts, reach for a do-it-all circ saw. Here are some terms to know:
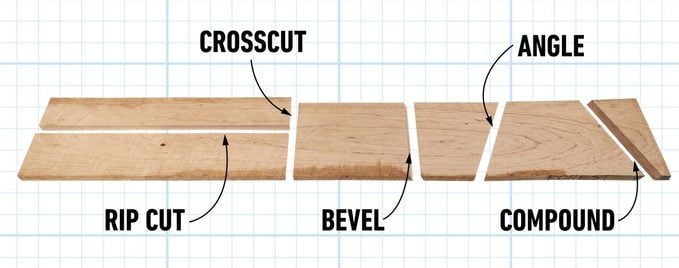
- Angle: Changing the angle of the saw relative to the material you are cutting.
- Rip cut: Sawing with the grain of solid lumber.
- Bevel: Changing the angle of the blade relative to the saw’s shoe.
- Crosscut: Sawing across the grain of solid lumber.
- Compound: Sawing at an angle with the blade set at a bevel.
Your circular saw can cut far more than just 2x4s and plywood. Specialty blades are available to help you cut other materials, such as:
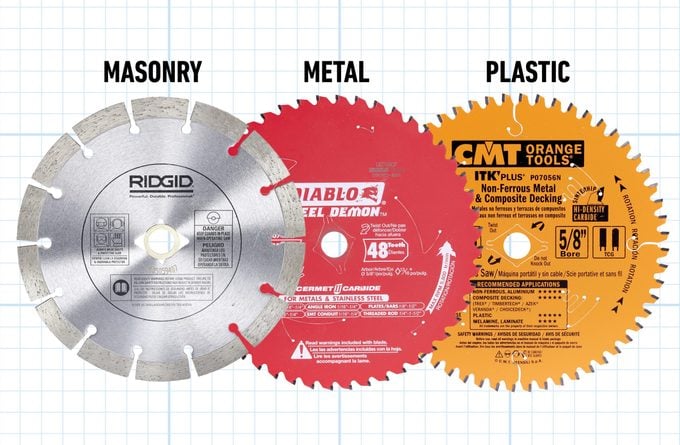
- Plastic: I learned to cut vinyl siding by flipping the blade to spin backward. This is a bad idea. Instead, use a blade for cutting composite material. They’re configured to cut — not melt — plastic and other composite materials, as well as aluminum.
- Masonry: Repair a driveway crack or cut landscape blocks and pavers with a diamond blade in your circular saw. These blades are common for tile saws or angle grinders, but also come in sizes to fit your circular saw.
- Metal: Install a steel-cutting blade to cut cleanly through tough metal. Check that your circular saw does not exceed the blade’s revolutions per minute (rpm) rating. The heat-tolerant Cermet blade by Diablo cuts up to 3/8-in.-thick steel, without heating up the material or leaving sharp burrs.
Types of Saws
A specific circular saw exists for whatever work you do most often. If you only cut 2x4s, you don’t need a bigger saw. If you need to cut flooring easily, there’s a saw for that. Getting the right saw for the job makes your work easier. Here are the types of saws and what they cut best.
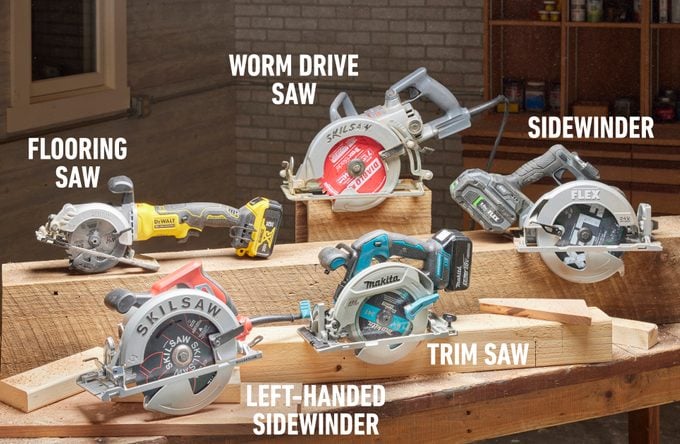
Traditional/ Sidewinder
Everybody knows this one. The motor is mounted on the left and spins a 7-1/4-in. blade on the right. Tried and true, this saw can handle most of the jobs on your weekend projects list. It’s also available in a left-handed version with the motor and blade reversed.
Worm Drive
Most circular saws are direct drive, meaning the saw blade connects directly to the motor’s spindle. A worm-drive saw has the blade in front of the motor. Gears perpendicular to the motor spin the blade.
Some framing carpenters favor gear-driven saws. They’re narrower and heavier than traditional circular saws but are more powerful and track straight when you’re making long cuts. Two versions of this saw, worm drive and hypoid drive, use slightly different style gears; both need gear oil for maintenance.
Compact/Flooring Saw
Equipped with a much smaller 4-1/2-in. blade, this saw can still cut two-by material, but excels at flooring and sheet goods. The barrel handle design gives them a unique operating feel, and they demand different use habits for safety.
Trim Saw
A smaller version of a traditional circular saw, this has a 6-1/2-in. blade and typically comes in a blade-left orientation, although some use a blade-right setup. The smaller blade results in less cutting-depth capacity, but its light weight and easy handling make trim saws shine for out-of-shop tasks.
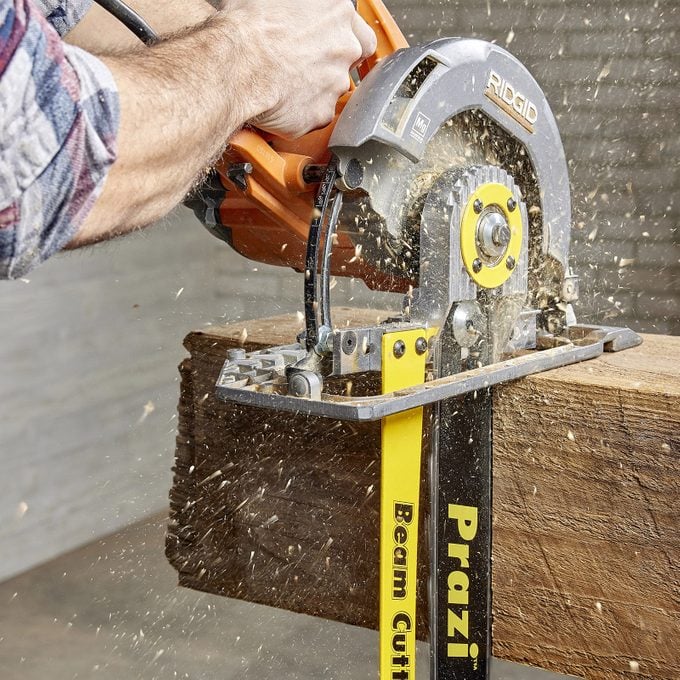
Beam Cutter
When you need to cut large timbers for landscaping or a thick slab for a project, check out a beam cutter such as the one pictured below. This attachment fits a variety of 7-1/4-in. sidewinder saws. Bolt one on and you’ll cut lumber up to 12 inches thick.
Circular Saw Features to Look For
Circular saws might all look similar, but they vary in significant ways. Cutting capacity is mostly a factor of blade size but can differ slightly among saws.
When choosing the best saw, look for the following features that improve safety, make the saw more versatile or stand up better to the rigors of the jobsite:
- Electric brake: Stops the blade as soon as you release trigger.
- Magnesium shoe: Magnesium is lighter and stronger than steel.
- No-catch blade guard: Some blade guards catch on the edge of your material, which is annoying and unsafe. A blade guard shaped to avoid snagging the edge of a board means you don’t have to lift it to make your cut. Keeping safety features in place is always a good thing.
- Positive bevel stops: This feature makes it easy to change the bevel angle from 90 degrees to 45, or other common angles, with speed and consistency.
Tips for Using a Circular Saw
Cut angles easier
Cutting angles can be tricky because the blade guard often catches on the material as the saw begins to cut, even with a no-catch blade guard. Before starting the cut, lift the blade guard lever with your opposite hand until the blade guard can rest on the material.
Cut plywood on a foam backer
Cut full-size sheets of plywood on top of a sheet of one-inch rigid foam. The foam won’t dull the blade and the cut-off parts won’t crash to the floor.

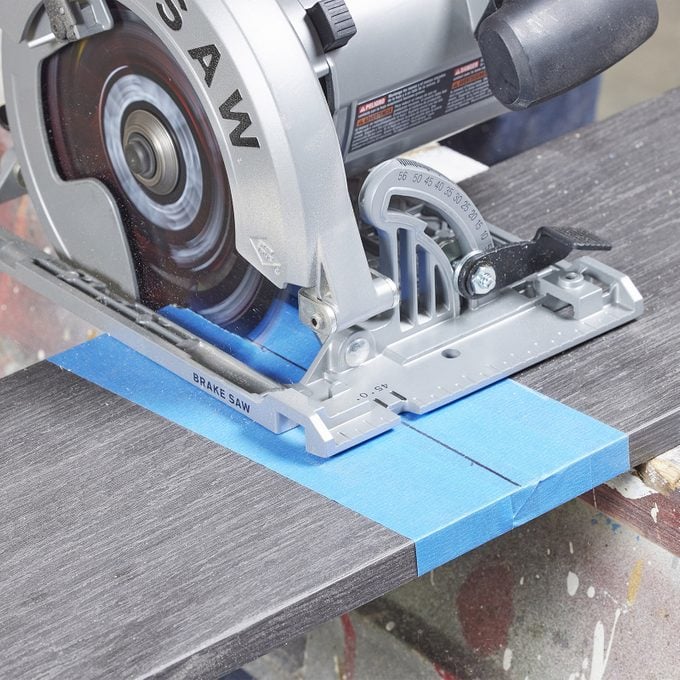
Prevent scratches and chip-out
Apply tape to the material you’re cutting. This accomplishes three things: It prevents the saw’s shoe from scuffing your wood, allows you to make an accurate and visible (dark) mark you won’t have to sand away, and helps prevent chip-out.
Use a speed square guide
To quickly make square cuts, use a Speed square as a saw guide. You’ll get a perfect cut, fast. Be sure to place your square and the bulk of the saw on the keeper side of the board and line up the blade so it cuts on the scrap side of the board. If necessary, adjust the blade depth to prevent the motor from hitting the square.
Make a notch
Mark the width and depth of your notch, then set the saw’s depth and make several cuts between your marks. Knock away what’s left with a screwdriver or chisel.
If the notch is less than 1-1/2-in. wide, use your circular saw to smooth out the bottom by slowly dragging the saw blade over the notch sideways. If both sides of the blade can’t support the shoe of the saw, smooth out the bottom with a chisel.
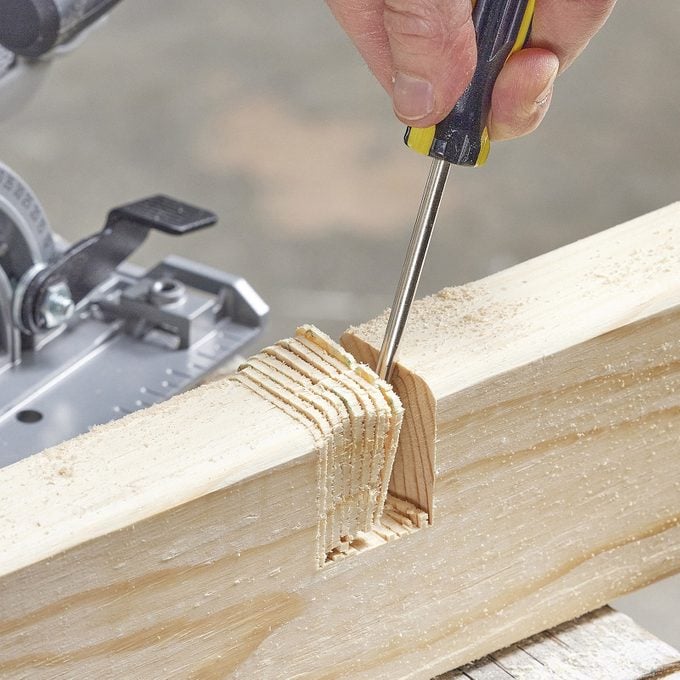
Pro tip: If you’re notching a narrow piece of lumber, clamp scrap lumber on both sides of the piece to give the shoe more solid footing

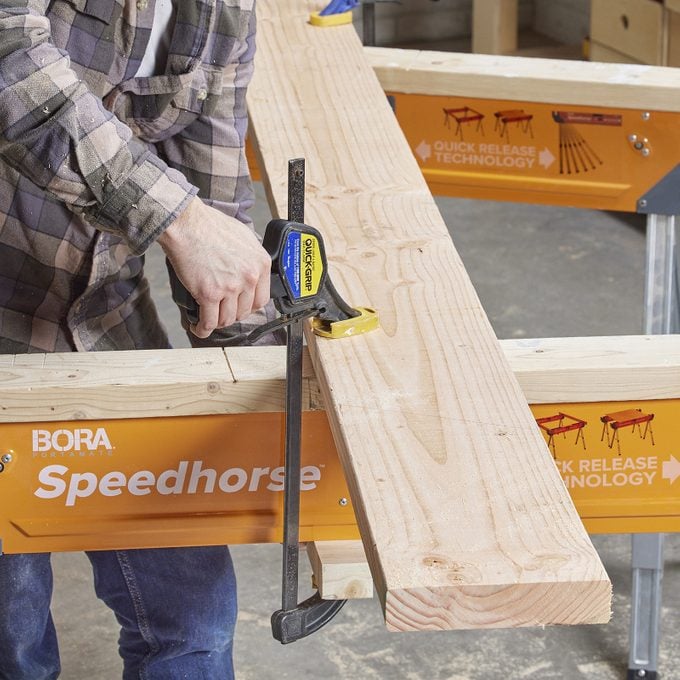
Secure material
Whether you’re ripping or crosscutting, if your material shifts, you risk a potentially dangerous kickback. Secure the material to a workbench or sawhorse with nails, screws or clamps.
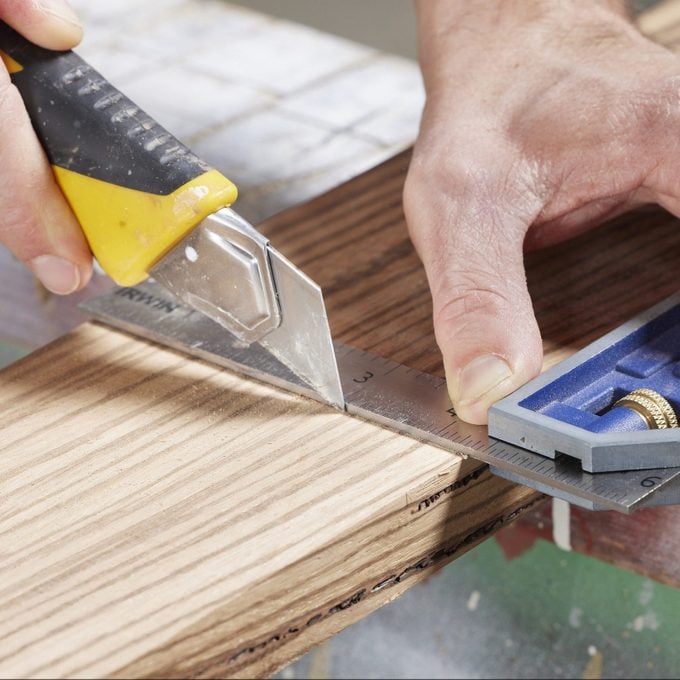
Score for a clean cut
A saw blade tends to lift the surface wood fibers as it cuts, giving you a fuzzy or splintered edge. Score your cutting line with a razor blade to cut the fibers on top and give you a clean edge.
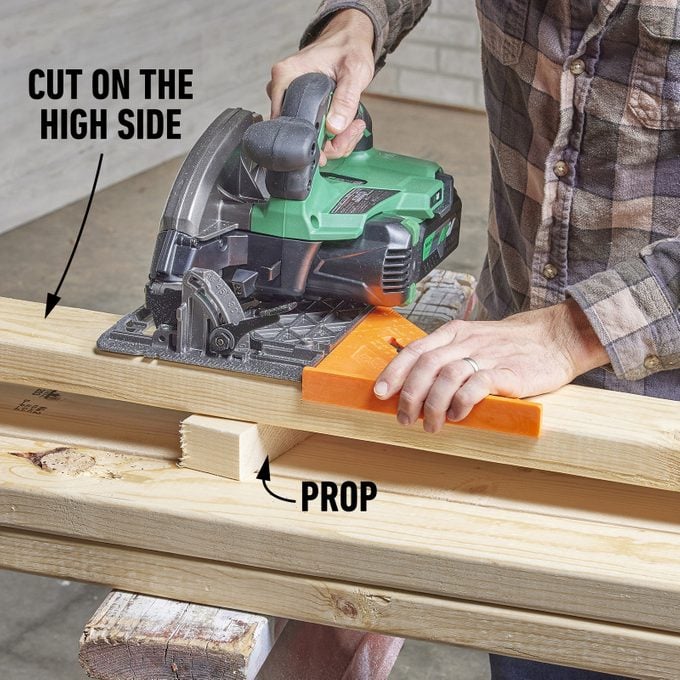
Prop the board
When making cuts on a pile of lumber or on a flat work surface, prop up the piece with a small scrap about two inches long. It prevents you from cutting into the work surface and allows the cutoff piece to fall away from the blade. Make your cut on the high side of the prop.
Trouble cutting straight? Check the shoe
If your saw isn’t cutting straight along a guide and leaving burn marks, check that the edge of the shoe is parallel to the blade. The shoe can bend and become crooked if your saw has been dropped or jostled too much. It might be time for a new saw or to find a replacement shoe online.
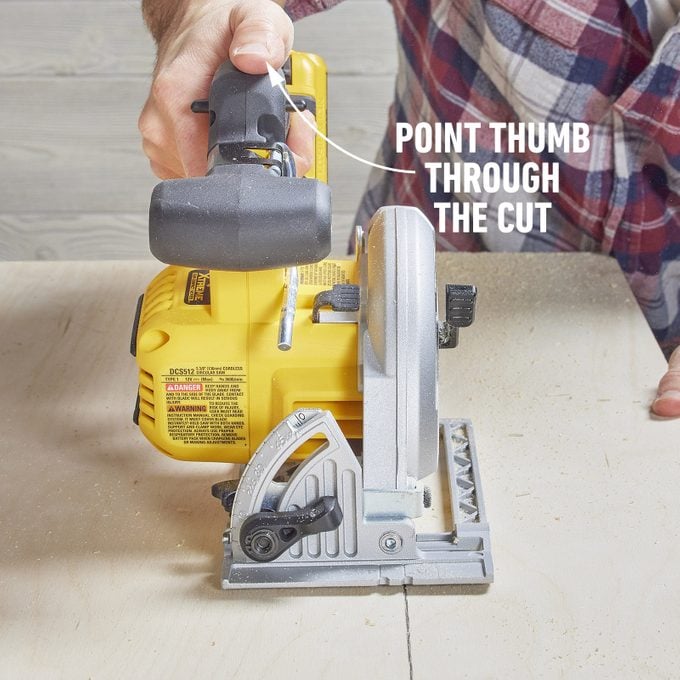
Make straight cuts using a circular saw
A veteran carpenter once suggested I unwrap my thumb from the saw handle and align my wrist and thumb with the direction I’m pushing the saw. When I changed my grip, I made much straighter cuts without a saw guide.
Pro tip: For straighter cuts when not using a guide, watch the blade cut along your line.
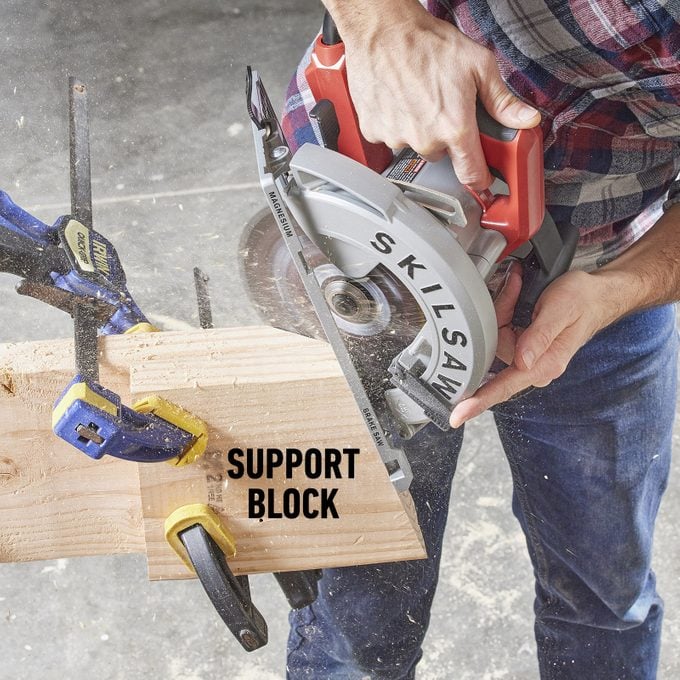
Make steep bevel cuts
Most circular saws will make bevel cuts up to 55 degrees. What if you need a steeper bevel? Subtract the bevel you’re after from 90 and set your saw at that bevel. Next, clamp or screw a block even with the end of the board to support the saw base while you cut. If the blade doesn’t complete the cut, finish it with a handsaw or reciprocating saw.
This trick works for compound cuts as well. Cut the angle first with the bevel at 90 degrees, and then use the off-cut to support the saw while you cut the steep bevel.
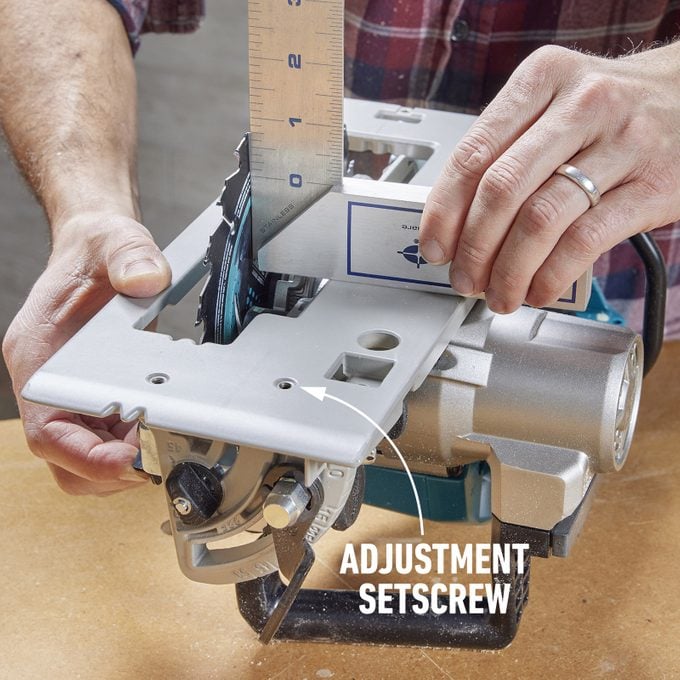
Check for 90 degrees
If the blade on your circular saw isn’t 90 degrees against its shoe, any bevel you adjust to will be inaccurate. Check the blade with a machinist’s square. If it’s not square, flip the saw upside down and adjust the setscrew on the bottom until it is square.
Once the saw is dialed in at 90 degrees, adjust it to 45 degrees and check the angle with a Speed or combination square. Be sure to unplug the saw or remove its battery when making the adjustments.
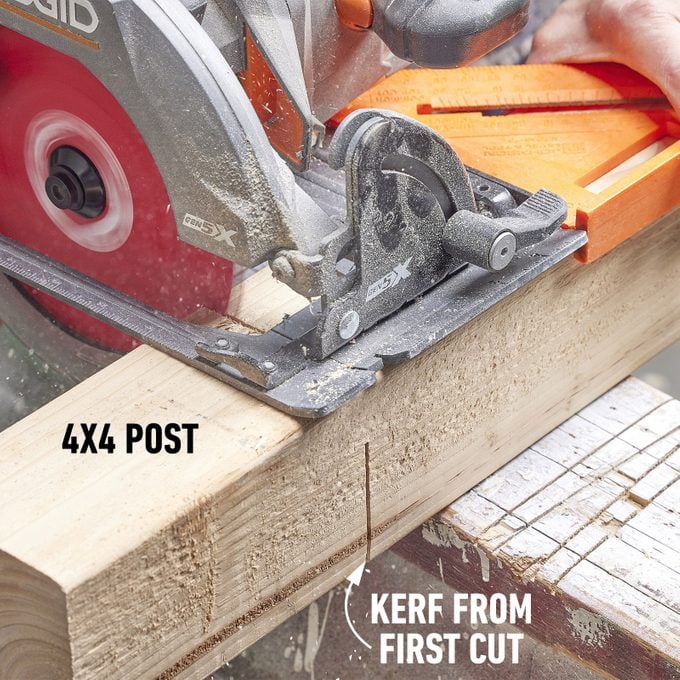
Cut and roll through posts
Even though the cutting capacity for traditional 7-1/4-in. circular saws is only about 2-1/2 in., you can easily cut through thicker posts.
Mark the cut and make the first full-depth cut on one side, then roll the material backward and use the saw kerf to line up the next cut. A third roll and cut will saw through a 4×4 post. If you’re working with larger lumber such as 6×6 posts, cut on all four sides and finish it off with a handsaw or reciprocating saw.
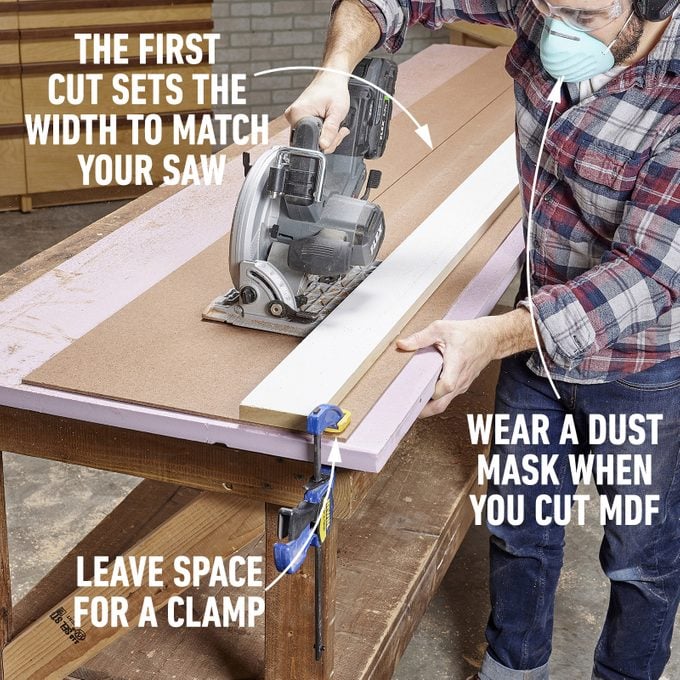
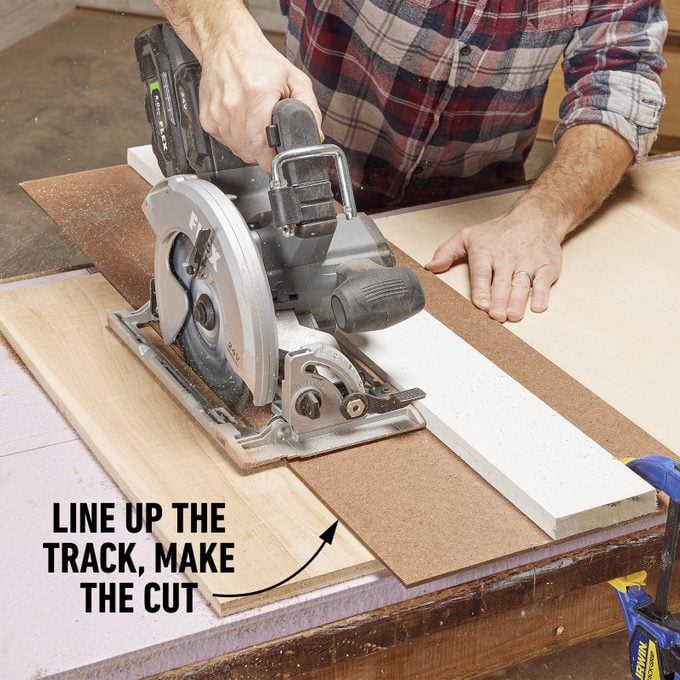
Upgrade with a DIY Track Guide
A simple and inexpensive track guide will let you cut straight, accurate lines with any circular saw. The track consists of a straight board fastened with glue and nails to a piece of 1/4-in. hardboard.
Use the board as a fence and run the saw along the track, cutting the hardboard to match your saw blade exactly. Then to make a cut, just line up the edge of the guide with your marks. Making one long and one short version of this guide will give you a rip guide and a crosscut guide.
Originally Published: February 24, 2022