
A Step-by-Step Guide on Struts Replacement
Updated: Jan. 02, 2024
Replace struts yourself and save $300
Introduction
If you've put 80,000 or more miles on your struts, they're worn out and must be replaced. We know they're expensive (about $700 for front struts replaced at a shop). But in the long run, driving on worn struts actually costs you more.Strut Replacement
Driving on worn struts actually costs you more because the unchecked bouncing destroys your tires and quickly wears out other expensive suspension components like ball joints, control arm bushings, stabilizer bar end links and tie rod ends. And worn struts are dangerous because they increase your stopping distance by almost 10 ft. from 60 mph and cause steering instability, especially on curves at higher speeds.
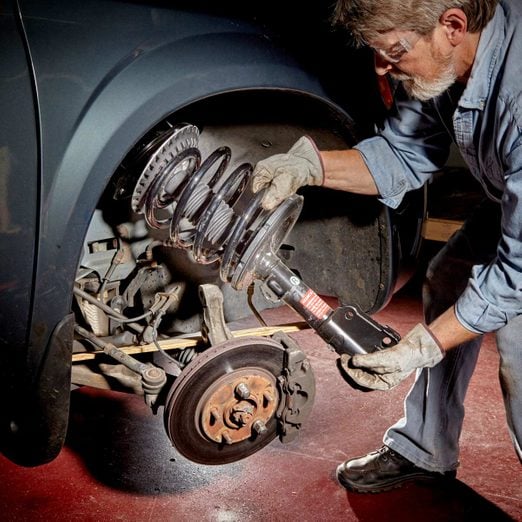
Replacing struts used to be a dangerous job for a DIYer. You had to compress the spring and remove the strut while praying the spring wouldn’t let go and take out an eye or a limb. Plus, removing the rusty nut at the top of the strut could turn into a nightmare if the internal hex stripped out. But these days you can buy a complete strut assembly that eliminates the strut/spring/mount disassembly process. These assemblies allow you to replace both of your front struts yourself in less than two hours. You’ll have to get an alignment done afterward, but you’ll still save hundreds by doing the job yourself. You’ll need rust penetrant, wrenches, a pin punch or large screwdriver, and a thin piece of plywood. You may need to buy a few large sockets and a breaker bar. Here are the steps.
Project step-by-step (10)
How to Tell If You Need New Struts

The old ‘bounce test’ for testing shock absorbers doesn’t apply to struts-a severely worn strut will pass that test with flying colors. Instead, you have to rely on physical inspection and a road test. Always replace struts in pairs, never one at a time. Replace your struts if you notice any of these issues:
- They’re leaking. A very light film of oil near the top of the strut is OK, but fluid leaking down the side of the strut means it’s shot.
- You notice bounce, sway or front-end dive during braking.
- It’s hard to keep your vehicle in its own lane on bumpy roads and curves.
- Your tires show evidence of ‘cupping’-shallow craters caused by tire bounce.
- The strut boot is damaged or the strut body is dented.
Complete Strut Assemblies are Just That, Complete
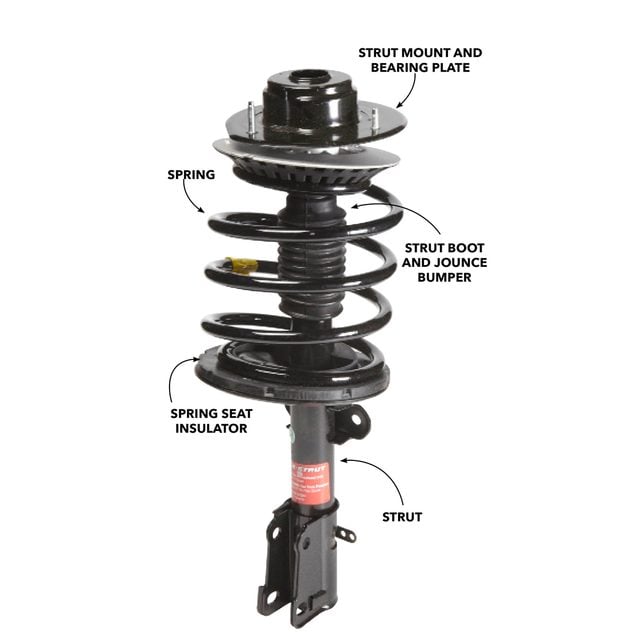
A strut assembly comes assembled and includes all new parts (where applicable): strut, spring, spring seat insulator, strut boot, jounce bumper, strut mount and bearing plate. Find complete strut assemblies (Quick-Strut by Monroe, Strut-Plus by KYB, and ReadyMount by Gabriel are three brands) at any auto parts store or online auto parts supplier. They’re available for most makes and models. Complete strut assemblies cost more than just the strut, but they’re a much better option because they allow you to do the job yourself and get all new parts. The new spring restores factory ride height and firmness, and the new strut mount and bearing provide smoother turning and quieter operation.
The strut-to-steering-knuckle nuts and bolts are fairly large, so you’ll need 18mm through 23mm 1/2-in.-drive deep sockets and a beefy 1/2-in.-drive breaker bar and ratchet. Some strut bolts are a single-use ‘torque-to-yield’ (TTY) style that can’t be reused. Ask the parts store clerk if yours are TTY. If so, buy new bolts and follow the proper shop manual torque procedure when installing the new struts.
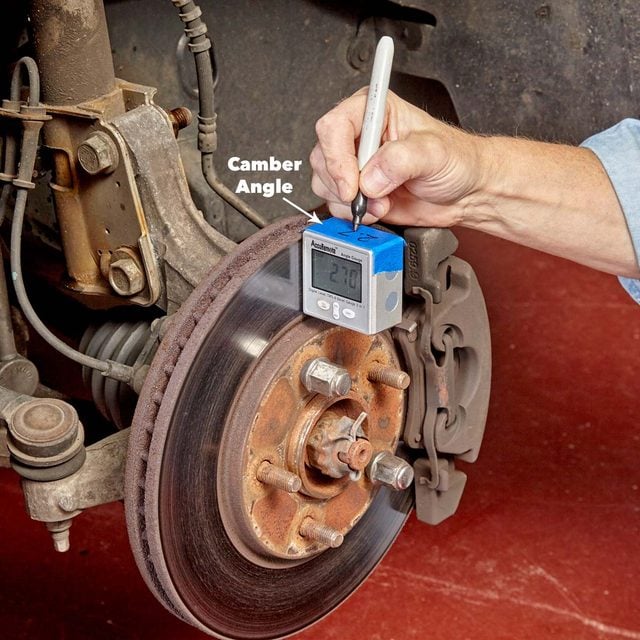
To get the strut and wheel aligned close enough to drive it to the shop for a professional alignment, you’ll need an angle gauge. Use a digital or mechanical angle gauge.
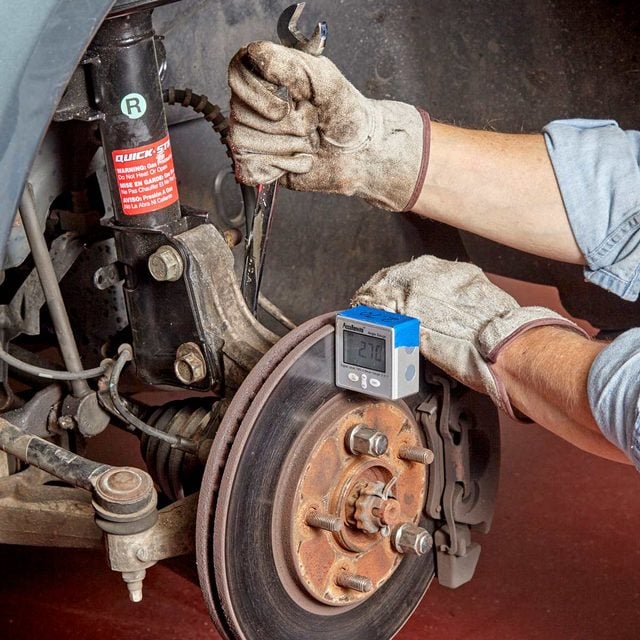
Measure the Camber Angle
You’ll have to disconnect a few components from the strut. Replace one side at a time and note the position and location of all nuts and bolts as you remove them. Use the other side as a reference.
Raise the vehicle and support it with jack stands. Start by soaking the strut flange nuts and bolts with rust penetrant. Then pop the hood and spray the strut-tower mounting nuts. Spin two lug nuts onto the studs and tighten to secure the rotor to the hub. While they’re soaking, mount the angle gauge to the top of the rotor and note the angle.
Disconnect the End Link
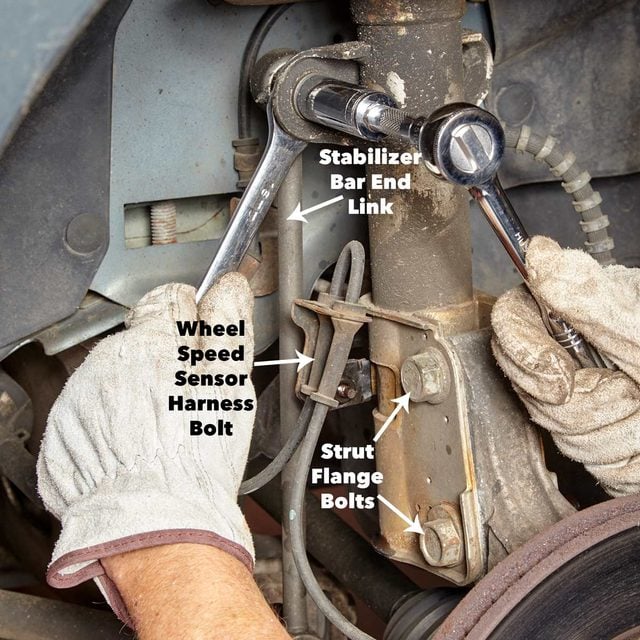
Next, disconnect the stabilizer bar end link and any brake lines that may be secured to the strut. Hold the stabilizer bar end link with a wrench. Then loosen the nut with a socket and ratchet. Push the end link out of the strut hole and move it to the side. Disconnect the wheel speed sensor wiring harness and put that aside.
Loosen and Remove the Nuts and Bolts
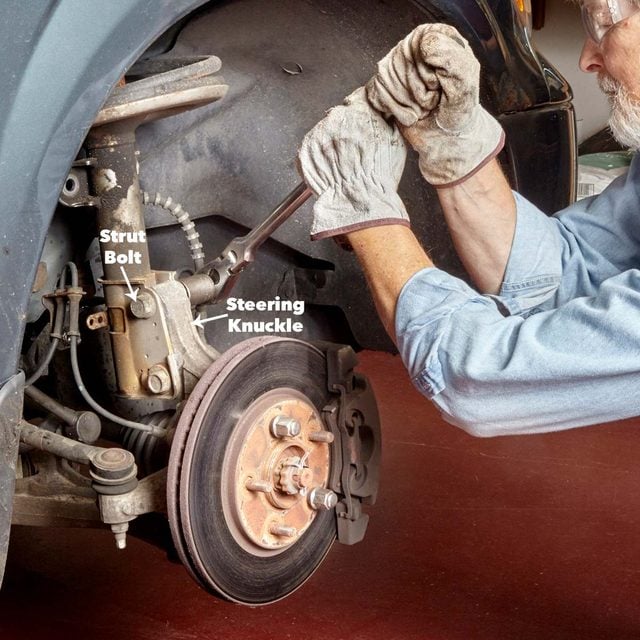
Lean in and put some muscle into loosening the strut nuts. Remove them and then loosen the bolts. Push the steering knuckle in and out to wiggle the bolts out of the holes.
Separate the Strut and Knuckle
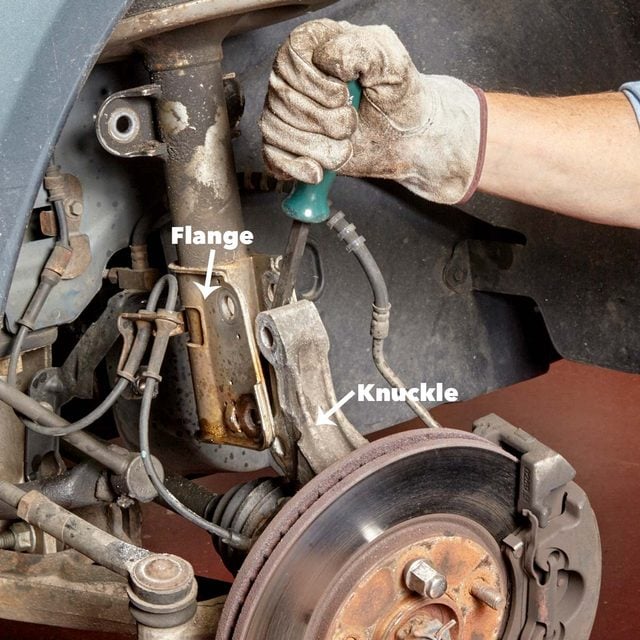
Jam a pry bar between the strut and the knuckle and pry the knuckle toward you until it pops out of the strut flange.
Remove the Strut Mount Nuts
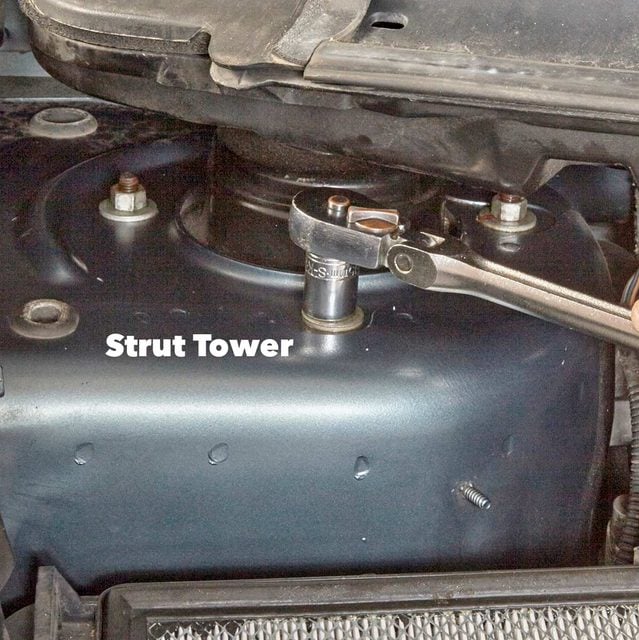
Place a thin piece of plywood under the strut flange to prevent it from damaging the CV boot once you disengage the top portion of the strut. Use a ratcheting wrench or socket/ratchet to loosen the strut mount nuts located on the strut tower. Loosen all of them and remove all but one.
Remove the Strut
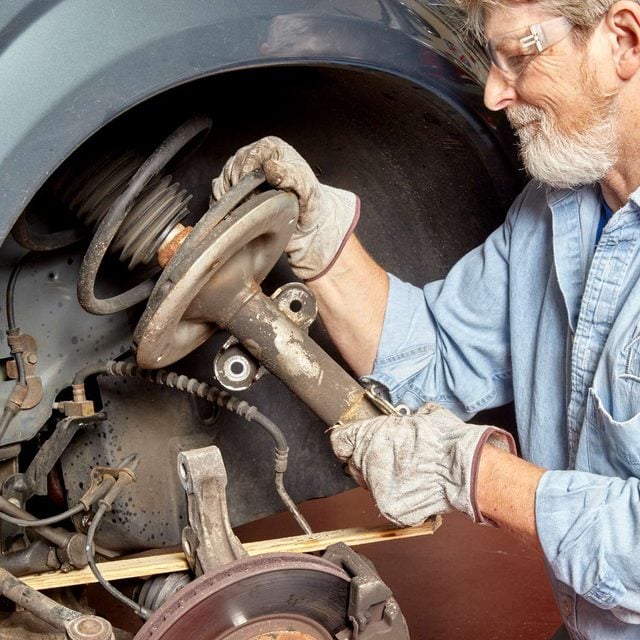
Then reach into the wheel well to support the strut while you remove the last nut. Grab the strut bottom and spring and tilt the bottom out toward you. Then lower the strut until it clears the strut tower and lift it out. Rest the strut on the plywood and remove the old strut
Install the New Strut and Reset the Angle
Installing the new strut is the reverse of the removal, but it’s very tricky and sometimes impossible to get it into place and hold it there while you get the nuts started. So enlist the help of a friend for the actual installation. Once it’s in place, torque the strut mount nuts to spec. Then push the steering knuckle into the strut flange and use a pin punch to align one hole so you can insert a bolt. Then remove the punch and insert the other bolt. Snug up the nuts, but don’t tighten fully.
Reattach your angle gauge and push the knuckle in or out to come as close as possible to the original camber angle. Torque the nuts to spec and recheck the camber angle. Adjust if necessary.
Reinstall the stabilizer bar end link and wheel speed sensor wiring harness or any other components you removed earlier.
Get it Professionally Aligned ASAP

The angle gauge method shown here is just to get you close to the alignment you had before replacing the struts. But it’s no substitute for a real alignment from a pro. Since incorrect camber can cause tire wear, get your vehicle into a shop for a full alignment. We mean the next day, not four months later.
We asked our ace mechanics for their best DIY fixes, tips and their most avoidable “oopsies.”