


These tips from a certified expert make childproofing drawers and cabinets a snap.

How To Babyproof Drawers and Cabinets

Updated Apr. 29, 2024
It might seem premature, but ideally you should start childproofing your home before the baby arrives. It’s shocking how fast those first few months go, and by six months — earlier for some — your baby can be rolling, scooting or crawling, which is enough to cause a little trouble. If you’re on top of things, great! If not, take heart that even pro childproofers sometimes get caught off guard by enterprising mobile ones: Peter Kerin, advanced certified childproofer through the International Association for Child Safety and owner of Foresight Childproofing, says his third child pulled out drawers and climbed up them like stairs, right next to the stove.
That all serves to underscore the importance of getting babyproofing in place, particularly when it comes to cabinets and drawers. (Kerin says most people babyproof drawer and cabinets from counter height on down.) The task can be intimidating, since your home has so many of them, and there are lots of drawer babyproofing options. Luckily, cabinets and drawers often require the same solution.
Up until now, you’ve arranged your home for your convenience. Time to make it safe for little ones.
On This Page
Step One: Remove Dangerous Items
Kerin says while many people think about pinching fingers in drawers or cabinets, that is near the least of his concerns, because that can usually be remedied with an ice pack, hug or reassurance.
Even if you plan to latch drawers and cabinets, don’t tempt fate by having potentially dangerous things in drawers and cabinets that babies and young children can reach. That way, if you forget to re-engage a latch, there’s nothing inside that drawer or cabinet that can really harm the child.
Examples of what should not be kept in lower drawers and cabinets :
- Medications and personal care items in bathroom cabinets or bedroom nightstands.
- Chemicals and cleaning products in a vanity or under-sink cabinet in the kitchen and laundry room.
- Kitchen tools. Kerin says that allowing a child to play with a wooden spoon seems fine until that tot spots their “toy” wooden spoon leaning on the side of a pot of boiling pasta.
- Important documents in a bottom drawer of a home office filing cabinet.
- Lipstick and other beauty products in a makeup vanity.
Step Two: Count and Measure
Knowing how many drawers and cabinets need securing, as well as their dimensions, helps inform your latch/lock choice.
Step Three: Choose Your Latches
There are three basic types of cabinet and drawer latches for babyproofing to choose from:
1. Exterior Latches
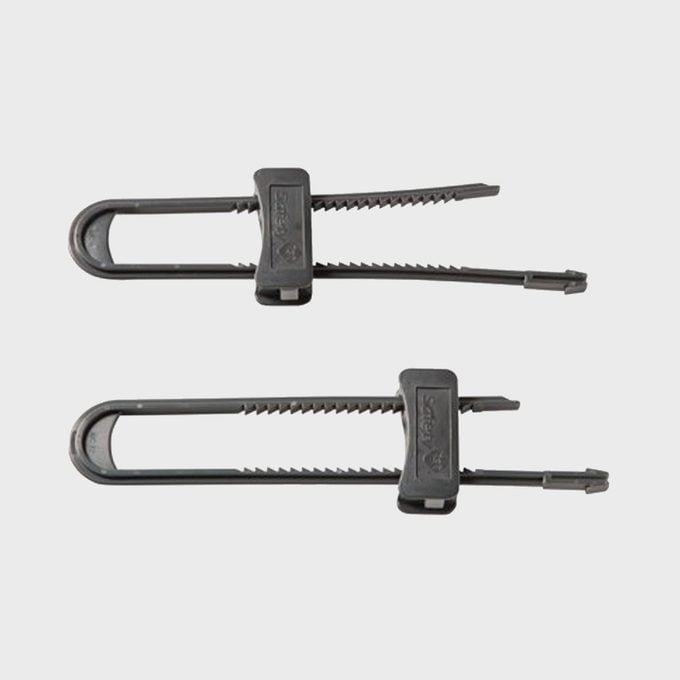
These latches (AKA belt or strap latches) usually attach to the side and front of the cabinet, holding the drawer or cabinet door closed. Another style of exterior latches are u-shaped or circular and snap closed. These can only be used on paired cabinet handles or knobs.
Exterior latches are a good choice for frameless cabinets because exterior latches don’t rely on the inner structure of the frame for mounting and use.
Exterior Latch Pros
- Inexpensive;
- Easy to use;
- Some offer no-tool install; others require a small screw that can be easily hidden when you remove the latch.
Exterior Latch Cons
- Every time you open and close the cabinet or drawer, you have to disengage and re-engage the latch. Kerin says he often sees these dangling open because they can be inconvenient.
- Some exterior latches only work if the cabinet has a pair of knobs or handles next to each other.
- They are always visible, which may infringe on your aesthetic. Plus, your kids will see them and may be curious.
- They tend to be the easiest for kids to circumvent.
Three standout exterior babyproofing latches
- North States Corner Drawer Locks: Unlike many others, these locks re-engage when you close drawer. They require no tools to install and are among Kerin’s go-tos for exterior latches.
- Qdos Adhesive Flexible Multilock: A versatile latch that protects kids from toilets and appliances in addition to cabinet doors and drawers. Plus, no-tool installation!
- Safety 1st Cabinet Slide Locks: “These are great locks. I’ve purchased them for all of our cabinets. We have no issues with them being flimsy or breaking. Our little toddler can’t figure out how to open them,” writes Amazon reviewer Amanda.
2. Traditional Tab Latches
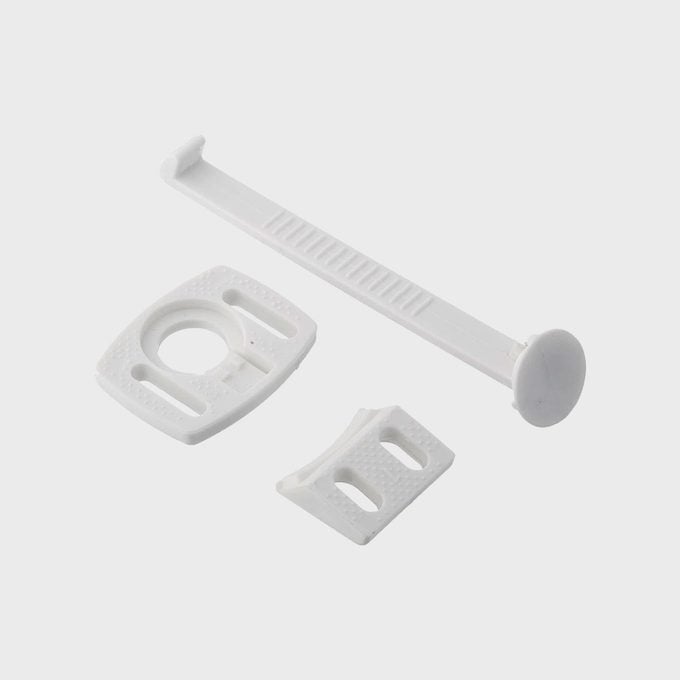
These latches are installed on the inside of the cabinet. They have a plastic arm that catches inside and stops the drawer or door from opening more than a couple of inches. The user has to push down the plastic arm to fully open. Some kids eventually find a way to open these latches, Kerin says, so monitor closely.
Tab Latch Pros
- Inexpensive;
- Easy to use;
- Hidden out of sight.
Tab Latch Cons
- If a kid can reach it, they can potentially open it;
- Plastic quality can vary, therefore so can the protection;
- Can be tricky to install.
Three standout babyproofing tab latches
- Kidco Swivel Cabinet and Door Locks: These include a swivel on the arm, so you can disengage the lock itself when appropriate, Kerin says.
- Qdos Tab Latch: Qdos offers tab latches for both upper and lower framed cabinets and drawers.
- Cardinal Gates Tab Latch: High-quality plastic makes these more trustworthy latches, according to Kerin.
3. Magnetic Cabinet Latches
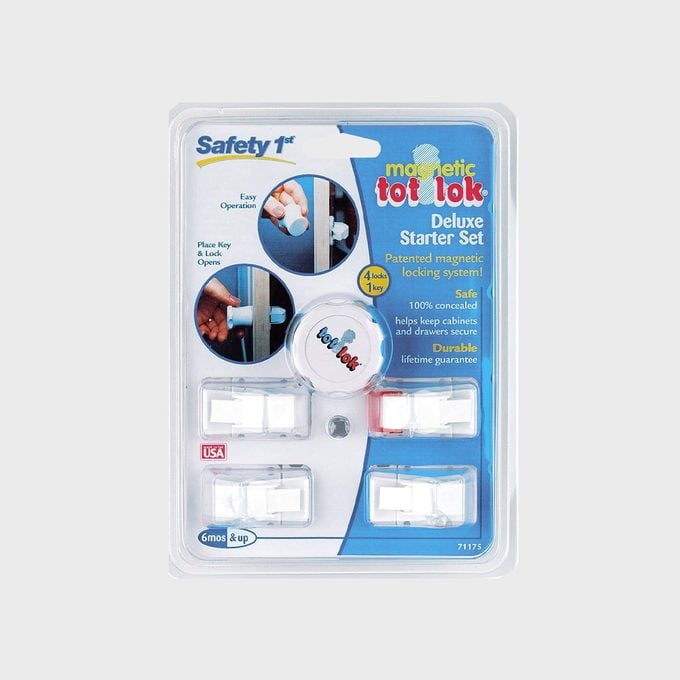
Magnetic latches are you safest option, and Kerin’s favorite.
Magnetic Cabinet Latch Pros
- Interior mount: Out of sight, out of mind;
- No access without a key and knowing how to use it, so very kid-proof;
- Most can be turned off by pushing a tab or sliding a retainer, so you don’t ever have to remove them after they’re no longer needed.
Magnetic Cabinet Latch Cons
- Requires hiding/keeping track of the key to open;
- You may want to buy extra keys for convenience and in case of loss.
Three Standout Magnetic Babyproofing Latches
- Safety 1st Magnetic Locking System: Amazon reviewer Southern Family writes, “This system is awesome! … I absolutely loved the fact that they were hidden from view and easy to manipulate with the tool to get them open. When we moved last year, we ordered another set because we swear by these things. Once the kids grow up, I doubt we’ll even remove — we may just keep them on.”
- KidCo Magnetic Lock: Kerin says he trusts all the KidCo products, so between the brand authority and the style of lock, this is one of his top picks.
- TotLok: Kerin says these are a bit more difficult to install, but are the Fort Knox of magnetic locks, which is also great for older children with special needs and stronger bodies.
Step Four: Gather Tools and Screws
Determine if your latches require tools for installation, and make sure you have everything you need before you start. Two insider tips:
- Kerin recommends using Spax #6 x 5/8 screws instead of the lesser-quality screws that may come with your latches.
- It can be difficult to get a drill into tight cabinet spaces, so Kerin suggests using a right-angle drill attachment to make installation simpler.
Step Five: Install Babyproofing Latches
Babyproofing latches and locks almost always come with complete, easy-to-follow installation instructions. For additional help, search your lock brand on YouTube for lots of helpful videos.
Step Six: Perform Final Safety Checks
Give all newly installed latches and locks a test run to make sure they operate properly. Even when they are, Kerin offers these two reminders:
- Nothing replaces adult supervision.
- Child development is ongoing. Check up on your latches and locks regularly to ensure they’re working as they should and that they are the right kind of child safety measures for your family.
One final note: No matter what your childproofing plan entails, never use something labeled a hack. “Hair ties and rubber bands are not safety devices,” Kerin says. “Your child is worth more than that.”
Originally Published: February 04, 2022