
How to Repair Damaged Wallpaper
Updated: Jun. 30, 2017How to make an invisible wallpaper patch
- Time
- Complexity
- Cost
- A full day
- Beginner
- Less than $20
Make an invisible patch in wallpaper
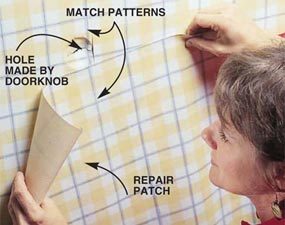
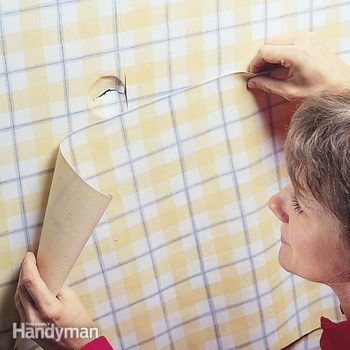
Photo 1: Match patterns with new paper
Cut an oversized swatch of leftover wallpaper and position it over the damaged area so it extends at least 6 in. in all directions beyond the damaged area. Match the patterns. This extra space allows adequate area for feathering out joint compound around the hole repair.
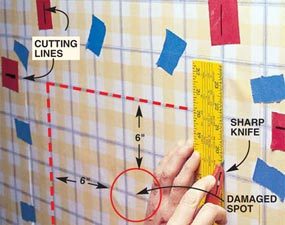
Photo 2: Cut the patch
Cut the new patch oversize. Then tape the new paper (blue tape) directly over the existing wallpaper so the wallpaper patterns match. To establish the cutting lines, place marked pieces of tape (red tape) on the wall to mark the horizontal and vertical cutting lines. Lay a metal straightedge between these lines. When you cut the new patch, you’ll also be cutting a hole exactly the same size out of the old wallpaper.
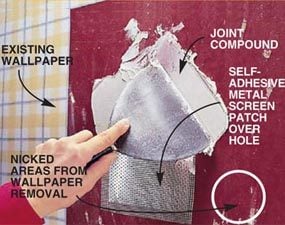
Photo 3: Repair the wall
Apply a selfsticking metal screen patch (about $4 at home centers) over the hole after removing the patch and old paper. Apply two coats of joint compound in thin layers, feathering it out at the edges and sanding the repair flat. Since the hole repair will be covered by wallpaper, it doesn’t have to look as perfect as a regular wall repair.
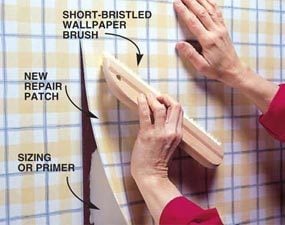
Photo 4: Install the new patch
Wet the patch (if prepasted) or apply the paste, carefully matching the pattern lines between the patch and the wall (stretch the paper sparingly to fit). Smooth out any air bubbles or wrinkles with long pulling strokes using a short-bristled wallpaper brush. Work the brush from the middle out to the sides. Use a dampened sponge to remove any glue residue or fingerprints.
Your doorknob has slammed into the wall one too many times, and now it’s punched clear through. The worst wall to repair is one covered with wallpaper. Not only must you repair the wall surface, but you’ve got to undertake the tricky task of installing an “invisible” wallpaper patch. Budget about two hours over two days to repair the wall. As you work, apply these tips:
- Select a repair patch from a section of a leftover paper roll that matches both the vertical and the horizontal pattern in the existing wallpaper. This can be tricky (and sometimes impossible) if the damaged hole is near a vertical seam that overlaps or has separated (Photo 1).
- When positioning and cutting the repair patch (Photo 2), don’t wet it or apply paste.
- To avoid ragged cuts, put a new blade in your knife. Double-cut through both the new patch and old wallpaper (Photo 2). Remove the patch and carefully scrape off the old wallpaper.
- If you nick the wall surface when scraping off the old paper, fill the nicks with joint compound and sand the repairs flat.
- Before applying the patch (Photo 4), seal the repaired wall by brushing on a coat of wallpaper sizing or oil-based primer. This step ensures a tighter bond between the wallpaper patch and the wall.
Required Tools for this Project
Have the necessary tools for this DIY project lined up before you start—you’ll save time and frustration.
- Metal straightedge
- Taping knife
- Utility knife
Required Materials for this Project
Avoid last-minute shopping trips by having all your materials ready ahead of time. Here’s a list.
- Drywall compound
- Extra wallpaper
- Primer
