
No Hot Water? Restore It Yourself
Updated: Jun. 02, 2023
No more hot water? You may need a new thermocouple.

A full day
Beginner
Less than $20
Introduction
Before you replace a broken hot water heater, check to make sure the thermocouple still works. It's a simple, inexpensive repair that could save you a bundle.Tools Required
- Paintbrush
- Wrench set
Materials Required
- Thermocouple
Diagnosing and fixing a thermocouple “no hot water” problem
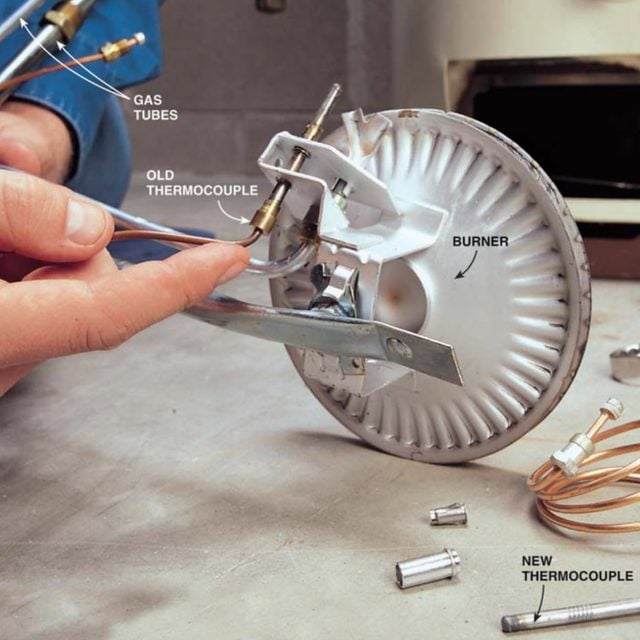
Inside the burner compartment of your gas water heater, right in front of the pilot light, is a small metal cylinder called a thermocouple. The thermocouple is a safety device that senses when the pilot light is burning. If the pilot goes out, the thermocouple signals the gas valve to remain closed until the pilot light is relit.
A worn out thermocouple is one of the most common gas water heater problems
When thermocouples wear out, the pilot light goes out, the burner won’t light, and you will have no hot water. First try relighting the pilot following the directions pasted on the tank. If the pilot lights but the flame goes out as soon as you release the button after holding it for 60 seconds, then the thermocouple is bad.
It’s possible to replace the thermocouple without removing the burner assembly, and many repair people do this. But removing the burner assembly as we’ve done simplifies the job of replacing the thermocouple and allows you to vacuum out the burner compartment and clean the burner while you’re at it.
Even though this job is simple, don’t attempt it unless you know how to turn off the gas to the water heater and are comfortable with relighting the pilot. You’ll need a few wrenches to remove the burner, possibly a screwdriver to remove the access cover, and a small brush and dishwashing liquid to test for leaks.
Thermocouples for water heaters are readily available at hardware stores and home centers. Remove the old thermocouple and measure it. Then buy the same size replacement. Parts are included to mount the thermocouple in almost any water heater.
Call a repair person if your water heater looks different from the one shown.
Project step-by-step (3)
Disconnect the old thermocouple

Turn off the lever handle gas valve to the water heater and turn the knob on the top of the temperature control valve to “Off.” Use open-end wrenches to unscrew the nuts that connect the burner gas line, the pilot gas line and the thermocouple. Pull the gas tubes and thermocouple down out of the gas valve. Slide the burner out of the water heater. Some burners have a tab of metal that fits into a slot in the bottom of the water heater. Push and lift to disengage the tab to begin solving your issue of no hot water in the home. This photo shows how to disconnect the thermocouple.
Water Heater Maintenance: Extend Your Hot Water Heater Lifespan
Insert the new thermocouple
Slide the old thermocouple out and push the new one in. Note the position and mounting details of the old thermocouple and install the new one the same way. Details vary according to the manufacturer of the water heater. This photo shows how to replace the old thermocouple.
Reinstall the burner and tighten the nuts
Push the ends of the burner, the pilot tubes and the thermocouple into the gas valve. Carefully start the nuts into the threads and hand tighten. To avoid stripping the threads, do not use a wrench until you’ve turned the nuts at least two full revolutions by hand. Tighten the nuts with moderate pressure. This photo shows how to reinstall the burner
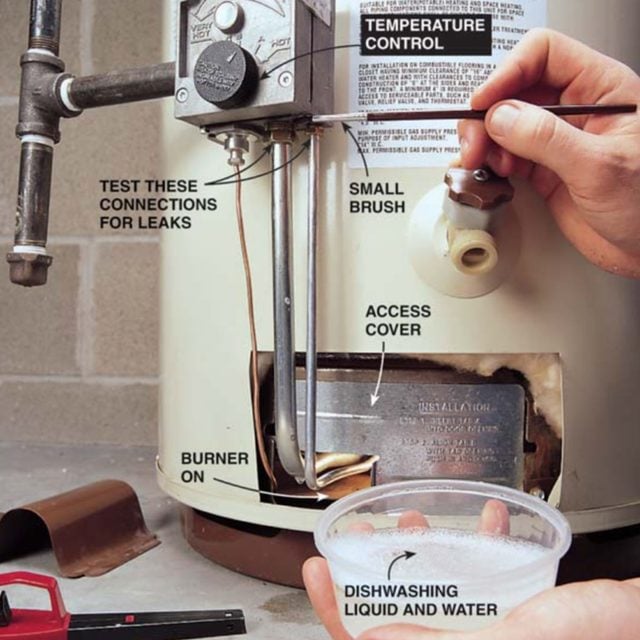
To Test for Leaks
- Turn the temperature control to “Off.”
- Open the lever handle gas valve to the water heater.
- Light the pilot according to instructions on the water heater.
- Replace the access covers.
- Turn up the temperature control until the burner lights.
- Test around the burner and pilot light connections with a solution of dishwashing liquid and water. The burner must be on to test the burner connections. If bubbles appear, shut off the gas and tighten the fittings. Then repeat this procedure. Shut off the gas and call a gas repair person if leaks continue.
Every product is independently selected by our editors. If you buy something through our links, we may earn an affiliate commission.