
How to Build Pull Out Under Sink Storage Trays for Your Kitchen
Updated: Jan. 03, 2024
Multiple Days
Beginner
$51–100
Introduction
Build these handy undersink roll-out trays in a weekend. You can tackle this project with simple carpentry tools and some careful measuring. You can make all the trays in an afternoon using building products from your local home center or hardware store for as little as $80.Tools Required
- Air compressor
- Air hose
- Brad nail gun
- Circular saw
- Clamps
- Combination square
- Cordless drill
- Countersink drill bit
- Framing square
- Paintbrush
- Safety glasses
- Tape measure
Materials Required
- 1-5/8" wood screws
- 1/2" x 2' x 2' hardwood plywood
- 1x4 x 16' maple
- 1x6 x 2' maple
- 20" ball-bearing drawer glides
- 3/4" x 4' x 8' hardwood plywood
- 6d finish nails
- Construction adhesive
- Woodworker's glue
Getting the right stuff
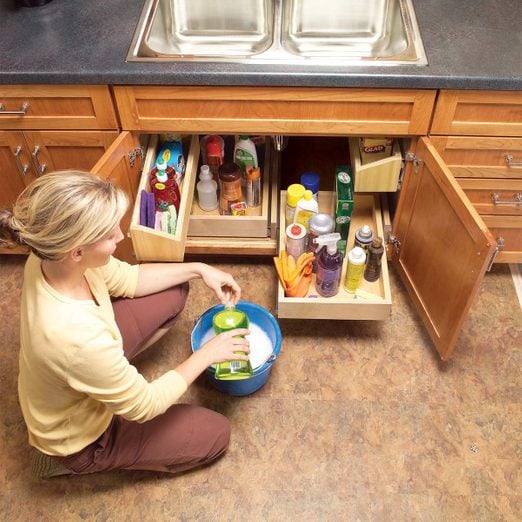
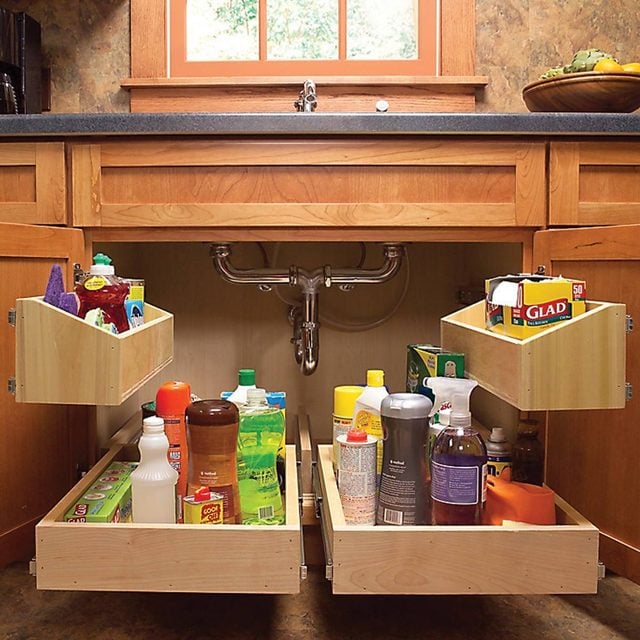
Have you finally had it with that dark and dingy, I’m-not-sure-what’s-there storage space under the kitchen sink? Well, these two types of roll-out trays, which ride on smooth-action ball-bearing drawer glides, will get everything out in the open and let you find exactly what you need at a glance.
This under sink storage project isn’t difficult. In fact, there aren’t even any miter joints. All the parts are glued together and then nailed or screwed. You can make all the trays in an afternoon using building products from your local home center or hardware store for as little as $75. You can build everything with simple carpentry tools and some careful measuring. You don’t need a table saw for this project, but it will help you zero in on more exact measurements, especially for the lower tray bases where accuracy is important for the ball-bearing drawer glides. The nail gun shown in the photos is also optional, but it makes assembly a lot faster and less tedious. It shoots thin 18-gauge nails.
The best under sink storage solution
In this article, we’ll show you how to measure your sink base and custom-size and assemble the wood trays. We’ll also give you some tips for installing the drawer glides without a lot of head scratching. You’ll probably have to adapt the project dimensions to fit your space. For example, you may have a bulky garbage disposer that won’t allow you to install both upper slide-out trays. In that case, just make one tray instead. If you have plumbing that comes up through the floor of your sink cabinet, you may need to shorten the lower trays to fit in front of the plumbing. In any case, add as many part of this project as you can to organize this black hole once and for all.
Before you get the materials, scan this article and see if you can build all the trays or only a few of them. At a home center or lumberyard, look for hardwood plywood. You can often buy 2 x 4-ft. pieces instead of a whole sheet. The hardwood plywood has two good sides and is smoother and flatter than exterior-grade softwood plywood. It costs more too.
In the hardware department, look for ball-bearing side-mount drawer glides. The pairs of the brand we purchased are exactly the same—there’s no specific right or left, which makes things easier if you misplace a part. We used 20-in.-long side-mount glides to fit our 20-in.-long trays. This gave us some wiggle room in the back and a bit of extra space to get the pieces into place. If you have plumbing coming up through the bottom of the cabinet, you may need to shorten the trays and buy shorter drawer glides.
Then follow the photos for the step-by-step measuring and assembly instructions. Here are a few specifics to consider:
- If the opening between the open doors is narrower than the opening between the sides of the frame, use the shorter dimension to make the base.
- If you have a center stile or partition between the doors, you may need to make two separate bases for each side and a tray for each.
- Make sure the base and the tray parts are cut square and accurately so the trays slide smoothly.
Project step-by-step (14)
Measure the cabinet opening to construct the base for the lower pull-out trays
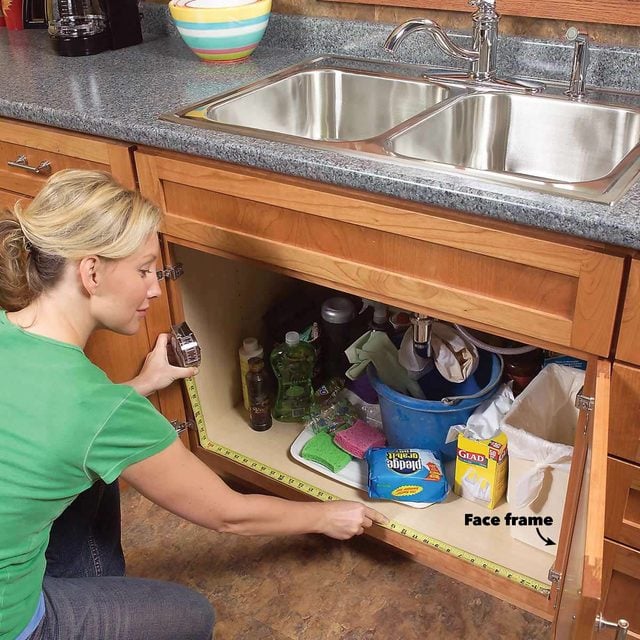
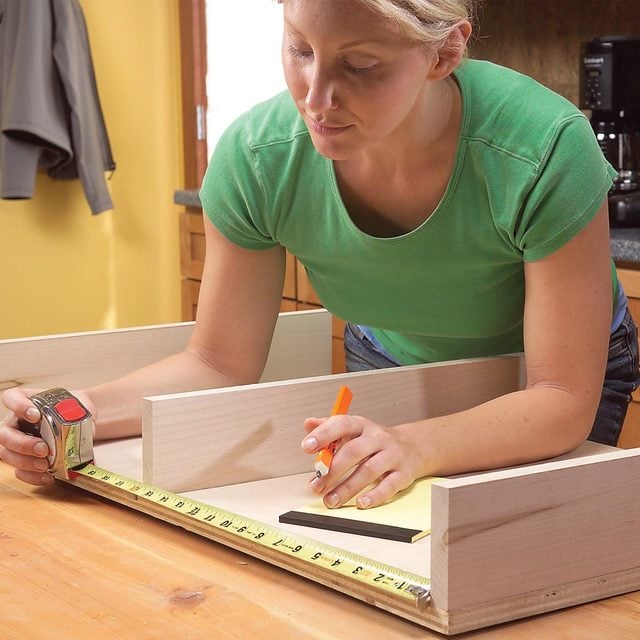
Before you start building this under sink pull out storage system, first measure the width of your kitchen base cabinet inside the frame. Cut the base (A) 1/4 in. narrower than the opening.
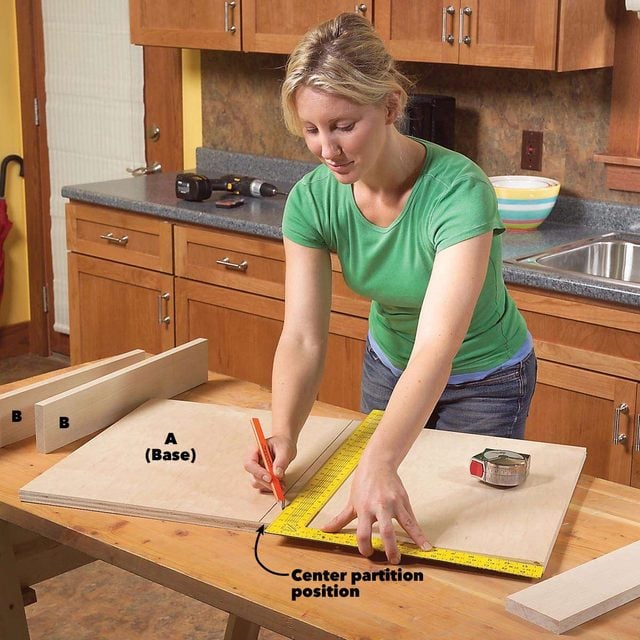
Mark the base to locate the center and side partitions
Be sure to locate the center partition exactly in the middle of the base; this way you’ll be able to make the two trays exactly the same size.
Screw the partitions to the base
Align the side partitions even with the outer edges of the base. Find the center of the base (A) and mark it for the center partition. Cut the 20-in.-long partitions (B) from 1×4.
Drill pilot holes before driving screws
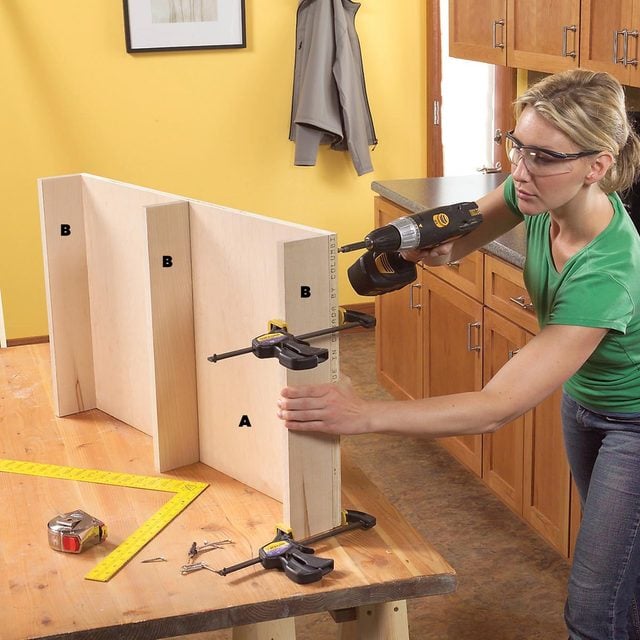
Clamp the partitions to the base, drill pilot holes, and glue and screw them to the base with No. 8 x 2-in. screws. Plus: Here are 30 cheap kitchen cabinet add-ons you can DIY.
Measure between the partitions
Measure the exact distance between the partitions. Make the outer dimension of the tray 1 in. narrower than this measurement to allow for the glides.
Fasten the sides to the tray base first.
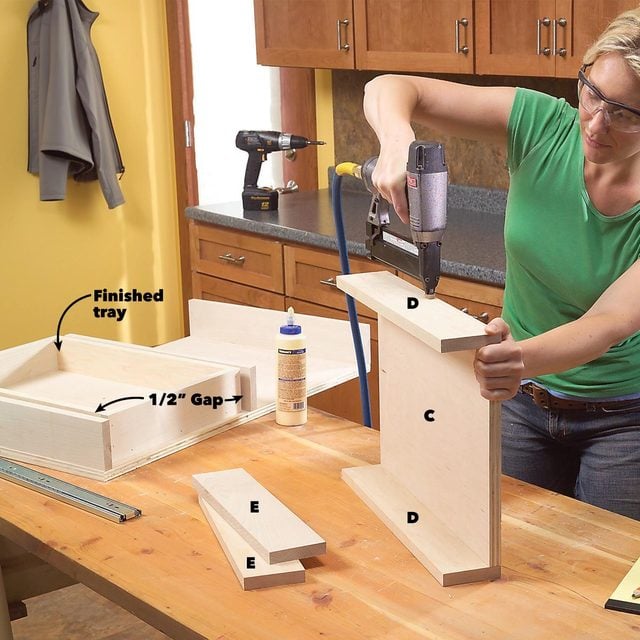
Cut the parts for the trays and glue and nail them together. Cut the bases perfectly square to keep the trays square.
Align the glide edges with the front of the partition
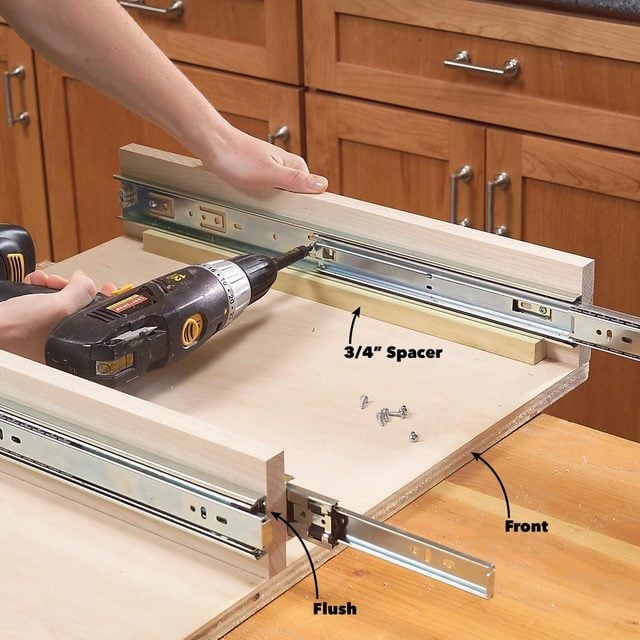
Set the drawer glides on 3/4-in. spacers, holding them flush with the front. Open them to expose the mounting holes and screw them to the partitions.
Flush the glide with the tray front
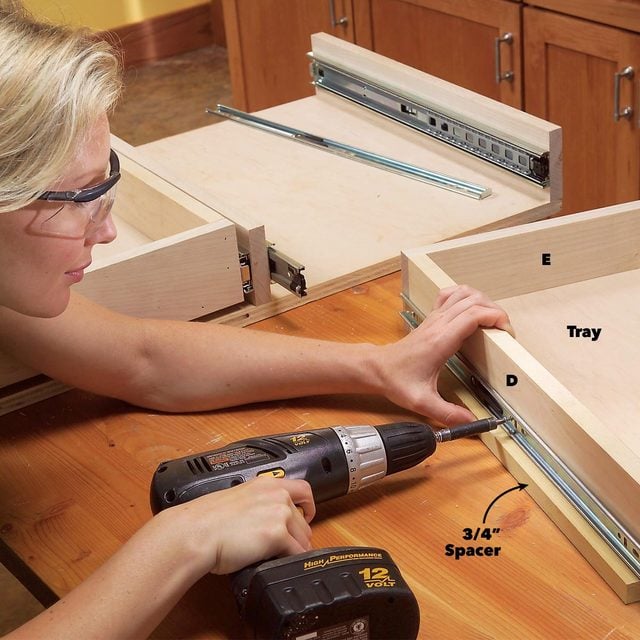
Remove the inner sections of the glides and screw them to the sides of the trays. Reassemble the glides and make sure they glide smoothly.
A Word About Drawer Glides

The ball-bearing glides are designed to mount on the sides of the trays (Photos 6 and 7). The glides require exactly 1/2 in. of space between the partition and drawer on each side to work properly, so make the trays exactly 1 in. narrower than the distance between the partitions. If the trays are too wide, they’ll bind and be tough to open, in which case, you’ll have to take them apart and recut the tray bottom. If the trays are too narrow, the glides will not engage. Fixing this is a bit easier. You can just shim behind the glides with thin washers.
Watch for protruding hinges and other obstructions when you mount the lower or upper trays. You may need to adjust the height or placement of the trays to accommodate them.
Install the base under sink storage assembly
Align the front of the base with the back edge of the face frame. If you have frameless overlay cabinets, mount it 1/8-in. back from the cabinet front.
Center the base assembly inside the cabinet
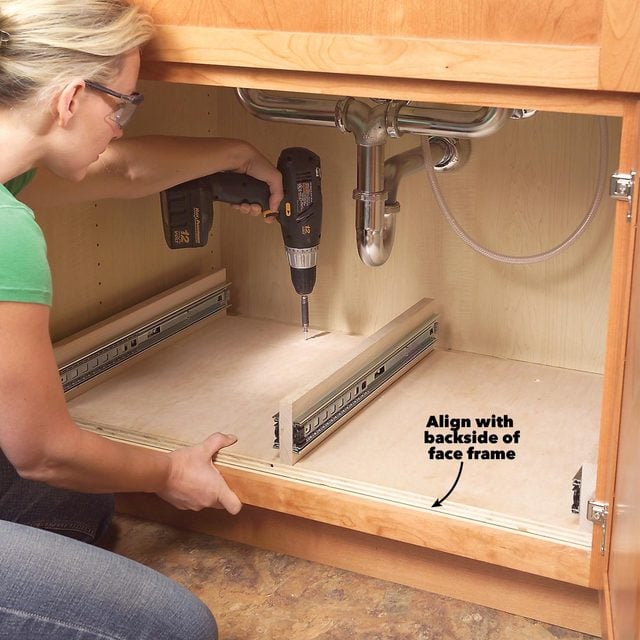
Insert the base assembly into the floor of the cabinet. Align the front of the base flush with the backside of the face frame. Screw the base to the floor of the cabinet.
Make and install the upper trays
The upper trays are mounted with two glides on one side. Use the jig in Photo 10 to mark the glide locations. Unlike the mounting method for the lower trays, this method aligns the center holes of the glide with the lines traced along the jig.
Build the upper trays

Cut the parts for the upper trays, drill pilot holes, and glue and screw them together. Cut two thicknesses of plywood and glue them together to make the 1-in.-thick side cleats (K).
Mount the glides
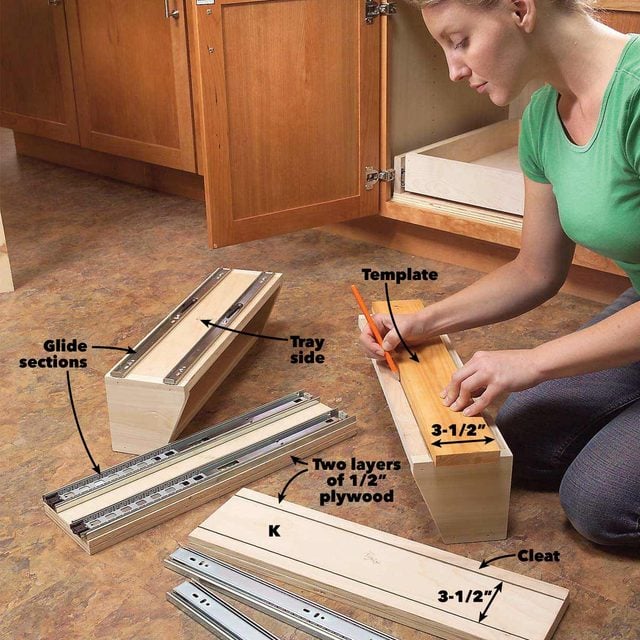
Cut a 3-1/2-in.-wide template, center it on the cleats and the tall side of each tray and trace the edges. Center the mounting holes of the glides on these lines and screw them to the cleats (outer sections) tray sides (inner sections).
Mount the cleats to the inside of cabinet
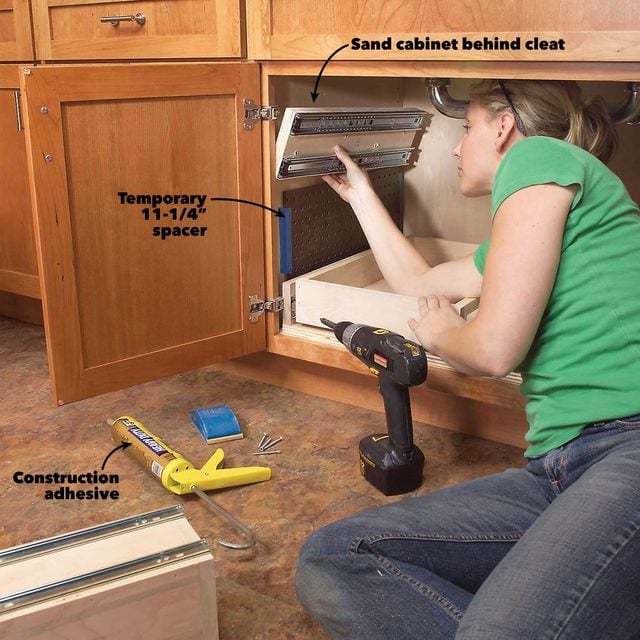
Sand the side of the cabinet to increase the adhesion, then glue and screw the cleats to the sides of the cabinet. Cut a plywood spacer to hold the cleat even.
Test the fit
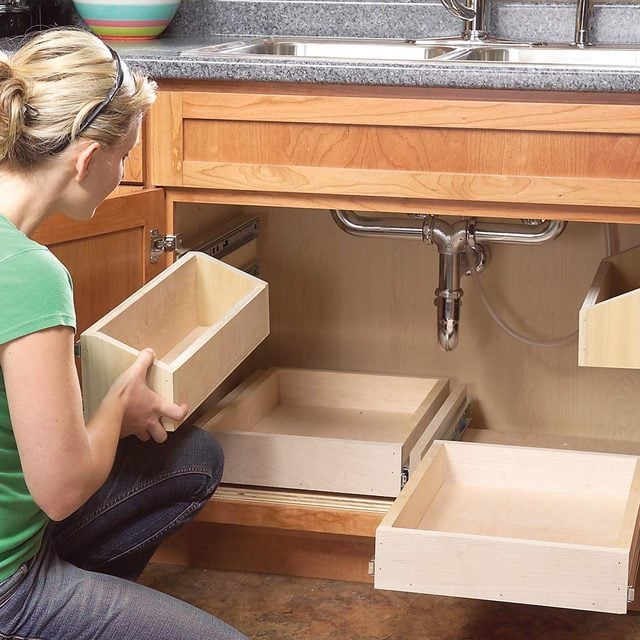
Slide the upper trays into position and test the fit. Seal the trays with two coats of polyurethane to make cleaning easier.
Seal the trays with polyurethane
You never know what kind of spill or leak will happen under the sink, so it’s best to seal the wood. Once you’ve finished the project, remove the trays and glides, sand them with 150-grit sandpaper and brush on two coats of polyurethane. Let the trays dry thoroughly, then look through all that stuff you had stored under the sink. Toss out old stuff and combine duplicate products—and enjoy your reclaimed and now easily accessible space.
Editor’s Note:
After I built this same under sink storage project at home, friends dropped by, saw it and were inspired to organize their under sink storage cabinet. Because they have small children, I advised them to add childproof latches to secure the strong household cleaners they’ll be storing. Next, make these DIY dividers for your kitchen cabinets.