
Customizable Garage Storage
Updated: Jan. 25, 2024Build this easily customizable garage storage system with just a circular saw and drill. Our French cleat design makes rearranging your storage a breeze.

- Time
- Complexity
- Cost
- Multiple Days
- Beginner
- $101–250
Organize and reorganize in minutes: Garage storage system design

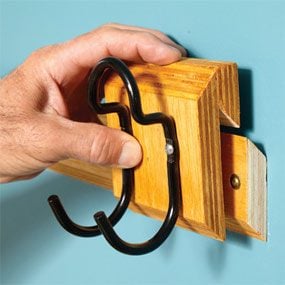
Rearrange, reorganize, add on, make room for new stuff. It’s as easy as lifting off the hangers and putting them somewhere else. There’s nothing complicated about this storage system. The matching bevels and gravity hold the hangers securely until you want to move them. And you can build the whole system with just two power tools—a circular saw and a drill. What could be simpler!
Customizable Garage Storage
Organize your clutter, tools and toys. Customize this French cleat system to fit any wall width and height. A variety of easy to assemble hangers will hold just about everything in your garage.
Garage storage design, materials and tools
The problem with organizing garages is that there are so many different kinds of things to store that it’s overwhelming trying to decide how to do it. But with this French cleat system, you don’t have to worry about the ultimate positioning of all your hooks and shelves because you can rearrange them at will. And you don’t have to plan ahead for future storage needs either. You can easily add on to the French cleat system just by assembling more hangers and rearranging the existing ones. Once the beveled strips are attached, you never have to locate a stud or use drywall anchors to hang hooks or other hardware. Just screw them to an appropriate-size wood-cleat hanger and put them up wherever you want.
The French cleat system consists of beveled strips that are screwed to the wall studs, and custom-made wooden hangers that lock onto the strips. We built everything with utility plywood, which costs about $45 a sheet. You can cut enough strips from a 4 x 8-ft. sheet to cover a 12-ft.-long wall. And you can assemble enough hangers, tool totes and other miscellaneous holders from another 4 x 8 sheet to get a good start on organizing your garage. See the Materials List in “Additional Information” below for other items you may need. We used four sheets of plywood to build everything you see in the photo.
It would be a little quicker to cut the parts using a table saw and a miter saw, but you don’t need these tools; we’ll show you how to safely and accurately cut all the parts using just a circular saw. You’ll be surprised at how quickly and easily you can cut the parts with the help of a few simple saw guides. But before you start, make sure you have a sharp blade for your circular saw. To make clean, splinter-free cuts in plywood, we spent about $15 on a 40-tooth carbide blade. In addition to a circular saw and drill, you’ll need a hammer, level, tape measure, pair of clamps, chalk line with dust-off chalk, and small and large rafter squares.
How to Make a French Cleat: Wood Strips, Hangers, Shelves and Bins
The system consists and wood strips screwed to the wall and a variety of hangers, shelves, bins and whatever containers you dream up to hold special items like our golf bag holder! Work with whatever sections of garage wall you have open.
Cut the beveled strips
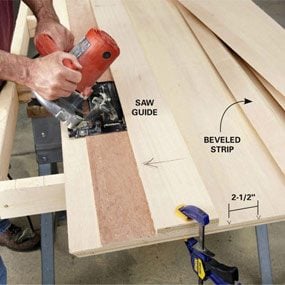
Photo 1: Cut beveled strips
Start by positioning the beveled guide 1 in. from the edge and cutting a strip with a bevel on one edge. You can use this to make hangers. Then make a series of marks 2-1/2 in. apart on each end of the sheet. Line up the saw guide with the marks to cut the beveled strips.
Cut the strips from a sheet of plywood. Photo 1 shows how. You won’t be able to cut the narrow beveled strips from the last 10 or 12 in. of the plywood sheet with this guide. Instead, use the remaining wide strip for the totes or other wider parts.
Build a Saw Guide for Perfect Cuts
To make the saw guide, start by marking a line and cutting a 5-in.-wide strip from the edge of an uncut sheet of plywood (photo “Cutting a straightedge”). It doesn’t matter if you don’t saw perfectly straight because you’ll only use the factory edge. Draw arrows toward the factory edge to identify it.
You could simply clamp this straightedge to the plywood as a saw guide, but then you would have to compensate for the distance from the guide to the saw blade every time. The photo “Building the saw guide” shows how to build a guide that you can line up with the cutting mark, a technique that is quicker and more accurate. Attach a 12-in.-wide strip of 1/4-in. plywood to the straightedge with short screws. Make sure to face the factory edge of the straightedge toward the excess base material. Then, with the saw set to a 45-degree bevel, run the saw’s bed along the straightedge to cut off the excess base. To see a video on how to build this saw guide, download the September 2012 iPad edition.
Make another guide just like this one, except set the saw to cut 90 degrees when you cut off the excess 1/4-in. plywood. You can use the opposite edge of the same sheet of plywood for the straight edge. Use this guide for non-beveled cuts.
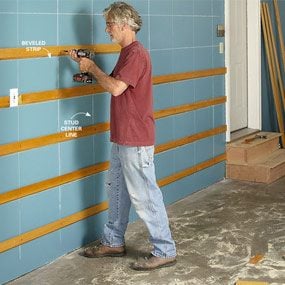
Mount the strips on the garage wall
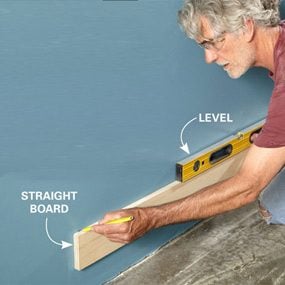
Photo 2: Mark a level line
Measure up from the floor 9 in. and make a mark. Use a straight board and a level to draw a level line.

Photo 3: Mark wall cleat locations with chalk lines
Measure up from the level line and make marks every 12 in. Do this on both ends. Then snap chalk lines between the marks. Use dust-off chalk, which won’t leave permanent stains on the wall.
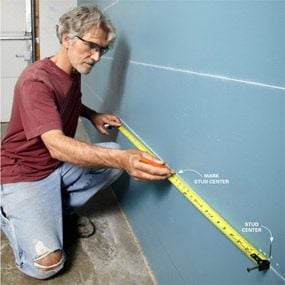
Photo 4: Mark the center of the studs
Locate a stud with a finder or the knuckle-knocking method. Then probe with a nail until you find both edges of the stud. Mark the center of the stud. Measure from this mark—most studs are 16 in. center-to-center—to find the remaining stud centers. Double-check by probing with a nail at each mark. Repeat this process at the uppermost chalk line and connect the marks with chalk lines.
To ensure that the strips are straight and level and that all the screws hit the center of the studs, make a grid of chalk lines. Start by drawing a level line to mark the bottom of the lowest strip (Photo 2). Then make marks every 12 in. above the line and connect the marks with chalk lines (Photo 3). Use special dust-off chalk—it’s easily erasable.
Next, locate the center of a stud. Use a stud finder or knock on the wall until you feel and hear a solid spot. Then zero in on the center by probing with a nail (Photo 4). Do this above the lines, where the nail holes will be covered by the strips. Find both edges of the stud with the nail. Then mark the center. In most cases, studs are 16 in. apart, and you can measure from this first center mark to find the remaining studs. Whatever method you use, probe with a nail at each stud to make sure you hit solid wood. Make marks for the center of the studs at the top and bottom and connect the marks with chalk lines. With the grid done, it’s easy to align and attach the strips (Photo 5).
Cut the hanger parts and assemble the hangers
Small hangers
Glue and screw the small cleat to the back of the face. Drill pilot holes for the screws.
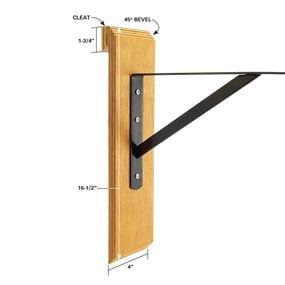
Long hangers
These are like the small ones, only long enough to rest on the horizontal cleat below. Use these for shelf brackets and other longer hardware.
With the saw guides, it’s fast and easy to make long, table saw–quality cuts in plywood. But what about all those small parts? One problem with cutting small parts freehand is that it’s hard to keep the cuts square. Another is that the cutoff pieces tend to fall away just before the cut is finished, creating a little torn-off section. You can solve both these problems, and make marks for repeatable cuts, by building two crosscut guides (See “Build simple guides for cutting small parts” below). We bought a 2 x 4-ft. piece of MDF at the home center, but you can use any flat scraps of plywood. Start by cutting two fence strips 1-3/8 in. wide by 3 or 4 ft. long. Then cut a 4-1/2-in.-wide strip and a 9-1/2-in.- wide strip for the base pieces. Use your straightedge saw guide to make these cuts. Glue and clamp the fence parts to the base pieces. Or you can glue and screw them. If you use screws, remove them after the glue sets.
“Build simple guides for cutting small parts” (below) shows how to use the crosscut guides. When you make the first cut, mark the location of the square on the crosscut guide. To make several parts that are the same length, measure from the saw kerf in the work support and make a mark. Line up the end of the material with this mark and align the clamp with the clamp mark.
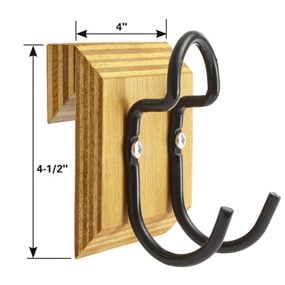
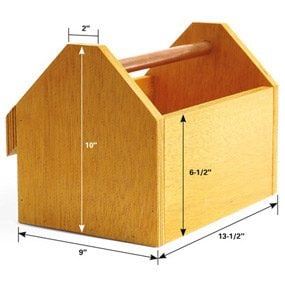
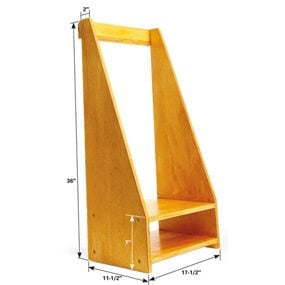
With a little ingenuity, you can hang just about anything from these beveled strips. The golf bag holder and tote boxes are just a few ideas. We haven’t included detailed plans because frankly, it doesn’t really matter. Anything you can attach to a beveled French cleat is fair game. Home centers, hardware stores and sporting goods stores all have hooks and brackets for hanging stuff. You just have to build a wooden cleat to screw them to. Have something to hang? Have fun inventing a new hanging bracket. When you’re finished, your garage will be the envy of the neighborhood.
Build Simple Guides for Cutting Small Parts
Both of these crosscut guides are simple: All you need to do is glue a 1-3/8-in.-wide strip of plywood or MDF to a wider strip. Set the work-piece on the guide, clamp on a rafter square and run your saw along the square to get straight, precise cuts. This works for plain cuts or 45-degree bevels. It’s best to have two widths and two sizes of rafter squares for different size parts.
Additional Wall Cleat Information
Required Tools for this French Cleat Storage Project
Have the necessary tools for this DIY French cleat project lined up before you start—you’ll save time and frustration.
- Chalk line
- Circular saw
- Clamps
- Drill bit set
- Drill/driver - cordless
- Hammer
- Level
- Rafter square
- Speed square
- Stud finder
- Tape measure
