
How to Start a Small Engine
Updated: Apr. 29, 2024Give your starter-cord arm a rest while you run these basic diagnostic tests
Introduction
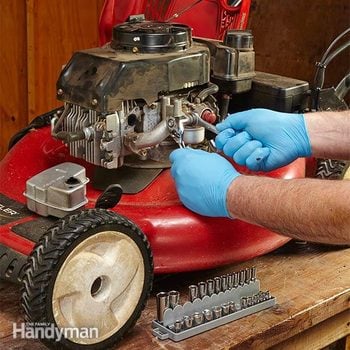
You can fix any of these problems yourself easily, cheaply and quickly. You’ll not only save lots of money but also skip the hassle of hauling your lawn mower, snow blower, pressure washer or whatever to a service center and home again.
Typical professional repairs start at about $100. But if you do the work yourself and order the replacement parts online, you can usually save enough to justify replacing parts even if you’re not sure they’re bad. (Psep.biz is one source of discount small-engine parts.) We’ll cover a few basic tests, explain how to order parts and show you how to replace a carburetor, an ignition coil and a recoil starter. You can replace any defective parts in just a few hours with basic hand tools.
Check the basics first
Engine problems may have their root in something very simple. If your machine has a shutoff valve, check that first to make sure it’s in the On position. Next, make sure the engine has fresh gas. If the gas is more than 30 days old, replace it with fresh, stabilized gas. Next, check the air filter to make sure it’s not clogged.
If the tank has fresh gas and you’ve primed the carburetor and set the choke but it still won’t start, it’s time to remove the spark plug. If the spark plug is wet with gas, it proves the engine is getting fuel. Dry off the plug with compressed air and examine it for signs of carbon buildup or oil deposits. Check the gap to make sure it’s within specs.
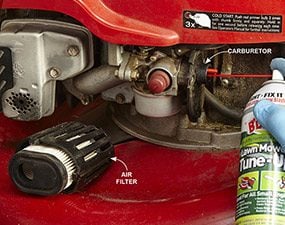
If you have any doubts about the plug’s condition, replace it—they’re cheap. If the plug is dry, it’s a sign of a fuel problem and most likely a messed-up carburetor. Shoot a substitute fuel (WD-40 or PB Blaster Lawn Mower Tune-Up) into the carburetor throat and then try starting the engine (Photo 1). If it won’t start or fire with spray fuel, you probably have an ignition system problem, most likely a bad ignition coil. However, if it starts and dies, that proves the ignition is working and the problem is fuel starvation.
Check the fuel filter first by disconnecting the fuel line from the filter to the carb. Gas should run out. If it doesn’t, replace the filter. If gas flows freely through the filter, then the problem is inside the carburetor.
Testing an ignition coil is a bit trickier. To do it right, you need a small-engine spark tester. Holding the spark plug boot close to the engine to check for spark isn’t a reliable test because a bad coil can produce a spark in open air but fail when the cylinder is under compression. If you own several small engines, it may pay to buy a tester To learn how to use it, read How to Test an Ignition Coil. However, since the tester costs almost as much as a new coil, replacing the coil without testing may be the way to go.
Find the right parts
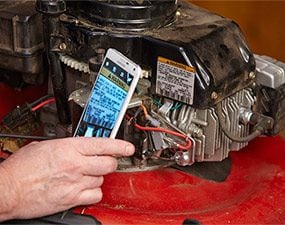
Lawn and garden tool manufacturers often use several different engine brands for a certain model, so you can’t buy parts based on the model number of the mower or snow blower. Instead, you need the engine model and serial number and the date of manufacture to find the parts. This Toro lawn mower, for example, was built with a Tecumseh engine, while a different Toro mower may be built with a Briggs & Stratton engine. We found the Tecumseh engine information on a label (Photo 2). But other brands may stamp the numbers into the engine block, valve cover or engine shield.
Once you have the engine information, locate a parts list and exploded diagram by entering the brand and model number into a search engine. Find the engine manufacturer’s part number and enter that into a search engine to find the lowest price or nearest seller.
Carb rebuild vs. new carb
These days we don’t recommend rebuilding a carburetor. First, a brand new carburetor from a discount online seller usually costs less than a rebuild kit and a bucket of carburetor soaking solution. Plus, rebuilding a carburetor is time consuming and doesn’t always work, especially if the internal parts are corroded.
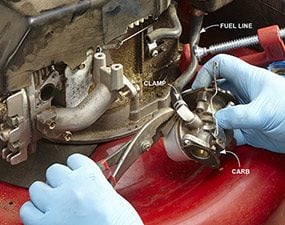
Once you have the new carburetor in hand, remove the old one and swap in the new unit (Photo 3). After you reinstall the fuel line and prime the engine, it should start right up.
Replace an ignition coil
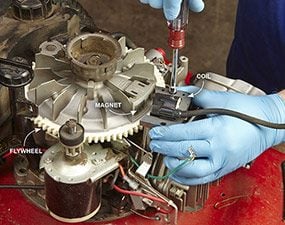
Photo 4: Remove the old coil
Remove the two coil retaining screws. The instant they’re loose, the coil will snap against the magnet on the top of the crankshaft. Grab the coil and yank it off the magnet.
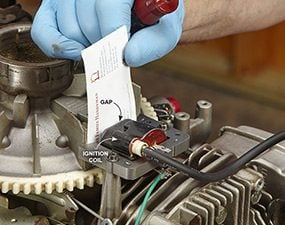
Photo 5: Install the new coil
Set the new coil in place and snug the retaining screws, but don’t tighten them all the way. Align the crankshaft magnet to the center of the coil. Set the air gap using a business card as a gauge. Move the coil in and out until you feel a slight drag on the card. Then tighten the coil screws. Check the gap again. If it’s right, reinstall the engine shield and cover.
If you’ve determined that you have a weak spark or no spark, go ahead and buy and install a new coil. Start by removing the plastic engine cover and setting it aside. Then lift off the gas tank and remove any engine shields to access the ignition coil. Remove the old coil (Photo 4). Then install the new coil and set the air gap (Photo 5).
Replace a recoil starter
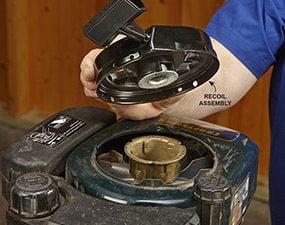
If the starter rope is broken, you can buy a recoil rebuild kit for about $15. The kit contains a new rope, dogs and dog springs. Setting the proper spring tension can be tricky, and if you get it wrong, you’ll break the spring and have to replace the entire unit. Frankly, we recommend skipping the rebuild and just replacing the entire recoil assembly (Photo 6). It’s much faster, and the complete assembly includes a new housing and spring (set to the proper tension).
Required Tools for this Project
Have the necessary tools for this DIY project lined up before you start—you’ll save time and frustration.
- 4-in-1 screwdriver
- Air compressor
- Air hose
- Rags
- Socket/ratchet set
Required Materials for this Project
Avoid last-minute shopping trips by having all your materials ready ahead of time. Here’s a list.
- Fuel stabilizer
- Starting fluid
