
What Does a Planer Do?
Updated: Feb. 02, 2024Smooth rough lumber, clean up sawn edges and reclaim salvaged boards with a wood planer

- Time
- Complexity
- Cost
- An hour or less
- Beginner
- $101–250
Planer Woodworking Overview
Nothing beats owning a wood planer when you need to smooth boards and mill them to an exact thickness. Woodworking planers used to be found only at cabinet and millwork shops. Now you can buy a bench-top wood planer for several hundred dollars at home centers and tool retailers. If you do any remodeling, deck building or woodworking, you’ll never regret the investment in a woodworking router planer. In this article, we’ll show you how to solve the most common problems of tearout, snipe and ridges and a few of our techniques for special projects.
Avoiding tearout
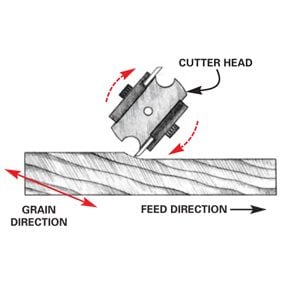
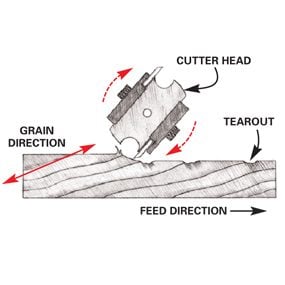
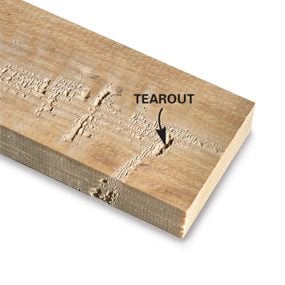
Tearout happens when you feed a board into the wood planer with the wrong end forward. The knives catch in the rising wood fibers and tear rather than cut them. Figure B illustrates how this occurs.
In some cases, you’ll be able to tell which end to feed into the planer by inspecting the grain (or to be precise, the direction of the fibers). When you’re planing the wide surface of the board, inspect the grain on the narrow edge. When you’re planing the edges, inspect the wide face. On rough lumber, you can feel the fibers by running your hand over the board. It will be smooth in one direction and rough in the other. Feed the smooth direction forward into the wood planer. With some boards, you might get tearout in both directions. Then the best approach is to take a small amount of wood off with each pass; 1/32 in. is about right.
Plane perfect deck spindles
Gang-feed deck spindles
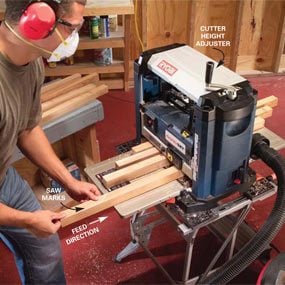
Remove saw marks from ripped 2x2s with a wood planer. Gang feeding like this speeds the work and reduces “snipe’ on the ends of boards.
Nothing jazzes up a rail quicker than custom-planed spindles. And planing rough-cut 2x2s into crisp, clean spindles is a great way to get familiar with your planer. I usually make 2x2s from wider 2×4 or 2×6 lumber. It allows me to get better-looking spindles with crisp, square edges. Rip the boards to about 1-5/8 in. This will allow you to remove the saw marks and still have about a 1-1/2 in. thickness.
Set the planer to remove about 1/32 in. and run a batch of 2x2s through. Reset the planer to remove another 1/32 in. and run them through with the opposite face up. When the width and thickness are the same dimension, rotate the spindle a quarter turn and plane adjacent faces. Finally, lower the cutters 1/32 in. and plane the remaining two adjacent faces. Remember to stack the spindles consistently so you can keep track of which sides you’ve planed. It helps to mark one face on the end of each spindle as a reference.
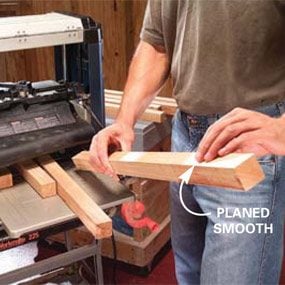
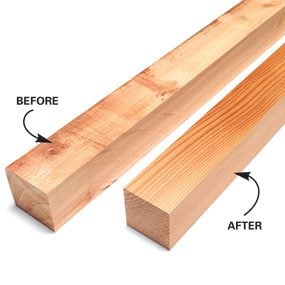
Reclaim old wood
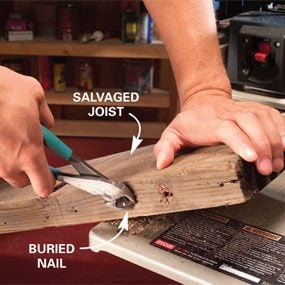
Remove metal and grit before planing
Dig out all remnants of nails, screws and staples before planing old lumber. One encounter with a nail is all it takes to put a good-sized nick in a set of knives.


Woodworking planer purists will probably cringe at the thought of using a wood planer to recycle old wood. And it’s true that if you’re not diligent about removing fasteners and dirt from old lumber, you’ll nick the knives or dull them. But I figure the high cost of quality lumber makes it worth it, even if it means replacing a $30 set of blades once in a while.
The board shown in the photo is an old deck joist that was salvaged from the trash. Planing revealed handsome, vertical-grain redwood. The most critical step in reclaiming lumber is to inspect it carefully for screws and nails. In addition, remove dirt and grit from the board with a wire brush.
Video: Flattening Rough-Sawn Lumber
Expand your woodworking planer and other skills and get access to a wide range of domestic and imported wood for your furniture projects by learning to flatten and plane rough-sawn lumber.
Tricks for stopping “snipe”
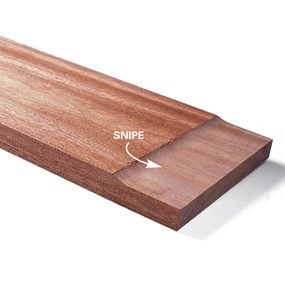
Snipe is a term used to describe the planer gouge that often occurs at the beginning and end of boards as they enter and leave the planer. Most new woodworking routers have a mechanism for locking the planer heads in place after you adjust the depth. This helps minimize snipe. But the best technique is simply to leave an extra 5 in. of length on your boards. Then cut off the snipe when you cut the boards to their final length. Another trick is to feed in a sacrificial board first. Then feed the next board in against the end of the first board and continue feeding boards end to end. Finally feed in another sacrificial board. The planer will treat it as one long board, and only snipe the first and last boards.
Planer Safety
Read over the instruction manual included with your planer for setup procedures and safety precautions.
- Wear a dust mask, hearing protection and safety glasses when planing.
- Do not wear loose clothes, gloves or jewelry that could get caught in the rollers or knives.
- Keep your hands away from the cutting area. Never reach under the cutters.
- Be sure the planer is switched off before plugging it in.
- Unplug the tool when it’s not in use so kids can’t turn it on.
Clean up board edges
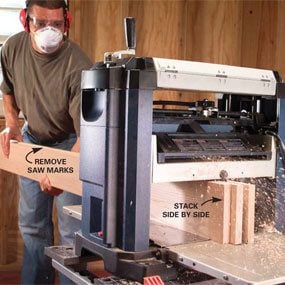
Stacking several boards side by side allows you to remove saw marks from the edges of ripped boards. This technique prevents them from tipping sideways. Another advantage of this method is that you can easily produce a pile of boards exactly the same width. Use this method to plane shelf nosing, face frame parts or the edges of any ripped lumber.
Sand out ridges
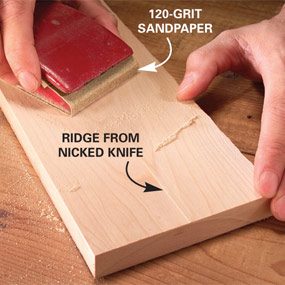
Sand ridges
Sand out ridges left by a nicked planer knife with 120-grit sandpaper. Sand with the grain. Wrap the sandpaper around a Styrofoam block or use a commercial sanding block as shown here.
No matter how careful you are, you’ll eventually put a tiny chip in your planer knives. You’ll know by the telltale ridge left in your planed board. Short of buying a new set of knives, there are a few things you can do. On some planers it’s possible to shift one of the knives slightly to offset the nicks. It doesn’t take much offset to cure the problem. If this isn’t possible, don’t sweat it. It only takes a few seconds to sand out most ridges. In fact, most boards will require a light sanding before finishing anyway.
Required Tools for this Project
Have the necessary tools for this DIY project lined up before you start—you’ll save time and frustration.
- Dust mask
- Hearing protection
- Pliers
- Safety glasses
Required Materials for this Project
Avoid last-minute shopping trips by having all your materials ready ahead of time. Here’s a list.
- Good quality hardwood or softwood lumber
- Sandpaper
