
Create Circular Saw Cutting Guides for Plywood
Updated: Mar. 20, 2024Make circular saw cuts so clean that you don't have to sand or touch up the plywood edges

Tip 1: Cut plywood sheets on the floor with full support
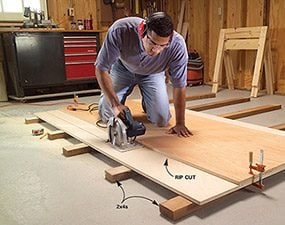
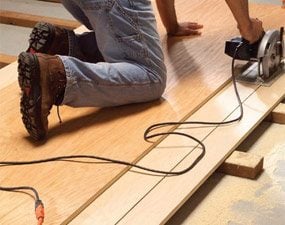
I’ve cut a lot of plywood on sawhorses with pretty good results, but when I want really smooth finish cuts on an expensive sheet, I always cut on the floor. That way you’re sure to get solid, stable support so the plywood won’t move, even if you have to climb on top of it to complete your cut. It also ensures that the cutoff piece won’t splinter, break or fall off as you finish the cut.
Lay 2x4s under the plywood perpendicular to the direction of the cut. The 2x4s will be “sacrificed” just a bit when the blade passes over them, but that won’t affect the quality of the cut. The system works well for both rip cuts (parallel to the grain) and crosscuts (perpendicular to the grain). The more stable the plywood, the better your chances for a perfectly smooth cut.
Tip 2: Set the blade depth to just clear the plywood thickness
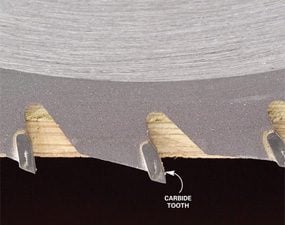
Adjust the depth of your blade so that no more than half a carbide tooth falls below the bottom of the plywood (photo). That may seem unnecessarily fussy, but blade depth makes quite a difference in achieving smooth results. This setting lets the teeth shear the wood fiber rather than chop it, and it helps stabilize the blade (less vibration). Both factors minimize saw tooth marks. The deeper you set your saw blade, the more marks you get.
Set the saw along the plywood edge, lift the guard and look closely as you set the depth. It’s also a good time to check the blade for chipped or missing teeth. A blade with bad teeth or wood pitch buildup won’t cut cleanly. Also note that a circular saw cuts on the upstroke, which often splinters the top edge (veneer) slightly. The bottom edge usually remains splinter-free. So always cut plywood with the good side down.
Tip 3: Clamp on a solid straightedge for a guide
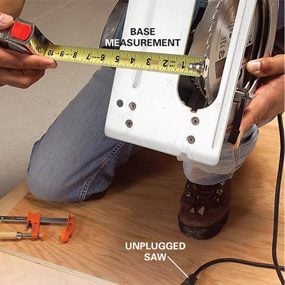
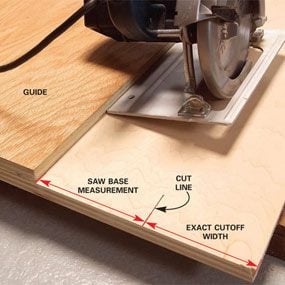
You can buy straightedges at home centers and hardware stores, but for long cuts I almost always use the “factory cut” edge on a strip of 3/4-in. plywood. For one thing, the factory edge is usually perfectly straight (sight along the edge to make sure). In addition, the 3/4-in. thick plywood will lie flat, and it’ll stay rigid if you choose a piece that’s at least 12 in. wide. You only have to clamp the ends.
The tricky part is clamping it in the right spot for an exact cut. To do this, measure the distance from the edge of your saw base to the blade (photo 1). Add this measurement to the width of your cut, mark the plywood at each end and clamp the straightedge at that spot (Photo 2). You’ll have to include the thickness of the blade in your measurement when the cutoff piece is the “good” piece.
Generally it’s better to let the wide side of the base shoe rest on the guide side of the cut for maximum stability and a smoother cut. That also allows the smaller cutoff piece to move aside slightly as you finish the cut, so you can finish the cut cleanly, without binding.
Tip 4: Test the guide for accuracy before making the cut
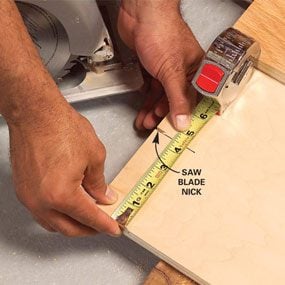
Here’s where you fine-tune the cut. Draw a fine pencil line about 2 in. long marking the desired width of your piece. (We made a dark line for photo clarity.) Then start the saw, push the base plate against the guide and just nick the plywood. Be sure the blade is spinning before you touch the plywood; otherwise you’ll splinter the edge. Then measure to the edge of the nick to double-check your measurements. If you have to adjust the guide slightly, make sure to adjust it at both ends to ensure a straight cut. Be fussy here. Retest until the guide is positioned just right.
Tip 5: Make the cut at a steady speed without stopping

Cutting speed depends on many factors, including the type and sharpness of the blade and the type of plywood you’re cutting. In general, a sharp blade should flow through the wood with little force, as if it’s melting the wood away. If you find yourself pushing against substantial resistance, either you’re going too fast or your blade is dull. Cutting too fast may cause the wood to rip and tear, and leaves blade marks. Going too slowly may cause the blade to overheat and burn the wood.
You’ll get both blade and burn marks if you let the blade spin in one place, so it’s important to keep moving. This is where working on the floor pays off for long cuts. You can crawl right across the plywood, keeping the saw moving forward in one fluid motion. And you don’t have to bend or stretch into an awkward position.
But the cord can do you in. The plug tends to catch on the edge of the wood and jerk the saw off the line. Sometimes the saw even comes unplugged. (I’ve had that happen more than once!) Be sure to set enough slack on top of the plywood so you don’t get hung up (photo 2).
Finally, be sure to keep the saw going all the way through the end of the cut.
Tip 6: Choose a blade with more teeth for smoother cuts
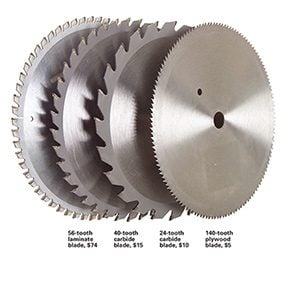
As long as they’re sharp, any of these four 7-1/4- in. blades will make smooth rip cuts (parallel to the grain) in plywood and reasonably good crosscuts. In general, the more teeth, the smoother the cut. The disadvantage of the 140-tooth plywood blade is that the teeth will dull much faster than the teeth on the three carbide blades. This is especially true if you cut particleboard. My favorite is the 40-tooth carbide blade. I keep one in reserve and use it only when I need a fine cut. However, if you have a project that calls for a lot of fine cuts in expensive plywood, don’t hesitate to buy the special 56-tooth laminate-cutting blade. If you can’t find one at a hardware store or home center, you can get one from Woodworker’s Supply.
Tip 7: Tape crosscuts to reduce splintering
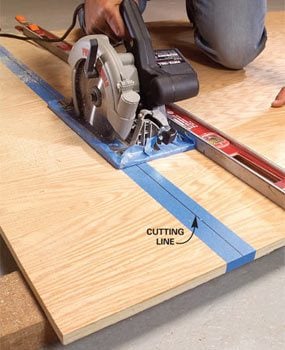
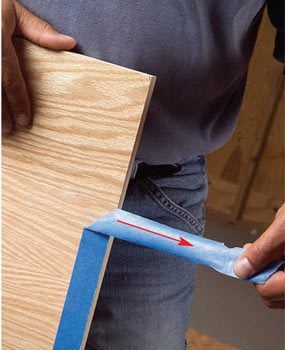
Crosscuts, that is, cuts perpendicular to the grain, will splinter the top veneer, even with a sharp blade. This is a bigger issue when both sides of the plywood will be visible. The best solution is to buy an expensive laminate blade (photo, above). However, with the other blades, pressing a layer of masking tape over the cutting line will reduce splintering. Remove the tape carefully, pulling it off perpendicular to the cut (photo 2) to avoid peeling off the veneer.
Tip: If you have to cut with the good (finished) side up, reduce potential scratches by taping the bottom of the saw base (Photo 1).
Video: How to Cut Plywood
Spike Carlsen, an editor for The Family Handyman, will show you how to cut construction grade plywood and finish grade plywood with a circular saw in our video tutorial. After watching this video, you will be able to make plunge cuts and full width cuts with out leaving rough edges.
